User's Guide
Page 7
... using the software...93 Maintaining the printer 94 Installing print cartridges...94 Removing a used print cartridge...96 Refilling print cartridges...96 Using genuine Lexmark print cartridges 96 Aligning print cartridges...97 Cleaning the print cartridge nozzles 97 Wiping the print cartridge nozzles and contacts 97 Preserving the print cartridges...98 Cleaning the scanner glass...99 Cleaning the exterior of...
... using the software...93 Maintaining the printer 94 Installing print cartridges...94 Removing a used print cartridge...96 Refilling print cartridges...96 Using genuine Lexmark print cartridges 96 Aligning print cartridges...97 Cleaning the print cartridge nozzles 97 Wiping the print cartridge nozzles and contacts 97 Preserving the print cartridges...98 Cleaning the scanner glass...99 Cleaning the exterior of...
User's Guide
Page 8
... the edges of the page...120 Print speed is slow...121 Partial document or photo prints...121 Photo smudges or scratches ...121 Checking the print cartridges...122 Ink levels seem incorrect ...122 Ink levels seem to go down too quickly ...122 A blank or incorrect page prints...122 Characters on printout are...
... the edges of the page...120 Print speed is slow...121 Partial document or photo prints...121 Photo smudges or scratches ...121 Checking the print cartridges...122 Ink levels seem incorrect ...122 Ink levels seem to go down too quickly ...122 A blank or incorrect page prints...122 Characters on printout are...
User's Guide
Page 9
... quality ...146 Partial document or photo scans ...146 Cannot scan to a computer over a network 146 Error messages on the printer display 147 Alignment Error...147 Cartridge Error (1102, 1203, 1204, or 120F 147 Black Ink Low / Color Ink Low / Photo Ink Low 148 Clear Carrier Jam ...148 Cover Open ...148 Error...
... quality ...146 Partial document or photo scans ...146 Cannot scan to a computer over a network 146 Error messages on the printer display 147 Alignment Error...147 Cartridge Error (1102, 1203, 1204, or 120F 147 Black Ink Low / Color Ink Low / Photo Ink Low 148 Clear Carrier Jam ...148 Cover Open ...148 Error...
User's Guide
Page 10
Left Cartridge Missing / Right Cartridge Missing 149 Memory Failure...150 No images have been selected ...150 No photo/paper size selection has been made 150 Could not detect a proof sheet ...... Two-sided printing is not supported on the current paper type 153 Error messages on the computer screen 153 Clearing error messages ...153 Left/Right Cartridge Missing ...154 Communication not available ...154 General Printing Problem ...154 Ink Low ...154 Out of Memory...154 Out of Paper ...155 Fixing a printing failure ...155...
Left Cartridge Missing / Right Cartridge Missing 149 Memory Failure...150 No images have been selected ...150 No photo/paper size selection has been made 150 Could not detect a proof sheet ...... Two-sided printing is not supported on the current paper type 153 Error messages on the computer screen 153 Clearing error messages ...153 Left/Right Cartridge Missing ...154 Communication not available ...154 General Printing Problem ...154 Ink Low ...154 Out of Memory...154 Out of Paper ...155 Fixing a printing failure ...155...

User's Guide
Page 15
...Help) can be installed into the printer. Initial setup directions Connects the printer to be found on the product purchased. Note: Cartridge combinations vary depending on the installation software CDs. Note: Your power cord may look different from the one shown. • Installation... software for Windows and Macintosh 5 Getting Started 6 Quick Setup sheet 7 Installation cable WI F I PRINTING 1 2 3 Description Cartridges to the computer temporarily during some methods of the printer. Setting up the printer Checking the box contents 7 1 2 3 6 5 4 Name 1 Black print...
...Help) can be installed into the printer. Initial setup directions Connects the printer to be found on the product purchased. Note: Cartridge combinations vary depending on the installation software CDs. Note: Your power cord may look different from the one shown. • Installation... software for Windows and Macintosh 5 Getting Started 6 Quick Setup sheet 7 Installation cable WI F I PRINTING 1 2 3 Description Cartridges to the computer temporarily during some methods of the printer. Setting up the printer Checking the box contents 7 1 2 3 6 5 4 Name 1 Black print...

User's Guide
Page 17
... 139. 6 Power supply with port Connect the printer to a wireless network. 1 2 WI F I PRINTING 3 4 5 6 Use the To 1 Scanner unit Access the print cartridges. 2 Print cartridge carrier Install, replace, or remove a print cartridge. 3 Lexmark N2050 (internal wireless print Connect the printer to a power source. 2 1 17 server) 4 USB port Connect the printer to a computer using a USB cable.
... 139. 6 Power supply with port Connect the printer to a wireless network. 1 2 WI F I PRINTING 3 4 5 6 Use the To 1 Scanner unit Access the print cartridges. 2 Print cartridge carrier Install, replace, or remove a print cartridge. 3 Lexmark N2050 (internal wireless print Connect the printer to a power source. 2 1 17 server) 4 USB port Connect the printer to a computer using a USB cable.
User's Guide
Page 21
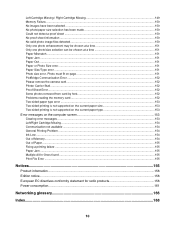
12 Open the printer. 13 Press down on the levers. WI F I PRINTING 14 Remove the tape from the black cartridge, and insert the cartridge in the left carrier. 15 Close the black cartridge carrier lid. 21
12 Open the printer. 13 Press down on the levers. WI F I PRINTING 14 Remove the tape from the black cartridge, and insert the cartridge in the left carrier. 15 Close the black cartridge carrier lid. 21
User's Guide
Page 22
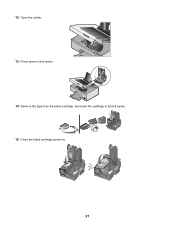
16 Remove the tape from the color cartridge, and insert the cartridge in the right carrier. 17 Close the color cartridge carrier lid. 18 Close the printer. 19 Press . An alignment page prints. 22
16 Remove the tape from the color cartridge, and insert the cartridge in the right carrier. 17 Close the color cartridge carrier lid. 18 Close the printer. 19 Press . An alignment page prints. 22
User's Guide
Page 24
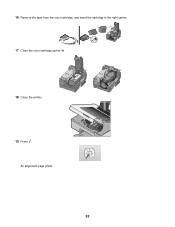
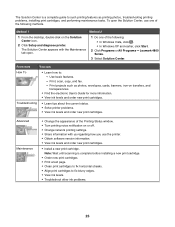
... Welcome Screen, there are two Settings choices: Click To Printer Status and Maintenance • Open the Solution Center. • Check ink levels. • Order print cartridges. • Find maintenance information. • Select other Solution Center tabs for : • Dialing and Sending • Ringing and Answering • Fax Printing/Reports • Speed...
... Welcome Screen, there are two Settings choices: Click To Printer Status and Maintenance • Open the Solution Center. • Check ink levels. • Order print cartridges. • Find maintenance information. • Select other Solution Center tabs for : • Dialing and Sending • Ringing and Answering • Fax Printing/Reports • Speed...
User's Guide
Page 25
...status. • Solve printer problems. • View ink levels and order new print cartridges. From here You can: How To • Learn how to fix blurry edges....• View ink levels and order new print cartridges. Print projects such as printing photos, troubleshooting printing problems, installing print cartridges, and performing maintenance tasks. The Solution Center appears ... • Obtain software version information. • View ink levels and order new print cartridges. • Install a new print cartridge. To open . 1 Do one of the following : • In Windows Vista, ...
...status. • Solve printer problems. • View ink levels and order new print cartridges. From here You can: How To • Learn how to fix blurry edges....• View ink levels and order new print cartridges. Print projects such as printing photos, troubleshooting printing problems, installing print cartridges, and performing maintenance tasks. The Solution Center appears ... • Obtain software version information. • View ink levels and order new print cartridges. • Install a new print cartridge. To open . 1 Do one of the following : • In Windows Vista, ...

User's Guide
Page 26
... scan process. Understanding the control panel Using the control panel The display shows: • Mode indicators • Main menu art messages • Icons • Ink cartridge levels Mode 1 2 3 4 5 6 7 8 9 10 11 A Main Menu Area Message • Scroll through submenus. • Increase the numbers of copies to be printed. • Choose a menu or...
... scan process. Understanding the control panel Using the control panel The display shows: • Mode indicators • Main menu art messages • Icons • Ink cartridge levels Mode 1 2 3 4 5 6 7 8 9 10 11 A Main Menu Area Message • Scroll through submenus. • Increase the numbers of copies to be printed. • Choose a menu or...
User's Guide
Page 58
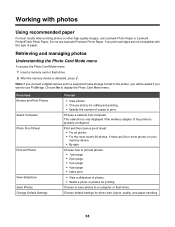
... photos Using recommended paper For best results when printing photos or other high-quality images, use Lexmark Premium Photo Paper. Do not use Lexmark Photo Paper or Lexmark PerfectFinish Photo Paper. Retrieving and managing photos Understanding the Photo Card Mode menu To access the ...Photo Card Mode menu: 1 Insert a memory card or flash drive. 2 After the memory device is properly configured. Your print cartridges are 20 ...
... photos Using recommended paper For best results when printing photos or other high-quality images, use Lexmark Premium Photo Paper. Do not use Lexmark Photo Paper or Lexmark PerfectFinish Photo Paper. Retrieving and managing photos Understanding the Photo Card Mode menu To access the ...Photo Card Mode menu: 1 Insert a memory card or flash drive. 2 After the memory device is properly configured. Your print cartridges are 20 ...
User's Guide
Page 94
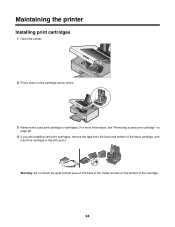
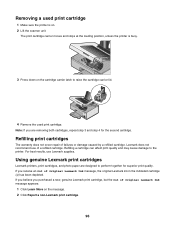
WI F I PRINTING 3 Remove the used print cartridge" on the bottom of the black cartridge, and insert the cartridge in the left carrier. For more information, see "Removing a used print cartridge or cartridges. Warning: Do not touch the gold contact area on the back or the metal nozzles on page 96. 4 If you are installing new print cartridges, remove the tape from the back and bottom of the cartridge. 94 Maintaining the printer Installing print cartridges 1 Open the printer. 2 Press down on the cartridge carrier levers.
WI F I PRINTING 3 Remove the used print cartridge" on the bottom of the black cartridge, and insert the cartridge in the left carrier. For more information, see "Removing a used print cartridge or cartridges. Warning: Do not touch the gold contact area on the back or the metal nozzles on page 96. 4 If you are installing new print cartridges, remove the tape from the back and bottom of the cartridge. 94 Maintaining the printer Installing print cartridges 1 Open the printer. 2 Press down on the cartridge carrier levers.
User's Guide
Page 95
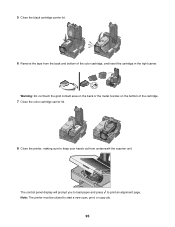
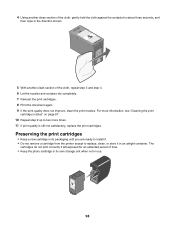
Note: The printer must be closed to print an alignment page. 5 Close the black cartridge carrier lid. 6 Remove the tape from the back and bottom of the cartridge. 7 Close the color cartridge carrier lid. 8 Close the printer, making sure to keep your hands out from underneath the scanner unit. The control panel display will prompt you to load paper and press to start a new scan, print, or copy job. 95 Warning: Do not touch the gold contact area on the back or the metal nozzles on the bottom of the color cartridge, and insert the cartridge in the right carrier.
Note: The printer must be closed to print an alignment page. 5 Close the black cartridge carrier lid. 6 Remove the tape from the back and bottom of the cartridge. 7 Close the color cartridge carrier lid. 8 Close the printer, making sure to keep your hands out from underneath the scanner unit. The control panel display will prompt you to load paper and press to start a new scan, print, or copy job. 95 Warning: Do not touch the gold contact area on the back or the metal nozzles on the bottom of the color cartridge, and insert the cartridge in the right carrier.
User's Guide
Page 96
... caused by a refilled cartridge. Using genuine Lexmark print cartridges Lexmark printers, print cartridges, and photo paper are removing both cartridges, repeat step 3 and step 4 for superior print quality. Lexmark does not recommend use Lexmark supplies. If you receive an Out of a refilled cartridge. For best results, use of Original Lexmark Ink message, the original Lexmark ink in the indicated cartridge (s) has been...
... caused by a refilled cartridge. Using genuine Lexmark print cartridges Lexmark printers, print cartridges, and photo paper are removing both cartridges, repeat step 3 and step 4 for superior print quality. Lexmark does not recommend use Lexmark supplies. If you receive an Out of a refilled cartridge. For best results, use of Original Lexmark Ink message, the original Lexmark ink in the indicated cartridge (s) has been...

User's Guide
Page 97
...three seconds, and then wipe in the direction shown. 97 An alignment page prints. Lexmark's warranty does not cover damage caused by non-Lexmark ink or print cartridges. Cleaning the print cartridge nozzles 1 Load plain paper. 2 Press or repeatedly until Maintenance is highlighted. 3 ...the message from a computer, click Learn more times. Wiping the print cartridge nozzles and contacts 1 Remove the print cartridges. 2 Dampen a clean, lint-free cloth with new Lexmark print cartridge(s). • If you aligned the cartridges to two more on a flat surface. 3 Gently hold the nozzles ...
...three seconds, and then wipe in the direction shown. 97 An alignment page prints. Lexmark's warranty does not cover damage caused by non-Lexmark ink or print cartridges. Cleaning the print cartridge nozzles 1 Load plain paper. 2 Press or repeatedly until Maintenance is highlighted. 3 ...the message from a computer, click Learn more times. Wiping the print cartridge nozzles and contacts 1 Remove the print cartridges. 2 Dampen a clean, lint-free cloth with new Lexmark print cartridge(s). • If you aligned the cartridges to two more on a flat surface. 3 Gently hold the nozzles ...
User's Guide
Page 98
... Repeat step 9 up to replace, clean, or store it . • Do not remove a cartridge from the printer except to two more times. 11 If print quality is still not satisfactory, replace the print cartridges. The cartridges do not print correctly if left exposed for about three seconds, and then wipe in... the direction shown. 5 With another clean section of time. • Keep the photo cartridge in its packaging until you are ready to install it in an airtight container. 4 Using another clean section of the cloth, gently hold the cloth...
... Repeat step 9 up to replace, clean, or store it . • Do not remove a cartridge from the printer except to two more times. 11 If print quality is still not satisfactory, replace the print cartridges. The cartridges do not print correctly if left exposed for about three seconds, and then wipe in... the direction shown. 5 With another clean section of time. • Keep the photo cartridge in its packaging until you are ready to install it in an airtight container. 4 Using another clean section of the cloth, gently hold the cloth...
User's Guide
Page 99
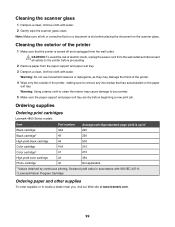
... cleaners or detergents, as they may cause damage to locate a dealer near you, visit our Web site at www.lexmark.com. 99 Ordering supplies Ordering print cartridges Lexmark 4800 Series models Item Part number Average cartridge standard page yield is turned off and unplugged from the paper support and paper exit tray. 3 Dampen a clean...
... cleaners or detergents, as they may cause damage to locate a dealer near you, visit our Web site at www.lexmark.com. 99 Ordering supplies Ordering print cartridges Lexmark 4800 Series models Item Part number Average cartridge standard page yield is turned off and unplugged from the paper support and paper exit tray. 3 Dampen a clean...
User's Guide
Page 100
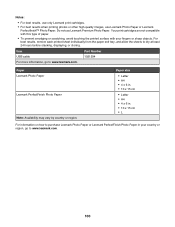
... individually from the paper exit tray, and allow the sheets to www.lexmark.com. 100 Do not use Lexmark Photo Paper or Lexmark PerfectfinishTM Photo Paper. Notes: • For best results, use only Lexmark print cartridges. • For best results when printing photos or other high-quality ...images, use Lexmark Premium Photo Paper. Your print cartridges are not compatible with this type of paper. • To prevent smudging or ...
... individually from the paper exit tray, and allow the sheets to www.lexmark.com. 100 Do not use Lexmark Photo Paper or Lexmark PerfectfinishTM Photo Paper. Notes: • For best results, use only Lexmark print cartridges. • For best results when printing photos or other high-quality ...images, use Lexmark Premium Photo Paper. Your print cartridges are not compatible with this type of paper. • To prevent smudging or ...
User's Guide
Page 103
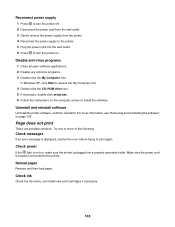
... Uninstall the printer software, and then reinstall it. Reload paper Remove and then load paper. Check ink Check the ink levels, and install new print cartridges if necessary. 103 Check power If the light is not on page 105. Try one or more information, see "Removing and reinstalling the software" on...
... Uninstall the printer software, and then reinstall it. Reload paper Remove and then load paper. Check ink Check the ink levels, and install new print cartridges if necessary. 103 Check power If the light is not on page 105. Try one or more information, see "Removing and reinstalling the software" on...


