
User's Guide
Page 9
.... 9 Do not subject the power cord to meet strict global safety standards with this product or make any electrical or cabling connections, such as furniture and walls. CAUTION-POTENTIAL INJURY: Do not twist, bind, crush, or place heavy objects on the power cord. The safety features of specific Lexmark components. Lexmark is designed, tested, and approved...
.... 9 Do not subject the power cord to meet strict global safety standards with this product or make any electrical or cabling connections, such as furniture and walls. CAUTION-POTENTIAL INJURY: Do not twist, bind, crush, or place heavy objects on the power cord. The safety features of specific Lexmark components. Lexmark is designed, tested, and approved...
User's Guide
Page 13
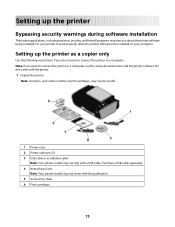
...a USB cable separately. 4 Networking Guide Note: Your printer model may not come with the printer. 1 Unpack the printer. For your computer. Note: If you want to connect the printer to be installed on your printer to work properly, allow the printer software to a computer. Note: Contents, such as ...want to connect the printer to a computer, use the setup documentation and the printer software CD that came with this publication. 5 Quick Setup sheet 6 Print cartridges 13 Setting up the printer as the number of print cartridges, may vary by model. 1 Power cord 2 Printer software CD 3 ...
...a USB cable separately. 4 Networking Guide Note: Your printer model may not come with the printer. 1 Unpack the printer. For your computer. Note: If you want to connect the printer to be installed on your printer to work properly, allow the printer software to a computer. Note: Contents, such as ...want to connect the printer to a computer, use the setup documentation and the printer software CD that came with this publication. 5 Quick Setup sheet 6 Print cartridges 13 Setting up the printer as the number of print cartridges, may vary by model. 1 Power cord 2 Printer software CD 3 ...
User's Guide
Page 14
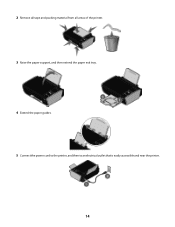
2 Remove all tape and packing material from all areas of the printer. 3 Raise the paper support, and then extend the paper exit tray. 4 Extend the paper guides. 5 Connect the power cord to the printer, and then to an electrical outlet that is easily accessible and near the printer. 14
2 Remove all tape and packing material from all areas of the printer. 3 Raise the paper support, and then extend the paper exit tray. 4 Extend the paper guides. 5 Connect the power cord to the printer, and then to an electrical outlet that is easily accessible and near the printer. 14
User's Guide
Page 99
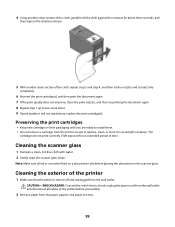
4 Using another clean section of electric shock, unplug the power cord from the wall outlet and disconnect all ink or corrective fluid on the scanner glass. Note: Make sure all cables to two more times. 9 If ... the direction shown. 5 With another clean section of the cloth, gently hold the cloth against the contacts for an extended period of the printer 1 Make sure that the printer is dry before proceeding. 2 Remove paper from the paper support and paper exit tray. 99 The cartridges do not print correctly if left...
4 Using another clean section of electric shock, unplug the power cord from the wall outlet and disconnect all ink or corrective fluid on the scanner glass. Note: Make sure all cables to two more times. 9 If ... the direction shown. 5 With another clean section of the cloth, gently hold the cloth against the contacts for an extended period of the printer 1 Make sure that the printer is dry before proceeding. 2 Remove paper from the paper support and paper exit tray. 99 The cartridges do not print correctly if left...
User's Guide
Page 103
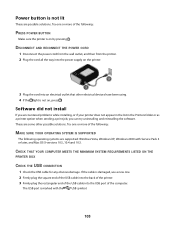
... use a new one. 2 Firmly plug the square end of the USB cable into the back of the printer. 3 Firmly plug the rectangular end of the USB cable into an electrical outlet that other possible solutions. DISCONNECT AND RECONNECT THE POWER CORD 1 Disconnect the power cord from the wall ...outlet, and then from the printer. 2 Plug the cord all the way into the power supply on the printer. 3 Plug the cord into the USB port of the following operating systems are...
... use a new one. 2 Firmly plug the square end of the USB cable into the back of the printer. 3 Firmly plug the rectangular end of the USB cable into an electrical outlet that other possible solutions. DISCONNECT AND RECONNECT THE POWER CORD 1 Disconnect the power cord from the wall ...outlet, and then from the printer. 2 Plug the cord all the way into the power supply on the printer. 3 Plug the cord into the USB port of the following operating systems are...

User's Guide
Page 104
... printer off. 2 Disconnect the power cord from the wall outlet. 3 Gently remove the power supply from the printer. 4 Reconnect the power supply to the printer. 5 Plug the power cord into a known working electrical outlet that the power cord is properly connected to the printer and plugged into the wall outlet. 6 Press to turn the printer on the computer screen to print again. Try one...
... printer off. 2 Disconnect the power cord from the wall outlet. 3 Gently remove the power supply from the printer. 4 Reconnect the power supply to the printer. 5 Plug the power cord into a known working electrical outlet that the power cord is properly connected to the printer and plugged into the wall outlet. 6 Press to turn the printer on the computer screen to print again. Try one...

User's Guide
Page 106
... want to set the printer as the default printer, then select the printer from the printer. 4 Reconnect the power supply to the printer. 5 Plug the power cord into the wall outlet. 6 Press to turn off the printer. 2 Disconnect the power cord from the wall outlet. 3 Remove the power supply from the Default Printer pop-up menu, check if the printer is not on hold...
... want to set the printer as the default printer, then select the printer from the printer. 4 Reconnect the power supply to the printer. 5 Plug the power cord into the wall outlet. 6 Press to turn off the printer. 2 Disconnect the power cord from the wall outlet. 3 Remove the power supply from the Default Printer pop-up menu, check if the printer is not on hold...
User's Guide
Page 107
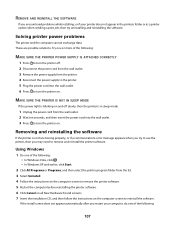
... 1 Do one of the following: • In Windows Vista, click . • In Windows XP and earlier, click Start. 2 Click All Programs or Programs, and then select the printer program folder from the printer. 4 Reconnect the power supply to the printer. 5 Plug the power cord into the wall... outlet. 3 Press to turn the printer on and off . 2 Disconnect the power cord from the wall outlet. 3 Remove the power supply from the list. 3 Select...
... 1 Do one of the following: • In Windows Vista, click . • In Windows XP and earlier, click Start. 2 Click All Programs or Programs, and then select the printer program folder from the printer. 4 Reconnect the power supply to the printer. 5 Plug the power cord into the wall... outlet. 3 Press to turn the printer on and off . 2 Disconnect the power cord from the wall outlet. 3 Remove the power supply from the list. 3 Select...
User's Guide
Page 132
...patented print cartridge(s) contained inside is automatically engaged after this single use, the license to stop product power consumption, disconnect the power supply cord from the wall outlet. The Power Saver Mode is /are designed to use the print cartridge terminates, and the used for a single...do not accept the terms of purchase. See www.lexmark.com for remanufacturing, refilling or recycling. return this product in order to change. Since power consumption claims are subject to calculate energy usage. The power consumption levels listed in minutes): 60 Off mode If ...
...patented print cartridge(s) contained inside is automatically engaged after this single use, the license to stop product power consumption, disconnect the power supply cord from the wall outlet. The Power Saver Mode is /are designed to use the print cartridge terminates, and the used for a single...do not accept the terms of purchase. See www.lexmark.com for remanufacturing, refilling or recycling. return this product in order to change. Since power consumption claims are subject to calculate energy usage. The power consumption levels listed in minutes): 60 Off mode If ...


