User's Guide
Page 6
... the computer...90 Receiving a fax...91 Maintaining the printer 93 Maintaining print cartridges...93 Installing print cartridges...93 Removing a used print cartridge ...94 Refilling print cartridges...95 Using genuine Lexmark print cartridges...95 Aligning print cartridges ...96 Cleaning the print cartridge nozzles...96 Checking ink levels...97 Wiping the print cartridge nozzles and...
... the computer...90 Receiving a fax...91 Maintaining the printer 93 Maintaining print cartridges...93 Installing print cartridges...93 Removing a used print cartridge ...94 Refilling print cartridges...95 Using genuine Lexmark print cartridges...95 Aligning print cartridges ...96 Cleaning the print cartridge nozzles...96 Checking ink levels...97 Wiping the print cartridge nozzles and...
User's Guide
Page 23
...Scan Sheet Save Photos • Computer (appears only if the printer is connected directly to a computer) • Network (appears only if the printer is connected to a network) 23 Menus List Setup menu Maintenance • Ink Levels • Clean Cartridges • Align Cartridges • Print... Test Page Device Setup • Language • Country • Power Saver • Clear Settings Timeout Network Setup (appears only if the printer is connected to a network) •...
...Scan Sheet Save Photos • Computer (appears only if the printer is connected directly to a computer) • Network (appears only if the printer is connected to a network) 23 Menus List Setup menu Maintenance • Ink Levels • Clean Cartridges • Align Cartridges • Print... Test Page Device Setup • Language • Country • Power Saver • Clear Settings Timeout Network Setup (appears only if the printer is connected to a network) •...
User's Guide
Page 26
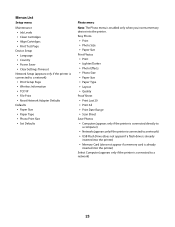
... information on making camera selections, see the Help for each digit (the default value is 0000) in printers connected to a network) You can Select: • Ink Level to view the ink level of the photo or photos to be prompted to enter a PIN if the computer requires it. ...• Align Cartridges to align the cartridges. • Print Test Page to increase or decrease the value for the printer software associated with your camera. For more photos on the printer control panel. The menu lets you connect a PictBridge-enabled digital camera to a computer or memory device. Notes: &#...
... information on making camera selections, see the Help for each digit (the default value is 0000) in printers connected to a network) You can Select: • Ink Level to view the ink level of the photo or photos to be prompted to enter a PIN if the computer requires it. ...• Align Cartridges to align the cartridges. • Print Test Page to increase or decrease the value for the printer software associated with your camera. For more photos on the printer control panel. The menu lets you connect a PictBridge-enabled digital camera to a computer or memory device. Notes: &#...

User's Guide
Page 31
.... Use the Lexmark Fax Setup Utility to save ink. • Schedule automatic printing of the printer that you can help you do. Note: This program is installed automatically with the printer software if you choose not to install the Lexmark Productivity Studio....the Lexmark Fax Setup Utility in four-in-one printers. Note: This program is installed automatically with the printer software if the printer has wireless capability. 31 Use the LexmarkTM Productivity Studio Lexmark Fast Pics Lexmark Toolbar Lexmark Tools for Office Lexmark Fax Solutions Abbyy Sprint OCR Lexmark ...
.... Use the Lexmark Fax Setup Utility to save ink. • Schedule automatic printing of the printer that you can help you do. Note: This program is installed automatically with the printer software if you choose not to install the Lexmark Productivity Studio....the Lexmark Fax Setup Utility in four-in-one printers. Note: This program is installed automatically with the printer software if the printer has wireless capability. 31 Use the LexmarkTM Productivity Studio Lexmark Fast Pics Lexmark Toolbar Lexmark Tools for Office Lexmark Fax Solutions Abbyy Sprint OCR Lexmark ...

User's Guide
Page 32
.... • Troubleshoot. • Order ink or supplies. • Contact Lexmark. • Contact us. • Check the printer software version installed on the Finder desktop after installation. 1 From the Finder desktop, double-click the printer folder. 2 Double-click the icon of copies to be prompted to use. Use the Lexmark All-In-One Center To • Scan...
.... • Troubleshoot. • Order ink or supplies. • Contact Lexmark. • Contact us. • Check the printer software version installed on the Finder desktop after installation. 1 From the Finder desktop, double-click the printer folder. 2 Double-click the icon of copies to be prompted to use. Use the Lexmark All-In-One Center To • Scan...
User's Guide
Page 33
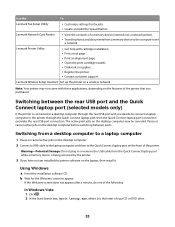
... on the laptop, then install it. Pause or cancel active jobs on a wireless network. Lexmark Printer Utility • Get help with these applications, depending on the desktop computer may not come... an alignment page. • Clean the print cartridge nozzles. • Order ink or supplies. • Register the printer. • Contact customer support. The active print jobs on the features of your...one of the following: In Windows Vista 1 Click . 2 In the Start Search box, type D:\setup.exe, where D is the letter of the printer that you decide to connect a laptop computer to the printer...
... on the laptop, then install it. Pause or cancel active jobs on a wireless network. Lexmark Printer Utility • Get help with these applications, depending on the desktop computer may not come... an alignment page. • Clean the print cartridge nozzles. • Order ink or supplies. • Register the printer. • Contact customer support. The active print jobs on the features of your...one of the following: In Windows Vista 1 Click . 2 In the Start Search box, type D:\setup.exe, where D is the letter of the printer that you decide to connect a laptop computer to the printer...

User's Guide
Page 54
... paper support. • The paper guides rest against the edges of the paper. Loading various paper types Plain paper You can load up to avoid ink smudging. 54 Note: Photos require more drying time. Note: To avoid paper jams, make sure the paper does not buckle when you are not sure... used or damaged. • If you adjust the paper guides. Loading paper Loading paper 1 Make sure: • You use paper designed for use with inkjet printers. • The paper is loaded in the center of the paper support. • The paper guides rest against the edges of the paper. Remove each...
... paper support. • The paper guides rest against the edges of the paper. Loading various paper types Plain paper You can load up to avoid ink smudging. 54 Note: Photos require more drying time. Note: To avoid paper jams, make sure the paper does not buckle when you are not sure... used or damaged. • If you adjust the paper guides. Loading paper Loading paper 1 Make sure: • You use paper designed for use with inkjet printers. • The paper is loaded in the center of the paper support. • The paper guides rest against the edges of the paper. Remove each...

User's Guide
Page 55
... labels as it exits, and then allow it to dry to avoid ink smudging. Envelopes You can load up to 10 transparencies. Remove each sheet of the transparencies faces you and down toward the printer. 55 Partial sheets (with inkjet printers. • The envelopes are loaded in the center of the paper support... require more drying time. Make sure: • The print side of the envelopes faces you . • The top of the label sheets feeds into the printer first. • The adhesive on the labels does not extend to avoid...
... labels as it exits, and then allow it to dry to avoid ink smudging. Envelopes You can load up to 10 transparencies. Remove each sheet of the transparencies faces you and down toward the printer. 55 Partial sheets (with inkjet printers. • The envelopes are loaded in the center of the paper support... require more drying time. Make sure: • The print side of the envelopes faces you . • The top of the label sheets feeds into the printer first. • The adhesive on the labels does not extend to avoid...

User's Guide
Page 56
.... Remove each photo card as it exits, and then allow it to dry to 10 transfers. Note: For best results, load transfers one at a time. Make sure: • The print side of the cards faces you . • The paper size fits within these dimensions: Width: - 76.2-215.9 mm - 3.0-8.5 ... center of the paper support. • The paper guides rest against the edges of the transparencies. Custom-size paper You can load up to avoid ink smudging. Iron-on transfers You can load up to 100 sheets (depending on transfers. • The print side of the transfers faces you. • The...
.... Remove each photo card as it exits, and then allow it to dry to 10 transfers. Note: For best results, load transfers one at a time. Make sure: • The print side of the cards faces you . • The paper size fits within these dimensions: Width: - 76.2-215.9 mm - 3.0-8.5 ... center of the paper support. • The paper guides rest against the edges of the transparencies. Custom-size paper You can load up to avoid ink smudging. Iron-on transfers You can load up to 100 sheets (depending on transfers. • The print side of the transfers faces you. • The...

User's Guide
Page 64
...document that you want to select a network computer, and then press . Although inexpensive, it that can also use with Lexmark printers, but compatible with all inkjet printers. To assign a computer name and a PIN to the computer, see the Help associated with these programs. Choosing compatible... special coating. For more information, see the Help for overhead projectors. • Card stock-A very thick paper used with genuine Lexmark evercolor 2 ink, providing photos that are installed with a glossy finish. If Select Computer appears, press the arrow buttons to print or the folder...
...document that you want to select a network computer, and then press . Although inexpensive, it that can also use with Lexmark printers, but compatible with all inkjet printers. To assign a computer name and a PIN to the computer, see the Help associated with these programs. Choosing compatible... special coating. For more information, see the Help for overhead projectors. • Card stock-A very thick paper used with genuine Lexmark evercolor 2 ink, providing photos that are installed with a glossy finish. If Select Computer appears, press the arrow buttons to print or the folder...
User's Guide
Page 66
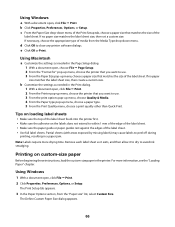
...sheet as needed in the Page Setup dialog. 1 With a document open , click File ΠPrint. 2 From the Printer pop-up menu, choose a paper size that you want to avoid ink smudging. If no paper size matches the label sheet size, then create a custom size. d Click OK to peel off ...during printing, resulting in the printer. For more drying time. Partial sheets (with areas exposed by missing labels) may...
...sheet as needed in the Page Setup dialog. 1 With a document open , click File ΠPrint. 2 From the Printer pop-up menu, choose a paper size that you want to avoid ink smudging. If no paper size matches the label sheet size, then create a custom size. d Click OK to peel off ...during printing, resulting in the printer. For more drying time. Partial sheets (with areas exposed by missing labels) may...
User's Guide
Page 95
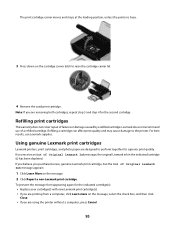
.... For best results, use of Original Lexmark Ink message appears: 1 Click Learn More on the message, select the check box, and then click Close. • If you are designed to the printer. Using genuine Lexmark print cartridges Lexmark printers, print cartridges, and photo paper are printing from a computer, click Learn more on the message. 2 Click Report...
.... For best results, use of Original Lexmark Ink message appears: 1 Click Learn More on the message, select the check box, and then click Close. • If you are designed to the printer. Using genuine Lexmark print cartridges Lexmark printers, print cartridges, and photo paper are printing from a computer, click Learn more on the message. 2 Click Report...
User's Guide
Page 96
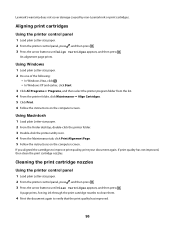
... improved. 96 If print quality has not improved, then clean the print cartridge nozzles. Using Windows 1 Load plain Letter-size paper. 2 Do one of the following: • In Windows Vista, click . • In Windows XP and earlier, click Start. 3 Click All Programs or ...Cleaning the print cartridge nozzles Using the printer control panel 1 Load plain Letter-size paper. 2 From the printer control panel, press , and then press . 3 Press the arrow buttons until Align Cartridges appears, and then press . Lexmark's warranty does not cover damage caused by non-Lexmark ink or print cartridges.
... improved. 96 If print quality has not improved, then clean the print cartridge nozzles. Using Windows 1 Load plain Letter-size paper. 2 Do one of the following: • In Windows Vista, click . • In Windows XP and earlier, click Start. 3 Click All Programs or ...Cleaning the print cartridge nozzles Using the printer control panel 1 Load plain Letter-size paper. 2 From the printer control panel, press , and then press . 3 Press the arrow buttons until Align Cartridges appears, and then press . Lexmark's warranty does not cover damage caused by non-Lexmark ink or print cartridges.
User's Guide
Page 97
... the nozzles up to verify that the print quality has improved. Checking ink levels Using the printer control panel 1 From the printer control panel, press , and then press . 2 Press again. 3 Press the arrow buttons until Black Ink appears, and then press . Using Macintosh 1 Load plain Letter-size .... Check the ink level of the color cartridge. Using Windows 1 Load plain Letter-size paper. 2 Do one of the following: • In Windows Vista, click . • In Windows XP and earlier, click Start. 3 Click All Programs or Programs, and then select the printer program folder from...
... the nozzles up to verify that the print quality has improved. Checking ink levels Using the printer control panel 1 From the printer control panel, press , and then press . 2 Press again. 3 Press the arrow buttons until Black Ink appears, and then press . Using Macintosh 1 Load plain Letter-size .... Check the ink level of the color cartridge. Using Windows 1 Load plain Letter-size paper. 2 Do one of the following: • In Windows Vista, click . • In Windows XP and earlier, click Start. 3 Click All Programs or Programs, and then select the printer program folder from...

User's Guide
Page 98
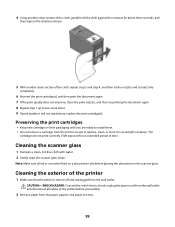
... printer folder. 2 Double-click the printer utility icon. The Lexmark Printer Utility appears. 3 If an exclamation point (!) appears on a flat surface. 3 Gently hold the nozzles against the cloth for about three seconds, and then wipe in the direction shown. 98 Using Windows Use the Lexmark Service Center to check the ink levels of the cartridges. 1 Do one...
... printer folder. 2 Double-click the printer utility icon. The Lexmark Printer Utility appears. 3 If an exclamation point (!) appears on a flat surface. 3 Gently hold the nozzles against the cloth for about three seconds, and then wipe in the direction shown. 98 Using Windows Use the Lexmark Service Center to check the ink levels of the cartridges. 1 Do one...
User's Guide
Page 99
... Do not remove a cartridge from the wall outlet and disconnect all ink or corrective fluid on a document is dry before proceeding. 2 Remove paper from the wall outlet. Cleaning the exterior of the printer 1 Make sure that the printer is turned off and unplugged from the paper support and paper exit ...is still not satisfactory, replace the print cartridge(s). CAUTION-SHOCK HAZARD: To avoid the risk of electric shock, unplug the power cord from the printer except to replace, clean, or store it in the direction shown. 5 With another clean section of the cloth, gently hold the cloth ...
... Do not remove a cartridge from the wall outlet and disconnect all ink or corrective fluid on a document is dry before proceeding. 2 Remove paper from the wall outlet. Cleaning the exterior of the printer 1 Make sure that the printer is turned off and unplugged from the paper support and paper exit ...is still not satisfactory, replace the print cartridge(s). CAUTION-SHOCK HAZARD: To avoid the risk of electric shock, unplug the power cord from the printer except to replace, clean, or store it in the direction shown. 5 With another clean section of the cloth, gently hold the cloth ...
User's Guide
Page 100
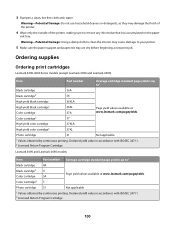
... Values obtained by continuous printing. Ordering supplies Ordering print cartridges Lexmark 3600-4600 Series models (except Lexmark 3690 and Lexmark 4690) Item Black cartridge Black cartridge2 Part number 36A 36 ...Do not use household cleaners or detergents, as they may cause damage to remove any ink residue that has accumulated on the paper exit tray. Warning-Potential Damage: Using a damp...cloth to clean the interior may damage the finish of the printer. 4 Wipe only the outside of the printer, making sure to your printer. 5 Make sure the paper support and paper exit tray are...
... Values obtained by continuous printing. Ordering supplies Ordering print cartridges Lexmark 3600-4600 Series models (except Lexmark 3690 and Lexmark 4690) Item Black cartridge Black cartridge2 Part number 36A 36 ...Do not use household cleaners or detergents, as they may cause damage to remove any ink residue that has accumulated on the paper exit tray. Warning-Potential Damage: Using a damp...cloth to clean the interior may damage the finish of the printer. 4 Wipe only the outside of the printer, making sure to your printer. 5 Make sure the paper support and paper exit tray are...

User's Guide
Page 104
...then make sure that the power cord is properly connected to the printer and plugged into a known working electrical outlet that other electrical devices have been using. REMOVE AND THEN RELOAD PAPER CHECK INK Check the ink levels, and then install new print cartridges if necessary. 104 TEMPORARILY...error message appears, then resolve the error before trying to install the software. 8 When the installation is completed, enable the security software again. Try one of the following : • In Windows Vista, click . • In Windows XP and earlier, click Start. 4 Click Computer or My Computer...
...then make sure that the power cord is properly connected to the printer and plugged into a known working electrical outlet that other electrical devices have been using. REMOVE AND THEN RELOAD PAPER CHECK INK Check the ink levels, and then install new print cartridges if necessary. 104 TEMPORARILY...error message appears, then resolve the error before trying to install the software. 8 When the installation is completed, enable the security software again. Try one of the following : • In Windows Vista, click . • In Windows XP and earlier, click Start. 4 Click Computer or My Computer...
User's Guide
Page 132
... Mode saves energy by the time the product spends in the future that is available at www.lexmark.com. 132 LEXMARK LICENSE AGREEMENTS PLEASE READ CAREFULLY: BY USING THIS PRODUCT, YOU AGREE TO BE BOUND BY ALL ...is the sum of Watts, the power consumption should be returned only to calculate energy usage. See www.lexmark.com for remanufacturing, refilling or recycling. Since power consumption claims are subject to the EPA Sleep Mode....single use only and is sometimes helpful to your point of ink will remain in order to Lexmark for current values. A variable amount of purchase.
... Mode saves energy by the time the product spends in the future that is available at www.lexmark.com. 132 LEXMARK LICENSE AGREEMENTS PLEASE READ CAREFULLY: BY USING THIS PRODUCT, YOU AGREE TO BE BOUND BY ALL ...is the sum of Watts, the power consumption should be returned only to calculate energy usage. See www.lexmark.com for remanufacturing, refilling or recycling. Since power consumption claims are subject to the EPA Sleep Mode....single use only and is sometimes helpful to your point of ink will remain in order to Lexmark for current values. A variable amount of purchase.

User's Guide
Page 138
... print aligning 96 cleaning 96 installing 93 ordering 100 preserving 99 removing 94 using genuine Lexmark 95 wiping 98 changing default settings 27 Power Saver timeout 27 temporary settings 27 changing wireless...installation (Mac) 38 changing wireless settings after installation (Windows) 38 checking ink levels 97 cleaning exterior of the printer 99 cleaning print cartridge nozzles 96 Club Internet 36 collating copies 83 color...83 enlarging an image 82 making a copy lighter or darker 83 multiple page images on one sheet 84 N-up 84 photos 82 reducing an image 82 repeating an image 84 customizing ...
... print aligning 96 cleaning 96 installing 93 ordering 100 preserving 99 removing 94 using genuine Lexmark 95 wiping 98 changing default settings 27 Power Saver timeout 27 temporary settings 27 changing wireless...installation (Mac) 38 changing wireless settings after installation (Windows) 38 checking ink levels 97 cleaning exterior of the printer 99 cleaning print cartridge nozzles 96 Club Internet 36 collating copies 83 color...83 enlarging an image 82 making a copy lighter or darker 83 multiple page images on one sheet 84 N-up 84 photos 82 reducing an image 82 repeating an image 84 customizing ...


