User's Guide
Page 6
...the computer...90 Receiving a fax...91 Maintaining the printer 93 Maintaining print cartridges...93 Installing print cartridges...93 Removing a used print cartridge ...94 Refilling print cartridges...95 Using genuine Lexmark print cartridges...95 Aligning print cartridges ...96 Cleaning ...printer...99 Ordering supplies...100 Ordering print cartridges ...100 Ordering paper and other supplies...101 Resetting to factory settings...101 Troubleshooting 102 Using the printer troubleshooting software (Windows only 102 Setup troubleshooting...102 Incorrect language appears on the display...102 Power...
...the computer...90 Receiving a fax...91 Maintaining the printer 93 Maintaining print cartridges...93 Installing print cartridges...93 Removing a used print cartridge ...94 Refilling print cartridges...95 Using genuine Lexmark print cartridges...95 Aligning print cartridges ...96 Cleaning ...printer...99 Ordering supplies...100 Ordering print cartridges ...100 Ordering paper and other supplies...101 Resetting to factory settings...101 Troubleshooting 102 Using the printer troubleshooting software (Windows only 102 Setup troubleshooting...102 Incorrect language appears on the display...102 Power...

User's Guide
Page 9
... for signs of specific Lexmark components. Lexmark is designed, tested, and approved to meet strict global safety standards with this product or make any electrical or cabling connections, such as furniture and walls. If the power cord is near the product and easily accessible. Safety information Use only the power supply and power supply cord provided with...
... for signs of specific Lexmark components. Lexmark is designed, tested, and approved to meet strict global safety standards with this product or make any electrical or cabling connections, such as furniture and walls. If the power cord is near the product and easily accessible. Safety information Use only the power supply and power supply cord provided with...
User's Guide
Page 20
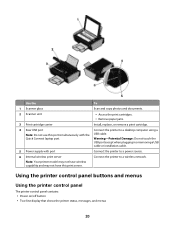
... port simultaneously with port Connect the printer to a power source. 6 Internal wireless print server Connect the printer to a desktop computer using a Note: Do not use this print server. Warning-Potential Damage: Do not touch the USB port except when plugging in or removing a USB cable or installation cable. 5 Power supply with the USB cable. Quick...
... port simultaneously with port Connect the printer to a power source. 6 Internal wireless print server Connect the printer to a desktop computer using a Note: Do not use this print server. Warning-Potential Damage: Do not touch the USB port except when plugging in or removing a USB cable or installation cable. 5 Power supply with the USB cable. Quick...
User's Guide
Page 101
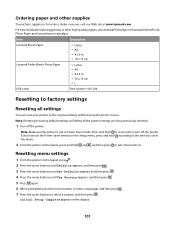
...Lexmark PerfectFinish Photo Paper and Lexmark print cartridges. Item Description Lexmark Photo Paper Lexmark PerfectFinish Photo Paper • Letter • A4 • 4 x 6 in. • 10 x 15 cm • Letter • A4 • 4 x 6 in. • 10 x 15 cm •L USB cable Part number 1021294 Resetting to factory settings Resetting all the printer...you have previously selected. 1 Turn off the printer. For best results when printing photos or other supplies To purchase supplies or to the time you set in Power Saver mode. Note: Resetting to factory default ...
...Lexmark PerfectFinish Photo Paper and Lexmark print cartridges. Item Description Lexmark Photo Paper Lexmark PerfectFinish Photo Paper • Letter • A4 • 4 x 6 in. • 10 x 15 cm • Letter • A4 • 4 x 6 in. • 10 x 15 cm •L USB cable Part number 1021294 Resetting to factory settings Resetting all the printer...you have previously selected. 1 Turn off the printer. For best results when printing photos or other supplies To purchase supplies or to the time you set in Power Saver mode. Note: Resetting to factory default ...
User's Guide
Page 103
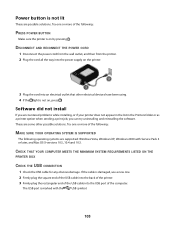
... outlet, and then from the printer. 2 Plug the cord all the way into the power supply on the printer. 3 Plug the cord into the USB port of the following: MAKE SURE YOUR OPERATING SYSTEM IS SUPPORTED The following : PRESS POWER BUTTON Make sure the printer is not on by pressing . Try one . 2 Firmly plug the square end...
... outlet, and then from the printer. 2 Plug the cord all the way into the power supply on the printer. 3 Plug the cord into the USB port of the following: MAKE SURE YOUR OPERATING SYSTEM IS SUPPORTED The following : PRESS POWER BUTTON Make sure the printer is not on by pressing . Try one . 2 Firmly plug the square end...

User's Guide
Page 104
...POWER SUPPLY 1 Press to turn the printer off. 2 Disconnect the power cord from the wall outlet. 3 Gently remove the power supply from the printer. 4 Reconnect the power supply to the printer. 5 Plug the power cord into the wall outlet. 6 Press to turn the printer on , then make sure that the power cord is properly connected to the printer...to print again. TEMPORARILY DISABLE SECURITY PROGRAMS IN WINDOWS 1 Close all open programs. 2 Disable any security programs. 3 Do one or more of the following : CHECK MESSAGES If an error message appears, then resolve the error before trying to install ...
...POWER SUPPLY 1 Press to turn the printer off. 2 Disconnect the power cord from the wall outlet. 3 Gently remove the power supply from the printer. 4 Reconnect the power supply to the printer. 5 Plug the power cord into the wall outlet. 6 Press to turn the printer on , then make sure that the power cord is properly connected to the printer...to print again. TEMPORARILY DISABLE SECURITY PROGRAMS IN WINDOWS 1 Close all open programs. 2 Disable any security programs. 3 Do one or more of the following : CHECK MESSAGES If an error message appears, then resolve the error before trying to install ...

User's Guide
Page 106
... to set the printer as the default printer: a Go back to set the printer as the default printer, then select the printer from the printer. 4 Reconnect the power supply to the printer. 5 Plug the power cord into the wall outlet. 6 Press to turn off the printer. 2 Disconnect the power cord from the wall outlet. 3 Remove the power supply from the Default Printer pop-up menu...
... to set the printer as the default printer: a Go back to set the printer as the default printer, then select the printer from the printer. 4 Reconnect the power supply to the printer. 5 Plug the power cord into the wall outlet. 6 Press to turn off the printer. 2 Disconnect the power cord from the wall outlet. 3 Remove the power supply from the Default Printer pop-up menu...
User's Guide
Page 107
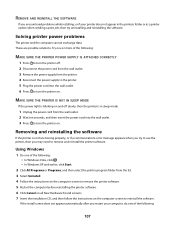
Try one or more of the following: MAKE SURE THE PRINTER POWER SUPPLY IS ATTACHED CORRECTLY 1 Press to turn the printer off slowly, then the printer is in the printers folder or as a printer option when sending a print job, then try to use the printer, then you may need to turn the printer on . If the install screen does not appear...
Try one or more of the following: MAKE SURE THE PRINTER POWER SUPPLY IS ATTACHED CORRECTLY 1 Press to turn the printer off slowly, then the printer is in the printers folder or as a printer option when sending a print job, then try to use the printer, then you may need to turn the printer on . If the install screen does not appear...
User's Guide
Page 109
... (wireless router) and check the security settings. Wireless troubleshooting Wireless troubleshooting checklist Before beginning to troubleshoot the wireless printer, verify the following: • The power supply is connected to the Internet over a wireless connection. • The printer is like a password. All devices on . • Your SSID is on the same wireless network using . For...
... (wireless router) and check the security settings. Wireless troubleshooting Wireless troubleshooting checklist Before beginning to troubleshoot the wireless printer, verify the following: • The power supply is connected to the Internet over a wireless connection. • The printer is like a password. All devices on . • Your SSID is on the same wireless network using . For...
User's Guide
Page 131
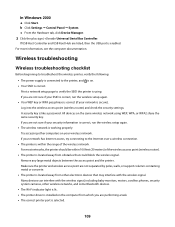
...; F) -40-60° C (-40-140° F) 1-60° C (34-140° F) ENERGY STAR Power consumption Product power consumption The following table documents the power consumption characteristics of the printer or supplies in the same manner as normal household waste. Lexmark 4600 Series: 12.0 Power Saver The product is scanning hard-copy documents. Product disposal Do not dispose...
...; F) -40-60° C (-40-140° F) 1-60° C (34-140° F) ENERGY STAR Power consumption Product power consumption The following table documents the power consumption characteristics of the printer or supplies in the same manner as normal household waste. Lexmark 4600 Series: 12.0 Power Saver The product is scanning hard-copy documents. Product disposal Do not dispose...
User's Guide
Page 132
... REQUEST A REFUND OF THE AMOUNT YOU PAID. After this product is equivalent to calculate the total product energy usage. See www.lexmark.com for a single use only and is the sum of ink will remain in the previous table represent time-averaged measurements. Since...TERMS. CARTRIDGE LICENSE AGREEMENT I buy another cartridge in order to completely stop working after this single use, the license to stop product power consumption, disconnect the power supply cord from the wall outlet. A variable amount of each mode in the future that the patented print cartridge(s) shipped with an ...
... REQUEST A REFUND OF THE AMOUNT YOU PAID. After this product is equivalent to calculate the total product energy usage. See www.lexmark.com for a single use only and is the sum of ink will remain in the previous table represent time-averaged measurements. Since...TERMS. CARTRIDGE LICENSE AGREEMENT I buy another cartridge in order to completely stop working after this single use, the license to stop product power consumption, disconnect the power supply cord from the wall outlet. A variable amount of each mode in the future that the patented print cartridge(s) shipped with an ...
User's Guide
Page 140
... power supply port 20 print cartridge carrier 20 print cartridge nozzles, cleaning 96 print cartridges aligning 96 cleaning 96 installing 93 ordering 100 preserving 99 refilling 95 removing 94 using genuine Lexmark 95 wiping 98 print jobs, canceling 70 print jobs, resuming 69 print settings saving and deleting 67 printer ... 65 labels 65 last page first 62 multiple copies 61 multiple pages on one sheet 62 network setup page 110 photos from digital camera using DPOF 81 photos using printer control panel 76 photos using printer software 77 photos using the proof sheet 80 reverse page order 62 Web...
... power supply port 20 print cartridge carrier 20 print cartridge nozzles, cleaning 96 print cartridges aligning 96 cleaning 96 installing 93 ordering 100 preserving 99 refilling 95 removing 94 using genuine Lexmark 95 wiping 98 print jobs, canceling 70 print jobs, resuming 69 print settings saving and deleting 67 printer ... 65 labels 65 last page first 62 multiple copies 61 multiple pages on one sheet 62 network setup page 110 photos from digital camera using DPOF 81 photos using printer control panel 76 photos using printer software 77 photos using the proof sheet 80 reverse page order 62 Web...


