
Getting Started
Page 3
... menu ...32 Using the Settings menu ...33 Saving settings ...35 Learning about the software 37 Using the printer software...37 Using the Lexmark Imaging Studio...37 Using the Solution Center...38 Using Printing Preferences...40 Opening Printing Preferences ...40 Using the Save Settings menu ...40 Using the I Want To menu...40 Using the Options...
... menu ...32 Using the Settings menu ...33 Saving settings ...35 Learning about the software 37 Using the printer software...37 Using the Lexmark Imaging Studio...37 Using the Solution Center...38 Using Printing Preferences...40 Opening Printing Preferences ...40 Using the Save Settings menu ...40 Using the I Want To menu...40 Using the Options...
Getting Started
Page 4
... ...52 Wi-Fi indicator light is orange ...53 Wi-Fi indicator light is blinking orange during installation 54 Wireless network printer does not print ...57 Wireless printer is no longer working...58 Photos do not transfer from a memory card across a wireless network 63 Changing wireless settings after...MAC address...64 Resetting to factory default settings 65 Resetting an internal wireless print server to factory default settings 65 Uninstalling and reinstalling the software 66 Advanced wireless setup 68 Adding a printer to an existing ad hoc wireless network 68 Creating an ad hoc wireless...
... ...52 Wi-Fi indicator light is orange ...53 Wi-Fi indicator light is blinking orange during installation 54 Wireless network printer does not print ...57 Wireless printer is no longer working...58 Photos do not transfer from a memory card across a wireless network 63 Changing wireless settings after...MAC address...64 Resetting to factory default settings 65 Resetting an internal wireless print server to factory default settings 65 Uninstalling and reinstalling the software 66 Advanced wireless setup 68 Adding a printer to an existing ad hoc wireless network 68 Creating an ad hoc wireless...
Getting Started
Page 6
... the printer to a network (if supported by your printer) The installation screen appears. • Maintaining the printer Note: If necessary, click Start Œ Run, and then type D:\setup, where D is included on To access the Lexmark Solution Center: your CD. It installs with printing, copying...All Programs Œ • Loading paper Lexmark 3500-4500 Series. • Printing 2 Click User's Guide. • Working with photos If the link to the User's Guide is not on your desktop, • Scanning (if supported by your printer) follow these instructions: • Making ...
... the printer to a network (if supported by your printer) The installation screen appears. • Maintaining the printer Note: If necessary, click Start Œ Run, and then type D:\setup, where D is included on To access the Lexmark Solution Center: your CD. It installs with printing, copying...All Programs Œ • Loading paper Lexmark 3500-4500 Series. • Printing 2 Click User's Guide. • Working with photos If the link to the User's Guide is not on your desktop, • Scanning (if supported by your printer) follow these instructions: • Making ...
Getting Started
Page 7
...Click CUSTOMER SUPPORT. 2 Click Technical Support. 3 Select your printer family. 4 Select your printer. For the most recent phone numbers available, see the printed warranty that shipped with your printer. materials and workmanship for a www.lexmark.com. Customer support Description Where to find (North America) Where... period of Limited Warranty section, click Inkjet & All-In-One Printers. 4 Scroll through the Web page to find (rest of country or region. this warranty that shipped with your printer will be available in printer, or set forth at • US: 1-800-332-...
...Click CUSTOMER SUPPORT. 2 Click Technical Support. 3 Select your printer family. 4 Select your printer. For the most recent phone numbers available, see the printed warranty that shipped with your printer. materials and workmanship for a www.lexmark.com. Customer support Description Where to find (North America) Where... period of Limited Warranty section, click Inkjet & All-In-One Printers. 4 Scroll through the Web page to find (rest of country or region. this warranty that shipped with your printer will be available in printer, or set forth at • US: 1-800-332-...
Getting Started
Page 9
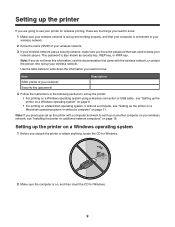
... a Windows operating system 1 Before you unpack the printer or attach anything, locate the CD for Windows. 2 Make sure the computer is on, and then insert the CD for wireless printing, these are going to use your wireless network. This password is connected to your wireless ... (password) Description 4 Follow the instructions in the following sections to set up the printer: • For printing on a Windows operating system using a wireless connection or USB cable , see "Installing the printer on additional network computers" on page 19. Setting up and working properly, and that...
... a Windows operating system 1 Before you unpack the printer or attach anything, locate the CD for Windows. 2 Make sure the computer is on, and then insert the CD for wireless printing, these are going to use your wireless network. This password is connected to your wireless ... (password) Description 4 Follow the instructions in the following sections to set up the printer: • For printing on a Windows operating system using a wireless connection or USB cable , see "Installing the printer on additional network computers" on page 19. Setting up and working properly, and that...
Getting Started
Page 14
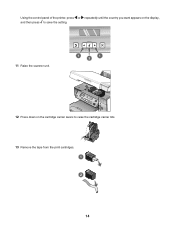
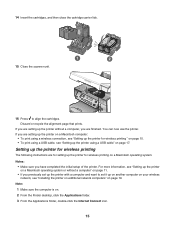
Using the control panel of the printer, press or repeatedly until the country you want appears on the display, and then press to save the setting. 11 Raise the scanner unit. 1 1 2 12 Press down on the cartridge carrier levers to raise the cartridge carrier lids. 13 Remove the tape from the print cartridges. 1 2 14
Using the control panel of the printer, press or repeatedly until the country you want appears on the display, and then press to save the setting. 11 Raise the scanner unit. 1 1 2 12 Press down on the cartridge carrier levers to raise the cartridge carrier lids. 13 Remove the tape from the print cartridges. 1 2 14
Getting Started
Page 15
... a USB cable" on page 17. You can now use the printer. Setting up the printer for wireless printing The following instructions are setting up the printer on a Macintosh computer: • To print using a wireless connection, see "Setting up the printer for wireless printing on . 2 From the Finder desktop, click the Applications folder. 3 From the Applications folder, double...
... a USB cable" on page 17. You can now use the printer. Setting up the printer for wireless printing The following instructions are setting up the printer on a Macintosh computer: • To print using a wireless connection, see "Setting up the printer for wireless printing on . 2 From the Finder desktop, click the Applications folder. 3 From the Applications folder, double...
Getting Started
Page 16
...an AirPort base station with other wireless devices c Select the type of security you use to your printer model. 10 Click Configuration. 11 Click Wireless. 12 Change these settings: a Enter the name of ... does not use a wireless access point (wireless router) to communicate with WEP security, you are connected to "print server XXXXXX" network. 6 Open the Safari browser. 7 From the Bookmarks drop-down menu, select Show All ...for Macintosh. 18 From the Finder desktop, double-click the Lexmark 3500-4500 Series Installer icon. 19 Double-click the Install icon. 16 If you must enter a ...
...an AirPort base station with other wireless devices c Select the type of security you use to your printer model. 10 Click Configuration. 11 Click Wireless. 12 Change these settings: a Enter the name of ... does not use a wireless access point (wireless router) to communicate with WEP security, you are connected to "print server XXXXXX" network. 6 Open the Safari browser. 7 From the Bookmarks drop-down menu, select Show All ...for Macintosh. 18 From the Finder desktop, double-click the Lexmark 3500-4500 Series Installer icon. 19 Double-click the Install icon. 16 If you must enter a ...
Getting Started
Page 17
... for you can cause damage to your printer and to complete the installation. If your printer, and then unplug the power cord from the printer. 17 Note: Make sure you have an internal wireless print server already installed, you to unplug the printer can purchase one separately at www.lexmark.com. The USB port is on a Macintosh...
... for you can cause damage to your printer and to complete the installation. If your printer, and then unplug the power cord from the printer. 17 Note: Make sure you have an internal wireless print server already installed, you to unplug the printer can purchase one separately at www.lexmark.com. The USB port is on a Macintosh...

Getting Started
Page 18
... the packaging materials. Warning: Wireless print servers are easily damaged by static electricity. 3 Unpack the internal wireless print server. Touch something metal such as the printer frame before you purchased the optional internal wireless print server separately and have already installed the printer: a Click Start ΠPrograms or All Programs ΠLexmark 3500-4500 Series. b Click...
... the packaging materials. Warning: Wireless print servers are easily damaged by static electricity. 3 Unpack the internal wireless print server. Touch something metal such as the printer frame before you purchased the optional internal wireless print server separately and have already installed the printer: a Click Start ΠPrograms or All Programs ΠLexmark 3500-4500 Series. b Click...
Getting Started
Page 19
... additional computer, and follow these steps: 1 Install the internal wireless print server into each computer you need help finding the IP or MAC address, see "Finding your printer was already set up the printer" chapter. 2 Click Start ΠPrograms or All Programs ΠLexmark 3500-4500 Series. 3 Click Wireless Setup. 4 Click Start. 5 Follow the...
... additional computer, and follow these steps: 1 Install the internal wireless print server into each computer you need help finding the IP or MAC address, see "Finding your printer was already set up the printer" chapter. 2 Click Start ΠPrograms or All Programs ΠLexmark 3500-4500 Series. 3 Click Wireless Setup. 4 Click Start. 5 Follow the...
Getting Started
Page 20
... so that they can communicate over a network. The printers in them so that enables it must be connected to wired or wireless networks. Lexmark internal print servers are devices made by an Ethernet cable. • A laptop and a printer are connected wirelessly to the router. • The... network is connected to a wireless router by Lexmark to enable Lexmark printers to be wired and/or have a wireless print server attached or installed that they can be set up. Devices on a wireless network use radio waves instead of ...
... so that they can communicate over a network. The printers in them so that enables it must be connected to wired or wireless networks. Lexmark internal print servers are devices made by an Ethernet cable. • A laptop and a printer are connected wirelessly to the router. • The... network is connected to a wireless router by Lexmark to enable Lexmark printers to be wired and/or have a wireless print server attached or installed that they can be set up. Devices on a wireless network use radio waves instead of ...
Getting Started
Page 22
... transmit and receive radio signals. It is included in the MAC filter list. Many factors can print a network setup page only after a print server has been installed. One factor is that allows devices to locate a computer's IP address 1 From the desktop, click ... Type ipconfig 3 Press Enter. The farther two wireless device are from each other . Printing a network setup page A network setup page lists your configuration settings. To print a network setup page: 1 From the printer's control panel, press Settings. 2 Press or repeatedly until Network Setup appears. 3 Press ...
... transmit and receive radio signals. It is included in the MAC filter list. Many factors can print a network setup page only after a print server has been installed. One factor is that allows devices to locate a computer's IP address 1 From the desktop, click ... Type ipconfig 3 Press Enter. The farther two wireless device are from each other . Printing a network setup page A network setup page lists your configuration settings. To print a network setup page: 1 From the printer's control panel, press Settings. 2 Press or repeatedly until Network Setup appears. 3 Press ...
Getting Started
Page 23
... through a wireless access point (wireless router) is one of wireless network is set to the ping, several seconds "Request timed out." d Check that the printer has an IP address. If the printer does not respond: a Print a setup page. A device in infrastructure mode using...address of communication is not responding, after several lines appear that the Status is true with the printer. Lexmark recommends setting up in infrastructure mode. Pinging the printer To test whether your printer on the same network, issue a ping command. 1 From the desktop, click Start Menu ...
... through a wireless access point (wireless router) is one of wireless network is set to the ping, several seconds "Request timed out." d Check that the printer has an IP address. If the printer does not respond: a Print a setup page. A device in infrastructure mode using...address of communication is not responding, after several lines appear that the Status is true with the printer. Lexmark recommends setting up in infrastructure mode. Pinging the printer To test whether your printer on the same network, issue a ping command. 1 From the desktop, click Start Menu ...
Getting Started
Page 25
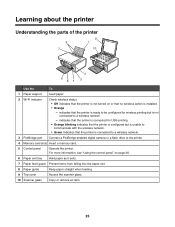
... but is unable to communicate with the wireless network. • Green indicates that the printer is ready to be configured for wireless printing but is not connected to the printer. 4 Memory card slots Insert a memory card. 5 Control panel Operate the printer. For more information, see "Using the control panel" on or that no wireless...
... but is unable to communicate with the wireless network. • Green indicates that the printer is ready to be configured for wireless printing but is not connected to the printer. 4 Memory card slots Insert a memory card. 5 Control panel Operate the printer. For more information, see "Using the control panel" on or that no wireless...
Getting Started
Page 26
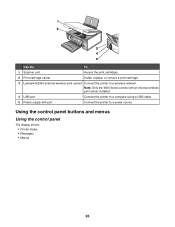
Use the To 1 Scanner unit Access the print cartridges. 2 Print cartridge carrier Install, replace, or remove a print cartridge. 3 Lexmark N2050 (internal wireless print server) Connect the printer to a power source. Note: Only the 4500 Series comes with an internal wireless print server installed. 4 USB port Connect the printer to a computer using a USB cable. 5 Power supply with port Connect the printer to a wireless network. Using the control panel buttons and menus Using the control panel The display shows: • Printer status • Messages • Menus 26
Use the To 1 Scanner unit Access the print cartridges. 2 Print cartridge carrier Install, replace, or remove a print cartridge. 3 Lexmark N2050 (internal wireless print server) Connect the printer to a power source. Note: Only the 4500 Series comes with an internal wireless print server installed. 4 USB port Connect the printer to a computer using a USB cable. 5 Power supply with port Connect the printer to a wireless network. Using the control panel buttons and menus Using the control panel The display shows: • Printer status • Messages • Menus 26
Getting Started
Page 27
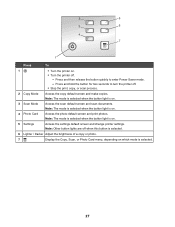
...button light is selected. 27 Press and then release the button quickly to turn the printer off . - Note: The mode is selected when the button light is on . 4 Photo Card Access the photo default screen and print photos. Note: The mode is selected when the button light is on . •...; Turn the printer off . • Stop the print, copy, or scan process. 2 Copy Mode Access the copy default screen and make copies.
...button light is selected. 27 Press and then release the button quickly to turn the printer off . - Note: The mode is selected when the button light is on . 4 Photo Card Access the photo default screen and print photos. Note: The mode is selected when the button light is on . •...; Turn the printer off . • Stop the print, copy, or scan process. 2 Copy Mode Access the copy default screen and make copies.
Getting Started
Page 28
... or eject paper. 4 • Increase a number. • Enter a space between letters or numbers. • Scroll through menus, submenus, or settings on the display. 5 • Cancel a print, copy, or scan job in progress. • Exit a menu or submenu, and return to the default copy, scan, or photo card screen. • Clear current...
... or eject paper. 4 • Increase a number. • Enter a space between letters or numbers. • Scroll through menus, submenus, or settings on the display. 5 • Cancel a print, copy, or scan job in progress. • Exit a menu or submenu, and return to the default copy, scan, or photo card screen. • Clear current...
Getting Started
Page 29
... Black. 29 Note: Pressing selects a setting. Press To 1 Start Color Start a color copy, scan, or photo print job, depending on which mode is selected. 2 Start Black Start a black-and-white copy, scan, or photo print job, depending on which mode is selected. Using the Copy menu To access and navigate the Copy...
... Black. 29 Note: Pressing selects a setting. Press To 1 Start Color Start a color copy, scan, or photo print job, depending on which mode is selected. 2 Start Black Start a black-and-white copy, scan, or photo print job, depending on which mode is selected. Using the Copy menu To access and navigate the Copy...
Getting Started
Page 30
...to return to the previous menus and make other settings, see "Saving settings" on a page. Repeat Image* Choose how many pages to print on page 35. For information on a page. Lighter / Darker* Adjust the brightness of a copy. Quality* Adjust the quality of a copy. Collate... Print one or more copies in the correct order. N-Up* Choose how many copies of the original document. Original Size* Specify the size of an image to print on saving temporary and other setting selections. 11 Press Start Color or Start...
...to return to the previous menus and make other settings, see "Saving settings" on a page. Repeat Image* Choose how many pages to print on page 35. For information on a page. Lighter / Darker* Adjust the brightness of a copy. Quality* Adjust the quality of a copy. Collate... Print one or more copies in the correct order. N-Up* Choose how many copies of the original document. Original Size* Specify the size of an image to print on saving temporary and other setting selections. 11 Press Start Color or Start...


