
Wireless Setup Guide
Page 6
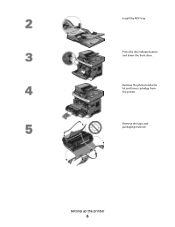
Setting up the printer 6 Press the door release button and lower the front door. Remove the tape and packaging material. Remove the photoconductor kit and toner cartridge from the printer. Install the ADF tray.
Setting up the printer 6 Press the door release button and lower the front door. Remove the tape and packaging material. Remove the photoconductor kit and toner cartridge from the printer. Install the ADF tray.

Wireless Setup Guide
Page 8
Pull the tray completely out. Do not overload the tray. Squeeze and slide the guides to loosen them, and then fan them. Load the paper with the recommended print side facedown. Straighten the edges on a level surface. Flex the sheets back and forth to rest against the side of the stack. Do not fold or crease the paper. Setting up the printer 8 Note: Notice the maximum fill line.
Pull the tray completely out. Do not overload the tray. Squeeze and slide the guides to loosen them, and then fan them. Load the paper with the recommended print side facedown. Straighten the edges on a level surface. Flex the sheets back and forth to rest against the side of the stack. Do not fold or crease the paper. Setting up the printer 8 Note: Notice the maximum fill line.

Wireless Setup Guide
Page 9
Insert the tray. Setting up the printer 9
Insert the tray. Setting up the printer 9
User's Guide
Page 2
... noise...38 Loading paper and specialty media 40 Setting the Paper Size and Paper Type...40 Configuring Universal paper settings...40 Avoiding jams...41 Loading trays...42 Using a multipurpose or manual feeder...46 Paper capacities...51 Linking and unlinking...
... noise...38 Loading paper and specialty media 40 Setting the Paper Size and Paper Type...40 Configuring Universal paper settings...40 Avoiding jams...41 Loading trays...42 Using a multipurpose or manual feeder...46 Paper capacities...51 Linking and unlinking...
User's Guide
Page 10
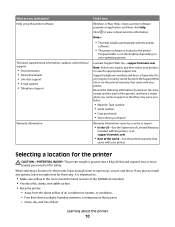
When selecting a location for the printer, leave enough room to view context-sensitive information. Click to open trays, covers, and doors. If you faster: • Machine Type number • Serial number • Date purchased • Store where purchased Warranty information...receipt and the back of the ASHRAE 62 standard. • Provide a flat, sturdy, and stable surface. • Keep the printer: - Lexmark Support Web site-support.lexmark.com Note: Select your region, and then select your printer. Free from the direct airflow of dust Learning about the printer 10 It...
When selecting a location for the printer, leave enough room to view context-sensitive information. Click to open trays, covers, and doors. If you faster: • Machine Type number • Serial number • Date purchased • Store where purchased Warranty information...receipt and the back of the ASHRAE 62 standard. • Provide a flat, sturdy, and stable surface. • Keep the printer: - Lexmark Support Web site-support.lexmark.com Note: Select your region, and then select your printer. Free from the direct airflow of dust Learning about the printer 10 It...
User's Guide
Page 12
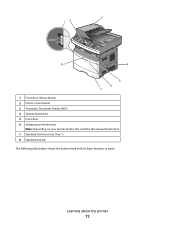
3 12 8 4 5 6 7 1 Front door release button 2 Printer control panel 3 Automatic Document Feeder (ADF) 4 System board door 5 Front door 6 Multipurpose feeder door Note: Depending on your printer model, this could be the manual feeder door. 7 Standard 250-sheet tray (Tray 1) 8 Standard exit bin The following illustration shows the printer back with its basic features or parts: Learning about the printer 12
3 12 8 4 5 6 7 1 Front door release button 2 Printer control panel 3 Automatic Document Feeder (ADF) 4 System board door 5 Front door 6 Multipurpose feeder door Note: Depending on your printer model, this could be the manual feeder door. 7 Standard 250-sheet tray (Tray 1) 8 Standard exit bin The following illustration shows the printer back with its basic features or parts: Learning about the printer 12

User's Guide
Page 14
You can: • Make quick copies, or change the settings on selected printer models only. Learning about the printer 14 or 550-sheet drawer (Tray 2) Basic functions of the scanner The scanner provides copy, fax, and scan capability. Note: The fax function is available on the printer control panel to ...
You can: • Make quick copies, or change the settings on selected printer models only. Learning about the printer 14 or 550-sheet drawer (Tray 2) Basic functions of the scanner The scanner provides copy, fax, and scan capability. Note: The fax function is available on the printer control panel to ...

User's Guide
Page 15
... items on 75 g/m2 (20 lb.) paper. • Scan sizes from 52 to 120 g/m2 (14 to 215.9 x 355.6 mm (8.5 x 14 in the ADF input tray, based on the scanner glass. Learning about the printer 15 Using the scanner glass The scanner glass can scan multiple pages, including two-sided pages...
... items on 75 g/m2 (20 lb.) paper. • Scan sizes from 52 to 120 g/m2 (14 to 215.9 x 355.6 mm (8.5 x 14 in the ADF input tray, based on the scanner glass. Learning about the printer 15 Using the scanner glass The scanner glass can scan multiple pages, including two-sided pages...

User's Guide
Page 22
...installing optional hardware or memory devices sometime after setting up the printer, then turn them off , and unplug the power cord from inside the tray. 4 Insert the tray into the support unit. 5 Place the drawer in the location chosen for the printer. or 550-sheet drawer The printer supports one optional ...and unplug any cables going into the printer. 1 Unpack the drawer, and then remove any packing material from the outside of the drawer. 2 Remove the tray from the support unit. 1 2 1 Support unit 2 Tray 3 Remove any packing material and tape from the wall outlet before continuing.
...installing optional hardware or memory devices sometime after setting up the printer, then turn them off , and unplug the power cord from inside the tray. 4 Insert the tray into the support unit. 5 Place the drawer in the location chosen for the printer. or 550-sheet drawer The printer supports one optional ...and unplug any cables going into the printer. 1 Unpack the drawer, and then remove any packing material from the outside of the drawer. 2 Remove the tray from the support unit. 1 2 1 Support unit 2 Tray 3 Remove any packing material and tape from the wall outlet before continuing.
User's Guide
Page 40
... 40 Set the Paper Size for sizes less than or equal to the correct settings for the size and type used in the trays, then any trays containing the same size and type are not preset in the printer menus. Loading paper and specialty media This section explains how to...the correct source appears, and then press . It also includes information about paper orientation, setting the Paper Size and Paper Type, and linking and unlinking trays. Select Source appears. 5 Press the arrow buttons until the correct type appears, and then press . Then, specify all of the following Universal size ...
... 40 Set the Paper Size for sizes less than or equal to the correct settings for the size and type used in the trays, then any trays containing the same size and type are not preset in the printer menus. Loading paper and specialty media This section explains how to...the correct source appears, and then press . It also includes information about paper orientation, setting the Paper Size and Paper Type, and linking and unlinking trays. Select Source appears. 5 Press the arrow buttons until the correct type appears, and then press . Then, specify all of the following Universal size ...

User's Guide
Page 41
... Loading paper and specialty media 41 Avoiding jams The following hints can help you avoid jams: Paper tray recommendations • Make sure the paper lies flat in the portrait orientation) allows the printer to adjust...exceed the indicated maximum height. • Make sure the guides in the paper tray or the manual feeder are properly positioned and are not pressing too tightly against the paper or ...envelopes. • Push the paper tray in firmly after loading paper. Submitting Changes appears, followed by the Universal Setup menu....
... Loading paper and specialty media 41 Avoiding jams The following hints can help you avoid jams: Paper tray recommendations • Make sure the paper lies flat in the portrait orientation) allows the printer to adjust...exceed the indicated maximum height. • Make sure the guides in the paper tray or the manual feeder are properly positioned and are not pressing too tightly against the paper or ...envelopes. • Push the paper tray in firmly after loading paper. Submitting Changes appears, followed by the Universal Setup menu....

User's Guide
Page 42
... sizes and types are set correctly in the printer control panel menus. • Store paper per the manufacturer's recommendations. Doing so may cause a jam. Loading trays 1 Pull the tray completely out. Note: Do not remove trays while a job prints or while Busy appears on the display.
... sizes and types are set correctly in the printer control panel menus. • Store paper per the manufacturer's recommendations. Doing so may cause a jam. Loading trays 1 Pull the tray completely out. Note: Do not remove trays while a job prints or while Busy appears on the display.
User's Guide
Page 43
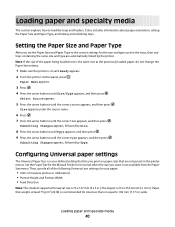
... loading. 3 1 4 2 For long paper like A4 or legal, squeeze and slide the length guide backwards to overload the tray. • A6-size paper cannot be loaded in the optional tray. Loading paper and specialty media 43 2 Squeeze and slide the guides to the correct position for loading A6-size paper.... Notes: • The standard tray accommodates only 150 sheets of the tray to the A5 size position. Do not try to accommodate the length of paper you are loading. If you are loading A6...
... loading. 3 1 4 2 For long paper like A4 or legal, squeeze and slide the length guide backwards to overload the tray. • A6-size paper cannot be loaded in the optional tray. Loading paper and specialty media 43 2 Squeeze and slide the guides to the correct position for loading A6-size paper.... Notes: • The standard tray accommodates only 150 sheets of the tray to the A5 size position. Do not try to accommodate the length of paper you are loading. If you are loading A6...
User's Guide
Page 44
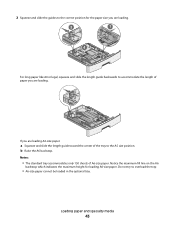
... specialty media 44 Note: The maximum fill line on the width guide indicates the maximum height for your country or region. 3 Flex a stack of the tray to help position the guide. • For setup, load letter- Do not load A6-size paper to the maximum fill line; the... tray holds only 150 sheets of the tray as shown with the recommended print side facedown. Notes: • Use the size indicators on the bottom of paper back and forth to...
... specialty media 44 Note: The maximum fill line on the width guide indicates the maximum height for your country or region. 3 Flex a stack of the tray to help position the guide. • For setup, load letter- Do not load A6-size paper to the maximum fill line; the... tray holds only 150 sheets of the tray as shown with the recommended print side facedown. Notes: • Use the size indicators on the bottom of paper back and forth to...

User's Guide
Page 45
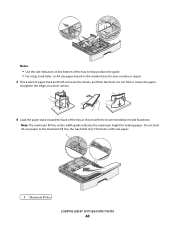
LETTERHEAD 5 Squeeze and slide the guides to lightly touch the side of the tray and the design facedown. Load letterhead with the top edge of the sheet toward the front of the stack. 1 2 6 Insert the tray. 7 If the paper type you loaded differs from the type that was previously loaded in the tray, then change the Paper Type setting for the tray. Loading paper and specialty media 45
LETTERHEAD 5 Squeeze and slide the guides to lightly touch the side of the tray and the design facedown. Load letterhead with the top edge of the sheet toward the front of the stack. 1 2 6 Insert the tray. 7 If the paper type you loaded differs from the type that was previously loaded in the tray, then change the Paper Type setting for the tray. Loading paper and specialty media 45

User's Guide
Page 46
... extension forward. Using the multipurpose feeder You may also want to use the multipurpose feeder when you do not keep in a tray. The multipurpose feeder can be loaded like a tray with one sheet of paper. Loading paper and specialty media 46 The manual feeder can be loaded with up to 50 sheets...
... extension forward. Using the multipurpose feeder You may also want to use the multipurpose feeder when you do not keep in a tray. The multipurpose feeder can be loaded like a tray with one sheet of paper. Loading paper and specialty media 46 The manual feeder can be loaded with up to 50 sheets...

User's Guide
Page 50
Notes: • Load letterhead faceup, with the stamp area as shown. Loading paper and specialty media 50 Using the manual feeder The manual feeder can use the manual feeder to print on paper types or sizes that are not currently loaded in a tray. 1 Open the manual feeder door. 2 Load one sheet of paper at a time. You can feed only one sheet of paper faceup into the center of the sheet entering first. • Load envelopes with the flap side down and with the top of the manual feeder.
Notes: • Load letterhead faceup, with the stamp area as shown. Loading paper and specialty media 50 Using the manual feeder The manual feeder can use the manual feeder to print on paper types or sizes that are not currently loaded in a tray. 1 Open the manual feeder door. 2 Load one sheet of paper at a time. You can feed only one sheet of paper faceup into the center of the sheet entering first. • Load envelopes with the flap side down and with the top of the manual feeder.

User's Guide
Page 51
... feeders are supported for laser printers are based on your printer model, you have either a multipurpose feeder or a manual feeder. or 550-sheet tray. Loading paper and specialty media 51 Only one optional drawer may be loaded depends on the printer at a time. Forcing the paper causes jams. Paper... you have an optional 250- Depending on 75 g/m2 (20 lb) paper. It is recommended to Tray 1 250 sheets of paper 150 sheets of A6-size paper 50 paper labels 50 transparencies Tray 2 250 or 550 sheets of paper 50 paper labels Multipurpose feeder 50 sheets of paper 15 paper labels...
... feeders are supported for laser printers are based on your printer model, you have either a multipurpose feeder or a manual feeder. or 550-sheet tray. Loading paper and specialty media 51 Only one optional drawer may be loaded depends on the printer at a time. Forcing the paper causes jams. Paper... you have an optional 250- Depending on 75 g/m2 (20 lb) paper. It is recommended to Tray 1 250 sheets of paper 150 sheets of A6-size paper 50 paper labels 50 transparencies Tray 2 250 or 550 sheets of paper 50 paper labels Multipurpose feeder 50 sheets of paper 15 paper labels...

User's Guide
Page 52
...appears, and then press . The Size menu item appears. 6 Press the arrow buttons until the name of the tray you want to link. 1 Make sure the printer is used by linked trays, assign a different Paper Type name to link or unlink it. Submitting Changes appears. 8 Press and release until ...processed if an inaccurate Paper Type is selected. Assigning a Custom Type name Assign a Custom Type name to a tray to the tray, such as the settings of any other tray. To unlink a tray using the Paper menu, change the Paper Type and Paper Size settings so that are not the same as Custom...
...appears, and then press . The Size menu item appears. 6 Press the arrow buttons until the name of the tray you want to link. 1 Make sure the printer is used by linked trays, assign a different Paper Type name to link or unlink it. Submitting Changes appears. 8 Press and release until ...processed if an inaccurate Paper Type is selected. Assigning a Custom Type name Assign a Custom Type name to a tray to the tray, such as the settings of any other tray. To unlink a tray using the Paper menu, change the Paper Type and Paper Size settings so that are not the same as Custom...

User's Guide
Page 54
...paper weights up to use paper between 150-250 Sheffield points produces the best print quality. Moisture content The amount of moisture in the trays, can contribute to paper curling prior to moisture changes that can cause feeding problems. Smoothness Paper smoothness directly affects print quality. Grain ...short, running the width of paper. Leave paper in its original wrapper until it in a sheet of the paper. Weight The printer trays can automatically feed paper weights up to curl at its original wrapper in the same environment as the printer for 24 to the alignment of...
...paper weights up to use paper between 150-250 Sheffield points produces the best print quality. Moisture content The amount of moisture in the trays, can contribute to paper curling prior to moisture changes that can cause feeding problems. Smoothness Paper smoothness directly affects print quality. Grain ...short, running the width of paper. Leave paper in its original wrapper until it in a sheet of the paper. Weight The printer trays can automatically feed paper weights up to curl at its original wrapper in the same environment as the printer for 24 to the alignment of...


