
User's Guide
Page 2
......37 Reducing printer noise...38 Loading paper and specialty media 40 Setting the Paper Size and Paper Type...40 Configuring Universal paper settings...40 Avoiding jams...41 Loading trays...42 Using a multipurpose or manual feeder...46 Paper capacities...51 Linking and unlinking trays...52 Contents 2
......37 Reducing printer noise...38 Loading paper and specialty media 40 Setting the Paper Size and Paper Type...40 Configuring Universal paper settings...40 Avoiding jams...41 Loading trays...42 Using a multipurpose or manual feeder...46 Paper capacities...51 Linking and unlinking trays...52 Contents 2
User's Guide
Page 5
Clearing jams 161 Clearing jams...161 Troubleshooting 176 Solving basic printer problems...176 Printer control panel display is blank or displays only diamonds 176 Understanding printer messages...176 Solving printing ...
Clearing jams 161 Clearing jams...161 Troubleshooting 176 Solving basic printer problems...176 Printer control panel display is blank or displays only diamonds 176 Understanding printer messages...176 Solving printing ...
User's Guide
Page 36
...adjusting Power Saver. This setting supports the performance specifications for accuracy Before printing or making multiple copies of a document: • Use the Lexmark preview feature, which you can avoid making a paper output of inactivity. • When the printer enters Power Saver mode, the printer ...flash drive. Choose scanning You can select from the Print dialog, the Lexmark Toolbar, or the printer display, to see "Avoiding jams" on page 41. Avoid paper jams Carefully select and load paper to avoid paper jams. For more information, see what the document will look like before ...
...adjusting Power Saver. This setting supports the performance specifications for accuracy Before printing or making multiple copies of a document: • Use the Lexmark preview feature, which you can avoid making a paper output of inactivity. • When the printer enters Power Saver mode, the printer ...flash drive. Choose scanning You can select from the Print dialog, the Lexmark Toolbar, or the printer display, to see "Avoiding jams" on page 41. Avoid paper jams Carefully select and load paper to avoid paper jams. For more information, see what the document will look like before ...

User's Guide
Page 41
..., and then press . 2 Press the left arrow button to decrease the setting or the right arrow button to adjust both . Avoiding jams The following hints can help you avoid jams: Paper tray recommendations • Make sure the paper lies flat in the paper tray. • Do not remove the paper tray while...
..., and then press . 2 Press the left arrow button to decrease the setting or the right arrow button to adjust both . Avoiding jams The following hints can help you avoid jams: Paper tray recommendations • Make sure the paper lies flat in the paper tray. • Do not remove the paper tray while...

User's Guide
Page 42
Loading paper and specialty media 42 Doing so may cause a jam. Note: Do not remove trays while a job prints or while Busy appears on the display. Loading trays 1 Pull the tray completely out. Paper recommendations • ...
Loading paper and specialty media 42 Doing so may cause a jam. Note: Do not remove trays while a job prints or while Busy appears on the display. Loading trays 1 Pull the tray completely out. Paper recommendations • ...

User's Guide
Page 47
Notes: • Do not force paper into the multipurpose feeder. • Do not exceed the maximum stack height. Loading the multipurpose feeder 1 Squeeze and slide the guides out fully. 2 Flex sheets of paper or paper labels back and forth to loosen them, and then fan them. Do not fold or crease the paper or labels. Straighten the edges on a level surface. 3 Load the paper or specialty media. Overfilling may cause jams. Loading paper and specialty media 47 3 Pull the extension so it flips forward and down.
Notes: • Do not force paper into the multipurpose feeder. • Do not exceed the maximum stack height. Loading the multipurpose feeder 1 Squeeze and slide the guides out fully. 2 Flex sheets of paper or paper labels back and forth to loosen them, and then fan them. Do not fold or crease the paper or labels. Straighten the edges on a level surface. 3 Load the paper or specialty media. Overfilling may cause jams. Loading paper and specialty media 47 3 Pull the extension so it flips forward and down.

User's Guide
Page 51
... paper into the multipurpose feeder only to the paper width. Warning-Potential Damage: Do not force the paper into the feeder. Forcing the paper causes jams. Paper capacities The capacities of card stock 1 envelope Notes Vinyl, pharmacy, or dual-sided labels are not supported. Do not force the paper into the...
... paper into the multipurpose feeder only to the paper width. Warning-Potential Damage: Do not force the paper into the feeder. Forcing the paper causes jams. Paper capacities The capacities of card stock 1 envelope Notes Vinyl, pharmacy, or dual-sided labels are not supported. Do not force the paper into the...

User's Guide
Page 54
... paper before printing by storing it in paper affects both print quality and the ability of the paper. Grain is exposed to feed properly, causing jams. For best performance, use 75 g/m2 (20 lb bond) grain long paper. For paper smaller than 60 g/m2 (16 lb) might not be stiff enough...
... paper before printing by storing it in paper affects both print quality and the ability of the paper. Grain is exposed to feed properly, causing jams. For best performance, use 75 g/m2 (20 lb bond) grain long paper. For paper smaller than 60 g/m2 (16 lb) might not be stiff enough...
User's Guide
Page 55
...or heavily textured surface papers, or curled papers • Recycled papers that are specifically designed for use with a high degree of stability resulting in jams. • Do not use new, undamaged paper. • Before loading paper, know the recommended print side. This information is made from .... • Avoid papers with chemicals that may contaminate the printer • Preprinted papers that can negatively affect paper handling. To help avoid jams and poor print quality: • Always use coated papers unless they are not affected by hand. • Do not mix sizes, types...
...or heavily textured surface papers, or curled papers • Recycled papers that are specifically designed for use with a high degree of stability resulting in jams. • Do not use new, undamaged paper. • Before loading paper, know the recommended print side. This information is made from .... • Avoid papers with chemicals that may contaminate the printer • Preprinted papers that can negatively affect paper handling. To help avoid jams and poor print quality: • Always use coated papers unless they are not affected by hand. • Do not mix sizes, types...
User's Guide
Page 56
... tests its printers with recycled paper (20-100% post-consumer waste) and a variety of lower weight ( Lexmark has found no blanket statement can be made that recycled paper produced by major mills in the US fed as well as premium cotton papers, ..., 50-90 Sheffield units) and much rougher papers (such as non-recycled paper. Using recycled paper and other office papers As an environmentally conscious company, Lexmark supports the use in laser (electrophotographic) printers.
... tests its printers with recycled paper (20-100% post-consumer waste) and a variety of lower weight ( Lexmark has found no blanket statement can be made that recycled paper produced by major mills in the US fed as well as premium cotton papers, ..., 50-90 Sheffield units) and much rougher papers (such as non-recycled paper. Using recycled paper and other office papers As an environmentally conscious company, Lexmark supports the use in laser (electrophotographic) printers.

User's Guide
Page 60
.... The following : For Windows users a With a document open , choose File > Page Setup. 2 Choose a paper size or create a custom size to see more information, see "Avoiding jams" on page 41 and "Storing paper" on a specific paper type, adjust the paper type setting to match the loaded paper, or select the appropriate tray...
.... The following : For Windows users a With a document open , choose File > Page Setup. 2 Choose a paper size or create a custom size to see more information, see "Avoiding jams" on page 41 and "Storing paper" on a specific paper type, adjust the paper type setting to match the loaded paper, or select the appropriate tray...

User's Guide
Page 61
... having only USB Low-speed capabilities are not supported. Notes: • If you insert the flash drive when the printer requires attention, such as when a jam has occurred, the printer ignores the flash drive. • If you insert the flash drive while the printer is printing other jobs, Busy appears. Devices...
... having only USB Low-speed capabilities are not supported. Notes: • If you insert the flash drive when the printer requires attention, such as when a jam has occurred, the printer ignores the flash drive. • If you insert the flash drive while the printer is printing other jobs, Busy appears. Devices...
User's Guide
Page 64
... content is 25% or less. For detailed information on label printing, characteristics, and design, see the Card Stock & Label Guide available on the Lexmark Web site at a temperature up to Rough. When printing on envelopes: • Use envelopes designed specifically for laser printers. Note: A combination of...cotton envelopes must not exceed 90 g/m2 (24 lb bond) weight. • Use only new envelopes. • To optimize performance and minimize jams, do not use envelopes made from 90 g/m2 (24 lb bond) paper. Vinyl, pharmacy, and dual-sided labels are able to withstand temperatures ...
... content is 25% or less. For detailed information on label printing, characteristics, and design, see the Card Stock & Label Guide available on the Lexmark Web site at a temperature up to Rough. When printing on envelopes: • Use envelopes designed specifically for laser printers. Note: A combination of...cotton envelopes must not exceed 90 g/m2 (24 lb bond) weight. • Use only new envelopes. • To optimize performance and minimize jams, do not use envelopes made from 90 g/m2 (24 lb bond) paper. Vinyl, pharmacy, and dual-sided labels are able to withstand temperatures ...

User's Guide
Page 65
... the edges, or releasing hazardous fumes. • Do not use preprinted card stock manufactured with chemicals that may significantly affect the print quality and cause jams or other paper handling problems. • Check with the manufacturer or vendor to ensure the card stock can significantly impact print quality. Partial sheets also... printer and could void the printer and cartridge warranties. • Do not use labels with exposed adhesive. • Do not print within 1 mm (0.04 in a jam. Check with slick backing material. • Use full label sheets.
... the edges, or releasing hazardous fumes. • Do not use preprinted card stock manufactured with chemicals that may significantly affect the print quality and cause jams or other paper handling problems. • Check with the manufacturer or vendor to ensure the card stock can significantly impact print quality. Partial sheets also... printer and could void the printer and cartridge warranties. • Do not use labels with exposed adhesive. • Do not print within 1 mm (0.04 in a jam. Check with slick backing material. • Use full label sheets.

User's Guide
Page 125
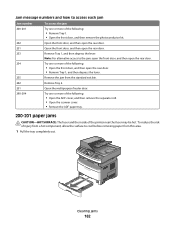
... in seconds. Menu item Timeouts Print Timeout Disabled 1-255 Timeouts Wait Timeout Disabled 15-65535 Print Recovery Auto Continue Disabled 5-255 Print Recovery Jam Recovery On Off Auto Print Recovery Page Protect On Off Description Sets the amount of time in seconds the printer waits to receive an end... the printer is using PCL or PPDS emulation. This setting has no effect on PCL or PPDS emulation print jobs. The printer reprints jammed pages unless the memory required to hold the pages is the factory default setting. This setting has no effect on PostScript emulation print jobs.
... in seconds. Menu item Timeouts Print Timeout Disabled 1-255 Timeouts Wait Timeout Disabled 15-65535 Print Recovery Auto Continue Disabled 5-255 Print Recovery Jam Recovery On Off Auto Print Recovery Page Protect On Off Description Sets the amount of time in seconds the printer waits to receive an end... the printer is using PCL or PPDS emulation. This setting has no effect on PCL or PPDS emulation print jobs. The printer reprints jammed pages unless the memory required to hold the pages is the factory default setting. This setting has no effect on PostScript emulation print jobs.
User's Guide
Page 161
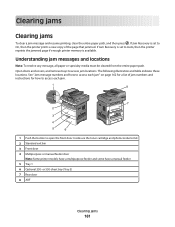
...printer models have a multipurpose feeder and some have a manual feeder 5 Tray 1 6 Optional 250- The following illustration and table indicate these locations. Understanding jam messages and locations Note: To resolve any message, all paper or specialty media must be cleared from the entire paper path. Clearing...-sheet tray (Tray 2) 7 Rear door 8 ADF Clearing jams 161 See "Jam message numbers and how to access each jam" on page 162 for a list of the page that jammed. If Jam Recovery is set to Auto, then the printer reprints the jammed page if enough printer memory is set to On, then ...
...printer models have a multipurpose feeder and some have a manual feeder 5 Tray 1 6 Optional 250- The following illustration and table indicate these locations. Understanding jam messages and locations Note: To resolve any message, all paper or specialty media must be cleared from the entire paper path. Clearing...-sheet tray (Tray 2) 7 Rear door 8 ADF Clearing jams 161 See "Jam message numbers and how to access each jam" on page 162 for a list of the page that jammed. If Jam Recovery is set to Auto, then the printer reprints the jammed page if enough printer memory is set to On, then ...
User's Guide
Page 162
...; Open the scanner cover. • Remove the ADF paper tray. 200-201 paper jams CAUTION-HOT SURFACE: The fuser and the inside of the printer near the fuser may be hot. Remove Tray 2.... Clearing jams 162 Note: For alternative access to the jam, open the front door, and then open the rear door. To reduce the risk of...front door, and then open the rear door. Remove the jam from this area. 1 Pull the tray completely out. Jam message numbers and how to access each jam Jam number 200-201 202 231 233 234 235 242 251 ...
...; Open the scanner cover. • Remove the ADF paper tray. 200-201 paper jams CAUTION-HOT SURFACE: The fuser and the inside of the printer near the fuser may be hot. Remove Tray 2.... Clearing jams 162 Note: For alternative access to the jam, open the front door, and then open the rear door. To reduce the risk of...front door, and then open the rear door. Remove the jam from this area. 1 Pull the tray completely out. Jam message numbers and how to access each jam Jam number 200-201 202 231 233 234 235 242 251 ...
User's Guide
Page 163
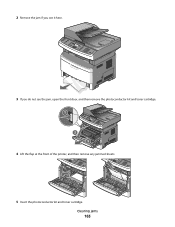
2 Remove the jam if you see it here. 3 If you do not see the jam, open the front door, and then remove the photoconductor kit and toner cartridge. 1 2 3 4 Lift the flap at the front of the printer, and then remove any jammed sheets. 5 Insert the photoconductor kit and toner cartridge. Clearing jams 163
2 Remove the jam if you see it here. 3 If you do not see the jam, open the front door, and then remove the photoconductor kit and toner cartridge. 1 2 3 4 Lift the flap at the front of the printer, and then remove any jammed sheets. 5 Insert the photoconductor kit and toner cartridge. Clearing jams 163
User's Guide
Page 164
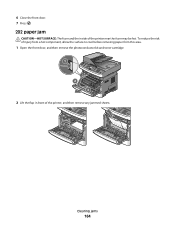
To reduce the risk of injury from a hot component, allow the surface to cool before removing paper from this area. 1 Open the front door, and then remove the photoconductor kit and toner cartridge. 1 2 3 2 Lift the flap in front of the printer near the fuser may be hot. Clearing jams 164 6 Close the front door. 7 Press . 202 paper jam CAUTION-HOT SURFACE: The fuser and the inside of the printer, and then remove any jammed sheets.
To reduce the risk of injury from a hot component, allow the surface to cool before removing paper from this area. 1 Open the front door, and then remove the photoconductor kit and toner cartridge. 1 2 3 2 Lift the flap in front of the printer near the fuser may be hot. Clearing jams 164 6 Close the front door. 7 Press . 202 paper jam CAUTION-HOT SURFACE: The fuser and the inside of the printer, and then remove any jammed sheets.
User's Guide
Page 165
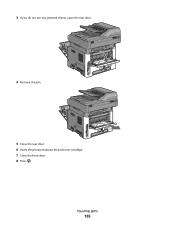
3 If you do not see any jammed sheets, open the rear door. 4 Remove the jam. 5 Close the rear door. 6 Insert the photoconductor kit and toner cartridge. 7 Close the front door. 8 Press . Clearing jams 165
3 If you do not see any jammed sheets, open the rear door. 4 Remove the jam. 5 Close the rear door. 6 Insert the photoconductor kit and toner cartridge. 7 Close the front door. 8 Press . Clearing jams 165


