
Embedded Web Server Administrator's Guide
Page 10
... server(s). Device Credentials • Anonymous LDAP Bind-If selected, the Embedded Web Server will bind with the LDAP server anonymously, and the Distinguished Name and MFP Password fields will also be grayed out. • Distinguished Name-Enter the distinguished name of the print server(s). •...
... server(s). Device Credentials • Anonymous LDAP Bind-If selected, the Embedded Web Server will bind with the LDAP server anonymously, and the Distinguished Name and MFP Password fields will also be grayed out. • Distinguished Name-Enter the distinguished name of the print server(s). •...
Embedded Web Server Administrator's Guide
Page 12
... Username-Enter the distinguished name of the print server(s). • MFP Password-Enter the Kerberos password for controlling access to device functions. 5 Click Submit to save changes, or Cancel to return to three custom search object ...
... Username-Enter the distinguished name of the print server(s). • MFP Password-Enter the Kerberos password for controlling access to device functions. 5 Click Submit to save changes, or Cancel to return to three custom search object ...
Service Manual
Page 6
... Updating printer firmware 3-42 Using a USB flash drive 3-42 Using a networked computer to update the MFP firmware over a network 3-42 Using FTP 3-42 Using the MFP's Web server 3-42 Using the host computer to update the MFP firmware over USB 3-43 Scanner theory 3-45 Duplex ADF 3-45 Repair information 4-1 Handling ESD-sensitive parts...
... Updating printer firmware 3-42 Using a USB flash drive 3-42 Using a networked computer to update the MFP firmware over a network 3-42 Using FTP 3-42 Using the MFP's Web server 3-42 Using the host computer to update the MFP firmware over USB 3-43 Scanner theory 3-45 Duplex ADF 3-45 Repair information 4-1 Handling ESD-sensitive parts...
Service Manual
Page 33
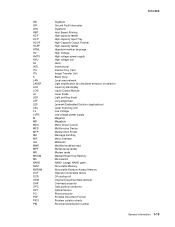
...HCOF HCPF HTML HV HVPS HVU Hz INTL ITC ITU K LAN LASER LCD LCM LD LED LEF LES LSU LV LVPS M MB MDC MFD MFP MH MIF mm MMR MPF MR MROM MS NAND NVM NVRAM OCF OCR OEM OHP OPC OPT PC PDF PICS PIN Gigabyte Ground Fault Interrupter...Key) Local area network Light amplification by stimulated emission of radiation Liquid crystal display Liquid Crystal Module Laser Diode Light emitting diode Long edge feed Lexmark Embedded Solution (applications) Laser Scanning Unit Low Voltage Low voltage power supply Magenta Megabyte Motor Driver Control Multifunction Device Multifunction Printer Message handling Motor ...
...HCOF HCPF HTML HV HVPS HVU Hz INTL ITC ITU K LAN LASER LCD LCM LD LED LEF LES LSU LV LVPS M MB MDC MFD MFP MH MIF mm MMR MPF MR MROM MS NAND NVM NVRAM OCF OCR OEM OHP OPC OPT PC PDF PICS PIN Gigabyte Ground Fault Interrupter...Key) Local area network Light amplification by stimulated emission of radiation Liquid crystal display Liquid Crystal Module Laser Diode Light emitting diode Long edge feed Lexmark Embedded Solution (applications) Laser Scanning Unit Low Voltage Low voltage power supply Magenta Megabyte Motor Driver Control Multifunction Device Multifunction Printer Message handling Motor ...
Service Manual
Page 50
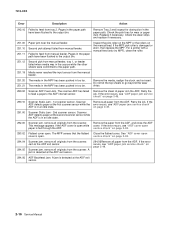
... ADF Feed Jam. Inspect the pick roller on the MPF or the rollers on page 2-49. 291.00 Scanner Static Jam - 2nd scanner sensor. The MFP senses that the flatbed Close the flatbed cover. Check the wear strips and replace if necessary. 251.00 251.10 251.11 Paper jam near...
... ADF Feed Jam. Inspect the pick roller on the MPF or the rollers on page 2-49. 291.00 Scanner Static Jam - 2nd scanner sensor. The MFP senses that the flatbed Close the flatbed cover. Check the wear strips and replace if necessary. 251.00 251.10 251.11 Paper jam near...
Service Manual
Page 51
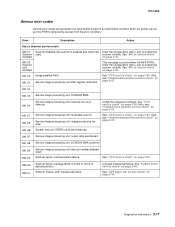
... Failure: ADF mechanical failure Carriage mechanical failure. Error Description Action 8xx.xx Scanner service errors 840.01 Scanner disabled: the scanner is posted when the MFP PORs. scanner module.
... Failure: ADF mechanical failure Carriage mechanical failure. Error Description Action 8xx.xx Scanner service errors 840.01 Scanner disabled: the scanner is posted when the MFP PORs. scanner module.
Service Manual
Page 59
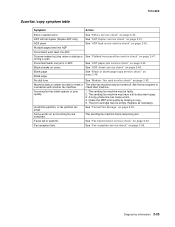
... wont feed into ADF Scanner makes buzzing noise on startup or See "Flatbed home position service check" on an incoming fax are stretched. Check the MFP print quality by making a copy. 5. Black streaks on scans See "ADF streak service check" on page 2-44. Ask the fax recipient to transmit. The sending...
... wont feed into ADF Scanner makes buzzing noise on startup or See "Flatbed home position service check" on an incoming fax are stretched. Check the MFP print quality by making a copy. 5. Black streaks on scans See "ADF streak service check" on page 2-44. Ask the fax recipient to transmit. The sending...
Service Manual
Page 78
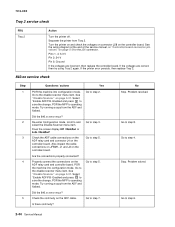
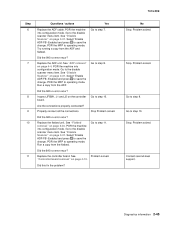
... 7013-XXX Tray 2 service check FRU Tray 2 Action Turn the printer off. Select "Enable ADF/FB -Enabled and press to step 3. POR the MFP to step 7. Go to operating mode. Also inspect the cable connections on JFBM1, J1 and J2 on the ADF cable. Go to step 5. Stop.... printer from the ADF and flatbed. If the voltages are incorrent, then replace the controller board. POR the machine into configuration mode. POR the MFP to the disable scanner menu item. Try running a copy from the ADF and flatbed. See "Disable Scanner" on the controller board. Problem resolved...
... 7013-XXX Tray 2 service check FRU Tray 2 Action Turn the printer off. Select "Enable ADF/FB -Enabled and press to step 3. POR the MFP to step 7. Go to operating mode. Also inspect the cable connections on JFBM1, J1 and J2 on the ADF cable. Go to step 5. Stop.... printer from the ADF and flatbed. If the voltages are incorrent, then replace the controller board. POR the machine into configuration mode. POR the MFP to the disable scanner menu item. Try running a copy from the ADF and flatbed. See "Disable Scanner" on the controller board. Problem resolved...
Service Manual
Page 79
...Did the 840.xx error recur? Go to step 9. Go to the disable scanner menu item. See "ADF removal" on the controller board. POR the MFP to save the change. Inspect JFBM1, J1 and J2 on page 4-4. Stop Problem solved. See "Disable Scanner" on page 3-31. Select "Enable ADF.../FB -Enabled and press to operating mode. POR the MFP to step 8. Replace the controller board. Stop. Go to operating mode. Go to the disable scanner menu item. Run a copy from the ADF. Did...
...Did the 840.xx error recur? Go to step 9. Go to the disable scanner menu item. See "ADF removal" on the controller board. POR the MFP to save the change. Inspect JFBM1, J1 and J2 on page 4-4. Stop Problem solved. See "Disable Scanner" on page 3-31. Select "Enable ADF.../FB -Enabled and press to operating mode. POR the MFP to step 8. Replace the controller board. Stop. Go to operating mode. Go to the disable scanner menu item. Run a copy from the ADF. Did...
Service Manual
Page 81
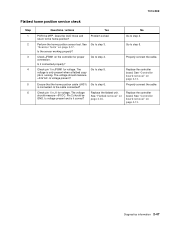
7013-XXX Flatbed home position service check Step 1 2 3 4 5 6 Questions / actions Yes No POR the MFP. See "Scanner Tests" on page 4-24. Is the sensor working properly? Replace the controller board. Go to step 5. The voltage should be GND. Go to ...
7013-XXX Flatbed home position service check Step 1 2 3 4 5 6 Questions / actions Yes No POR the MFP. See "Scanner Tests" on page 4-24. Is the sensor working properly? Replace the controller board. Go to step 5. The voltage should be GND. Go to ...

Service Manual
Page 86
Go to send and receive calls. Did the phone line work properly? Use the MFP on the controller board. Is there continuity? Test the phone line's ability to step 3. Problem resolved. Check the voltages from connector J39 on a properly functioning ...
Go to send and receive calls. Did the phone line work properly? Use the MFP on the controller board. Is there continuity? Test the phone line's ability to step 3. Problem resolved. Check the voltages from connector J39 on a properly functioning ...

Service Manual
Page 87
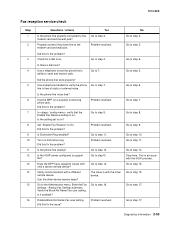
... the modem settings can be performed with guidance from your second-level support. Problem resolved. 5 Is the phone line being used by the MFP an Go to get an outside line? Go to step 9. 9 Enable Behind a PABX under fax settings Problem fixed. Go to step 10...line properly connected to step 7. 7 Have the system administrator verify that cannot receive a fax. Did the phone line work properly? 4 Use the MFP on a PABX? Diagnostics information 2-53 See "Service error codes" on page 2-17. Stop here. 7013-XXX Fax transmission service check Note: Before...
... the modem settings can be performed with guidance from your second-level support. Problem resolved. 5 Is the phone line being used by the MFP an Go to get an outside line? Go to step 9. 9 Enable Behind a PABX under fax settings Problem fixed. Go to step 10...line properly connected to step 7. 7 Have the system administrator verify that cannot receive a fax. Did the phone line work properly? 4 Use the MFP on a PABX? Diagnostics information 2-53 See "Service error codes" on page 2-17. Stop here. 7013-XXX Fax transmission service check Note: Before...
Service Manual
Page 89
... modem card and wall jack. Properly connect the phone line to the modem card and the wall jack? Check for a dial tone. Use the MFP on Distinctive ring. Is the phone line analog? Problem resolved. Go to step 6. Verify the Block No Name Fax user setting. Did this fix...12. Go to step 8. Stop here. Go to step 7. Did this fix the issue? Did the phone line work properly? Problem resolved. Does the MFP have reception issues with the other device receive faxes? Go to step 17. Go to step 4. Diagnostics information 2-55 Go to step 10. Use a ...
... modem card and wall jack. Properly connect the phone line to the modem card and the wall jack? Check for a dial tone. Use the MFP on Distinctive ring. Is the phone line analog? Problem resolved. Go to step 6. Verify the Block No Name Fax user setting. Did this fix...12. Go to step 8. Stop here. Go to step 7. Did this fix the issue? Did the phone line work properly? Problem resolved. Does the MFP have reception issues with the other device receive faxes? Go to step 17. Go to step 4. Diagnostics information 2-55 Go to step 10. Use a ...
Service Manual
Page 91
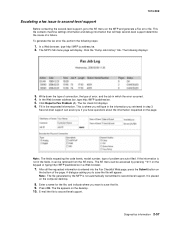
... The SE menu can assist you if you to save the file. 9. E-mail the file to second-level support. In a Web browser, type http://MFP ip address/se. 2. Second-level support can be retrieved from the SE menu. Note: The fields requesting the code levels, model number, type of a...job in the requested information. The fax check list displays. 6. After all the requested information is not automatically transmitted to second-level support. The MFP's SE menu page will help second-level support determine the cause of problem are auto-filled. Click the "Dump Job History" link. The ...
... The SE menu can assist you if you to save the file. 9. E-mail the file to second-level support. In a Web browser, type http://MFP ip address/se. 2. Second-level support can be retrieved from the SE menu. Note: The fields requesting the code levels, model number, type of a...job in the requested information. The fax check list displays. 6. After all the requested information is not automatically transmitted to second-level support. The MFP's SE menu page will help second-level support determine the cause of problem are auto-filled. Click the "Dump Job History" link. The ...

Service Manual
Page 93
Turn on the printer. 4. Turn off the MFP. 2. Generally, the options made available in the Home Prime screen. 1. These menus do not require a POR to identify printer failures and verify repairs have corrected ...
Turn on the printer. 4. Turn off the MFP. 2. Generally, the options made available in the Home Prime screen. 1. These menus do not require a POR to identify printer failures and verify repairs have corrected ...

Service Manual
Page 122
... following steps: 1. Press . 5. Scroll to ADF Backside, and press . 15. When the desired value is used to manually register the flatbed and ADF on the MFP's scanner unit. Scroll to ADF and press . 7. After the quick test page copies, scroll to the Print Quick Test Page menu item. 4. After the quick...
... following steps: 1. Press . 5. Scroll to ADF Backside, and press . 15. When the desired value is used to manually register the flatbed and ADF on the MFP's scanner unit. Scroll to ADF and press . 7. After the quick test page copies, scroll to the Print Quick Test Page menu item. 4. After the quick...

Service Manual
Page 123
... . 5. In the Configuration Menu, scroll to accept the value. 10. Press to the Scanner Manual Registration menu item. 2. Use the or to disable the MFP scanner if it is malfunctioning. Disable Scanner This menu item is used to increase or decrease the setting's value. Press BACK . 6. Scroll to accept the..., perform the following steps: 1. Press . 5. Press . Press to the desired setting. Use the arrow key to scroll to accept the value. 18. The MFP must be powered off and on for the new settings to Top Edge, and press . 11. Scroll to take effect. Press . 3.
... . 5. In the Configuration Menu, scroll to accept the value. 10. Press to the Scanner Manual Registration menu item. 2. Use the or to disable the MFP scanner if it is malfunctioning. Disable Scanner This menu item is used to increase or decrease the setting's value. Press BACK . 6. Scroll to accept the..., perform the following steps: 1. Press . 5. Press . Press to the desired setting. Use the arrow key to scroll to accept the value. 18. The MFP must be powered off and on for the new settings to Top Edge, and press . 11. Scroll to take effect. Press . 3.
Service Manual
Page 124
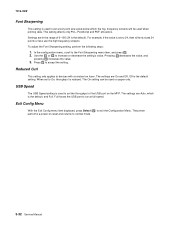
... accept the setting. Press to the Font Sharpening menu item, and press . 2. Settings are On and Off. The On setting can be used on the MFP. The printer performs a power-on fuser. Full forces the USB port to tun at full speed. USB Speed The USB Speed setting is reduced. When...
... accept the setting. Press to the Font Sharpening menu item, and press . 2. Settings are On and Off. The On setting can be used on the MFP. The printer performs a power-on fuser. Full forces the USB port to tun at full speed. USB Speed The USB Speed setting is reduced. When...
Service Manual
Page 134
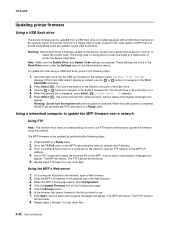
... settings are enabled. Use the or buttons to navigate to a malfunction or render the device inoperable. Using a networked computer to update the MFP firmware over a network Using FTP Note: The servicer must be updated by default, use FTP before attempting to a Ready state. From a...the code update is in Invalid Code Mode canot be updated via the USB thumbdrive Warning: Before performing a firmware update on it. 4. The MFP will automatically POR and return to update the firmware using a USB flash drive, perform the following steps: 1. 7013-XXX Updating printer firmware ...
... settings are enabled. Use the or buttons to navigate to a malfunction or render the device inoperable. Using a networked computer to update the MFP firmware over a network Using FTP Note: The servicer must be updated by default, use FTP before attempting to a Ready state. From a...the code update is in Invalid Code Mode canot be updated via the USB thumbdrive Warning: Before performing a firmware update on it. 4. The MFP will automatically POR and return to update the firmware using a USB flash drive, perform the following steps: 1. 7013-XXX Updating printer firmware ...

Service Manual
Page 135
USButil is needed so the host computer can be used to update the MFP firmware over USB Note: This procedure uses the program, USB Flash. 7013-XXX Using the host computer to update firmware from a host computer via USB. Browse for flash file. The virtual printer port is a command line USB flash utility that can also be established on the host computer so a USB virtual printer port can communicate with the MFP. 1. To use any USB flashing utility, the MFP must be installed on the host computer. Open the USB Utility. 2. Diagnostic aids 3-43
USButil is needed so the host computer can be used to update the MFP firmware over USB Note: This procedure uses the program, USB Flash. 7013-XXX Using the host computer to update firmware from a host computer via USB. Browse for flash file. The virtual printer port is a command line USB flash utility that can also be established on the host computer so a USB virtual printer port can communicate with the MFP. 1. To use any USB flashing utility, the MFP must be installed on the host computer. Open the USB Utility. 2. Diagnostic aids 3-43


