User's Guide
Page 3
... control panel buttons...14 Learning about the software 15 Using the printer software...15 Using the Lexmark Imaging Studio...15 Using the Solution Center...17 Using Print Properties...18 Opening Print Properties ...18 Using the Save Settings menu ...18 Using the I Want To menu ...18...on the scanner glass 24 Printing 26 Changing the paper type...26 Printing a document...26 Printing a Web page...26 Printing high-quality graphics...27 Printing photos or images from a Web page...27 Printing collated copies...28 Printing the last page first (reverse page order)...28 Printing on both sides of the...
... control panel buttons...14 Learning about the software 15 Using the printer software...15 Using the Lexmark Imaging Studio...15 Using the Solution Center...17 Using Print Properties...18 Opening Print Properties ...18 Using the Save Settings menu ...18 Using the I Want To menu ...18...on the scanner glass 24 Printing 26 Changing the paper type...26 Printing a document...26 Printing a Web page...26 Printing high-quality graphics...27 Printing photos or images from a Web page...27 Printing collated copies...28 Printing the last page first (reverse page order)...28 Printing on both sides of the...
User's Guide
Page 4
...photos from a media device using the computer 32 Printing photos using the computer...33 Printing photos from the Photo Library ...33 Printing all photos from a media device using the computer 33 Printing selected photos from a media device using the computer 33 Printing Photo Packages ...34 Creating photo projects...34 Creating Photo... Greeting Cards...34 Creating and viewing a slideshow...35 Printing an image as a multiple-page poster ...35 Copying 37 Copying using the control panel...37 Making a copy...37 Copying 4 x 6 photos...37...
...photos from a media device using the computer 32 Printing photos using the computer...33 Printing photos from the Photo Library ...33 Printing all photos from a media device using the computer 33 Printing selected photos from a media device using the computer 33 Printing Photo Packages ...34 Creating photo projects...34 Creating Photo... Greeting Cards...34 Creating and viewing a slideshow...35 Printing an image as a multiple-page poster ...35 Copying 37 Copying using the control panel...37 Making a copy...37 Copying 4 x 6 photos...37...
User's Guide
Page 5
... Installing print cartridges...50 Achieving better print quality...52 Improving print quality ...52 Aligning the print cartridges ...52 Cleaning the print cartridge nozzles...53 Wiping the print cartridge nozzles and contacts ...54 Preserving the print cartridges...55 Cleaning the scanner glass...55 Ordering print cartridges...55 Ordering paper and other supplies...56 Using genuine Lexmark print cartridges...56 Refilling a print cartridge...
... Installing print cartridges...50 Achieving better print quality...52 Improving print quality ...52 Aligning the print cartridges ...52 Cleaning the print cartridge nozzles...53 Wiping the print cartridge nozzles and contacts ...54 Preserving the print cartridges...55 Cleaning the scanner glass...55 Ordering print cartridges...55 Ordering paper and other supplies...56 Using genuine Lexmark print cartridges...56 Refilling a print cartridge...
User's Guide
Page 6
... a fax...66 Can send but not receive faxes...67 Can receive but not send faxes...67 Printer receives a blank fax...67 Received fax has poor print quality...68 Jams and misfeeds troubleshooting...68 Paper jams...68 Paper or specialty media misfeeds...68 Printer does not feed paper, envelopes, or specialty media...
... a fax...66 Can send but not receive faxes...67 Can receive but not send faxes...67 Printer receives a blank fax...67 Received fax has poor print quality...68 Jams and misfeeds troubleshooting...68 Paper jams...68 Paper or specialty media misfeeds...68 Printer does not feed paper, envelopes, or specialty media...
User's Guide
Page 8
...) 1 Click Start Œ Programs or All Programs Œ • Loading paper Lexmark 2500 Series. • Printing 2 Click User's Guide. • Working with printing, copying, scanning, faxing, paper jams, and misfeeds 3 Click Yes. Lexmark 2500 Series. 2 Select Lexmark Solution Center. Finding information about the printer 8 Lexmark Solution Center Description Where to find The Help gives you instructions...
...) 1 Click Start Œ Programs or All Programs Œ • Loading paper Lexmark 2500 Series. • Printing 2 Click User's Guide. • Working with printing, copying, scanning, faxing, paper jams, and misfeeds 3 Click Yes. Lexmark 2500 Series. 2 Select Lexmark Solution Center. Finding information about the printer 8 Lexmark Solution Center Description Where to find The Help gives you instructions...
User's Guide
Page 9
...view the warranty. materials and workmanship for a www.lexmark.com. Note: For additional information about contacting Lexmark, see the printed warranty that shipped with your printer. E-mail support For e-mail support, visit our Web site: www.lexmark.com. Note: Support numbers and times may not ... or region, and then select the Customer Support link. See the printed furnishes a limited warranty that shipped with your this printer will be available in printer, or set forth at www.lexmark.com. period of 12 months after the 1 Click CUSTOMER SUPPORT. Customer...
...view the warranty. materials and workmanship for a www.lexmark.com. Note: For additional information about contacting Lexmark, see the printed warranty that shipped with your printer. E-mail support For e-mail support, visit our Web site: www.lexmark.com. Note: Support numbers and times may not ... or region, and then select the Customer Support link. See the printed furnishes a limited warranty that shipped with your this printer will be available in printer, or set forth at www.lexmark.com. period of 12 months after the 1 Click CUSTOMER SUPPORT. Customer...
User's Guide
Page 11
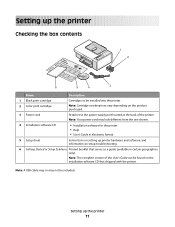
Note: Your power cord may not be installed into the printer. 2 Color print cartridge Note: Cartridge combinations vary depending on the installation software CD that serves as a guide (available in certain geographies only). ...printer hardware and software, and information on setup troubleshooting. 6 Getting Started or Setup Solutions Printed booklet that shipped with the printer. Setting up the printer Checking the box contents 1 2 ?? ? 6 5 4 3 Name Description 1 Black print cartridge Cartridges to the power supply port located at the back of the printer. Note:...
Note: Your power cord may not be installed into the printer. 2 Color print cartridge Note: Cartridge combinations vary depending on the installation software CD that serves as a guide (available in certain geographies only). ...printer hardware and software, and information on setup troubleshooting. 6 Getting Started or Setup Solutions Printed booklet that shipped with the printer. Setting up the printer Checking the box contents 1 2 ?? ? 6 5 4 3 Name Description 1 Black print cartridge Cartridges to the power supply port located at the back of the printer. Note:...
User's Guide
Page 13
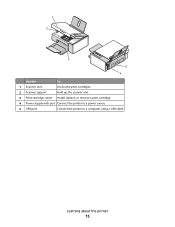
1 2 3 5 4 Use the To 1 Scanner unit Access the print cartridges. 2 Scanner support Hold up the scanner unit. 3 Print cartridge carrier Install, replace, or remove a print cartridge. 4 Power supply with port Connect the printer to a power source. 5 USB port Connect the printer to a computer using a USB cable. Learning about the printer 13
1 2 3 5 4 Use the To 1 Scanner unit Access the print cartridges. 2 Scanner support Hold up the scanner unit. 3 Print cartridge carrier Install, replace, or remove a print cartridge. 4 Power supply with port Connect the printer to a power source. 5 USB port Connect the printer to a computer using a USB cable. Learning about the printer 13
User's Guide
Page 14
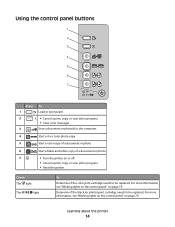
...Blinking lights on the control panel" on page 70. For more information, see "Blinking lights on the control panel" on or off. • Cancel a print, copy, or scan job in progress. • Clear error messages. Using the control panel buttons Press 1 2 3 To Load or eject paper. • Cancel..., or scan job in progress. • Reset the printer. Learning about the printer 14 Determine if the black (or photo) print cartridge needs to the computer. 4 Start a 4 x 6 color photo copy. 5 Start a color copy of a document or photo. 6 Start a black-and-white copy of a document or ...
...Blinking lights on the control panel" on page 70. For more information, see "Blinking lights on the control panel" on or off. • Cancel a print, copy, or scan job in progress. • Clear error messages. Using the control panel buttons Press 1 2 3 To Load or eject paper. • Cancel..., or scan job in progress. • Reset the printer. Learning about the printer 14 Determine if the black (or photo) print cartridge needs to the computer. 4 Start a 4 x 6 color photo copy. 5 Start a color copy of a document or photo. 6 Start a black-and-white copy of a document or ...
User's Guide
Page 15
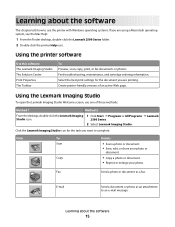
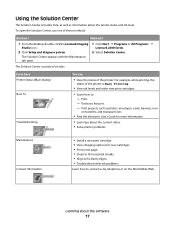
... the printer Help icon. Using the printer software Use this software The Lexmark Imaging Studio The Solution Center Print Properties The Toolbar To Preview, scan, copy, print, or fax documents or photos. Click the Lexmark Imaging Studio icon for the document you are printing. E-mail Send a document or photo as a fax. Learning about the software...
... the printer Help icon. Using the printer software Use this software The Lexmark Imaging Studio The Solution Center Print Properties The Toolbar To Preview, scan, copy, print, or fax documents or photos. Click the Lexmark Imaging Studio icon for the document you are printing. E-mail Send a document or photo as a fax. Learning about the software...
User's Guide
Page 16
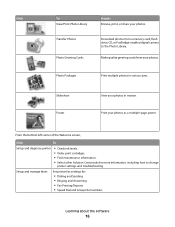
...maintenance information. • Select other Solution Center tabs for : • Dialing and Sending • Ringing and Answering • Fax Printing/Reports • Speed Dial and Group Dial numbers Learning about the software 16 Setup and manage faxes Set printer fax settings for more ...information, including how to the Photo Library. Click To View/Print Photo Library Transfer Photos Photo Greeting Cards Details Browse, print, or share your photos in various sizes. Download photos from your photos as a multiple-page poster. Photo...
...maintenance information. • Select other Solution Center tabs for : • Dialing and Sending • Ringing and Answering • Fax Printing/Reports • Speed Dial and Group Dial numbers Learning about the software 16 Setup and manage faxes Set printer fax settings for more ...information, including how to the Photo Library. Click To View/Print Photo Library Transfer Photos Photo Greeting Cards Details Browse, print, or share your photos in various sizes. Download photos from your photos as a multiple-page poster. Photo...
User's Guide
Page 17
...Printer Status (Main dialog) How To Troubleshooting You can • View the status of the printer is Busy Printing. • View ink levels and order new print cartridges. • Learn how to contact us by telephone or on transfers, and transparencies. • Find ...1 Method 2 1 From the desktop, double-click the Lexmark Imaging Studio icon. 2 Click Setup and diagnose printer. 1 Click Start Œ Programs or All Programs Œ Lexmark 2500 Series. 2 Select Solution Center. Use basic features. - Print. - Print projects such as information about the printer status and ink level...
...Printer Status (Main dialog) How To Troubleshooting You can • View the status of the printer is Busy Printing. • View ink levels and order new print cartridges. • Learn how to contact us by telephone or on transfers, and transparencies. • Find ...1 Method 2 1 From the desktop, double-click the Lexmark Imaging Studio icon. 2 Click Setup and diagnose printer. 1 Click Start Œ Programs or All Programs Œ Lexmark 2500 Series. 2 Select Solution Center. Use basic features. - Print. - Print projects such as information about the printer status and ink level...
User's Guide
Page 18
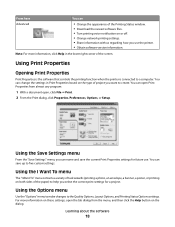
... settings. Note: For more information on these settings, open the tab dialog from almost any program: 1 With a document open Print Properties from the menu, and then click the Help button on the type of the screen. Using the Save Settings menu From the..., click File ΠPrint. 2 From the Print dialog, click Properties, Preferences, Options, or Setup. You can save the current Print Properties settings for a project. Learning about the software 18 Using Print Properties Opening Print Properties Print Properties is the software that controls the printing function when the printer is ...
... settings. Note: For more information on these settings, open the tab dialog from almost any program: 1 With a document open Print Properties from the menu, and then click the Help button on the type of the screen. Using the Save Settings menu From the..., click File ΠPrint. 2 From the Print dialog, click Properties, Preferences, Options, or Setup. You can save the current Print Properties settings for a project. Learning about the software 18 Using Print Properties Opening Print Properties Print Properties is the software that controls the printing function when the printer is ...
User's Guide
Page 19
...8226; Specify the size of paper loaded. • Select the orientation of the document on the printed page: portrait or landscape. • Select the layout you want to print. • Choose to print on the screen. Note: For more information about the software 19 Click Normal To • ...the Web using Microsoft Windows Internet Explorer version 5.5 or later. The "Options" menu also provides direct links to the Lexmark Web site. • Access Help for printing photos. • Access links to different parts of the Solution Center as well as software version information. Note: The...
...8226; Specify the size of paper loaded. • Select the orientation of the document on the printed page: portrait or landscape. • Select the layout you want to print. • Choose to print on the screen. Note: For more information about the software 19 Click Normal To • ...the Web using Microsoft Windows Internet Explorer version 5.5 or later. The "Options" menu also provides direct links to the Lexmark Web site. • Access Help for printing photos. • Access links to different parts of the Solution Center as well as software version information. Note: The...
User's Guide
Page 20
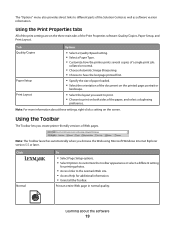
... draft quality. Text Only A Photos Preview Print only the text of photos or images valid for printing appears next to defaults Windows 2000, Windows XP, or Windows Vista users: 1 Click Start ΠSettings ΠPrinters or Printers and Faxes. 2 Right-click the Lexmark 2500 Series icon. 3 Click Printing Preferences. 4 Click the Save Settings menu...
... draft quality. Text Only A Photos Preview Print only the text of photos or images valid for printing appears next to defaults Windows 2000, Windows XP, or Windows Vista users: 1 Click Start ΠSettings ΠPrinters or Printers and Faxes. 2 Right-click the Lexmark 2500 Series icon. 3 Click Printing Preferences. 4 Click the Save Settings menu...

User's Guide
Page 22
... center of the paper support. • The paper guides rest against the edges of the labels. Load up to 10 envelopes Make sure • The print side of the envelopes faces you . • The top of the labels feeds into the printer first. • The adhesive on the labels does not... label sheets. Remove each envelope as it exits, and allow it to dry to avoid ink smudging. 25 sheets of labels 25 transparencies • The print side of the labels faces you . • The stamp location is in the upper left corner. • The envelopes are designed for use with areas...
... center of the paper support. • The paper guides rest against the edges of the labels. Load up to 10 envelopes Make sure • The print side of the envelopes faces you . • The top of the labels feeds into the printer first. • The adhesive on the labels does not... label sheets. Remove each envelope as it exits, and allow it to dry to avoid ink smudging. 25 sheets of labels 25 transparencies • The print side of the labels faces you . • The stamp location is in the upper left corner. • The envelopes are designed for use with areas...

User's Guide
Page 23
...index cards 25 photo cards 25 postcards Make sure • You follow the loading instructions that came with the iron-on transfers. • The print side of the transfers faces you. • The transfers are loaded in the center of the paper support. • The paper guides rest against... the edges of the paper. Note: For best results, load transfers one at a time. • The print side of the cards faces you . • The paper size fits within these dimensions: Width: - 76.2-215.9 mm - 3.0-8.5 inches Length: - 127.0-355.6 mm - ...
...index cards 25 photo cards 25 postcards Make sure • You follow the loading instructions that came with the iron-on transfers. • The print side of the transfers faces you. • The transfers are loaded in the center of the paper support. • The paper guides rest against... the edges of the paper. Note: For best results, load transfers one at a time. • The print side of the cards faces you . • The paper size fits within these dimensions: Width: - 76.2-215.9 mm - 3.0-8.5 inches Length: - 127.0-355.6 mm - ...
User's Guide
Page 24
...; You remove all the paper from the paper support before loading the banner paper. • You tear off only the number of pages needed to print the banner. • You place the required stack of banner paper behind the printer, and feed in the first sheet. • The leading edge of..., text documents, magazine articles, newspapers, and other publications. Note: The maximum scan area for faxing. For more information, see "Using Print Properties" on the scanner glass You can scan a document for the scanner glass is loaded in the center of the paper support. • The paper ...
...; You remove all the paper from the paper support before loading the banner paper. • You tear off only the number of pages needed to print the banner. • You place the required stack of banner paper behind the printer, and feed in the first sheet. • The leading edge of..., text documents, magazine articles, newspapers, and other publications. Note: The maximum scan area for faxing. For more information, see "Using Print Properties" on the scanner glass You can scan a document for the scanner glass is loaded in the center of the paper support. • The paper ...
User's Guide
Page 26
... You can use the Toolbar to check or change your print settings: a From the toolbar area, click Lexmark Œ Page Setup. Note: For additional print setting options, see "Using Print Properties" on transfers, you are loading. 5 Click OK. 6 Click OK or Print. b Adjust the print settings. Printing 26 Printing a document 1 Load paper. 2 With a document open , click File Œ...
... You can use the Toolbar to check or change your print settings: a From the toolbar area, click Lexmark Œ Page Setup. Note: For additional print setting options, see "Using Print Properties" on transfers, you are loading. 5 Click OK. 6 Click OK or Print. b Adjust the print settings. Printing 26 Printing a document 1 Load paper. 2 With a document open , click File Œ...
User's Guide
Page 27
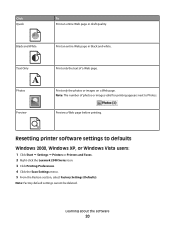
... Photos. 3 If no number appears next to Photos. The number of photos valid for printing appears next to Photos: a From the Lexmark logo drop-down menu, select Options. Printing 27 c Select a lower minimum photo size. c Click: • Print or • Close, and continue to print text and images or text only. b Select the Advanced tab.
... Photos. 3 If no number appears next to Photos. The number of photos valid for printing appears next to Photos: a From the Lexmark logo drop-down menu, select Options. Printing 27 c Select a lower minimum photo size. c Click: • Print or • Close, and continue to print text and images or text only. b Select the Advanced tab.


