User's Guide
Page 5
... Changing print cartridges...50 Removing a used print cartridge ...50 Installing print cartridges...50 Achieving better print quality...52 Improving print quality ...52 Aligning the print cartridges ...52 Cleaning the print cartridge nozzles...53 Wiping the print cartridge nozzles and contacts ...54 Preserving the print cartridges...55 Cleaning the scanner glass...55 Ordering print cartridges...55 Ordering paper and other supplies...56 Using genuine Lexmark print cartridges...56 Refilling a print cartridge...57 Recycling Lexmark products...
... Changing print cartridges...50 Removing a used print cartridge ...50 Installing print cartridges...50 Achieving better print quality...52 Improving print quality ...52 Aligning the print cartridges ...52 Cleaning the print cartridge nozzles...53 Wiping the print cartridge nozzles and contacts ...54 Preserving the print cartridges...55 Cleaning the scanner glass...55 Ordering print cartridges...55 Ordering paper and other supplies...56 Using genuine Lexmark print cartridges...56 Refilling a print cartridge...57 Recycling Lexmark products...
User's Guide
Page 11
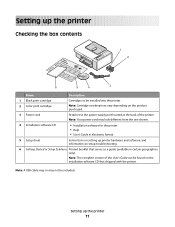
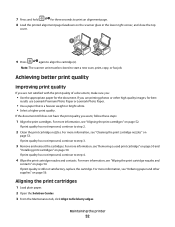
...setting up the printer 11 Setting up the printer Checking the box contents 1 2 ?? ? 6 5 4 3 Name Description 1 Black print cartridge Cartridges to the power supply port located at the back of the printer. Note: The complete version of the User's Guide can be installed ...in electronic format 5 Setup sheet Instructions on setup troubleshooting. 6 Getting Started or Setup Solutions Printed booklet that shipped with the printer. Note: A USB cable may or may look different from the one shown. 4 Installation software CD • Installation software for the printer • Help &#...
...setting up the printer 11 Setting up the printer Checking the box contents 1 2 ?? ? 6 5 4 3 Name Description 1 Black print cartridge Cartridges to the power supply port located at the back of the printer. Note: The complete version of the User's Guide can be installed ...in electronic format 5 Setup sheet Instructions on setup troubleshooting. 6 Getting Started or Setup Solutions Printed booklet that shipped with the printer. Note: A USB cable may or may look different from the one shown. 4 Installation software CD • Installation software for the printer • Help &#...
User's Guide
Page 13
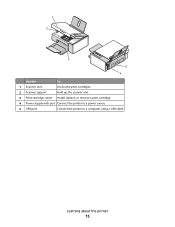
1 2 3 5 4 Use the To 1 Scanner unit Access the print cartridges. 2 Scanner support Hold up the scanner unit. 3 Print cartridge carrier Install, replace, or remove a print cartridge. 4 Power supply with port Connect the printer to a power source. 5 USB port Connect the printer to a computer using a USB cable. Learning about the printer 13
1 2 3 5 4 Use the To 1 Scanner unit Access the print cartridges. 2 Scanner support Hold up the scanner unit. 3 Print cartridge carrier Install, replace, or remove a print cartridge. 4 Power supply with port Connect the printer to a power source. 5 USB port Connect the printer to a computer using a USB cable. Learning about the printer 13
User's Guide
Page 14
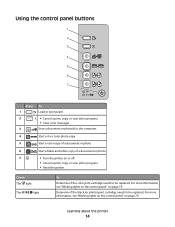
... to be replaced. Using the control panel buttons Press 1 2 3 To Load or eject paper. • Cancel a print, copy, or scan job in progress. • Reset the printer. Determine if the black (or photo) print cartridge needs to be replaced. For more information, see "Blinking lights on the control panel" on page 70. Learning about the...
... to be replaced. Using the control panel buttons Press 1 2 3 To Load or eject paper. • Cancel a print, copy, or scan job in progress. • Reset the printer. Determine if the black (or photo) print cartridge needs to be replaced. For more information, see "Blinking lights on the control panel" on page 70. Learning about the...
User's Guide
Page 15
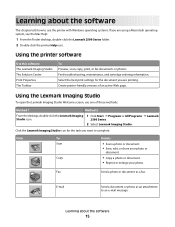
... message. Click the Lexmark Imaging Studio icon for the document you are printing. Learning about the software This chapter tells how to use one of an active Web page. Using the Lexmark Imaging Studio To open the Lexmark Imaging Studio Welcome screen... Use this software The Lexmark Imaging Studio The Solution Center Print Properties The Toolbar To Preview, scan, copy, print, or fax documents or photos. E-mail Send a document or photo as a fax. Find troubleshooting, maintenance, and cartridge ordering information. Click To Scan Copy Details • Scan a photo or document....
... message. Click the Lexmark Imaging Studio icon for the document you are printing. Learning about the software This chapter tells how to use one of an active Web page. Using the Lexmark Imaging Studio To open the Lexmark Imaging Studio Welcome screen... Use this software The Lexmark Imaging Studio The Solution Center Print Properties The Toolbar To Preview, scan, copy, print, or fax documents or photos. E-mail Send a document or photo as a fax. Find troubleshooting, maintenance, and cartridge ordering information. Click To Scan Copy Details • Scan a photo or document....
User's Guide
Page 16
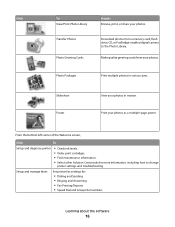
...photos as a multiple-page poster. Setup and manage faxes Set printer fax settings for more information, including how to the Photo Library. Print your photos. Make quality greeting cards from a memory card, flash drive, CD, or PictBridge-enabled digital camera to change printer settings...the bottom left corner of the Welcome screen, Click To Setup and diagnose printer • Check ink levels. • Order print cartridges. • Find maintenance information. • Select other Solution Center tabs for : • Dialing and Sending • Ringing and Answering •...
...photos as a multiple-page poster. Setup and manage faxes Set printer fax settings for more information, including how to the Photo Library. Print your photos. Make quality greeting cards from a memory card, flash drive, CD, or PictBridge-enabled digital camera to change printer settings...the bottom left corner of the Welcome screen, Click To Setup and diagnose printer • Check ink levels. • Order print cartridges. • Find maintenance information. • Select other Solution Center tabs for : • Dialing and Sending • Ringing and Answering •...
User's Guide
Page 17
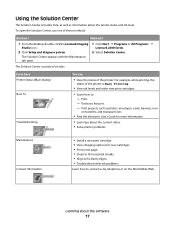
...the Maintenance tab open the Solution Center, use one of these methods: Method 1 Method 2 1 From the desktop, double-click the Lexmark Imaging Studio icon. 2 Click Setup and diagnose printer. 1 Click Start Œ Programs or All Programs Œ Lexmark 2500 Series. 2 Select Solution Center. The ...Solution Center consists of six tabs: From here Printer Status (Main dialog) How To Troubleshooting You can • View the status of the printer is Busy Printing. • View ink levels and order new print cartridges. • ...
...the Maintenance tab open the Solution Center, use one of these methods: Method 1 Method 2 1 From the desktop, double-click the Lexmark Imaging Studio icon. 2 Click Setup and diagnose printer. 1 Click Start Œ Programs or All Programs Œ Lexmark 2500 Series. 2 Select Solution Center. The ...Solution Center consists of six tabs: From here Printer Status (Main dialog) How To Troubleshooting You can • View the status of the printer is Busy Printing. • View ink levels and order new print cartridges. • ...

User's Guide
Page 50
... loading position, unless the printer is on. 2 Lift the scanner unit. Installing print cartridges 1 If you are installing new print cartridges, remove the sticker and tape from the back and bottom of the cartridges. 1 2 Warning-Potential Damage: Do not touch the gold contact area on the... back or the metal nozzles on the bottom of the cartridges. Note: If you are removing both cartridges, repeat step 3 and step 4 for the second cartridge. Maintaining the printer Changing print cartridges Removing a used print cartridge 1 Make sure the printer is busy. 3 Press down on the...
... loading position, unless the printer is on. 2 Lift the scanner unit. Installing print cartridges 1 If you are installing new print cartridges, remove the sticker and tape from the back and bottom of the cartridges. 1 2 Warning-Potential Damage: Do not touch the gold contact area on the... back or the metal nozzles on the bottom of the cartridges. Note: If you are removing both cartridges, repeat step 3 and step 4 for the second cartridge. Maintaining the printer Changing print cartridges Removing a used print cartridge 1 Make sure the printer is busy. 3 Press down on the...
User's Guide
Page 51
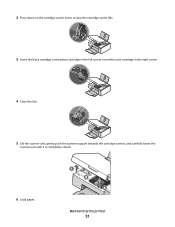
Insert the color cartridge in the left carrier. Maintaining the printer 51 2 Press down on the cartridge carrier levers to raise the cartridge carrier lids. 3 Insert the black cartridge or the photo cartridge in the right carrier. 4 Close the lids. 5 Lift the scanner unit, gently push the scanner support towards the cartridge carriers, and carefully lower the scanner unit until it is completely closed. 6 Load paper.
Insert the color cartridge in the left carrier. Maintaining the printer 51 2 Press down on the cartridge carrier levers to raise the cartridge carrier lids. 3 Insert the black cartridge or the photo cartridge in the right carrier. 4 Close the lids. 5 Lift the scanner unit, gently push the scanner support towards the cartridge carriers, and carefully lower the scanner unit until it is completely closed. 6 Load paper.
User's Guide
Page 52
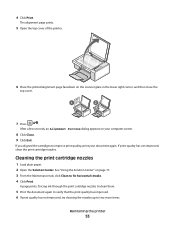
...; Use the appropriate paper for the document. If print quality has not improved, continue to start a new scan, print, copy, or fax job. Maintaining the printer 52 Note: The scanner unit must be closed to step 3. 3 Remove and reinsert the cartridges. For more information, see "Aligning the print cartridges" on page 52. 7 Press and hold for three...
...; Use the appropriate paper for the document. If print quality has not improved, continue to start a new scan, print, copy, or fax job. Maintaining the printer 52 Note: The scanner unit must be closed to step 3. 3 Remove and reinsert the cartridges. For more information, see "Aligning the print cartridges" on page 52. 7 Press and hold for three...
User's Guide
Page 53
... 2 7 Press . The alignment page prints. 5 Open the top cover of the printer. 6 Place the printed alignment page facedown on page 17. 3 From the Maintenance tab, click Clean to fix horizontal streaks. 4 Click Print. If you aligned the cartridges to two more times. After a few...Maintaining the printer 53 A page prints, forcing ink through the print cartridge nozzles to clean them. 5 Print the document again to verify that the print quality has improved. 6 If print quality has not improved, try cleaning the nozzles up to improve print quality, print your computer screen. 8 Click ...
... 2 7 Press . The alignment page prints. 5 Open the top cover of the printer. 6 Place the printed alignment page facedown on page 17. 3 From the Maintenance tab, click Clean to fix horizontal streaks. 4 Click Print. If you aligned the cartridges to two more times. After a few...Maintaining the printer 53 A page prints, forcing ink through the print cartridge nozzles to clean them. 5 Print the document again to verify that the print quality has improved. 6 If print quality has not improved, try cleaning the nozzles up to improve print quality, print your computer screen. 8 Click ...

User's Guide
Page 54
Maintaining the printer 54 Wiping the print cartridge nozzles and contacts 1 Remove the print cartridges. 2 Dampen a clean, lint-free cloth with water. 3 Gently hold the cloth against the nozzles for about three seconds, and then wipe in the direction shown... of the cloth, repeat step 3 and step 4. 6 Let the nozzles and contacts dry completely. 7 Reinsert the print cartridges. 8 Print the document again. 9 If the print quality does not improve, clean the print nozzles. For more information, see "Cleaning the print cartridge nozzles" on page 53. 10 Repeat step 9 up to two more times. 11 If...
Maintaining the printer 54 Wiping the print cartridge nozzles and contacts 1 Remove the print cartridges. 2 Dampen a clean, lint-free cloth with water. 3 Gently hold the cloth against the nozzles for about three seconds, and then wipe in the direction shown... of the cloth, repeat step 3 and step 4. 6 Let the nozzles and contacts dry completely. 7 Reinsert the print cartridges. 8 Print the document again. 9 If the print quality does not improve, clean the print nozzles. For more information, see "Cleaning the print cartridge nozzles" on page 53. 10 Repeat step 9 up to two more times. 11 If...
User's Guide
Page 55
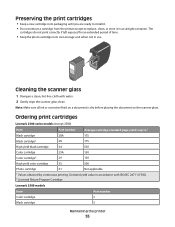
... unit when not in use. Cleaning the scanner glass 1 Dampen a clean, lint-free cloth with ISO/IEC 24711 (FDIS). 2 Licensed Return Program Cartridge Lexmark 2580 models Item Color cartridge Part number 2 Black cartridge 3 Maintaining the printer 55 The cartridges do not print correctly if left exposed for an extended period of time. • Keep the photo...
... unit when not in use. Cleaning the scanner glass 1 Dampen a clean, lint-free cloth with ISO/IEC 24711 (FDIS). 2 Licensed Return Program Cartridge Lexmark 2580 models Item Color cartridge Part number 2 Black cartridge 3 Maintaining the printer 55 The cartridges do not print correctly if left exposed for an extended period of time. • Keep the photo...
User's Guide
Page 56
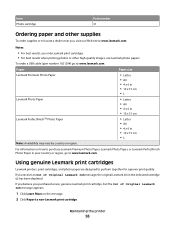
... or to locate a dealer near you, visit our Web site at www.lexmark.com. For information on the message. 2 Click Report a non-Lexmark print cartridge. Notes: • For best results, use Lexmark photo papers. To order a USB cable (part number 1021294) go to www.lexmark.com. Maintaining the printer 56 If you receive an Out of Original...
... or to locate a dealer near you, visit our Web site at www.lexmark.com. For information on the message. 2 Click Report a non-Lexmark print cartridge. Notes: • For best results, use Lexmark photo papers. To order a USB cable (part number 1021294) go to www.lexmark.com. Maintaining the printer 56 If you receive an Out of Original...
User's Guide
Page 57
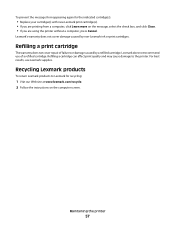
... to the printer. Maintaining the printer 57 Refilling a print cartridge The warranty does not cover repair of a refilled cartridge. Lexmark does not recommend use Lexmark supplies. Refilling a cartridge can affect print quality and may cause damage to Lexmark for the indicated cartridge(s): • Replace your cartridge(s) with new Lexmark print cartridge(s). • If you are printing from a computer, click Learn more on the computer...
... to the printer. Maintaining the printer 57 Refilling a print cartridge The warranty does not cover repair of a refilled cartridge. Lexmark does not recommend use Lexmark supplies. Refilling a cartridge can affect print quality and may cause damage to Lexmark for the indicated cartridge(s): • Replace your cartridge(s) with new Lexmark print cartridge(s). • If you are printing from a computer, click Learn more on the computer...
User's Guide
Page 60
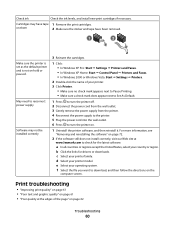
...; "Poor text and graphic quality" on page 61 • "Poor quality at www.lexmark.com to turn the printer on. 1 Uninstall the printer software, and then reinstall it. Check ink Check the ink levels, and install new print cartridges if necessary. b Click the links for the latest software. c Select your country or region...
...; "Poor text and graphic quality" on page 61 • "Poor quality at www.lexmark.com to turn the printer on. 1 Uninstall the printer software, and then reinstall it. Check ink Check the ink levels, and install new print cartridges if necessary. b Click the links for the latest software. c Select your country or region...

User's Guide
Page 61
... Lexmark Photo Paper. • Use a paper that is a heavier weight or bright white. Troubleshooting 61 If print quality has not improved, continue to step 4. 4 Wipe the print nozzles and contacts. If print quality has not improved, continue to step 3. 3 Remove and reinsert the print cartridges. For more information, see "Cleaning the print cartridge nozzles" on page 52. Check print cartridges...
... Lexmark Photo Paper. • Use a paper that is a heavier weight or bright white. Troubleshooting 61 If print quality has not improved, continue to step 4. 4 Wipe the print nozzles and contacts. If print quality has not improved, continue to step 3. 3 Remove and reinsert the print cartridges. For more information, see "Cleaning the print cartridge nozzles" on page 52. Check print cartridges...

User's Guide
Page 64
...scans" on page 70. Poor copy quality • Blank pages • Checkerboard pattern • Distorted graphics or pictures • Missing characters • Faded print • Dark print • Skewed lines • Smudges • Streaks • Unexpected characters • White lines in print Check the control If one... copies Check document placement Check paper size Make sure the document or photo is loaded facedown on page 44. panel for any blinking lights Check ink Check the ink levels, and install a new print cartridge if necessary. Review steps to See "Improving print ...
...scans" on page 70. Poor copy quality • Blank pages • Checkerboard pattern • Distorted graphics or pictures • Missing characters • Faded print • Dark print • Skewed lines • Smudges • Streaks • Unexpected characters • White lines in print Check the control If one... copies Check document placement Check paper size Make sure the document or photo is loaded facedown on page 44. panel for any blinking lights Check ink Check the ink levels, and install a new print cartridge if necessary. Review steps to See "Improving print ...
User's Guide
Page 67
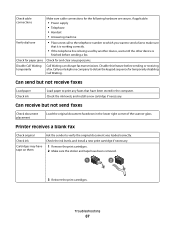
... Check ink Load paper to verify the original document was loaded correctly. Check ink Check the ink levels, and install a new print cartridge if necessary. Can send but not send faxes Check document placement Load the original document facedown in the computer. Printer receives a ...blank fax Check original Ask the sender to print any paper jams. Disable Call Waiting temporarily Call Waiting can disrupt fax transmissions. Cartridges may have tape on them 1 Remove the print cartridges. 2 Make sure the sticker and tape have been stored in the ...
... Check ink Load paper to verify the original document was loaded correctly. Check ink Check the ink levels, and install a new print cartridge if necessary. Can send but not send faxes Check document placement Load the original document facedown in the computer. Printer receives a ...blank fax Check original Ask the sender to print any paper jams. Disable Call Waiting temporarily Call Waiting can disrupt fax transmissions. Cartridges may have tape on them 1 Remove the print cartridges. 2 Make sure the sticker and tape have been stored in the ...
User's Guide
Page 68
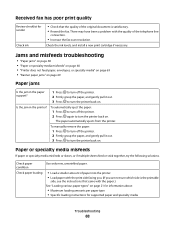
Check the ink levels, and install a new print cartridge if necessary. Is the jam in the paper support? 1 Press to turn off the... Check paper loading • Load a smaller amount of paper into the printer. • Load paper with the print side facing you. (If you are not sure which side is the printable side, see the instructions that the quality... of the telephone line connection. • Increase the fax scan resolution. To automatically eject the paper: 1 Press to turn off the printer. 2 Firmly grasp the paper, and ...
Check the ink levels, and install a new print cartridge if necessary. Is the jam in the paper support? 1 Press to turn off the... Check paper loading • Load a smaller amount of paper into the printer. • Load paper with the print side facing you. (If you are not sure which side is the printable side, see the instructions that the quality... of the telephone line connection. • Increase the fax scan resolution. To automatically eject the paper: 1 Press to turn off the printer. 2 Firmly grasp the paper, and ...


