Getting Started
Page 6
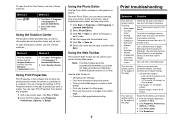
... File Æ Print. 2 Click Properties, Preferences, Options, or Setup. 3 Click Print Layout. 4 Click Borderless. Using the Web Toolbar The Lexmark Web Toolbar can open the Solution Center, use these methods: Method 1 From the desktop, double-click the Imaging Studio icon, and then click the... Maintain/ Troubleshoot button. Transparencies may take up to 15 minutes to print printer-friendly Web pages. Use only new, unwrinkled paper. Each paper brand accepts ink differently. To open Print Properties from a Web page. • Preview a Web page before stacking...
... File Æ Print. 2 Click Properties, Preferences, Options, or Setup. 3 Click Print Layout. 4 Click Borderless. Using the Web Toolbar The Lexmark Web Toolbar can open the Solution Center, use these methods: Method 1 From the desktop, double-click the Imaging Studio icon, and then click the... Maintain/ Troubleshoot button. Transparencies may take up to 15 minutes to print printer-friendly Web pages. Use only new, unwrinkled paper. Each paper brand accepts ink differently. To open Print Properties from a Web page. • Preview a Web page before stacking...

User's Guide
Page 15
.../Troubleshoot link The Maintain/Troubleshoot link provides you with direct links to the Solution Center. 1 Click StartŒPrograms or All ProgramsŒLexmark 2400 Series. 2 Select All-In-One Center. 3 Click Maintain/Troubleshoot. 4 Select from these methods: Method 1 Method 2 From the...scanned document (OCR). - E-mail an image. - Fax using your computer modem. • Edit - Note: For more information about the printer status and ink level. To open the Solution Center, use one of the screen. Modify an image with various photo sizes. - Print an album page with...
.../Troubleshoot link The Maintain/Troubleshoot link provides you with direct links to the Solution Center. 1 Click StartŒPrograms or All ProgramsŒLexmark 2400 Series. 2 Select All-In-One Center. 3 Click Maintain/Troubleshoot. 4 Select from these methods: Method 1 Method 2 From the...scanned document (OCR). - E-mail an image. - Fax using your computer modem. • Edit - Note: For more information about the printer status and ink level. To open the Solution Center, use one of the screen. Modify an image with various photo sizes. - Print an album page with...

User's Guide
Page 16
...Note: Wait until scanning is Busy Printing. • View the ink level of the Printing Status window. • Turn printing voice notification on the World Wide Web. For example, while printing, the status of the printer is complete before installing a new print cartridge. • View... shopping options for a new cartridge. • Print a test page. • Clean to fix horizontal streaks. • Align to fix blurry edges. • Troubleshoot other ink problems. Learn how to : &#...
...Note: Wait until scanning is Busy Printing. • View the ink level of the Printing Status window. • Turn printing voice notification on the World Wide Web. For example, while printing, the status of the printer is complete before installing a new print cartridge. • View... shopping options for a new cartridge. • Print a test page. • Clean to fix horizontal streaks. • Align to fix blurry edges. • Troubleshoot other ink problems. Learn how to : &#...
User's Guide
Page 21
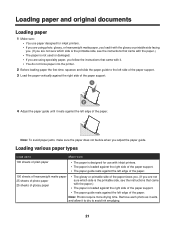
... to dry to Make sure 100 sheets of plain paper • The paper is designed for use paper designed for inkjet printers. • If you are using photo, glossy, or heavyweight matte paper, you load it with the glossy or printable ...which side is the printable side, see the instructions that came with it. • You do not force paper into the printer. 2 Before loading paper the first time, squeeze and slide the paper guide to the left side of the paper support....paper guide. Note: Photos require more drying time. Loading various paper types Load up to avoid ink smudging. 21
... to dry to Make sure 100 sheets of plain paper • The paper is designed for use paper designed for inkjet printers. • If you are using photo, glossy, or heavyweight matte paper, you load it with the glossy or printable ...which side is the printable side, see the instructions that came with it. • You do not force paper into the printer. 2 Before loading paper the first time, squeeze and slide the paper guide to the left side of the paper support....paper guide. Note: Photos require more drying time. Loading various paper types Load up to avoid ink smudging. 21
User's Guide
Page 22
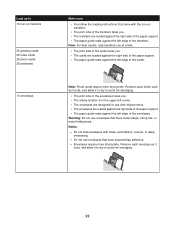
...paper guide rests against the left edge of the cards. Notes: - Note: Photo cards require more drying time. Do not load envelopes with inkjet printers. • The envelopes are designed for use envelopes that have metal clasps, string ties, or metal folding bars. Do not use with holes, ...perforations, cutouts, or deep embossing. - Envelopes require more drying time. Remove each envelope as it exits, and allow it to dry to avoid ink smudging. • The print side of the envelopes faces you. • The stamp location is in the upper left edge of the envelopes. Note...
...paper guide rests against the left edge of the cards. Notes: - Note: Photo cards require more drying time. Do not load envelopes with inkjet printers. • The envelopes are designed for use envelopes that have metal clasps, string ties, or metal folding bars. Do not use with holes, ...perforations, cutouts, or deep embossing. - Envelopes require more drying time. Remove each envelope as it exits, and allow it to dry to avoid ink smudging. • The print side of the envelopes faces you. • The stamp location is in the upper left edge of the envelopes. Note...

User's Guide
Page 23
... guide rests against the left edge of the transparencies. Remove each strip faces away from you . • The top of the labels feeds into the printer first. • The adhesive on the labels does not extend to within these dimensions: Width: - 76-216 mm - 3.0-8.5 inches Length: - 127-432 ...; The labels are not recommended. • Transparencies require more drying time. Remove each transparency as it exits, and allow it to dry to avoid ink smudging. • The rough side of the transparencies faces you. • If the transparencies have a removable strip, each sheet of the paper. ...
... guide rests against the left edge of the transparencies. Remove each strip faces away from you . • The top of the labels feeds into the printer first. • The adhesive on the labels does not extend to within these dimensions: Width: - 76-216 mm - 3.0-8.5 inches Length: - 127-432 ...; The labels are not recommended. • Transparencies require more drying time. Remove each transparency as it exits, and allow it to dry to avoid ink smudging. • The rough side of the transparencies faces you. • If the transparencies have a removable strip, each sheet of the paper. ...

User's Guide
Page 46
... to install it. • Do not remove a cartridge from the printer except to replace, clean, or store it in its packaging until you , visit our Web site at www.lexmark.com. Note: Make sure all ink or corrective fluid on a document is still not satisfactory, replace the ...print cartridge. If you believe you receive an Out of Original Lexmark Ink message, the original Lexmark ink in the indicated cartridge (s) has been depleted. If you purchased a new, genuine Lexmark print cartridge, but the Out of time. Ordering supplies To order supplies or to locate ...
... to install it. • Do not remove a cartridge from the printer except to replace, clean, or store it in its packaging until you , visit our Web site at www.lexmark.com. Note: Make sure all ink or corrective fluid on a document is still not satisfactory, replace the ...print cartridge. If you believe you receive an Out of Original Lexmark Ink message, the original Lexmark ink in the indicated cartridge (s) has been depleted. If you purchased a new, genuine Lexmark print cartridge, but the Out of time. Ordering supplies To order supplies or to locate ...
User's Guide
Page 50
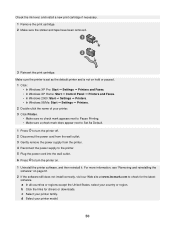
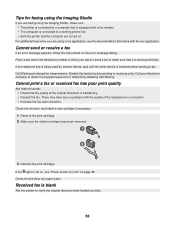
Check the ink level, and install a new print cartridge if necessary. 1 Remove the print cartridge. 2 Make sure the sticker and tape have been removed. 3 Reinsert the print cartridge. a In all countries or regions except the United States, select your printer model. 50 d Select your country or region. b Click ... remove the power supply from the printer. 4 Reconnect the power supply to the printer. 5 Plug the power cord into the wall outlet. 6 Press to turn the printer on page 61. 2 If the software still does not install correctly, visit our Web site at www.lexmark.com to check for drivers or ...
Check the ink level, and install a new print cartridge if necessary. 1 Remove the print cartridge. 2 Make sure the sticker and tape have been removed. 3 Reinsert the print cartridge. a In all countries or regions except the United States, select your printer model. 50 d Select your country or region. b Click ... remove the power supply from the printer. 4 Reconnect the power supply to the printer. 5 Plug the power cord into the wall outlet. 6 Press to turn the printer on page 61. 2 If the software still does not install correctly, visit our Web site at www.lexmark.com to check for drivers or ...
User's Guide
Page 52
...ink differently and prints with graphics or images • Photo paper • Heavy weight matte or glossy paper • Transparency • Labels • Envelopes • Iron-on page 61. 2 If the software still does not install correctly, visit our Web site at www.lexmark.com to dry. e Select your printer... want to dry: • Document with color variations. a In all countries or regions except the United States, select your printer model. To avoid ink smudging when you are working with the following media, remove each sheet as it exits, and allow it . Use a different...
...ink differently and prints with graphics or images • Photo paper • Heavy weight matte or glossy paper • Transparency • Labels • Envelopes • Iron-on page 61. 2 If the software still does not install correctly, visit our Web site at www.lexmark.com to dry. e Select your printer... want to dry: • Document with color variations. a In all countries or regions except the United States, select your printer model. To avoid ink smudging when you are working with the following media, remove each sheet as it exits, and allow it . Use a different...

User's Guide
Page 55
...Windows XP Pro: Start Œ Settings Œ Printers and Faxes. • In Windows XP Home: Start Œ Control Panel Œ Printers and Faxes. • In Windows 2000: Start Œ Settings Œ Printers. • In Windows 98/Me: Start Œ Settings Œ Printers. 2 Double-click the name of the document ...or image. Make sure the printer is set as the default printer and is not lit" on page 48. Check the ink level, and install a new print ...
...Windows XP Pro: Start Œ Settings Œ Printers and Faxes. • In Windows XP Home: Start Œ Control Panel Œ Printers and Faxes. • In Windows 2000: Start Œ Settings Œ Printers. • In Windows 98/Me: Start Œ Settings Œ Printers. 2 Double-click the name of the document ...or image. Make sure the printer is set as the default printer and is not lit" on page 48. Check the ink level, and install a new print ...
User's Guide
Page 58
... can disrupt fax transmissions. Place a test call to the telephone number to which you want to send a fax to make sure: • The printer is connected to a computer that is equipped with a fax modem. • The computer is connected to verify the original document was loaded correctly. 58...using a fax application, see "Power button is not lit" on page 48. There may have been removed. 3 Reinsert the print cartridge. Check the ink level, and install a new cartridge if necessary. 1 Remove the print cartridge. 2 Make sure the sticker and tape have been a problem with the fax application...
... can disrupt fax transmissions. Place a test call to the telephone number to which you want to send a fax to make sure: • The printer is connected to a computer that is equipped with a fax modem. • The computer is connected to verify the original document was loaded correctly. 58...using a fax application, see "Power button is not lit" on page 48. There may have been removed. 3 Reinsert the print cartridge. Check the ink level, and install a new cartridge if necessary. 1 Remove the print cartridge. 2 Make sure the sticker and tape have been a problem with the fax application...

User's Guide
Page 68
... Studio, using 12 improving print quality 44, 51 index cards loading 22 printing 28 information, finding 7 ink level, checking 15 inserting PictBridge-enabled digital camera 31 installing print cartridge 42 printer software 61 software and sharing printer on network 41 iron-on transfers, loading 22 J jams and misfeeds troubleshooting banner paper jams 60...
... Studio, using 12 improving print quality 44, 51 index cards loading 22 printing 28 information, finding 7 ink level, checking 15 inserting PictBridge-enabled digital camera 31 installing print cartridge 42 printer software 61 software and sharing printer on network 41 iron-on transfers, loading 22 J jams and misfeeds troubleshooting banner paper jams 60...


