
Getting Started
Page 1
... fax troubleshooting - Jams and misfeeds troubleshooting - Ordering supplies - Recycling Lexmark products • Troubleshooting - Error messages troubleshooting • Notices Contents Setup troubleshooting 3 Removing and reinstalling the software 3 Checking the printer status 3 Using the control panel 4 Printing 4 Printing a document ... item 5 Working with photos • Copying • Scanning • Faxing • Networking the printer • Maintaining the printer - 2400 Series Getting Started See the complete User's Guide on the CD for more detailed information about...
... fax troubleshooting - Jams and misfeeds troubleshooting - Ordering supplies - Recycling Lexmark products • Troubleshooting - Error messages troubleshooting • Notices Contents Setup troubleshooting 3 Removing and reinstalling the software 3 Checking the printer status 3 Using the control panel 4 Printing 4 Printing a document ... item 5 Working with photos • Copying • Scanning • Faxing • Networking the printer • Maintaining the printer - 2400 Series Getting Started See the complete User's Guide on the CD for more detailed information about...
Getting Started
Page 3
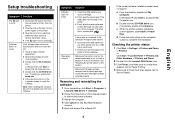
...anti-virus software. Checking the printer status 1 Click Start Æ Settings Æ Printers and Faxes or Printers. or Click Start Æ Control Panel Æ Printers and Other Hardware Æ Printers and Faxes. 2 Double-click the Lexmark 2400 Series icon. 3 Click Printer, and make sure no .... Removing and reinstalling the software 1 From the desktop, click Start Æ Programs Æ Lexmark 2400 Series Æ Uninstall. 2 Follow the instructions on the computer screen to remove the printer software. 3 Restart the computer. 4 Click Cancel on the computer screen to Set As Default...
...anti-virus software. Checking the printer status 1 Click Start Æ Settings Æ Printers and Faxes or Printers. or Click Start Æ Control Panel Æ Printers and Other Hardware Æ Printers and Faxes. 2 Double-click the Lexmark 2400 Series icon. 3 Click Printer, and make sure no .... Removing and reinstalling the software 1 From the desktop, click Start Æ Programs Æ Lexmark 2400 Series Æ Uninstall. 2 Follow the instructions on the computer screen to remove the printer software. 3 Restart the computer. 4 Click Cancel on the computer screen to Set As Default...
Getting Started
Page 4
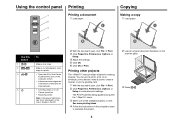
.... 3 Select one of a photo. • Open the All-In-One Center to preview the scan on or off. • Cancel a print job. • Reset the printer. The Print Properties dialog appears along with the "I Want To" menu provides wizards for three seconds. • Turn the... printer on the computer screen. • Initiate scan-back alignment if the button is held down for creating projects. Note: If the power light blinks, see "...
.... 3 Select one of a photo. • Open the All-In-One Center to preview the scan on or off. • Cancel a print job. • Reset the printer. The Print Properties dialog appears along with the "I Want To" menu provides wizards for three seconds. • Turn the... printer on the computer screen. • Initiate scan-back alignment if the button is held down for creating projects. Note: If the power light blinks, see "...

Getting Started
Page 5
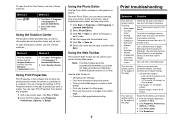
.... Understanding the software Using the Imaging Studio English 3 Press . Using a PictBridge-enabled camera to print photos You can connect a PictBridge-enabled camera to the printer and use one of the preview image to scan. 5 From the "Send scanned image to:" menu, select a program. 6 Click Scan Now. 2 Load...with photos, see the complete User's Guide on working with a photo editor. Method 2 1 Click Start Æ Programs or All programs Æ Lexmark 2400 Series. 2 Select Imaging Studio. Using the All-In-One Center Use the All-In-One Center to select and print your photos. Copying ...
.... Understanding the software Using the Imaging Studio English 3 Press . Using a PictBridge-enabled camera to print photos You can connect a PictBridge-enabled camera to the printer and use one of the preview image to scan. 5 From the "Send scanned image to:" menu, select a program. 6 Click Scan Now. 2 Load...with photos, see the complete User's Guide on working with a photo editor. Method 2 1 Click Start Æ Programs or All programs Æ Lexmark 2400 Series. 2 Select Imaging Studio. Using the All-In-One Center Use the All-In-One Center to select and print your photos. Copying ...
Getting Started
Page 6
.... To avoid ink smudging, remove each sheet as it exits, and allow it to print printer-friendly Web pages. Unless you are printing photos or other tools. 1 Click Start Æ Programs or All Programs Æ Lexmark 2400 Series. 2 Select Photo Editor. 3 Click File Æ Open to select the image.... • Find more information about the printer status and ink level. Use only new, unwrinkled paper. You can change the settings in Print Properties based on the type of paper. Using the Web Toolbar The Lexmark Web Toolbar can reduce red-eye, crop your photos, resize your photos,...
.... To avoid ink smudging, remove each sheet as it exits, and allow it to print printer-friendly Web pages. Unless you are printing photos or other tools. 1 Click Start Æ Programs or All Programs Æ Lexmark 2400 Series. 2 Select Photo Editor. 3 Click File Æ Open to select the image.... • Find more information about the printer status and ink level. Use only new, unwrinkled paper. You can change the settings in Print Properties based on the type of paper. Using the Web Toolbar The Lexmark Web Toolbar can reduce red-eye, crop your photos, resize your photos,...
User's Guide
Page 3
Contents Finding information about the printer 7 Setting up the printer...9 Checking the box contents...9 Learning about the printer 10 Understanding the parts of the printer 10 Using the control panel...11 Learning about the software 12 Using the printer software...12 Using the Imaging Studio...12 Using the All-In-One Center...13 Opening the All...
Contents Finding information about the printer 7 Setting up the printer...9 Checking the box contents...9 Learning about the printer 10 Understanding the parts of the printer 10 Using the control panel...11 Learning about the software 12 Using the printer software...12 Using the Imaging Studio...12 Using the All-In-One Center...13 Opening the All...

User's Guide
Page 4
... images from magazines or newspapers 38 Faxing...39 Sending a fax using the software...39 Receiving a fax using the software...40 Networking the printer 41 Shared printing...41 Maintaining the printer 42 Changing a print cartridge...42 Removing a used print cartridge...42 Installing a print cartridge...42 Achieving better print quality...44 Improving print quality...
... images from magazines or newspapers 38 Faxing...39 Sending a fax using the software...39 Receiving a fax using the software...40 Networking the printer 41 Shared printing...41 Maintaining the printer 42 Changing a print cartridge...42 Removing a used print cartridge...42 Installing a print cartridge...42 Achieving better print quality...44 Improving print quality...
User's Guide
Page 5
Preserving the print cartridge...46 Cleaning the scanner glass...46 Ordering supplies...46 Using genuine Lexmark print cartridges 46 Refilling a print cartridge...47 Recycling Lexmark products...47 Troubleshooting...48 Setup troubleshooting...48 Power button is not lit...48 Software does not install...48 Page does not...51 Print troubleshooting...51 Improving print quality...51 Poor text and graphic quality...52 Poor quality at the edges of the page...53 Printer does not print or respond...53 Print speed is slow...53 Partial document or photo prints...54 Copy troubleshooting...54 Copier does not...
Preserving the print cartridge...46 Cleaning the scanner glass...46 Ordering supplies...46 Using genuine Lexmark print cartridges 46 Refilling a print cartridge...47 Recycling Lexmark products...47 Troubleshooting...48 Setup troubleshooting...48 Power button is not lit...48 Software does not install...48 Page does not...51 Print troubleshooting...51 Improving print quality...51 Poor text and graphic quality...52 Poor quality at the edges of the page...53 Printer does not print or respond...53 Print speed is slow...53 Partial document or photo prints...54 Copy troubleshooting...54 Copier does not...
User's Guide
Page 7
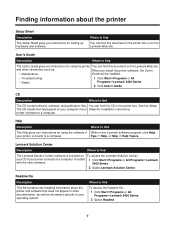
... and software. and other software. 2400 Series. 2 Select Lexmark Solution Center. CD Description Where to find The User's Guide gives you instructions for using the printer You can find this document in the printer box. Help Description Where to a computer. Readme file Description... You can find The CD contains drivers, software, and publication files. Where to a computer. printer connects to find To access the Readme file: 1 Click StartŒPrograms or All ProgramsŒLexmark 2400 Series. 2 Select Readme. 7 Tips Œ Help, or Help Œ Help Topics...
... and software. and other software. 2400 Series. 2 Select Lexmark Solution Center. CD Description Where to find The User's Guide gives you instructions for using the printer You can find this document in the printer box. Help Description Where to a computer. Readme file Description... You can find The CD contains drivers, software, and publication files. Where to a computer. printer connects to find To access the Readme file: 1 Click StartŒPrograms or All ProgramsŒLexmark 2400 Series. 2 Select Readme. 7 Tips Œ Help, or Help Œ Help Topics...
User's Guide
Page 8
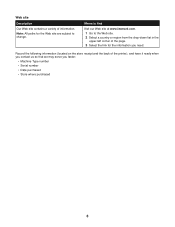
Web site Description Our Web site contains a variety of the printer), and have it ready when you contact us so that we may serve you need. Where to find Visit our Web site at www.lexmark.com. 1 Go to the Web site. 2 Select a country or region from the drop-down list in the...
Web site Description Our Web site contains a variety of the printer), and have it ready when you contact us so that we may serve you need. Where to find Visit our Web site at www.lexmark.com. 1 Go to the Web site. 2 Select a country or region from the drop-down list in the...

User's Guide
Page 9
Setting up the printer Checking the box contents Name 1 Color print cartridge 2 Power supply cord 3 Installation software CD 4 Getting Started or Setup Solutions 5 Setup Sheet Description Cartridge to be installed in the printer Attaches to the power supply port located at the back of the printer • Installation software for the printer • Help • User's Guide in electronic format Additional information depending on your country or region Instructions on setting up printer hardware and software, and information on setup troubleshooting 9
Setting up the printer Checking the box contents Name 1 Color print cartridge 2 Power supply cord 3 Installation software CD 4 Getting Started or Setup Solutions 5 Setup Sheet Description Cartridge to be installed in the printer Attaches to the power supply port located at the back of the printer • Installation software for the printer • Help • User's Guide in electronic format Additional information depending on your country or region Instructions on setting up printer hardware and software, and information on setup troubleshooting 9

User's Guide
Page 10
Connect a PictBridge-enabled digital camera to the printer. Install or replace a print cartridge. 10 Scan, copy, or remove an item. 3 Use the 1 Scanner support 2 Print cartridge carrier 1 2 4 5 To Hold up the scanner unit. Access the scanner glass. Align paper when feeding. Stack paper as it exits. Learning about the printer Understanding the parts of the printer 6 1 5 7 4 Use the 1 Paper support 2 Control panel 3 PictBridge port 4 Paper exit tray 5 Top cover 6 Paper guide 7 Scanner glass 32 To Load paper. Operate the printer.
Connect a PictBridge-enabled digital camera to the printer. Install or replace a print cartridge. 10 Scan, copy, or remove an item. 3 Use the 1 Scanner support 2 Print cartridge carrier 1 2 4 5 To Hold up the scanner unit. Access the scanner glass. Align paper when feeding. Stack paper as it exits. Learning about the printer Understanding the parts of the printer 6 1 5 7 4 Use the 1 Paper support 2 Control panel 3 PictBridge port 4 Paper exit tray 5 Top cover 6 Paper guide 7 Scanner glass 32 To Load paper. Operate the printer.

User's Guide
Page 11
Connect the printer to access the print cartridge carrier. Use the 3 Scanner unit 4 Power supply port 5 USB port To Raise to a computer using a USB cable. or 10 x 15 ... light blinks, see "Error messages" on the computer screen. • Print an alignment page if the button is held down for three seconds. Connect the printer to a power source. Note: To complete the scan back alignment process, follow the instructions on the computer screen. • Turn the...
Connect the printer to access the print cartridge carrier. Use the 3 Scanner unit 4 Power supply port 5 USB port To Raise to a computer using a USB cable. or 10 x 15 ... light blinks, see "Error messages" on the computer screen. • Print an alignment page if the button is held down for three seconds. Connect the printer to a power source. Note: To complete the scan back alignment process, follow the instructions on the computer screen. • Turn the...

User's Guide
Page 12
...of these methods: Method 1 Method 2 From the desktop, double-click the Imaging Studio icon. 1 Click StartŒPrograms or All ProgramsŒLexmark 2400 Series. 2 Select Imaging Studio. The All-In-One Center Scan, copy, print, or fax. Using the Imaging Studio The Imaging Studio...8226; Scanning, copying, or faxing • Finding our Web site • Finding tips on the computer. Learning about the software Using the printer software Use this software To The Imaging Studio Open the software component necessary for the task you want to complete. Share photos • Scan...
...of these methods: Method 1 Method 2 From the desktop, double-click the Imaging Studio icon. 1 Click StartŒPrograms or All ProgramsŒLexmark 2400 Series. 2 Select Imaging Studio. The All-In-One Center Scan, copy, print, or fax. Using the Imaging Studio The Imaging Studio...8226; Scanning, copying, or faxing • Finding our Web site • Finding tips on the computer. Learning about the software Using the printer software Use this software To The Imaging Studio Open the software component necessary for the task you want to complete. Share photos • Scan...
User's Guide
Page 13
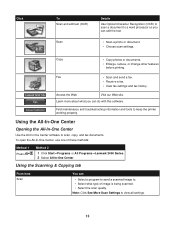
... and fax history. Using the All-In-One Center Opening the All-In-One Center Use the All-In-One Center software to keep the printer working properly. To open the All-In-One Center, use one of image is being scanned. • Select the scan quality. Learn more about ...what type of these methods: Method 1 Press Method 2 . 1 Click StartŒPrograms or All ProgramsŒLexmark 2400 Series. 2 Select All-In-One Center. Using the Scanning & Copying tab From here Scan You can • Select a program to send a scanned image to...
... and fax history. Using the All-In-One Center Opening the All-In-One Center Use the All-In-One Center software to keep the printer working properly. To open the All-In-One Center, use one of image is being scanned. • Select the scan quality. Learn more about ...what type of these methods: Method 1 Press Method 2 . 1 Click StartŒPrograms or All ProgramsŒLexmark 2400 Series. 2 Select All-In-One Center. Using the Scanning & Copying tab From here Scan You can • Select a program to send a scanned image to...

User's Guide
Page 15
...• Device status and ink level • More printing ideas and how to the Solution Center. 1 Click StartŒPrograms or All ProgramsŒLexmark 2400 Series. 2 Select All-In-One Center. 3 Click Maintain/Troubleshoot. 4 Select from these methods: Method 1 Method 2 From the desktop, double...editor. Modify an image with various photo sizes. - From here Creative Tasks You can • Print - Note: For more information about the printer status and ink level. Print an image as information about the Saved Images tab, click Help in a scanned document (OCR). - Using the ...
...• Device status and ink level • More printing ideas and how to the Solution Center. 1 Click StartŒPrograms or All ProgramsŒLexmark 2400 Series. 2 Select All-In-One Center. 3 Click Maintain/Troubleshoot. 4 Select from these methods: Method 1 Method 2 From the desktop, double...editor. Modify an image with various photo sizes. - From here Creative Tasks You can • Print - Note: For more information about the printer status and ink level. Print an image as information about the Saved Images tab, click Help in a scanned document (OCR). - Using the ...

User's Guide
Page 16
... • Install a print cartridge. The Solution Center consists of six tabs: From this tab Printer Status (Main dialog) How To Troubleshooting You can • View the status of the printer is complete before installing a new print cartridge. • View shopping options for a new cartridge...such as banners, photos, envelopes, cards, iron-on the World Wide Web. Learn how to contact us regarding how you use the printer. • Obtain software version information. Advanced • Change the appearance of the Printing Status window. • Turn printing voice notification...
... • Install a print cartridge. The Solution Center consists of six tabs: From this tab Printer Status (Main dialog) How To Troubleshooting You can • View the status of the printer is complete before installing a new print cartridge. • View shopping options for a new cartridge...such as banners, photos, envelopes, cards, iron-on the World Wide Web. Learn how to contact us regarding how you use the printer. • Obtain software version information. Advanced • Change the appearance of the Printing Status window. • Turn printing voice notification...
User's Guide
Page 17
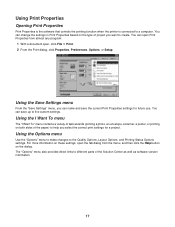
... "Options" menu to make changes to a computer. Using Print Properties Opening Print Properties Print Properties is the software that controls the printing function when the printer is connected to the Quality Options, Layout Options, and Printing Status Options settings.
... "Options" menu to make changes to a computer. Using Print Properties Opening Print Properties Print Properties is the software that controls the printing function when the printer is connected to the Quality Options, Layout Options, and Printing Status Options settings.
User's Guide
Page 18
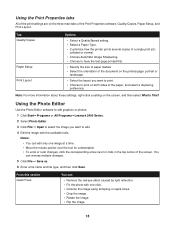
... 18 Tab Quality/Copies Paper Setup Print Layout Options • Select a Quality/Speed setting. • Select a Paper Type. • Customize how the printer prints several copies of a single print job: collated or normal. • Choose Automatic Image Sharpening. • Choose to have the last page printed first.... click Save. Using the Photo Editor Use the Photo Editor software to edit graphics or photos. 1 Click StartŒPrograms or All ProgramsŒLexmark 2400 Series. 2 Select Photo Editor. 3 Click File Œ Open to select the image you want to edit. 4 Edit the image with...
... 18 Tab Quality/Copies Paper Setup Print Layout Options • Select a Quality/Speed setting. • Select a Paper Type. • Customize how the printer prints several copies of a single print job: collated or normal. • Choose Automatic Image Sharpening. • Choose to have the last page printed first.... click Save. Using the Photo Editor Use the Photo Editor software to edit graphics or photos. 1 Click StartŒPrograms or All ProgramsŒLexmark 2400 Series. 2 Select Photo Editor. 3 Click File Œ Open to select the image you want to edit. 4 Edit the image with...

User's Guide
Page 19
Note: The Lexmark Web Toolbar launches automatically when you create printer-friendly Web pages. Click To • Select Page Setup options. • Select Options to customize the toolbar appearance or select a different setting for printing photos. &#... balance. • Colorize the image. • Adjust the Brightness/Contrast. • Adjust the blur. • Adjust the sharpness. • Despeckle (blur) the image to the Lexmark Web site. • Access Help for text box placement and cutting and copying areas. • Add text. • Fill pixels with color. • Draw with...
Note: The Lexmark Web Toolbar launches automatically when you create printer-friendly Web pages. Click To • Select Page Setup options. • Select Options to customize the toolbar appearance or select a different setting for printing photos. &#... balance. • Colorize the image. • Adjust the Brightness/Contrast. • Adjust the blur. • Adjust the sharpness. • Despeckle (blur) the image to the Lexmark Web site. • Access Help for text box placement and cutting and copying areas. • Add text. • Fill pixels with color. • Draw with...


