Getting Started
Page 3
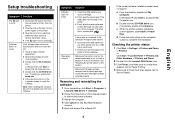
...-click the CD-ROM drive icon. or Click Start Æ Control Panel Æ Printers and Other Hardware Æ Printers and Faxes. 2 Double-click the Lexmark 2400 Series icon. 3 Click Printer, and make sure no check mark appears next to Pause Printing. 4 Make sure a check mark does appear next to re...or Printers. Make sure the printer is set as a USB hub or switch box. 2 Directly connect the cable to the printer and the computer. Note: After installing the software, be sure to Set As Default. 3 English Removing and reinstalling the software 1 From the desktop, click Start Æ Programs ...
...-click the CD-ROM drive icon. or Click Start Æ Control Panel Æ Printers and Other Hardware Æ Printers and Faxes. 2 Double-click the Lexmark 2400 Series icon. 3 Click Printer, and make sure no check mark appears next to Pause Printing. 4 Make sure a check mark does appear next to re...or Printers. Make sure the printer is set as a USB hub or switch box. 2 Directly connect the cable to the printer and the computer. Note: After installing the software, be sure to Set As Default. 3 English Removing and reinstalling the software 1 From the desktop, click Start Æ Programs ...
Getting Started
Page 4
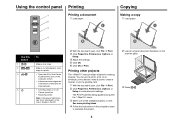
... Properties, Preferences, Options, or Setup to complete the project. 4 2 Load an original document facedown on or off. • Cancel a print job. • Reset the printer. Note: If the power light blinks, see "Error messages" in the User's Guide on the computer screen to customize print settings.
... Properties, Preferences, Options, or Setup to complete the project. 4 2 Load an original document facedown on or off. • Cancel a print job. • Reset the printer. Note: If the power light blinks, see "Error messages" in the User's Guide on the computer screen to customize print settings.
Getting Started
Page 6
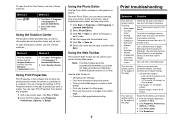
Method 2 1 Click Start Æ Programs or All programs Æ Lexmark 2400 Series. 2 Select Solution Center. From the Photo Editor, you want to print printer-friendly Web pages. Note: The Web Toolbar launches automatically whenever you are using Microsoft Windows Internet Explorer version 5.5 or later...click the Imaging Studio icon, and then click the Maintain/ Troubleshoot button. Method 2 1 Click Start Æ Programs or All programs Æ Lexmark 2400 Series. 2 Select All-In-One Center. Using the Photo Editor Use the Photo Editor software to : • Change printer settings. ...
Method 2 1 Click Start Æ Programs or All programs Æ Lexmark 2400 Series. 2 Select Solution Center. From the Photo Editor, you want to print printer-friendly Web pages. Note: The Web Toolbar launches automatically whenever you are using Microsoft Windows Internet Explorer version 5.5 or later...click the Imaging Studio icon, and then click the Maintain/ Troubleshoot button. Method 2 1 Click Start Æ Programs or All programs Æ Lexmark 2400 Series. 2 Select All-In-One Center. Using the Photo Editor Use the Photo Editor software to : • Change printer settings. ...
User's Guide
Page 8
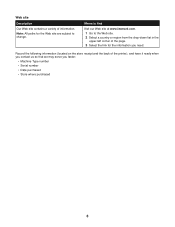
... on the store receipt and the back of the printer), and have it ready when you contact us so that we may serve you need. Note: All paths for the Web site are subject to the Web site. 2 Select a country or region from the drop-down list in the upper-left... you faster: • Machine Type number • Serial number • Date purchased • Store where purchased 8 Where to find Visit our Web site at www.lexmark.com. 1 Go to change.
... on the store receipt and the back of the printer), and have it ready when you contact us so that we may serve you need. Note: All paths for the Web site are subject to the Web site. 2 Select a country or region from the drop-down list in the upper-left... you faster: • Machine Type number • Serial number • Date purchased • Store where purchased 8 Where to find Visit our Web site at www.lexmark.com. 1 Go to change.

User's Guide
Page 11
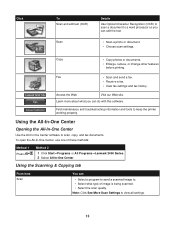
... complete the scan back alignment process, follow the instructions on the computer screen. • Turn the printer on page 60. 11 Note: If the power light blinks, see "Error messages" on and off. • Cancel a copy, scan, or print job. • Reset the printer. • Feed or ...
... complete the scan back alignment process, follow the instructions on the computer screen. • Turn the printer on page 60. 11 Note: If the power light blinks, see "Error messages" on and off. • Cancel a copy, scan, or print job. • Reset the printer. • Feed or ...
User's Guide
Page 13
Note: Click See More Scan Settings to keep the printer working properly. Fax • Scan and send a fax. • Receive a fax. • View fax settings and ... the All-In-One Center software to . • Select what type of these methods: Method 1 Press Method 2 . 1 Click StartŒPrograms or All ProgramsŒLexmark 2400 Series. 2 Select All-In-One Center. Using the Scanning & Copying tab From here Scan You can edit the text. • Scan a photo or document...
Note: Click See More Scan Settings to keep the printer working properly. Fax • Scan and send a fax. • Receive a fax. • View fax settings and ... the All-In-One Center software to . • Select what type of these methods: Method 1 Press Method 2 . 1 Click StartŒPrograms or All ProgramsŒLexmark 2400 Series. 2 Select All-In-One Center. Using the Scanning & Copying tab From here Scan You can edit the text. • Scan a photo or document...

User's Guide
Page 14
Note: Click Display Advanced Copy Settings to send the saved images. Repeat an image several times on your computer modem. • Save - Modify an image with ... Use the Saved Images tab to perform tasks with a photo editor. • Select a region of what will be printed or copied. Fax using your computer. - Note: For more information about the Scanning & Copying tab, click Help in a scanned document (OCR). - Click Next to scan or copy. • View an image of...
Note: Click Display Advanced Copy Settings to send the saved images. Repeat an image several times on your computer modem. • Save - Modify an image with ... Use the Saved Images tab to perform tasks with a photo editor. • Select a region of what will be printed or copied. Fax using your computer. - Note: For more information about the Scanning & Copying tab, click Help in a scanned document (OCR). - Click Next to scan or copy. • View an image of...

User's Guide
Page 15
...From the desktop, double-click the Imaging Studio icon, and then click the Maintain/Troubleshoot button. 1 Click StartŒPrograms or All ProgramsŒLexmark 2400 Series. 2 Select Solution Center. 15 Using the Maintain/Troubleshoot link The Maintain/Troubleshoot link provides you with direct links to 's •... or reduce an image. - To open the Solution Center, use one of the screen. From here Creative Tasks You can • Print - Note: For more information about the printer status and ink level. E-mail an image. - Fax using your computer modem. • Edit - Print an...
...From the desktop, double-click the Imaging Studio icon, and then click the Maintain/Troubleshoot button. 1 Click StartŒPrograms or All ProgramsŒLexmark 2400 Series. 2 Select Solution Center. 15 Using the Maintain/Troubleshoot link The Maintain/Troubleshoot link provides you with direct links to 's •... or reduce an image. - To open the Solution Center, use one of the screen. From here Creative Tasks You can • Print - Note: For more information about the printer status and ink level. E-mail an image. - Fax using your computer modem. • Edit - Print an...

User's Guide
Page 16
... until scanning is Busy Printing. • View the ink level of the screen. 16 Note: For more information. • Learn tips about the current status. • Solve printer problems. Maintenance Contact Information • Install a print cartridge. The Solution Center consists ...
... until scanning is Busy Printing. • View the ink level of the screen. 16 Note: For more information. • Learn tips about the current status. • Solve printer problems. Maintenance Contact Information • Install a print cartridge. The Solution Center consists ...
User's Guide
Page 18
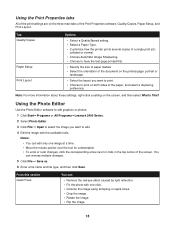
Using the Photo Editor Use the Photo Editor software to edit graphics or photos. 1 Click StartŒPrograms or All ProgramsŒLexmark 2400 Series. 2 Select Photo Editor. 3 Click File Œ Open to select the image you want to edit. 4 Edit the image with one image at a ...this section Quick Fixes You can reverse multiple changes. 5 Click File Œ Save as. 6 Enter a file name and file type, and then click Save. Note: For more information about these settings, right-click a setting on the printed page: portrait or landscape. • Select the layout you want to print. &#...
Using the Photo Editor Use the Photo Editor software to edit graphics or photos. 1 Click StartŒPrograms or All ProgramsŒLexmark 2400 Series. 2 Select Photo Editor. 3 Click File Œ Open to select the image you want to edit. 4 Edit the image with one image at a ...this section Quick Fixes You can reverse multiple changes. 5 Click File Œ Save as. 6 Enter a file name and file type, and then click Save. Note: For more information about these settings, right-click a setting on the printed page: portrait or landscape. • Select the layout you want to print. &#...

User's Guide
Page 19
... • Change the units of measurement. • Resize the image. • Crop the image. • Select an area by dragging a box around it. Note: The Lexmark Web Toolbar launches automatically when you create printer-friendly Web pages. From this for text box placement and cutting and copying areas. • Add text... • Colorize the image. • Adjust the Brightness/Contrast. • Adjust the blur. • Adjust the sharpness. • Despeckle (blur) the image to the Lexmark Web site. • Access Help for additional information. • Uninstall the Web Toolbar. 19
... • Change the units of measurement. • Resize the image. • Crop the image. • Select an area by dragging a box around it. Note: The Lexmark Web Toolbar launches automatically when you create printer-friendly Web pages. From this for text box placement and cutting and copying areas. • Add text... • Colorize the image. • Adjust the Brightness/Contrast. • Adjust the blur. • Adjust the sharpness. • Despeckle (blur) the image to the Lexmark Web site. • Access Help for additional information. • Uninstall the Web Toolbar. 19

User's Guide
Page 20
Click Normal Quick Text Only Photo Preview To Print an entire Web page in draft quality. Print an entire Web page in normal quality. Preview a Web page before printing. 20 Print only the photos or images on a Web page. Note: The number of a Web page. Print only the text of photos or images valid for printing appears next to Photos.
Click Normal Quick Text Only Photo Preview To Print an entire Web page in draft quality. Print an entire Web page in normal quality. Preview a Web page before printing. 20 Print only the photos or images on a Web page. Note: The number of a Web page. Print only the text of photos or images valid for printing appears next to Photos.
User's Guide
Page 21
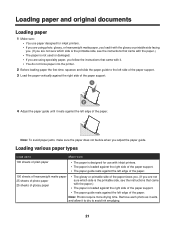
Note: Photos require more drying time. Remove each photo as it exits, and allow it to dry to Make sure 100 sheets of plain paper • ... sure which side is loaded against the right side of the paper support. • The paper guide rests against the left edge of the paper. Note: To avoid paper jams, make sure the paper does not buckle when you adjust the paper guide. Loading various paper types Load up to avoid...
Note: Photos require more drying time. Remove each photo as it exits, and allow it to dry to Make sure 100 sheets of plain paper • ... sure which side is loaded against the right side of the paper support. • The paper guide rests against the left edge of the paper. Note: To avoid paper jams, make sure the paper does not buckle when you adjust the paper guide. Loading various paper types Load up to avoid...
User's Guide
Page 22
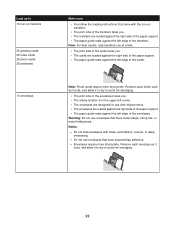
Envelopes require more drying time. Note: For best results, load transfers one at a time. • The print side of the cards faces you. • The cards are loaded against the right ... are loaded against the right side of the paper support. • The paper guide rests against the left edge of the envelopes. Note: Photo cards require more drying time. Notes: - Load up to 10 iron-on transfers 25 greeting cards 25 index cards 25 photo cards 25 postcards 10 envelopes Make sure...
Envelopes require more drying time. Note: For best results, load transfers one at a time. • The print side of the cards faces you. • The cards are loaded against the right ... are loaded against the right side of the paper support. • The paper guide rests against the left edge of the envelopes. Note: Photo cards require more drying time. Notes: - Load up to 10 iron-on transfers 25 greeting cards 25 index cards 25 photo cards 25 postcards 10 envelopes Make sure...

User's Guide
Page 23
Note: Labels require more drying time. Remove each transparency as it exits, and allow it to dry to avoid ink smudging. • The rough side of ... side of the paper faces you. • The paper size fits within 1 mm of the edge of the label. • You use full label sheets. Notes: • Transparencies with areas exposed by missing labels) may cause labels to within these dimensions: Width: - 76-216 mm - 3.0-8.5 inches Length: - 127-432 mm - 5.0-17...
Note: Labels require more drying time. Remove each transparency as it exits, and allow it to dry to avoid ink smudging. • The rough side of ... side of the paper faces you. • The paper size fits within 1 mm of the edge of the label. • You use full label sheets. Notes: • Transparencies with areas exposed by missing labels) may cause labels to within these dimensions: Width: - 76-216 mm - 3.0-8.5 inches Length: - 127-432 mm - 5.0-17...
User's Guide
Page 26
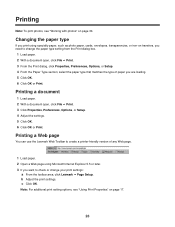
Printing a Web page You can use the Lexmark Web Toolbar to create a printer-friendly version of ..., Options, or Setup. 4 Adjust the settings. 5 Click OK. 6 Click OK or Print. b Adjust the print settings. c Click OK. Note: For additional print setting options, see "Working with photos" on page 30. Printing a document 1 Load paper. 2 With a document open , click... envelopes, transparencies, or iron-on transfers, you are loading. 5 Click OK. 6 Click OK or Print. Printing Note: To print photos, see "Using Print Properties" on page 17. 26 Changing the paper type If you print using ...
Printing a Web page You can use the Lexmark Web Toolbar to create a printer-friendly version of ..., Options, or Setup. 4 Adjust the settings. 5 Click OK. 6 Click OK or Print. b Adjust the print settings. c Click OK. Note: For additional print setting options, see "Working with photos" on page 30. Printing a document 1 Load paper. 2 With a document open , click... envelopes, transparencies, or iron-on transfers, you are loading. 5 Click OK. 6 Click OK or Print. Printing Note: To print photos, see "Using Print Properties" on page 17. 26 Changing the paper type If you print using ...
User's Guide
Page 28
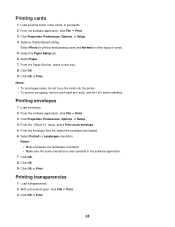
Notes: • Most envelopes use landscape orientation. • Make sure the same orientation is also selected in the software application. 7 Click OK. 8 Click OK. 9 Click OK .... 4 From the "I Want To" menu, select Print on an envelope. 5 From the Envelope Size list, select the envelope size loaded. 6 Select Portrait or Landscape orientation. Notes: • To avoid paper jams, do not force the cards into the printer. • To prevent smudging, remove each card as it exits, and let...
Notes: • Most envelopes use landscape orientation. • Make sure the same orientation is also selected in the software application. 7 Click OK. 8 Click OK. 9 Click OK .... 4 From the "I Want To" menu, select Print on an envelope. 5 From the Envelope Size list, select the envelope size loaded. 6 Select Portrait or Landscape orientation. Notes: • To avoid paper jams, do not force the cards into the printer. • To prevent smudging, remove each card as it exits, and let...

User's Guide
Page 29
... ΠPrint. 3 Click Properties, Preferences, Options, or Setup. 4 From the Quality/Copies tab, select Print Last Page First. 5 Click OK. 6 Click OK or Print. 29 Note: To prevent smudging, remove each copy as a set (collated) or to print the copies as it exits, and let it dry before stacking. Printing collated...
... ΠPrint. 3 Click Properties, Preferences, Options, or Setup. 4 From the Quality/Copies tab, select Print Last Page First. 5 Click OK. 6 Click OK or Print. 29 Note: To prevent smudging, remove each copy as a set (collated) or to print the copies as it exits, and let it dry before stacking. Printing collated...

User's Guide
Page 30
... to preview your photos, click Preview. 13 If you want to make common editing changes to print by clicking each photo. 8 In the "Photo Prints..." Note: For more advanced photo-editing options, see "Printing photos or images from a Web page, see "Using the Photo Editor" on page 18. 14 Click Print...
... to preview your photos, click Preview. 13 If you want to make common editing changes to print by clicking each photo. 8 In the "Photo Prints..." Note: For more advanced photo-editing options, see "Printing photos or images from a Web page, see "Using the Photo Editor" on page 18. 14 Click Print...
User's Guide
Page 31
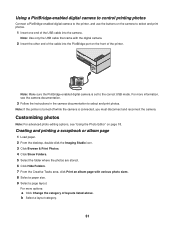
...cable into the PictBridge port on the front of the printer. For more information, see "Using the Photo Editor" on page 18. Customizing photos Note: For advanced photo-editing options, see the camera documentation. 3 Follow the instructions in the camera documentation to select and print photos. Creating and ...USB cable that came with various photo sizes. 8 Select a paper size. 9 Select a page layout. b Select a layout category. 31 Note: If the printer is turned off while the camera is set to the correct USB mode. Using a PictBridge-enabled digital camera to control printing...
...cable into the PictBridge port on the front of the printer. For more information, see "Using the Photo Editor" on page 18. Customizing photos Note: For advanced photo-editing options, see the camera documentation. 3 Follow the instructions in the camera documentation to select and print photos. Creating and ...USB cable that came with various photo sizes. 8 Select a paper size. 9 Select a page layout. b Select a layout category. 31 Note: If the printer is turned off while the camera is set to the correct USB mode. Using a PictBridge-enabled digital camera to control printing...