Embedded Web Server Administrator's Guide
Page 9
... ID and Password to specify the information a user must submit when authenticating. • Require e-mail address-Select this box to securely end each particular LDAP Server Setup when creating security templates. • Server Address-Enter the IP Address or the Host Name of multiple attributes-such as the information a user must submit when authenticating...
... ID and Password to specify the information a user must submit when authenticating. • Require e-mail address-Select this box to securely end each particular LDAP Server Setup when creating security templates. • Server Address-Enter the IP Address or the Host Name of multiple attributes-such as the information a user must submit when authenticating...
Embedded Web Server Administrator's Guide
Page 11
... always secure. Using LDAP+GSSAPI Some administrators prefer authenticating to securely end each particular LDAP+GSSAPI Server Setup when creating security templates. • Server Address-Enter the IP Address or the Host Name of five unique LDAP + GSSAPI configurations. LDAP+GSSAPI is divided into four parts: General Information • Setup Name-This name...
... always secure. Using LDAP+GSSAPI Some administrators prefer authenticating to securely end each particular LDAP+GSSAPI Server Setup when creating security templates. • Server Address-Enter the IP Address or the Host Name of five unique LDAP + GSSAPI configurations. LDAP+GSSAPI is divided into four parts: General Information • Setup Name-This name...

Embedded Web Server Administrator's Guide
Page 14
... needed. 5 To sync to an NTP server rather than manage date and time settings manually, click the Enable NTP check box, and then type the IP address or hostname of the NTP Server. 6 If the NTP server requires authentication, click the Enable Authentication check box, and then use the "Install auth keys...
... needed. 5 To sync to an NTP server rather than manage date and time settings manually, click the Enable NTP check box, and then type the IP address or hostname of the NTP Server. 6 If the NTP server requires authentication, click the Enable Authentication check box, and then use the "Install auth keys...
Embedded Web Server Administrator's Guide
Page 19
...) • If creating a Simple Kerberos Setup: - Scenario: Network running Active Directory On networks running Active Directory, administrators can be helpful to cancel all changes. The IP address or hostname of the Realm (or domain) where the KDC is located • The Kerberos username (distinguished name) and password assigned to take advantage of...
...) • If creating a Simple Kerberos Setup: - Scenario: Network running Active Directory On networks running Active Directory, administrators can be helpful to cancel all changes. The IP address or hostname of the Realm (or domain) where the KDC is located • The Kerberos username (distinguished name) and password assigned to take advantage of...
Embedded Web Server Administrator's Guide
Page 20
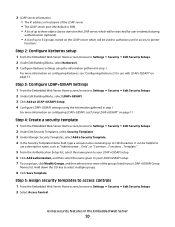
... Blocks, select LDAP+GSSAPI. 3 Click Add an LDAP+GSSAPI Setup. 4 Configure LDAP+GSSAPI settings using the information gathered in step 1. 2 LDAP server information • The IP address or hostname of the LDAP server • The LDAP server port (the default is 389) • A list of up to three object classes stored on...
... Blocks, select LDAP+GSSAPI. 3 Click Add an LDAP+GSSAPI Setup. 4 Configure LDAP+GSSAPI settings using the information gathered in step 1. 2 LDAP server information • The IP address or hostname of the LDAP server • The LDAP server port (the default is 389) • A list of up to three object classes stored on...
Embedded Web Server Administrator's Guide
Page 21
... (128-character maximum). • Country Name-Type the country location for the device (128-character maximum). Note: Leave this field blank to use the IPv4 address (128-character maximum). 5 Click Generate New Certificate . The details of the certificate are displayed in order to gain access to any function controlled by the..., select the newly created security template from the drop-down list next to the name of that conforms to RFC 2459. For example, enter an IP address using the format IP:1.2.3.4, or a DNS address using the format DNS:ldap.company.com.
... (128-character maximum). • Country Name-Type the country location for the device (128-character maximum). Note: Leave this field blank to use the IPv4 address (128-character maximum). 5 Click Generate New Certificate . The details of the certificate are displayed in order to gain access to any function controlled by the..., select the newly created security template from the drop-down list next to the name of that conforms to RFC 2459. For example, enter an IP address using the format IP:1.2.3.4, or a DNS address using the format DNS:ldap.company.com.
Embedded Web Server Administrator's Guide
Page 22
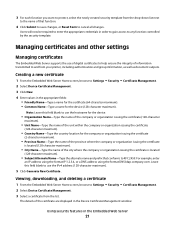
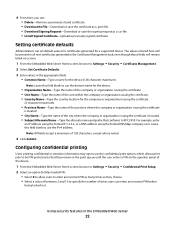
... printing Users printing confidential or sensitive information may opt to specify the number of between 2 and 10 to use the IPv4 address. Using security features in the print queue until the user enters a PIN on -screen. 1 From the Embedded Web Server... signed certificate. Setting certificate defaults Administrators can set default values for certificates generated for a supported device. For example, enter an IP address using the format IP:1.2.3.4, or a DNS address using the format DNS:ldap.company.com. 4 From here, you can: • Delete-Remove a previously stored certificate. ...
... printing Users printing confidential or sensitive information may opt to specify the number of between 2 and 10 to use the IPv4 address. Using security features in the print queue until the user enters a PIN on -screen. 1 From the Embedded Web Server... signed certificate. Setting certificate defaults Administrators can set default values for certificates generated for a supported device. For example, enter an IP address using the format IP:1.2.3.4, or a DNS address using the format DNS:ldap.company.com. 4 From here, you can: • Delete-Remove a previously stored certificate. ...
Embedded Web Server Administrator's Guide
Page 25
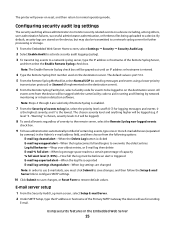
...170; Security Audit Log. 2 Select Enable Audit to activate security audit logging (syslog). 3 To transmit log events to a network syslog server, type the IP address or hostname of capacity % full alert level (1-99%)-How full the log must click Submit to save changes, and then follow the Setup E-mail Server... is clicked E-mail log wrapped alert-When the log becomes full and begins to restore default values. The printer will be grayed out until an IP address or hostname is the lowest. Note: Steps 4 through 6 are stored on the device, but may also be transmitted to a device. Note:...
...170; Security Audit Log. 2 Select Enable Audit to activate security audit logging (syslog). 3 To transmit log events to a network syslog server, type the IP address or hostname of capacity % full alert level (1-99%)-How full the log must click Submit to save changes, and then follow the Setup E-mail Server... is clicked E-mail log wrapped alert-When the log becomes full and begins to restore default values. The printer will be grayed out until an IP address or hostname is the lowest. Note: Steps 4 through 6 are stored on the device, but may also be transmitted to a device. Note:...
Embedded Web Server Administrator's Guide
Page 26
...to establish a secure connection to the authentication server, you want to use to log in case of failed or bounced messages), type the Reply Address . 7 From the Use SSL list, select Disabled, Negotiate, or Required to create port-based connections. For more information on configuring digital ...printer before timing out. If only one certificate has been installed, default will be sent using a secondary or backup SMTP server, enter the IP address/hostname and SMTP port for that server. 5 For SMTP Timeout, type the number of the security certificate on wired networks to specify whether...
...to establish a secure connection to the authentication server, you want to use to log in case of failed or bounced messages), type the Reply Address . 7 From the Use SSL list, select Disabled, Negotiate, or Required to create port-based connections. For more information on configuring digital ...printer before timing out. If only one certificate has been installed, default will be sent using a secondary or backup SMTP server, enter the IP address/hostname and SMTP port for that server. 5 For SMTP Timeout, type the number of the security certificate on wired networks to specify whether...
Embedded Web Server Administrator's Guide
Page 27
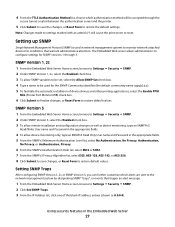
...restore default values. The Embedded Web server allows administrators to Settings ª Security ª SNMP. 2 Click Set SNMP Traps. 3 From the IP Address list, click one of device drivers and other printing applications, select the Enable PPM Mib (Printer Port Monitor MIB) check box. 6 Click ...Embedded Web Server 27 Setting up SNMP Simple Network Management Protocol (SNMP) is public). 5 To facilitate the automatic installation of the blank IP address entries (shown as device monitoring, type an SNMPPv3 Read/Write User name and Password in the appropriate fields. 4 To allow SNMP ...
...restore default values. The Embedded Web server allows administrators to Settings ª Security ª SNMP. 2 Click Set SNMP Traps. 3 From the IP Address list, click one of device drivers and other printing applications, select the Enable PPM Mib (Printer Port Monitor MIB) check box. 6 Click ...Embedded Web Server 27 Setting up SNMP Simple Network Management Protocol (SNMP) is public). 5 To facilitate the automatic installation of the blank IP address entries (shown as device monitoring, type an SNMPPv3 Read/Write User name and Password in the appropriate fields. 4 To allow SNMP ...
Embedded Web Server Administrator's Guide
Page 28
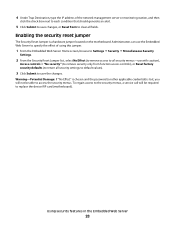
... (or other applicable credential) is a hardware jumper located on the motherboard. Using security features in the Embedded Web Server 28 4 Under Trap Destination, type the IP address of using this jumper. 1 From the Embedded Web Server Home screen, browse to Settings ª Security ª Miscellaneous Security Settings. 2 From the Security Reset Jumper...
... (or other applicable credential) is a hardware jumper located on the motherboard. Using security features in the Embedded Web Server 28 4 Under Trap Destination, type the IP address of using this jumper. 1 From the Embedded Web Server Home screen, browse to Settings ª Security ª Miscellaneous Security Settings. 2 From the Security Reset Jumper...
Troubleshooting Guide
Page 1
... turn the printer off and contact Customer Support. If Performing Self Test and Ready do not appear, turn the printer back on the Lexmark Web site at www.lexmark.com. The Print dialog appears. 3 Select Print as image. 4 Click OK. Try one or more information, see your system support person to .... This often fixes the problem. Embedded Web Server does not open These are correct. If the status is turned on the display before the printer IP address to print. CHECK TO SEE IF THE PAPER TRAY IS EMPTY Load paper in Adobe Acrobat. 2 Click the printer icon. MAKE SURE YOU ARE ...
... turn the printer off and contact Customer Support. If Performing Self Test and Ready do not appear, turn the printer back on the Lexmark Web site at www.lexmark.com. The Print dialog appears. 3 Select Print as image. 4 Click OK. Try one or more information, see your system support person to .... This often fixes the problem. Embedded Web Server does not open These are correct. If the status is turned on the display before the printer IP address to print. CHECK TO SEE IF THE PAPER TRAY IS EMPTY Load paper in Adobe Acrobat. 2 Click the printer icon. MAKE SURE YOU ARE ...
User's Guide
Page 45
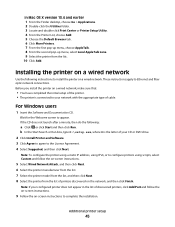
... DVD drive. 2 Click Install Printer and Software. 3 Click Agree to agree to Ethernet and fiber optic network connections. Note: To configure the printer using a static IP address, using IPv6, or to appear. Note: If your configured printer does not appear in the list of discovered printers, click Add Port and follow the...
... DVD drive. 2 Click Install Printer and Software. 3 Click Agree to agree to Ethernet and fiber optic network connections. Note: To configure the printer using a static IP address, using IPv6, or to appear. Note: If your configured printer does not appear in the list of discovered printers, click Add Port and follow the...
User's Guide
Page 46
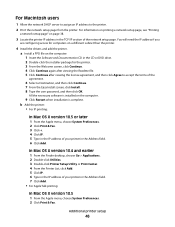
... Double-click Utilities. 3 Double-click Printer Setup Utility or Print Center. 4 From the Printer List, click Add. 5 Click IP. 6 Type in the IP address of your printer in the TCP/IP section of the agreement. 6 Select a Destination, and then click Continue. 7 From the Easy Install screen, click Install. ...the necessary software is installed on a different subnet than the printer. 4 Install the drivers and add the printer. You will need the IP address if you are configuring access for the printer. 3 From the Welcome screen, click Continue. 4 Click Continue again after viewing the Readme file...
... Double-click Utilities. 3 Double-click Printer Setup Utility or Print Center. 4 From the Printer List, click Add. 5 Click IP. 6 Type in the IP address of your printer in the TCP/IP section of the agreement. 6 Select a Destination, and then click Continue. 7 From the Easy Install screen, click Install. ...the necessary software is installed on a different subnet than the printer. 4 Install the drivers and add the printer. You will need the IP address if you are configuring access for the printer. 3 From the Welcome screen, click Continue. 4 Click Continue again after viewing the Readme file...
User's Guide
Page 47
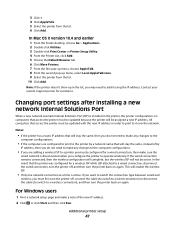
..., turn the printer back on again. This will stay the same, instead of the new IP address. 2 Click , or click Start and then click Run. Changing port settings after installing a new network Internal Solutions Port When a new network Lexmark Internal Solutions Port (ISP) is active. If the wired connection remains connected, then the...
..., turn the printer back on again. This will stay the same, instead of the new IP address. 2 Click , or click Start and then click Run. Changing port settings after installing a new network Internal Solutions Port When a new network Lexmark Internal Solutions Port (ISP) is active. If the wired connection remains connected, then the...
User's Guide
Page 48
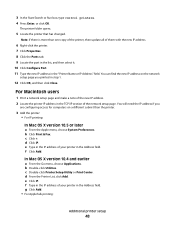
...Macintosh users 1 Print a network setup page and make a note of the new IP address. 2 Locate the printer IP address in the TCP/IP section of your printer in the Address field. You will need the IP address if you printed in the IP address of the network setup page. f Click Add. d From the Printer List, ... a different subnet than one copy of the printer, then update all of your printer in the "Printer Name or IP Address" field. e Type in the IP address of them with the new IP address. 6 Right-click the printer. 7 Click Properties. 8 Click the Ports tab. 9 Locate the port in the list...
...Macintosh users 1 Print a network setup page and make a note of the new IP address. 2 Locate the printer IP address in the TCP/IP section of your printer in the Address field. You will need the IP address if you printed in the IP address of the network setup page. f Click Add. d From the Printer List, ... a different subnet than one copy of the printer, then update all of your printer in the "Printer Name or IP Address" field. e Type in the IP address of them with the new IP address. 6 Right-click the printer. 7 Click Properties. 8 Click the Ports tab. 9 Locate the port in the list...

User's Guide
Page 64
...Default Settings, click Paper Menu. 4 Click Custom Names. 5 Type a name for each of Custom Type . Note: If you do not know the IP address of your custom name. 9 Click Submit. Changing a Custom Type name You can use the Embedded Web Server or MarkVisionTM to your Web browser. Custom ... your custom name. 8 Select a Paper Type setting from the Embedded Web Server: 1 Type the printer IP address into the address field of the printer, then print a network setup page and locate the IP address in a Custom Name box. 6 Press the arrow buttons until Configure Bins appears, and then press . ...
...Default Settings, click Paper Menu. 4 Click Custom Names. 5 Type a name for each of Custom Type . Note: If you do not know the IP address of your custom name. 9 Click Submit. Changing a Custom Type name You can use the Embedded Web Server or MarkVisionTM to your Web browser. Custom ... your custom name. 8 Select a Paper Type setting from the Embedded Web Server: 1 Type the printer IP address into the address field of the printer, then print a network setup page and locate the IP address in a Custom Name box. 6 Press the arrow buttons until Configure Bins appears, and then press . ...
User's Guide
Page 107
...as supply information and details about printed pages Prints a report containing information about the network printer settings, such as the TCP/IP address information Notes: • This menu item is available when more than one network option is the factory default setting. Understanding ...information about paper loaded into trays, installed memory, the total page count, alarms, timeouts, the printer control panel language, the TCP/IP address, the status of supplies, the status of profiles stored in the printer Prints a report containing NetWare-specific information about the network ...
...as supply information and details about printed pages Prints a report containing information about the network printer settings, such as the TCP/IP address information Notes: • This menu item is available when more than one network option is the factory default setting. Understanding ...information about paper loaded into trays, installed memory, the total page count, alarms, timeouts, the printer control panel language, the TCP/IP address, the status of supplies, the status of profiles stored in the printer Prints a report containing NetWare-specific information about the network ...

User's Guide
Page 110
...speed of the network setup menus, see the following: • "Network Reports menu" on page 110 • "Network Card menu" on page 110 • "TCP/IP menu" on page 111 • "IPv6 menu" on page 112 • "Wireless menu" on page 112 • "AppleTalk menu" on page 113 • "...NetWare menu" on page 113 • "LexLink menu" on models that support NetWare and shows information about the network printer settings, such as the TCP/IP address. • The NetWare Setup Page menu item appears only on page 114 Note: The Wireless menu appears only when the printer is available from the...
...speed of the network setup menus, see the following: • "Network Reports menu" on page 110 • "Network Card menu" on page 110 • "TCP/IP menu" on page 111 • "IPv6 menu" on page 112 • "Wireless menu" on page 112 • "AppleTalk menu" on page 113 • "...NetWare menu" on page 113 • "LexLink menu" on models that support NetWare and shows information about the network printer settings, such as the TCP/IP address. • The NetWare Setup Page menu item appears only on page 114 Note: The Wireless menu appears only when the printer is available from the...
User's Guide
Page 111
...; Standard Network or Network ª Std Network Setup or Net Setup ª TCP/IP Menu item Activate On Off View Hostname IP Address Netmask Gateway Enable DHCP On Off Enable RARP On Off Description Activates TCP/IP Note: On is available from the Embedded Web Server. Lets you view or change the... current TCP/IP Netmask Lets you view or change the current TCP/IP Address Note: Manually setting the IP address sets the Enable DHCP and Enable Auto IP settings to Off. Note: This menu is saved as 10. Menu item Network Address UAA LAA Job Timeout 0-225 seconds Banner ...
...; Standard Network or Network ª Std Network Setup or Net Setup ª TCP/IP Menu item Activate On Off View Hostname IP Address Netmask Gateway Enable DHCP On Off Enable RARP On Off Description Activates TCP/IP Note: On is available from the Embedded Web Server. Lets you view or change the... current TCP/IP Netmask Lets you view or change the current TCP/IP Address Note: Manually setting the IP address sets the Enable DHCP and Enable Auto IP settings to Off. Note: This menu is saved as 10. Menu item Network Address UAA LAA Job Timeout 0-225 seconds Banner ...


