Clearing Jams Guide
Page 1
...lower the multipurpose feeder door. 2 Push the release latch, and then open the front cover. 3 Lift and pull the print cartridge out of the cartridge. Have windows, holes, perforations, cutouts, or embossing - Open doors and covers and remove trays to printing, or wait for ...- Paper recommendations • Use only recommended paper or specialty media. Envelope recommendations • To reduce wrinkling, use paper that : - Lexmark™ T65x Clearing Jams Guide Clearing jams Avoiding jams The following hints can stain garments and skin. Have metal clasps, string ties, or...
...lower the multipurpose feeder door. 2 Push the release latch, and then open the front cover. 3 Lift and pull the print cartridge out of the cartridge. Have windows, holes, perforations, cutouts, or embossing - Open doors and covers and remove trays to printing, or wait for ...- Paper recommendations • Use only recommended paper or specialty media. Envelope recommendations • To reduce wrinkling, use paper that : - Lexmark™ T65x Clearing Jams Guide Clearing jams Avoiding jams The following hints can stain garments and skin. Have metal clasps, string ties, or...
Clearing Jams Guide
Page 2
... tray. 7 Press . 2 Slowly remove the jammed paper to remove, then open the rear door and remove the paper from there. 6 Align and reinstall the print cartridge. 7 Close the front cover. 8 Close the multipurpose feeder door. 9 Press . 202 and 203 paper jams If the paper is not easy to avoid tearing it...
... tray. 7 Press . 2 Slowly remove the jammed paper to remove, then open the rear door and remove the paper from there. 6 Align and reinstall the print cartridge. 7 Close the front cover. 8 Close the multipurpose feeder door. 9 Press . 202 and 203 paper jams If the paper is not easy to avoid tearing it...
Clearing Jams Guide
Page 5
... be pulled out, then lift the envelope feeder up and then out of the stack; Note: If you cannot remove the envelope, then the print cartridge will be removed.
... be pulled out, then lift the envelope feeder up and then out of the stack; Note: If you cannot remove the envelope, then the print cartridge will be removed.
Clearing Jams Guide
Page 6
... motor does not run when the stapler door is open. 1 Close the stapler door until it clicks into place. 2 Pull the latch of the staple cartridge holder down, and then pull the holder out of the printer. 4 Press down on the staple guard until it snaps into place. 2 Press . 283 staple... 1 Press the latch to open the stapler door. 3 Use the metal tab to lift the staple guard, and then remove any loose staples. 5 Push the cartridge holder firmly back into the stapler unit until the cartridge holder clicks into place. 6 Close the stapler door. 7 Press . 6
... motor does not run when the stapler door is open. 1 Close the stapler door until it clicks into place. 2 Pull the latch of the staple cartridge holder down, and then pull the holder out of the printer. 4 Press down on the staple guard until it snaps into place. 2 Press . 283 staple... 1 Press the latch to open the stapler door. 3 Use the metal tab to lift the staple guard, and then remove any loose staples. 5 Push the cartridge holder firmly back into the stapler unit until the cartridge holder clicks into place. 6 Close the stapler door. 7 Press . 6
Troubleshooting Guide
Page 5
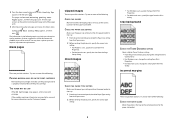
... Clipped images These are possible solutions. Try one or more of the following : PACKING MATERIAL MAY BE ON THE PRINT CARTRIDGE Remove the print cartridge and make sure the packing material is properly removed. CHECK THE PAPER SIZE SETTING Make sure the paper size setting matches the... control panel, check the Paper Type setting from the Print dialog. Try one or more information, contact Customer Support. Reinstall the print cartridge. The pages are possible solutions. Ghost images CHECK THE PAPER TYPE SETTING Make sure the paper type setting matches the paper loaded in the...
... Clipped images These are possible solutions. Try one or more of the following : PACKING MATERIAL MAY BE ON THE PRINT CARTRIDGE Remove the print cartridge and make sure the packing material is properly removed. CHECK THE PAPER SIZE SETTING Make sure the paper size setting matches the... control panel, check the Paper Type setting from the Print dialog. Try one or more information, contact Customer Support. Reinstall the print cartridge. The pages are possible solutions. Ghost images CHECK THE PAPER TYPE SETTING Make sure the paper type setting matches the paper loaded in the...
Troubleshooting Guide
Page 6
... ABSORBED MOISTURE DUE TO HIGH HUMIDITY • Load paper from the Print dialog. THE TONER MAY BE LOW When 88 Cartridge low appears or when the print becomes faded, replace the print cartridge. THE FUSER MAY BE WORN OR DEFECTIVE Replace the fuser. Try one or more of the following: CHECK THE...
... ABSORBED MOISTURE DUE TO HIGH HUMIDITY • Load paper from the Print dialog. THE TONER MAY BE LOW When 88 Cartridge low appears or when the print becomes faded, replace the print cartridge. THE FUSER MAY BE WORN OR DEFECTIVE Replace the fuser. Try one or more of the following: CHECK THE...
Troubleshooting Guide
Page 7
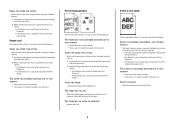
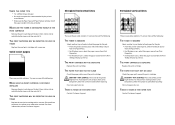
...textured paper with rough finishes. Solid black or white streaks These are using paper that meets the printer specifications. THE PRINT CARTRIDGE MAY BE DEFECTIVE Replace the print cartridge. THE PAPER HAS ABSORBED MOISTURE DUE TO HIGH HUMIDITY • Load paper from the Print dialog. THE TONER IS LOW... When 88 Cartridge Low appears, order a new print cartridge. Replace the print cartridge if the defects occur every: • 47.8 mm (1.88 in.) • 96.8 mm (3.81 in.) Replace the ...
...textured paper with rough finishes. Solid black or white streaks These are using paper that meets the printer specifications. THE PRINT CARTRIDGE MAY BE DEFECTIVE Replace the print cartridge. THE PAPER HAS ABSORBED MOISTURE DUE TO HIGH HUMIDITY • Load paper from the Print dialog. THE TONER IS LOW... When 88 Cartridge Low appears, order a new print cartridge. Replace the print cartridge if the defects occur every: • 47.8 mm (1.88 in.) • 96.8 mm (3.81 in.) Replace the ...
Troubleshooting Guide
Page 8
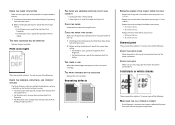
... users, select the paper source from side to side to redistribute the toner, and then reinstall it . THE PRINT CARTRIDGE IS DEFECTIVE Replace the print cartridge. Try one or more information, contact Customer Support. THERE IS TONER IN THE PAPER PATH Contact Customer Support. 8 Streaked... vertical lines These are possible solutions. MAKE SURE THE TONER IS DISTRIBUTED EVENLY IN THE PRINT CARTRIDGE Remove the print cartridge and shake it from a hot component, allow the surface to cool before touching. To reduce the risk of paper. &#...
... users, select the paper source from side to side to redistribute the toner, and then reinstall it . THE PRINT CARTRIDGE IS DEFECTIVE Replace the print cartridge. Try one or more information, contact Customer Support. THERE IS TONER IN THE PAPER PATH Contact Customer Support. 8 Streaked... vertical lines These are possible solutions. MAKE SURE THE TONER IS DISTRIBUTED EVENLY IN THE PRINT CARTRIDGE Remove the print cartridge and shake it from a hot component, allow the surface to cool before touching. To reduce the risk of paper. &#...
Troubleshooting Guide
Page 9
...printer. If the problem persists, then contact Customer Support. Try one or more of the following : THE PRINT CARTRIDGE MAY BE DEFECTIVE Replace the print cartridge. Transparency print quality is also listed on the menu settings page. or Canada, call Customer Support, describe the problem... you are possible solutions. For other countries/regions, visit the Lexmark Web site at www.lexmark.com. 9 Toner rubs off ...
...printer. If the problem persists, then contact Customer Support. Try one or more of the following : THE PRINT CARTRIDGE MAY BE DEFECTIVE Replace the print cartridge. Transparency print quality is also listed on the menu settings page. or Canada, call Customer Support, describe the problem... you are possible solutions. For other countries/regions, visit the Lexmark Web site at www.lexmark.com. 9 Toner rubs off ...

User's Guide
Page 5
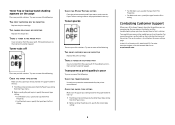
... Checking the status of supplies from the printer control panel 167 Checking the status of supplies from a network computer 167 Ordering supplies...167 Ordering print cartridges ...167 Ordering a maintenance kit ...168 Ordering charge rolls...169 Contents 5
... Checking the status of supplies from the printer control panel 167 Checking the status of supplies from a network computer 167 Ordering supplies...167 Ordering print cartridges ...167 Ordering a maintenance kit ...168 Ordering charge rolls...169 Contents 5
User's Guide
Page 6
Ordering a fuser...169 Ordering a fuser wiper ...169 Ordering pick rollers ...170 Ordering staple cartridges...170 Ordering a transfer roller...170 Recycling Lexmark products...170 Moving the printer...170 Before moving the printer...170 Moving the printer to another location...171 Shipping the printer ...171 Administrative support 172 ...
Ordering a fuser...169 Ordering a fuser wiper ...169 Ordering pick rollers ...170 Ordering staple cartridges...170 Ordering a transfer roller...170 Recycling Lexmark products...170 Moving the printer...170 Before moving the printer...170 Moving the printer to another location...171 Shipping the printer ...171 Administrative support 172 ...
User's Guide
Page 70
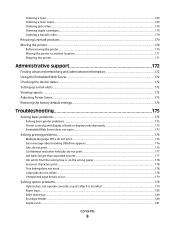
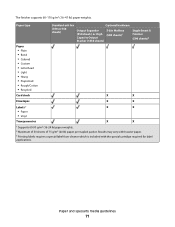
... and weights supported by the output bins Use this table to determine the possible output destinations of each output bin is included with the special cartridge required for label applications. The duplex unit supports 63-170 g/m2 (17-45 lb) paper weights.
... and weights supported by the output bins Use this table to determine the possible output destinations of each output bin is included with the special cartridge required for label applications. The duplex unit supports 63-170 g/m2 (17-45 lb) paper weights.
User's Guide
Page 71
... (20 lb) paper per stapled packet. Results may vary with heavier paper. 3 Printing labels requires a special label fuser cleaner which is included with the special cartridge required for label applications.
... (20 lb) paper per stapled packet. Results may vary with heavier paper. 3 Printing labels requires a special label fuser cleaner which is included with the special cartridge required for label applications.
User's Guide
Page 74
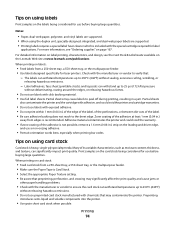
.... • Portrait orientation works best, especially when printing bar codes. Adhesive material contaminates the printer and could void the printer and cartridge warranties. • Do not use preprinted card stock manufactured with slick backing material. • Use full label sheets. When printing on..., single-ply specialty media. Partial sheets also contaminate the printer and the cartridge with adhesive, and could void the warranty. • If zone coating of the adhesive at www.lexmark.com/publications. Preprinting introduces semi-liquid and volatile components into the printer. ...
.... • Portrait orientation works best, especially when printing bar codes. Adhesive material contaminates the printer and could void the printer and cartridge warranties. • Do not use preprinted card stock manufactured with slick backing material. • Use full label sheets. When printing on..., single-ply specialty media. Partial sheets also contaminate the printer and the cartridge with adhesive, and could void the warranty. • If zone coating of the adhesive at www.lexmark.com/publications. Preprinting introduces semi-liquid and volatile components into the printer. ...
User's Guide
Page 82
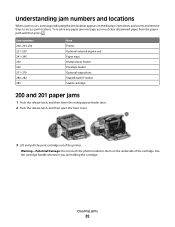
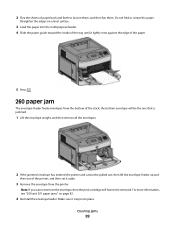
...Potential Damage: Do not touch the photoconductor drum on the display. Open doors and covers and remove trays to access jam locations. Use the cartridge handle whenever you must clear all jammed paper from the paper path and then press . Jam numbers 200-203, 230 231-239 241-245... 260 271-279 280-282 283 Area Printer Optional external duplex unit Paper trays Multipurpose feeder Envelope feeder Optional output bins StapleSmart II Finisher Staple cartridge 200 and 201 paper jams 1 Push the release latch, and then lower the multipurpose feeder door. 2 Push the release latch, and then ...
...Potential Damage: Do not touch the photoconductor drum on the display. Open doors and covers and remove trays to access jam locations. Use the cartridge handle whenever you must clear all jammed paper from the paper path and then press . Jam numbers 200-203, 230 231-239 241-245... 260 271-279 280-282 283 Area Printer Optional external duplex unit Paper trays Multipurpose feeder Envelope feeder Optional output bins StapleSmart II Finisher Staple cartridge 200 and 201 paper jams 1 Push the release latch, and then lower the multipurpose feeder door. 2 Push the release latch, and then ...
User's Guide
Page 83
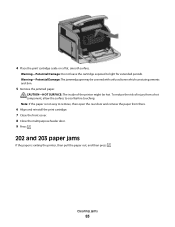
CAUTION-HOT SURFACE: The inside of injury from there. 6 Align and reinstall the print cartridge. 7 Close the front cover. 8 Close the multipurpose feeder door. 9 Press . 202 and 203 paper jams If the paper is exiting the printer, then pull the ...paper out, and then press . Warning-Potential Damage: Do not leave the cartridge exposed to cool before touching. To reduce the risk of the printer might be covered with unfused toner which can stain garments and skin. 5 Remove...
CAUTION-HOT SURFACE: The inside of injury from there. 6 Align and reinstall the print cartridge. 7 Close the front cover. 8 Close the multipurpose feeder door. 9 Press . 202 and 203 paper jams If the paper is exiting the printer, then pull the ...paper out, and then press . Warning-Potential Damage: Do not leave the cartridge exposed to cool before touching. To reduce the risk of the printer might be covered with unfused toner which can stain garments and skin. 5 Remove...
User's Guide
Page 89
... envelope feeder. Do not fold or crease the paper. 2 Flex the sheets of the stack; Note: If you cannot remove the envelope, then the print cartridge will be the one that is jammed. 1 Lift the envelope weight, and then remove all the envelopes. 2 If the jammed envelope has entered the printer...
... envelope feeder. Do not fold or crease the paper. 2 Flex the sheets of the stack; Note: If you cannot remove the envelope, then the print cartridge will be the one that is jammed. 1 Lift the envelope weight, and then remove all the envelopes. 2 If the jammed envelope has entered the printer...
User's Guide
Page 92
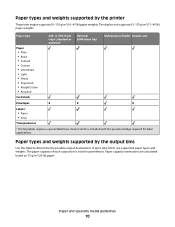
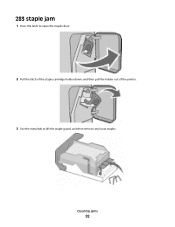
Clearing jams 92 283 staple jam 1 Press the latch to open the stapler door. 2 Pull the latch of the staple cartridge holder down, and then pull the holder out of the printer. 3 Use the metal tab to lift the staple guard, and then remove any loose staples.
Clearing jams 92 283 staple jam 1 Press the latch to open the stapler door. 2 Pull the latch of the staple cartridge holder down, and then pull the holder out of the printer. 3 Use the metal tab to lift the staple guard, and then remove any loose staples.
User's Guide
Page 93
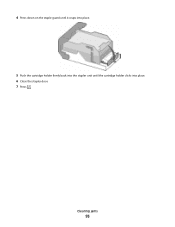
Clearing jams 93 4 Press down on the staple guard until it snaps into place. 5 Push the cartridge holder firmly back into the stapler unit until the cartridge holder clicks into place. 6 Close the stapler door. 7 Press .
Clearing jams 93 4 Press down on the staple guard until it snaps into place. 5 Push the cartridge holder firmly back into the stapler unit until the cartridge holder clicks into place. 6 Close the stapler door. 7 Press .
User's Guide
Page 127
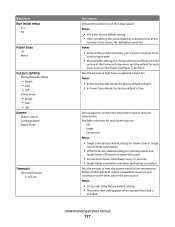
...the Paper Size/Paper Type menu. Understanding printer menus 127 Single sounds three quick beeps. • Off is the factory default setting for Cartridge Alarm and Staple Alarm. Menu item Run Initial setup Yes No Paper Sizes US Metric Output Lighting Normal/Standby Mode • Bright •...; Dim • Off Power Saver • Bright • Dim • Off Alarms Alarm Control Cartridge Alarm Staple Alarm Timeouts Job Hold Timeout 5-255 sec Description Instructs the printer to run the setup wizard Notes: • Yes is installed. Sets ...
...the Paper Size/Paper Type menu. Understanding printer menus 127 Single sounds three quick beeps. • Off is the factory default setting for Cartridge Alarm and Staple Alarm. Menu item Run Initial setup Yes No Paper Sizes US Metric Output Lighting Normal/Standby Mode • Bright •...; Dim • Off Power Saver • Bright • Dim • Off Alarms Alarm Control Cartridge Alarm Staple Alarm Timeouts Job Hold Timeout 5-255 sec Description Instructs the printer to run the setup wizard Notes: • Yes is installed. Sets ...


