User's Guide
Page 3
...18 Windows ...18 Macintosh ...22 UNIX/Linux ...24 NetWare ...24 Chapter 4: Installing and removing options 25 Installing input options ...25 Installing a duplex unit ...27 Installing memory or option cards ...28 Accessing the printer system board ...28 Installing or removing a memory card ...30 Installing or removing a flash memory or firmware card 32 Installing an option card ...34 Replacing the shield ...35 Chapter 5: Printing ...36 Sending a job to print ...36 Printing from a USB flash memory device ...36 Canceling a print job ...38 Printing the menu settings page ...39 Printing a network...
...18 Windows ...18 Macintosh ...22 UNIX/Linux ...24 NetWare ...24 Chapter 4: Installing and removing options 25 Installing input options ...25 Installing a duplex unit ...27 Installing memory or option cards ...28 Accessing the printer system board ...28 Installing or removing a memory card ...30 Installing or removing a flash memory or firmware card 32 Installing an option card ...34 Replacing the shield ...35 Chapter 5: Printing ...36 Sending a job to print ...36 Printing from a USB flash memory device ...36 Canceling a print job ...38 Printing the menu settings page ...39 Printing a network...
User's Guide
Page 4
... panel brightness and contrast 96 Disabling operator panel menus ...96 Enabling operator panel menus ...97 Restoring factory default settings ...97 Adjusting Power Saver ...98 Disabling Power Saver ...98 Encrypting the disk ...99 Setting security using the Embedded Web Server (EWS 99 Chapter 10: Troubleshooting 103 Understanding printer messages ...103 Online technical support ...103 Checking an unresponsive printer ...103 Printing multi-language PDFs ...104 Solving printing problems ...104 Solving option problems ...106 Solving paper feed problems ...109 Solving print quality problems...
... panel brightness and contrast 96 Disabling operator panel menus ...96 Enabling operator panel menus ...97 Restoring factory default settings ...97 Adjusting Power Saver ...98 Disabling Power Saver ...98 Encrypting the disk ...99 Setting security using the Embedded Web Server (EWS 99 Chapter 10: Troubleshooting 103 Understanding printer messages ...103 Online technical support ...103 Checking an unresponsive printer ...103 Printing multi-language PDFs ...104 Solving printing problems ...104 Solving option problems ...106 Solving paper feed problems ...109 Solving print quality problems...

User's Guide
Page 8
... to make it easy for you to change printer settings. Menu Paper Menu Reports Settings Paper Menu Default Source Paper Size/Type Configure MP Envelope Enhance Substitute Size Paper Texture Paper Weight Paper Loading Custom Types Universal Setup Bin Setup Reports Menu Settings Page Device Statistics Network Setup Page Network Setup Page Profiles List NetWare Setup Page Print Fonts Print Directory Settings Setup Menu Finishing Menu Quality Menu Utilities Menu PDF Menu PostScript Menu PCL Emul Menu HTML Menu Image Menu Network/Ports IPv6 TCP/IP Standard Network Network Standard USB USB...
... to make it easy for you to change printer settings. Menu Paper Menu Reports Settings Paper Menu Default Source Paper Size/Type Configure MP Envelope Enhance Substitute Size Paper Texture Paper Weight Paper Loading Custom Types Universal Setup Bin Setup Reports Menu Settings Page Device Statistics Network Setup Page Network Setup Page Profiles List NetWare Setup Page Print Fonts Print Directory Settings Setup Menu Finishing Menu Quality Menu Utilities Menu PDF Menu PostScript Menu PCL Emul Menu HTML Menu Image Menu Network/Ports IPv6 TCP/IP Standard Network Network Standard USB USB...

User's Guide
Page 10
... cursor moves one menu index item to the next whole page. Learning about the printer Button Navigation buttons USB Direct interface Numeric pad 1 2 3 4 5 6 789 0 # Display panel Status / Supplies Ready Tray 1 low View Supplies Tell me screen Remove tray; Pressing the backspace multiple times will also display the current status and the Supplies (Warnings) status. The display panel shows messages and graphics describing the current state of the screen. If applicable, it will be used to start or cancel a job.
... cursor moves one menu index item to the next whole page. Learning about the printer Button Navigation buttons USB Direct interface Numeric pad 1 2 3 4 5 6 789 0 # Display panel Status / Supplies Ready Tray 1 low View Supplies Tell me screen Remove tray; Pressing the backspace multiple times will also display the current status and the Supplies (Warnings) status. The display panel shows messages and graphics describing the current state of the screen. If applicable, it will be used to start or cancel a job.

User's Guide
Page 11
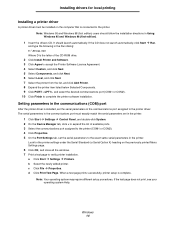
... Start Æ Run, and type D:\Setup.exe in the Printers folder. Note: Installing a custom driver will be used . If attaching a local printer, you must install the printer driver on the computer before connecting the USB cable. 1 Insert the drivers CD. Using Windows Server 2003, Windows 2000, Windows XP, Windows 98 SE, Windows Me, or Windows NT Note: Install the printer software before setting up the printer. Use the drivers CD that is compatible with the printer to page 11 11 12 12...
... Start Æ Run, and type D:\Setup.exe in the Printers folder. Note: Installing a custom driver will be used . If attaching a local printer, you must install the printer driver on the computer before connecting the USB cable. 1 Insert the drivers CD. Using Windows Server 2003, Windows 2000, Windows XP, Windows 98 SE, Windows Me, or Windows NT Note: Install the printer software before setting up the printer. Use the drivers CD that is compatible with the printer to page 11 11 12 12...

User's Guide
Page 13
...: Keep this : 1 Set serial parameters in the printer. 2 Install a printer driver on the attached computer. 3 Match the serial settings in the printer 1 Press on the operator panel. The printer returns to find the serial parameters. b Press until Menu Settings Page appears, and then press . d Look under the Standard Serial (or Serial Option X if a serial interface card is Xon/Xoff. 9 Press . Windows 13 appears (where is the parameter required for later use. To do this page for a change...
...: Keep this : 1 Set serial parameters in the printer. 2 Install a printer driver on the attached computer. 3 Match the serial settings in the printer 1 Press on the operator panel. The printer returns to find the serial parameters. b Press until Menu Settings Page appears, and then press . d Look under the Standard Serial (or Serial Option X if a serial interface card is Xon/Xoff. 9 Press . Windows 13 appears (where is the parameter required for later use. To do this page for a change...
User's Guide
Page 14
... the printer from the list, and click Add Printer. 8 Expand the printer item listed below Selected Components. 9 Click PORT: , and select the desired communications port (COM1 or COM2). 10 Click Finish to complete the printer software installation. When a test page prints successfully, printer setup is complete. Installing drivers for the printer settings under the Serial Standard (or Serial Option X) heading on the computer that is connected to the printer. Note: Windows 95 and Windows 98 (first edition) users should...
... the printer from the list, and click Add Printer. 8 Expand the printer item listed below Selected Components. 9 Click PORT: , and select the desired communications port (COM1 or COM2). 10 Click Finish to complete the printer software installation. When a test page prints successfully, printer setup is complete. Installing drivers for the printer settings under the Serial Standard (or Serial Option X) heading on the computer that is connected to the printer. Note: Windows 95 and Windows 98 (first edition) users should...

User's Guide
Page 19
... system Go to page Windows 98 SE, 19 Windows NT 4.0, Windows Me, Windows 2000, Windows XP, or Windows Server 2003 Windows NT 4.0, 20 Windows 2000, Windows XP, or Windows Server 2003 Direct printing using a local cable, such as Ethernet. • Printer drivers are installed on each network computer. Installing drivers for network printing Follow the steps for your printing configuration and operating system to configure the network printer: Printing configuration Direct • Printer is not listed: a Click Add Port. If the printer port is connected directly to...
... system Go to page Windows 98 SE, 19 Windows NT 4.0, Windows Me, Windows 2000, Windows XP, or Windows Server 2003 Windows NT 4.0, 20 Windows 2000, Windows XP, or Windows Server 2003 Direct printing using a local cable, such as Ethernet. • Printer drivers are installed on each network computer. Installing drivers for network printing Follow the steps for your printing configuration and operating system to configure the network printer: Printing configuration Direct • Printer is not listed: a Click Add Port. If the printer port is connected directly to...

User's Guide
Page 21
... be the default printer for the client, and click Finish. 9 Print a test page to verify printer installation. The shared printer name is a new printer, prompts may require different setup procedures. With this takes varies based on the Internet or an intranet), and click Next. If no system driver is usually the best use of driver modifications. The server handles driver modifications and the print job processing. The time this...
... be the default printer for the client, and click Finish. 9 Print a test page to verify printer installation. The shared printer name is a new printer, prompts may require different setup procedures. With this takes varies based on the Internet or an intranet), and click Next. If no system driver is usually the best use of driver modifications. The server handles driver modifications and the print job processing. The time this...

User's Guide
Page 28
... disk - Note: Use a Phillips screwdriver to install printer memory, flash memory, a firmware card, or an option card. The instructions in this section help you are installing memory or option cards sometime after setting up the printer, turn the printer off and unplug the power cord before continuing. Flash memory • Firmware cards - PrintCryption™ • Other options - RS-232 serial interface card - Installing memory or option cards 28 Parallel 1284-C interface card - MarkNet N8000 series internal print servers (also called internal network adapters or INAs) Accessing...
... disk - Note: Use a Phillips screwdriver to install printer memory, flash memory, a firmware card, or an option card. The instructions in this section help you are installing memory or option cards sometime after setting up the printer, turn the printer off and unplug the power cord before continuing. Flash memory • Firmware cards - PrintCryption™ • Other options - RS-232 serial interface card - Installing memory or option cards 28 Parallel 1284-C interface card - MarkNet N8000 series internal print servers (also called internal network adapters or INAs) Accessing...
User's Guide
Page 36
... using a USB flash memory device with the printer USB Direct Interface: • USB devices must use the Lexmark custom printer drivers supplied with NTFS or any other file system are sending to search for the specific job you choose Print from the printer operator panel. Updated drivers, as well as well. Printing 36 Sending a job to print A printer driver is software that were not available on the operator panel so you are available from a typical Windows application: 1 Open the file you can insert a USB flash memory device and print PDF...
... using a USB flash memory device with the printer USB Direct Interface: • USB devices must use the Lexmark custom printer drivers supplied with NTFS or any other file system are sending to search for the specific job you choose Print from the printer operator panel. Updated drivers, as well as well. Printing 36 Sending a job to print A printer driver is software that were not available on the operator panel so you are available from a typical Windows application: 1 Open the file you can insert a USB flash memory device and print PDF...
User's Guide
Page 70
... the printer driver to avoid damaging the printer. • In Macintosh, be able to withstand temperatures of the transparency cause poor print quality. Use only transparencies that : - Envelopes with the printer before buying large quantities. Understanding paper and specialty media guidelines • Multiple-part forms or documents Transparencies You can load up menu. • Use transparencies designed specifically for use in laser printers. • Set the Paper Size/Type in the Paper menu to MP Feeder, Manual...
... the printer driver to avoid damaging the printer. • In Macintosh, be able to withstand temperatures of the transparency cause poor print quality. Use only transparencies that : - Envelopes with the printer before buying large quantities. Understanding paper and specialty media guidelines • Multiple-part forms or documents Transparencies You can load up menu. • Use transparencies designed specifically for use in laser printers. • Set the Paper Size/Type in the Paper menu to MP Feeder, Manual...

User's Guide
Page 75
... toner. Status / Supplies Held jobs Status / Supplies View supplies Ready Tray 1 Low View Supplies Toner Low Staples OK Conserving supplies Several settings in your software application or printer driver to 32 pages on one side of a sheet. Supply Toner Print media Menu selection item Toner Darkness in the Settings Æ Quality Menu Multipage Print in the Settings Æ Finishing Menu Duplex in the Settings Æ Finishing Menu Use your application software or on the back). The header or gray area at the top of the display will open the Status / Supplies...
... toner. Status / Supplies Held jobs Status / Supplies View supplies Ready Tray 1 Low View Supplies Toner Low Staples OK Conserving supplies Several settings in your software application or printer driver to 32 pages on one side of a sheet. Supply Toner Print media Menu selection item Toner Darkness in the Settings Æ Quality Menu Multipage Print in the Settings Æ Finishing Menu Duplex in the Settings Æ Finishing Menu Use your application software or on the back). The header or gray area at the top of the display will open the Status / Supplies...
User's Guide
Page 78
... Lexmark representative. Ordering a transfer roller Order Lexmark part number 40X0130. Ordering staple cartridges Staple cartridges hold 3,000 staples. For information on clearing a staple jam, see the StapleSmart™ Reference that came with your finisher. If Staple Alarm is sounded, the printer stops printing, and the Load staples message appears. Label fuser cleaners are not recommended for duplex printing. For finisher maintenance information, see When Staples Low or Staples Empty appears on printed pages...
... Lexmark representative. Ordering a transfer roller Order Lexmark part number 40X0130. Ordering staple cartridges Staple cartridges hold 3,000 staples. For information on clearing a staple jam, see the StapleSmart™ Reference that came with your finisher. If Staple Alarm is sounded, the printer stops printing, and the Load staples message appears. Label fuser cleaners are not recommended for duplex printing. For finisher maintenance information, see When Staples Low or Staples Empty appears on printed pages...
User's Guide
Page 100
... default HTTP port. IPSec can connect to the Embedded Web Server more securely by default, requiring each host to the Web server within the print device. Each host must be secure. To configure for SNMPv3 through the Embedded Web Server: 1 Open your Web browser. Two types of the printer: 1 Open your Web browser. Using the secure Embedded Web Server The SSL (Secure Sockets Layer) allows for encrypted and authenticated network communications. In the address line...
... default HTTP port. IPSec can connect to the Embedded Web Server more securely by default, requiring each host to the Web server within the print device. Each host must be secure. To configure for SNMPv3 through the Embedded Web Server: 1 Open your Web browser. Two types of the printer: 1 Open your Web browser. Using the secure Embedded Web Server The SSL (Secure Sockets Layer) allows for encrypted and authenticated network communications. In the address line...

User's Guide
Page 101
... Secure mode Note: A password must be installed. Once enabled, only the ports set to configure using the format: http://ip_address/. 2 Click Configuration. 3 Under Other Settings, click Network/Ports. To configure the Secure mode for 802.1x requires the establishment of the signed certificate. Support for TCP and UDP ports from the Embedded Web Server: 1 Open your Web browser. In the address line, enter the IP address of three modes: • Disabled-Never allows network connections to this port...
... Secure mode Note: A password must be installed. Once enabled, only the ports set to configure using the format: http://ip_address/. 2 Click Configuration. 3 Under Other Settings, click Network/Ports. To configure the Secure mode for 802.1x requires the establishment of the signed certificate. Support for TCP and UDP ports from the Embedded Web Server: 1 Open your Web browser. In the address line, enter the IP address of three modes: • Disabled-Never allows network connections to this port...
User's Guide
Page 103
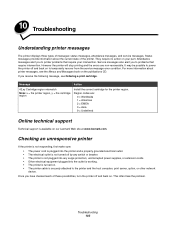
... checked each of these possibilities, turn the printer off and back on to temporarily recover from the service message error condition. Troubleshooting 103 It may be possible to the printer and the host computer, print server, option, or other network device. If you to problems that require your part. Status messages provide information about printer messages, see Ordering a print cartridge. Checking an unresponsive printer If the printer is not responding, first make sure: • The power...
... checked each of these possibilities, turn the printer off and back on to temporarily recover from the service message error condition. Troubleshooting 103 It may be possible to the printer and the host computer, print server, option, or other network device. If you to problems that require your part. Status messages provide information about printer messages, see Ordering a print cartridge. Checking an unresponsive printer If the printer is not responding, first make sure: • The power...

User's Guide
Page 104
... for network printing. For information regarding tested and approved USB flash memory devices, see our Lexmark Web site at http:// support.lexmark.com and click on KnowledgeBase to print in the tray. The specified output bin Remove the stack of paper from the output bin, and then is secure. Make sure you have properly configured the printer for service. Make sure the connection is full. Printing multi-language PDFs 104 unavailable fonts. If the Ready message does not appear, turn the printer...
... for network printing. For information regarding tested and approved USB flash memory devices, see our Lexmark Web site at http:// support.lexmark.com and click on KnowledgeBase to print in the tray. The specified output bin Remove the stack of paper from the output bin, and then is secure. Make sure you have properly configured the printer for service. Make sure the connection is full. Printing multi-language PDFs 104 unavailable fonts. If the Ready message does not appear, turn the printer...
User's Guide
Page 106
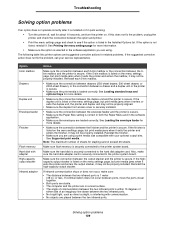
.... Option 5-bin mailbox Drawers Duplex unit Envelope feeder Finisher Flash memory Hard disk with your service representative. See Loading standard trays and optional trays for about 10 seconds, and turn the printer on the menu settings page, but print media jams when it exits the printer and enters the finisher, it may not be properly installed. Reinstall the high-capacity output stacker. Make sure the hard disk is securely connected to see if the option is listed in the Installed Options list. The following table lists printer options and...
.... Option 5-bin mailbox Drawers Duplex unit Envelope feeder Finisher Flash memory Hard disk with your service representative. See Loading standard trays and optional trays for about 10 seconds, and turn the printer on the menu settings page, but print media jams when it exits the printer and enters the finisher, it may not be properly installed. Reinstall the high-capacity output stacker. Make sure the hard disk is securely connected to see if the option is listed in the Installed Options list. The following table lists printer options and...

User's Guide
Page 121
... for repair or replacement (at http://support.lexmark.com. You should transfer proof of original purchase and this statement to present proof of original purchase. Remote technical support is not free of all print cartridges, programs, data, and removable storage media (unless directed otherwise by a Lexmark warranty, technical support may be available for this product throughout its warranty period. ALL INFORMATION, SPECIFICATIONS, PRICES, AND SERVICES ARE...
... for repair or replacement (at http://support.lexmark.com. You should transfer proof of original purchase and this statement to present proof of original purchase. Remote technical support is not free of all print cartridges, programs, data, and removable storage media (unless directed otherwise by a Lexmark warranty, technical support may be available for this product throughout its warranty period. ALL INFORMATION, SPECIFICATIONS, PRICES, AND SERVICES ARE...


