User's Reference
Page 4
... label fuser cleaner 101 Replacing the staple cartridge 104 Removing a used staple cartridge 105 Installing a new staple cartridge 106 Resetting the maintenance counter 108 Printer maintenance when printing on card stock 108 Printer maintenance when printing on labels 108 Chapter 5: Troubleshooting 109 Solving basic printer problems 109 Checking an unresponsive printer 109 Solving display...
... label fuser cleaner 101 Replacing the staple cartridge 104 Removing a used staple cartridge 105 Installing a new staple cartridge 106 Resetting the maintenance counter 108 Printer maintenance when printing on card stock 108 Printer maintenance when printing on labels 108 Chapter 5: Troubleshooting 109 Solving basic printer problems 109 Checking an unresponsive printer 109 Solving display...
User's Reference
Page 93
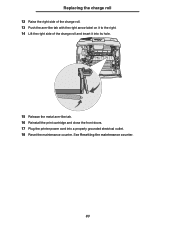
Replacing the charge roll 12 Raise the right side of the charge roll. 13 Push the arm-like tab with the right arrow label on it to the right. 14 Lift the right side of the charge roll and insert it into its hole. 15 Release the metal arm-like tab. 16 Reinstall the print cartridge and close the front doors. 17 Plug the printer power cord into a properly grounded electrical outlet. 18 Reset the maintenance counter. See Resetting the maintenance counter. 93
Replacing the charge roll 12 Raise the right side of the charge roll. 13 Push the arm-like tab with the right arrow label on it to the right. 14 Lift the right side of the charge roll and insert it into its hole. 15 Release the metal arm-like tab. 16 Reinstall the print cartridge and close the front doors. 17 Plug the printer power cord into a properly grounded electrical outlet. 18 Reset the maintenance counter. See Resetting the maintenance counter. 93

User's Reference
Page 97
See Resetting the maintenance counter. 97 Replacing the transfer roller 9 Lower the transfer roller gently until the left metal tab fits into a properly grounded electrical outlet. 12 Reset the maintenance counter. You may have to push it down for a secure fit. 10 Reinstall the print cartridge and close the front doors. 11 Plug the printer power cord into the slot.
See Resetting the maintenance counter. 97 Replacing the transfer roller 9 Lower the transfer roller gently until the left metal tab fits into a properly grounded electrical outlet. 12 Reset the maintenance counter. You may have to push it down for a secure fit. 10 Reinstall the print cartridge and close the front doors. 11 Plug the printer power cord into the slot.
User's Reference
Page 108
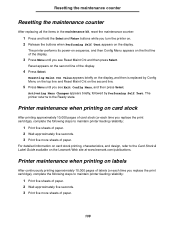
... then press Select. Resetting the maintenance counter Resetting the maintenance counter After replacing all the items in the maintenance kit, reset the maintenance counter: 1 Press and hold the Select and Return buttons while you turn the printer on. 2 Release the buttons when Performing Self Test appears on the Lexmark Web site at www.lexmark.com/publications. Resetting Maint Cnt Value...
... then press Select. Resetting the maintenance counter Resetting the maintenance counter After replacing all the items in the maintenance kit, reset the maintenance counter: 1 Press and hold the Select and Return buttons while you turn the printer on. 2 Release the buttons when Performing Self Test appears on the Lexmark Web site at www.lexmark.com/publications. Resetting Maint Cnt Value...

User's Reference
Page 268
... has been sent to the printer internal print server. The printer is trying to avoid print quality and paper feed problems. Replace the maintenance items and reset the printer maintenance counter (if necessary). Download valid code to the printer. The printer is one of the following sources: • Tray 1 - See also: Loading print...
... has been sent to the printer internal print server. The printer is trying to avoid print quality and paper feed problems. Replace the maintenance items and reset the printer maintenance counter (if necessary). Download valid code to the printer. The printer is one of the following sources: • Tray 1 - See also: Loading print...

User's Reference
Page 279
... • Press Go to maintain top performance and avoid print quality and paper feed problems. Replace the maintenance items and reset the printer maintenance counter, if necessary. If the service message recurs, call for service and report the message number and description of...disk. The printer requires replacement of the problem. Note: Disk operations will not be defective and require replacing. See also: Resetting the maintenance counter The printer has detected that may be allowed until you replace the print cartridge. See also: Replacing the print cartridge Messages...
... • Press Go to maintain top performance and avoid print quality and paper feed problems. Replace the maintenance items and reset the printer maintenance counter, if necessary. If the service message recurs, call for service and report the message number and description of...disk. The printer requires replacement of the problem. Note: Disk operations will not be defective and require replacing. See also: Resetting the maintenance counter The printer has detected that may be allowed until you replace the print cartridge. See also: Replacing the print cartridge Messages...
User's Reference
Page 284
... Queuing and Deleting Jobs 270 Queuing Jobs 271 Ready 271 Ready Hex 271 Reattach 271 Remove Paper 271 Res Reduced 271 Resetting Active Bin 271 Resetting Maint Cnt Value 271 Resetting the Printer 271 Restore Held Jobs. Index messages (continued) 54 Std Network Software Error 277 55 Unsupported Flash in Slot...Tray 267 Install or Cancel Job 267 Invalid Network Code 268 Invalid Standard Network Code 268 Load Manual 268 Load Staples 268 Load Tray 268 Maintenance 268 Menus Disabled 269 Network 269 Network , 269 Network Card Busy 269 No Jobs Found. Go/Stop? 272 Restoring Factory Defaults 272 ...
... Queuing and Deleting Jobs 270 Queuing Jobs 271 Ready 271 Ready Hex 271 Reattach 271 Remove Paper 271 Res Reduced 271 Resetting Active Bin 271 Resetting Maint Cnt Value 271 Resetting the Printer 271 Restore Held Jobs. Index messages (continued) 54 Std Network Software Error 277 55 Unsupported Flash in Slot...Tray 267 Install or Cancel Job 267 Invalid Network Code 268 Invalid Standard Network Code 268 Load Manual 268 Load Staples 268 Load Tray 268 Maintenance 268 Menus Disabled 269 Network 269 Network , 269 Network Card Busy 269 No Jobs Found. Go/Stop? 272 Restoring Factory Defaults 272 ...
Technical Reference
Page 453
...3-89 LPORTROTATE 3-82 LPRINTDIRECTORY 3-83, 6-4 LPRINTMENUS 3-83 LPRINTPCLFONTS 3-83 LPRINTPSFONTS 3-83 LPRINTTESTPAGE 3-83 LREADFILE 3-90 LRENAMEFILE 3-92 LRUNFILE 3-91 LWRITEFILE 3-91 OPMSG 3-81 RDYMSG 3-80 RESET 3-11 SET 3-9 STMSG 3-81 USTATUS 3-59 USTATUSOFF 3-60 information messages 88 Black Print Cartridge Low 3-61 88 Black Toner Low 3-61 88 Color Print Cartridge... Unsupported Disk Format 3-66 80 Belt Exhausted 3-66 80 Belt Life Warning 3-66 80 Fuser Exhausted 3-66 80 Fuser Life Warning 3-66 80 Fuser Maintenance 3-66 80 Fuser/Belt Exhausted 3-66 80 Fuser/Belt Life Warning 3-66 80 Scheduled...
...3-89 LPORTROTATE 3-82 LPRINTDIRECTORY 3-83, 6-4 LPRINTMENUS 3-83 LPRINTPCLFONTS 3-83 LPRINTPSFONTS 3-83 LPRINTTESTPAGE 3-83 LREADFILE 3-90 LRENAMEFILE 3-92 LRUNFILE 3-91 LWRITEFILE 3-91 OPMSG 3-81 RDYMSG 3-80 RESET 3-11 SET 3-9 STMSG 3-81 USTATUS 3-59 USTATUSOFF 3-60 information messages 88 Black Print Cartridge Low 3-61 88 Black Toner Low 3-61 88 Color Print Cartridge... Unsupported Disk Format 3-66 80 Belt Exhausted 3-66 80 Belt Life Warning 3-66 80 Fuser Exhausted 3-66 80 Fuser Life Warning 3-66 80 Fuser Maintenance 3-66 80 Fuser/Belt Exhausted 3-66 80 Fuser/Belt Life Warning 3-66 80 Scheduled...

Service Manual
Page 145
..., indicating it is the first digit to be changed . 2. Press Return/Stop to zero. Maintenance page count This counter is reset by pressing Select. 4. Select Reset Maintenance Count Configuration menu. 2. This is used whenever the system board is replaced because this board contains...Select Permanent Page Count from the Configuration menu. 2. Reset Maintenance Count Saved displays momentarily. Select Maintenance Count Value from the menu. 2. Press Return to go to the Printer Setup Reset Maintenance Count screen. When the reset operation is complete, the menu returns to the ...
..., indicating it is the first digit to be changed . 2. Press Return/Stop to zero. Maintenance page count This counter is reset by pressing Select. 4. Select Reset Maintenance Count Configuration menu. 2. This is used whenever the system board is replaced because this board contains...Select Permanent Page Count from the Configuration menu. 2. Reset Maintenance Count Saved displays momentarily. Select Maintenance Count Value from the menu. 2. Press Return to go to the Printer Setup Reset Maintenance Count screen. When the reset operation is complete, the menu returns to the ...
Service Manual
Page 235
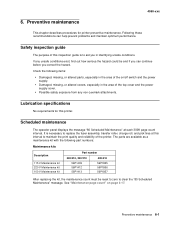
... out how serious the hazard could be reset to zero to maintain the print quality and reliability of the top cover and the power supply cover. • Possible safety exposure from any non-Lexmark attachments. Preventive maintenance 6-1 Preventive maintenance This chapter describes procedures for this printer. Scheduled maintenance The operator panel displays the message "80...
... out how serious the hazard could be reset to zero to maintain the print quality and reliability of the top cover and the power supply cover. • Possible safety exposure from any non-Lexmark attachments. Preventive maintenance 6-1 Preventive maintenance This chapter describes procedures for this printer. Scheduled maintenance The operator panel displays the message "80...


