User's Reference
Page 4
Contents Ordering a charge roll 84 Ordering a transfer roller 84 Ordering pick rollers 84 Ordering a label fuser cleaner 85 Ordering staple cartridges 85 Storing supplies ...85 Storing the print cartridge 86 Replacing the print cartridge 86 Removing ...the used print cartridge 86 Cleaning the printer 87 Installing the new print cartridge 88 Replacing the charge roll 90 Replacing the transfer roller 94 Replacing the pick rollers 98 Replacing the label fuser cleaner 101 Replacing the staple cartridge 104 Removing a used staple cartridge 105 Installing a new staple cartridge 106 ...
Contents Ordering a charge roll 84 Ordering a transfer roller 84 Ordering pick rollers 84 Ordering a label fuser cleaner 85 Ordering staple cartridges 85 Storing supplies ...85 Storing the print cartridge 86 Replacing the print cartridge 86 Removing ...the used print cartridge 86 Cleaning the printer 87 Installing the new print cartridge 88 Replacing the charge roll 90 Replacing the transfer roller 94 Replacing the pick rollers 98 Replacing the label fuser cleaner 101 Replacing the staple cartridge 104 Removing a used staple cartridge 105 Installing a new staple cartridge 106 ...
User's Reference
Page 84
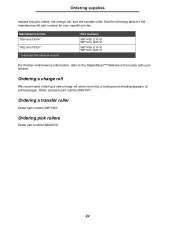
... part number 56P1357. Ordering pick rollers Order part number 99A0070. 84 Part numbers 56P1409 (110 V) 56P1410 (220 V) 56P1409 (110 V) 56P1410 (220 V) For finisher maintenance information, refer to the StapleSmart™ Reference ... when toner fog or background shading appears on printed pages. See the following table for the maintenance kit part number for : T630 and T630n* T632 and T632n* * n denotes the network version. Order Lexmark part number 99A1017. Maintenance kit for your finisher. Ordering supplies replace the pick rollers, the charge roll, and the transfer...
... part number 56P1357. Ordering pick rollers Order part number 99A0070. 84 Part numbers 56P1409 (110 V) 56P1410 (220 V) 56P1409 (110 V) 56P1410 (220 V) For finisher maintenance information, refer to the StapleSmart™ Reference ... when toner fog or background shading appears on printed pages. See the following table for the maintenance kit part number for : T630 and T630n* T632 and T632n* * n denotes the network version. Order Lexmark part number 99A1017. Maintenance kit for your finisher. Ordering supplies replace the pick rollers, the charge roll, and the transfer...
User's Reference
Page 87
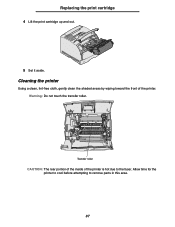
Warning: Do not touch the transfer roller. Transfer roller CAUTION: The rear portion of the inside of the printer. Replacing the print cartridge 4 Lift the print cartridge up and out. 5 Set it aside. Cleaning the printer Using a clean, lint-free cloth, gently clean the shaded areas by wiping toward the front of the printer is hot due to remove parts in this area. 87 Allow time for the printer to cool before attempting to the fuser.
Warning: Do not touch the transfer roller. Transfer roller CAUTION: The rear portion of the inside of the printer. Replacing the print cartridge 4 Lift the print cartridge up and out. 5 Set it aside. Cleaning the printer Using a clean, lint-free cloth, gently clean the shaded areas by wiping toward the front of the printer is hot due to remove parts in this area. 87 Allow time for the printer to cool before attempting to the fuser.

User's Reference
Page 94
... it. (Use any kind of the transfer roller up from its slot to replace the transfer roller. Replacing the transfer roller Replacing the transfer roller Order a new transfer roller when light print, toner fog, or background shading appears on ordering a transfer roller. See Ordering supplies for detailed installation information.... printer off and unplug the printer power cord. 2 Open the front doors and remove the print cartridge. 3 Locate the used transfer roller on the lower floor of the print cartridge housing. 4 Pry the left side of small tool.) 94 Refer to the documentation that ...
... it. (Use any kind of the transfer roller up from its slot to replace the transfer roller. Replacing the transfer roller Replacing the transfer roller Order a new transfer roller when light print, toner fog, or background shading appears on ordering a transfer roller. See Ordering supplies for detailed installation information.... printer off and unplug the printer power cord. 2 Open the front doors and remove the print cartridge. 3 Locate the used transfer roller on the lower floor of the print cartridge housing. 4 Pry the left side of small tool.) 94 Refer to the documentation that ...

User's Reference
Page 95
Replacing the transfer roller 5 Pull the transfer roller to the left to loosen the right side and then pull it aside. 6 Remove any packaging from the new transfer roller. 95 Set it straight out of the printer.
Replacing the transfer roller 5 Pull the transfer roller to the left to loosen the right side and then pull it aside. 6 Remove any packaging from the new transfer roller. 95 Set it straight out of the printer.

User's Reference
Page 96
Replacing the transfer roller 7 Grasp the transfer roller on the left side as shown. 8 Locate the small hole and insert the metal tab on the right side of the transfer roller into the hole. 96
Replacing the transfer roller 7 Grasp the transfer roller on the left side as shown. 8 Locate the small hole and insert the metal tab on the right side of the transfer roller into the hole. 96

User's Reference
Page 97
See Resetting the maintenance counter. 97 You may have to push it down for a secure fit. 10 Reinstall the print cartridge and close the front doors. 11 Plug the printer power cord into the slot. Replacing the transfer roller 9 Lower the transfer roller gently until the left metal tab fits into a properly grounded electrical outlet. 12 Reset the maintenance counter.
See Resetting the maintenance counter. 97 You may have to push it down for a secure fit. 10 Reinstall the print cartridge and close the front doors. 11 Plug the printer power cord into the slot. Replacing the transfer roller 9 Lower the transfer roller gently until the left metal tab fits into a properly grounded electrical outlet. 12 Reset the maintenance counter.

User's Reference
Page 98
Tab 4 Repeat step 3 on the end of the tab and pull the pick roller off the arm. Replacing the pick rollers Replacing the pick rollers 1 Remove the standard tray. 2 Look underneath the printer for the pick roller arm and pull it down. 3 Press on the other side to remove the other pick roller. 98
Tab 4 Repeat step 3 on the end of the tab and pull the pick roller off the arm. Replacing the pick rollers Replacing the pick rollers 1 Remove the standard tray. 2 Look underneath the printer for the pick roller arm and pull it down. 3 Press on the other side to remove the other pick roller. 98

User's Reference
Page 99
Replacing the pick rollers 5 Gently release the pick roller arm. 6 Discard the used pick rollers. Make sure the bottom arrow faces you as you align the recessed area with the tab on the arm. Note: There are two arrows on the pick roller and align it with the tab. 99 To install the new pick rollers: 1 Remove the two pick rollers from the packaging. 2 Pull the pick roller arm down. 3 Locate the recessed area on each pick roller.
Replacing the pick rollers 5 Gently release the pick roller arm. 6 Discard the used pick rollers. Make sure the bottom arrow faces you as you align the recessed area with the tab on the arm. Note: There are two arrows on the pick roller and align it with the tab. 99 To install the new pick rollers: 1 Remove the two pick rollers from the packaging. 2 Pull the pick roller arm down. 3 Locate the recessed area on each pick roller.

User's Reference
Page 100
Replacing the pick rollers 4 Push the pick roller onto the arm with the tab aligned. 5 Repeat step 3 on page 99 to step 4 to install the other pick roller. 6 Gently release the pick roller arm. 7 Insert the standard tray. 100
Replacing the pick rollers 4 Push the pick roller onto the arm with the tab aligned. 5 Repeat step 3 on page 99 to step 4 to install the other pick roller. 6 Gently release the pick roller arm. 7 Insert the standard tray. 100

User's Reference
Page 118
... sheet of print media is fed or a sheet is out of paper that may require service. Remove the print media in the drawer. Rubber feed rollers do not turn the printer on . • The power cord is plugged firmly into an outlet. • The outlet has power to it . Check the...
... sheet of print media is fed or a sheet is out of paper that may require service. Remove the print media in the drawer. Rubber feed rollers do not turn the printer on . • The power cord is plugged firmly into an outlet. • The outlet has power to it . Check the...

User's Reference
Page 126
Otherwise, continue with unfused toner, which can stain garments and skin. 200 and 201 Paper Jam Remove Cartridge 3 Gently push the feed roller release lever toward the back of the printer. 4 Pull the print media up and toward you pull, stop pulling. If the print media does not move immediately when you . Note: The print media may be covered with step 8. 126 You need to access the print media from the printer rear door.
Otherwise, continue with unfused toner, which can stain garments and skin. 200 and 201 Paper Jam Remove Cartridge 3 Gently push the feed roller release lever toward the back of the printer. 4 Pull the print media up and toward you pull, stop pulling. If the print media does not move immediately when you . Note: The print media may be covered with step 8. 126 You need to access the print media from the printer rear door.

User's Reference
Page 142
... touching this area. Lay the cartridge aside. Warning: Never touch the photoconductor drum on the cartridge to light for extended periods. 3 Gently push the feed roller release lever toward the back of the cartridge. Use the handhold on the underside of the printer. 4 Pull the print media up toward the upper...
... touching this area. Lay the cartridge aside. Warning: Never touch the photoconductor drum on the cartridge to light for extended periods. 3 Gently push the feed roller release lever toward the back of the cartridge. Use the handhold on the underside of the printer. 4 Pull the print media up toward the upper...

User's Reference
Page 149
Note: The print media may be covered with unfused toner, which can stain garments and skin. 11 Reinstall the print cartridge. 12 Close the upper and lower front doors. 13 Locate the recessed areas on each side of the printer. 10 Pull the print media up and toward you. 23x Paper Jam 9 Gently push the feed roller release lever toward the back of the duplex front access cover. 14 Slowly pull the duplex front access cover straight out. 149
Note: The print media may be covered with unfused toner, which can stain garments and skin. 11 Reinstall the print cartridge. 12 Close the upper and lower front doors. 13 Locate the recessed areas on each side of the printer. 10 Pull the print media up and toward you. 23x Paper Jam 9 Gently push the feed roller release lever toward the back of the duplex front access cover. 14 Slowly pull the duplex front access cover straight out. 149

User's Reference
Page 156
e Pull the print media out. 156 24x Paper Jam Check Tray x d Gently push the feed roller release lever toward the back of the printer.
e Pull the print media out. 156 24x Paper Jam Check Tray x d Gently push the feed roller release lever toward the back of the printer.

User's Reference
Page 161
... media does not move immediately when you pull, stop pulling. Continue with the next step. 2 Push the output bin rear door latches in the feeder rollers, and then pull the print media straight out. 4 Close all output bin rear doors. 161 27x Paper Jam Check Bin x In an optional output bin...
... media does not move immediately when you pull, stop pulling. Continue with the next step. 2 Push the output bin rear door latches in the feeder rollers, and then pull the print media straight out. 4 Close all output bin rear doors. 161 27x Paper Jam Check Bin x In an optional output bin...

User's Reference
Page 283
...tray 49 multipurpose feeder 55, 61 transparencies input tray 49 multipurpose feeder 61 Local Printer Setup Utility 185 drivers CD 185 Help 186 Lexmark Web site 185 values 186 Finishing Settings 186 Paper Settings 186 Parallel Settings 186 PCL Emulation Settings 186 PostScript Settings 186 Quality Settings...cartridge 83 Prebate 83 regular 83 print cartridge installing a new one 88 storing 86 maintenance charge roll 90 label fuser cleaner 101 pick rollers 98 staple cartridge 104 transfer roll 94 maximum stack height 60 memory Print and Hold function 187 Menu button 208 menu settings page, printing...
...tray 49 multipurpose feeder 55, 61 transparencies input tray 49 multipurpose feeder 61 Local Printer Setup Utility 185 drivers CD 185 Help 186 Lexmark Web site 185 values 186 Finishing Settings 186 Paper Settings 186 Parallel Settings 186 PCL Emulation Settings 186 PostScript Settings 186 Quality Settings...cartridge 83 Prebate 83 regular 83 print cartridge installing a new one 88 storing 86 maintenance charge roll 90 label fuser cleaner 101 pick rollers 98 staple cartridge 104 transfer roll 94 maximum stack height 60 memory Print and Hold function 187 Menu button 208 menu settings page, printing...
User's Reference
Page 288
... Reference (Help Menu) 263 R recommended papers 30 Remove Held Jobs (Utilities Menu) 228 repeat print 188 replacing charge roll 90 label fuser cleaner 101 pick rollers 98 staple cartridge 104 transfer roll 94 reserve print 189 Reset Active Bin (Job Menu) 233 Reset Printer (Job Menu) 232 resetting printer 232 resident...
... Reference (Help Menu) 263 R recommended papers 30 Remove Held Jobs (Utilities Menu) 228 repeat print 188 replacing charge roll 90 label fuser cleaner 101 pick rollers 98 staple cartridge 104 transfer roll 94 reserve print 189 Reset Active Bin (Job Menu) 233 Reset Printer (Job Menu) 232 resetting printer 232 resident...
Service Manual
Page 63
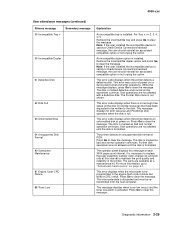
... Engine Code CRC Failure 88 Toner Low Explanation An incompatible tray is installed. The operator panel displays this interval to replace the fuser assembly, transfer roller, charge roll, and pick rolls at this message at POR. This error displays when the microcode to be written to clear the message.
... Engine Code CRC Failure 88 Toner Low Explanation An incompatible tray is installed. The operator panel displays this interval to replace the fuser assembly, transfer roller, charge roll, and pick rolls at this message at POR. This error displays when the microcode to be written to clear the message.

Service Manual
Page 68
... all sixteen blocks display and then they all turn . 13. Performing Self Test appears on . Busy appears on the display. 2-34 Service Manual The exit rollers turn off. The operator panel LED starts blinking. 14. The fuser lamp turns on the display. • The high-capacity option elevator tray moves to...
... all sixteen blocks display and then they all turn . 13. Performing Self Test appears on . Busy appears on the display. 2-34 Service Manual The exit rollers turn off. The operator panel LED starts blinking. 14. The fuser lamp turns on the display. • The high-capacity option elevator tray moves to...


