
User's Guide
Page 5
... 52 Chapter 21: Ordering supplies 53 Maintenance kit 53 Print cartridges 53 Label fuser cleaner 53 Charge roll 53 Transfer roll 54 Fuser assembly 54 Chapter 22: Storing supplies 55 Chapter 23: Checking ...
... 52 Chapter 21: Ordering supplies 53 Maintenance kit 53 Print cartridges 53 Label fuser cleaner 53 Charge roll 53 Transfer roll 54 Fuser assembly 54 Chapter 22: Storing supplies 55 Chapter 23: Checking ...

User's Guide
Page 51
... the new charge roll. 5 Reinstall the print cartridge and close the front doors. 6 Plug the printer power cord into a properly grounded electrical outlet. 7 Reset the maintenance counter. 49 Complete the following steps to the documentation that comes with the charge roll for information on ordering a charge roll. 17 Replacing the charge...
... the new charge roll. 5 Reinstall the print cartridge and close the front doors. 6 Plug the printer power cord into a properly grounded electrical outlet. 7 Reset the maintenance counter. 49 Complete the following steps to the documentation that comes with the charge roll for information on ordering a charge roll. 17 Replacing the charge...

User's Guide
Page 54
... state. 52 The printer performs its power-on sequence, and then Config Menu appears on the display. 20 Resetting the maintenance counter After replacing all the items in the maintenance kit, reset the maintenance counter: 1 Press and hold the Select and Return buttons while you see Reset Maint Cnt and then press Select. Activating...
... state. 52 The printer performs its power-on sequence, and then Config Menu appears on the display. 20 Resetting the maintenance counter After replacing all the items in the maintenance kit, reset the maintenance counter: 1 Press and hold the Select and Return buttons while you see Reset Maint Cnt and then press Select. Activating...

User's Guide
Page 55
... printer. shipped with a 20,000 pages label fuser cleaner2) 1 Sold at www.lexmark.com. They are included in the U.S. Charge roll Order part number 99A1017. 53 Maintenance kit 80 Scheduled Maintenance appears on the display after 250,000 pages have printed to let you know it...designed for duplex printing. 20 Ordering supplies For best results, use Lexmark supplies with the understanding that you return your empty cartridges only to Lexmark. or Canada, call 1-800438-2468 for information about Lexmark Authorized Supplies Dealers in your printer: Print cartridge part number1 Average ...
... printer. shipped with a 20,000 pages label fuser cleaner2) 1 Sold at www.lexmark.com. They are included in the U.S. Charge roll Order part number 99A1017. 53 Maintenance kit 80 Scheduled Maintenance appears on the display after 250,000 pages have printed to let you know it...designed for duplex printing. 20 Ordering supplies For best results, use Lexmark supplies with the understanding that you return your empty cartridges only to Lexmark. or Canada, call 1-800438-2468 for information about Lexmark Authorized Supplies Dealers in your printer: Print cartridge part number1 Average ...
User's Guide
Page 213
..., printing 176 statistics, storing 170 storing paper 45 Substitute Size (Paper Menu) 147 supplies 53 charge roll 53 fuser assembly 54 label fuser cleaner 53 maintenance kit 53 ordering 53 print cartridges 53 storing 55 transfer roll 54 Symbol Set (PCL Emul Menu) 153 symbol sets, definition 197 T test printing, Hex... tray linking 46 Tray Renumber (PCL Emul Menu) 153 TrueType fonts 191 typeface, description 189 U unacceptable paper types 20 Universal Setup (Paper Menu) 148 USB Buffer (USB Menu) 180 USB Menu 178 Job Buffering 178 MAC Binary PS 179 NPA Mode 179 PCL SmartSwitch 179 PS SmartSwitch 180...
..., printing 176 statistics, storing 170 storing paper 45 Substitute Size (Paper Menu) 147 supplies 53 charge roll 53 fuser assembly 54 label fuser cleaner 53 maintenance kit 53 ordering 53 print cartridges 53 storing 55 transfer roll 54 Symbol Set (PCL Emul Menu) 153 symbol sets, definition 197 T test printing, Hex... tray linking 46 Tray Renumber (PCL Emul Menu) 153 TrueType fonts 191 typeface, description 189 U unacceptable paper types 20 Universal Setup (Paper Menu) 148 USB Buffer (USB Menu) 180 USB Menu 178 Job Buffering 178 MAC Binary PS 179 NPA Mode 179 PCL SmartSwitch 179 PS SmartSwitch 180...

Service Manual
Page 57
...29 Press Go to clear the message. The operator panel displays this message. The parts are not allowed until the disk is marked as a maintenance kit. The microcode data is necessary to replace the fuser assembly, transfer roller, and charge roll at this interval to clear this message at power ...on. 4520-xxx User Error Message 62 Disk Full 63 Unformatted Disk 80 Scheduled Maintenance 81 Engine Code CRC Failure 88 Toner Low Explanation This error code is displayed when there is not enough free space on page 6-2. ...
...29 Press Go to clear the message. The operator panel displays this message. The parts are not allowed until the disk is marked as a maintenance kit. The microcode data is necessary to replace the fuser assembly, transfer roller, and charge roll at this interval to clear this message at power ...on. 4520-xxx User Error Message 62 Disk Full 63 Unformatted Disk 80 Scheduled Maintenance 81 Engine Code CRC Failure 88 Toner Low Explanation This error code is displayed when there is not enough free space on page 6-2. ...
Service Manual
Page 131
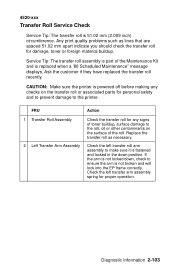
...the transfer roll or associated parts for personal safety and to prevent damage to the roll, oil or other contaminants on the surface of the Maintenance Kit and is 51.02 mm (2.009 inch) circumference. Replace the transfer roll as lines that are spaced 51.02 mm apart indicate you should...spring for damage, toner or foreign material buildup. 4520-xxx Transfer Roll Service Check Service Tip: The transfer roll is replaced when a '80 Scheduled Maintenance" message displays. Check the left transfer roll arm assembly to ensure the arm is fastened and locked in the down , check to make sure ...
...the transfer roll or associated parts for personal safety and to prevent damage to the roll, oil or other contaminants on the surface of the Maintenance Kit and is 51.02 mm (2.009 inch) circumference. Replace the transfer roll as lines that are spaced 51.02 mm apart indicate you should...spring for damage, toner or foreign material buildup. 4520-xxx Transfer Roll Service Check Service Tip: The transfer roll is replaced when a '80 Scheduled Maintenance" message displays. Check the left transfer roll arm assembly to ensure the arm is fastened and locked in the down , check to make sure ...

Service Manual
Page 151
Pressing Select resets the maintenance page counter to zero: Select Reset Maintenance Count. To reset the Maintenance Page Count to zero. Reset Maintenance Count Saved displays momentarily. 4520-xxx Maintenance Page Count This counter is reset by the servicer after a "80 Scheduled Maintenance" message displays (300K copies) and a maintenance kit is complete, the menu returns to the Printer Setup...
Pressing Select resets the maintenance page counter to zero: Select Reset Maintenance Count. To reset the Maintenance Page Count to zero. Reset Maintenance Count Saved displays momentarily. 4520-xxx Maintenance Page Count This counter is reset by the servicer after a "80 Scheduled Maintenance" message displays (300K copies) and a maintenance kit is complete, the menu returns to the Printer Setup...

Service Manual
Page 244
... panel displays the message "80 Scheduled Maintenance" at this interval to clear the "80 Scheduled Maintenance" message. See "Maintenance Page Count" on page 3-19. 6-2 Service Manual The parts are available as a maintenance kit with the following part numbers: 115 V 630 W Maintenance Kit 99A2420 220 V 630 W Maintenance Kit 99A2421 After replacing the kit, the maintenance count must be reset to zero to...
... panel displays the message "80 Scheduled Maintenance" at this interval to clear the "80 Scheduled Maintenance" message. See "Maintenance Page Count" on page 3-19. 6-2 Service Manual The parts are available as a maintenance kit with the following part numbers: 115 V 630 W Maintenance Kit 99A2420 220 V 630 W Maintenance Kit 99A2421 After replacing the kit, the maintenance count must be reset to zero to...
