Quick Reference
Page 4
...you may be used to print documents using the printer software Software HelpHelp installed automatically with fewer cartridges. • Clean the printhead. For Macintosh users In Mac OS X version 10.6 1 From the Applications folder in a minimum-power standby mode after the... folder from any printer software program or application. These features clean the printhead nozzles to reduce their environmental impact. The latest supplemental information, updates, Support Web site-http://support.lexmark.com online technical support, and telephone support * Available on the installation ...
...you may be used to print documents using the printer software Software HelpHelp installed automatically with fewer cartridges. • Clean the printhead. For Macintosh users In Mac OS X version 10.6 1 From the Applications folder in a minimum-power standby mode after the... folder from any printer software program or application. These features clean the printhead nozzles to reduce their environmental impact. The latest supplemental information, updates, Support Web site-http://support.lexmark.com online technical support, and telephone support * Available on the installation ...
Quick Reference
Page 6
...3 7 Use the 7 Ink cartridge access 8 Scanner unit To Install, replace, or remove ink cartridges. • Access the ink cartridges and printhead. • Remove paper jams. Using the printer control panel The following diagrams explain the sections of paper. • Remove paper jams.... 6 Printhead access Install the printhead. Note: When the printer is installed in or removing a USB cable or installation cable. 4 Power supply with port Connect the ...
...3 7 Use the 7 Ink cartridge access 8 Scanner unit To Install, replace, or remove ink cartridges. • Access the ink cartridges and printhead. • Remove paper jams. Using the printer control panel The following diagrams explain the sections of paper. • Remove paper jams.... 6 Printhead access Install the printhead. Note: When the printer is installed in or removing a USB cable or installation cable. 4 Power supply with port Connect the ...
Quick Reference
Page 10
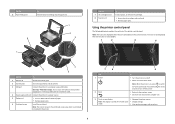
Lexmark S600 Series models Item Return Program Regular cartridge2 Cartridge1 Black cartridge 100 100A High yield black cartridge 100XL 100XLA Yellow color cartridge 100 100A High yield yellow color cartridge 100XL 100XLA Cyan color cartridge 100 100A High yield cyan color cartridge 100XL 100XLA Magenta color cartridge 100 100A High yield magenta color... ink remaining in the printhead nozzles may dry out. 1 Turn on the Lexmark Web site at www.lexmark.com/pageyields. Note: The printhead moves to Lexmark for a single use only Lexmark ink cartridges. Replacing ink...
Lexmark S600 Series models Item Return Program Regular cartridge2 Cartridge1 Black cartridge 100 100A High yield black cartridge 100XL 100XLA Yellow color cartridge 100 100A High yield yellow color cartridge 100XL 100XLA Cyan color cartridge 100 100A High yield cyan color cartridge 100XL 100XLA Magenta color cartridge 100 100A High yield magenta color... ink remaining in the printhead nozzles may dry out. 1 Turn on the Lexmark Web site at www.lexmark.com/pageyields. Note: The printhead moves to Lexmark for a single use only Lexmark ink cartridges. Replacing ink...
Quick Reference
Page 11
... ink. • If the ink levels are too low, then you must replace the ink cartridges before you can clean the printhead nozzles. Aligning the printhead If the characters or lines on the computer screen. Note: Do not remove the alignment page until printing is turned off. If... your prints. For Macintosh users Note: This feature is sometimes due to the following tasks that you can perform, your document again. Clean the printhead nozzles to improve print quality, then print your printer performs an automatic maintenance cycle every week if it is finished. 5 Close the printer. A...
... ink. • If the ink levels are too low, then you must replace the ink cartridges before you can clean the printhead nozzles. Aligning the printhead If the characters or lines on the computer screen. Note: Do not remove the alignment page until printing is turned off. If... your prints. For Macintosh users Note: This feature is sometimes due to the following tasks that you can perform, your document again. Clean the printhead nozzles to improve print quality, then print your printer performs an automatic maintenance cycle every week if it is finished. 5 Close the printer. A...
Quick Reference
Page 14
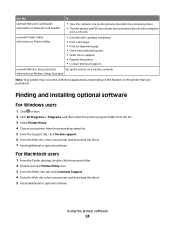
... printer has wireless capability. (referred to as Wireless Setup Assistant) Uninstaller Remove the printer software from your computer. Use Visit Lexmark SmartSolutions To • Visit the SmartSolutions Web site. • Choose your printer. Printing Printing a document For Windows users ... is automatically installed with cartridge installation. • Print a test page. • Print an alignment page. • Clean the printhead nozzles. • Order ink or supplies. • Register the printer. • Contact technical support. Web Links Web Links are...
... printer has wireless capability. (referred to as Wireless Setup Assistant) Uninstaller Remove the printer software from your computer. Use Visit Lexmark SmartSolutions To • Visit the SmartSolutions Web site. • Choose your printer. Printing Printing a document For Windows users ... is automatically installed with cartridge installation. • Print a test page. • Print an alignment page. • Clean the printhead nozzles. • Order ink or supplies. • Register the printer. • Contact technical support. Web Links Web Links are...
Quick Reference
Page 21
... not solve the problem, then try the following: REMOVE AND REINSERT THE PRINTHEAD 1 Open the printer and lift the latch. 2 W I F I PRINTING 21 If Troubleshooting does not solve your problem Visit our Web site at support.lexmark.com to find the following : CHANGE THE LANGUAGE USING THE PRINTER MENUS ... clear any errors. • Check for telephone technical support Setup troubleshooting • "Incorrect language appears on the display" on page 21 • "Printhead errors" on page 21 • "Software did not install" on page 22 • "Print job does not print or is missing pages" on...
... not solve the problem, then try the following: REMOVE AND REINSERT THE PRINTHEAD 1 Open the printer and lift the latch. 2 W I F I PRINTING 21 If Troubleshooting does not solve your problem Visit our Web site at support.lexmark.com to find the following : CHANGE THE LANGUAGE USING THE PRINTER MENUS ... clear any errors. • Check for telephone technical support Setup troubleshooting • "Incorrect language appears on the display" on page 21 • "Printhead errors" on page 21 • "Software did not install" on page 22 • "Print job does not print or is missing pages" on...
Quick Reference
Page 22
... printer. Warning-Potential Damage: Do not touch the printhead nozzles. 3 Wipe the printhead contacts using a clean, lint-free cloth. 4 Reinsert the printhead, and then close the latch until it . 3 Plug the power cord into the matching color slot of the printhead. 3 Close the printer. RECONNECT THE PRINTER POWER ... or more of the computer. You may have problems, then try removing and reinstalling the software. Note: If removing and reinserting the printhead does not resolve the error, then contact technical support. If the cable is marked with a USB symbol. Software did not install If...
... printer. Warning-Potential Damage: Do not touch the printhead nozzles. 3 Wipe the printhead contacts using a clean, lint-free cloth. 4 Reinsert the printhead, and then close the latch until it . 3 Plug the power cord into the matching color slot of the printhead. 3 Close the printer. RECONNECT THE PRINTER POWER ... or more of the computer. You may have problems, then try removing and reinstalling the software. Note: If removing and reinserting the printhead does not resolve the error, then contact technical support. If the cable is marked with a USB symbol. Software did not install If...
Quick Reference
Page 23
...RECONNECT THE PRINTER POWER SUPPLY 1 Turn off slowly, then the printer is finished. REINSTALL THE INK CARTRIDGES AND DEEP CLEAN AND ALIGN THE PRINTHEAD 1 Reinstall the ink cartridges, see the Wireless troubleshooting section. RECONNECT THE PRINTER POWER SUPPLY 1 Turn off the printer. 2 Pull out ...; For a printer that is damaged, then use a new one or more of the printer control panel, navigate to Deep Clean Printhead: > More Options > Deep Clean Printhead A cleaning page prints. 4 Navigate to wake up menu, choose your printer software or firmware. If the printer will not come...
...RECONNECT THE PRINTER POWER SUPPLY 1 Turn off slowly, then the printer is finished. REINSTALL THE INK CARTRIDGES AND DEEP CLEAN AND ALIGN THE PRINTHEAD 1 Reinstall the ink cartridges, see the Wireless troubleshooting section. RECONNECT THE PRINTER POWER SUPPLY 1 Turn off the printer. 2 Pull out ...; For a printer that is damaged, then use a new one or more of the printer control panel, navigate to Deep Clean Printhead: > More Options > Deep Clean Printhead A cleaning page prints. 4 Navigate to wake up menu, choose your printer software or firmware. If the printer will not come...

User Guide
Page 9
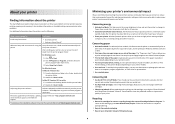
... of throwing it here Setup documentation The setup documentation came with fewer cartridges. • Clean the printhead. These features clean the printhead nozzles to request a postage-paid bag. • Recycle the product packaging. • Recycle your... prints. Initial setup instructions: • Connecting the printer • Installing the printer software Find it away. • Recycle paper from discarded print jobs. • Use recycled paper. To read the Lexmark...
... of throwing it here Setup documentation The setup documentation came with fewer cartridges. • Clean the printhead. These features clean the printhead nozzles to request a postage-paid bag. • Recycle the product packaging. • Recycle your... prints. Initial setup instructions: • Connecting the printer • Installing the printer software Find it away. • Recycle paper from discarded print jobs. • Use recycled paper. To read the Lexmark...

User Guide
Page 12
... to a power source. 5 Duplex unit • Print on both sides of a sheet of paper. • Remove paper jams. 6 Printhead Install, replace, or remove ink cartridges. 7 Scanner unit • Access the ink cartridges and printhead. • Remove paper jams. About your printer 12 Operate the printer. Prevent items from falling into the paper...
... to a power source. 5 Duplex unit • Print on both sides of a sheet of paper. • Remove paper jams. 6 Printhead Install, replace, or remove ink cartridges. 7 Scanner unit • Access the ink cartridges and printhead. • Remove paper jams. About your printer 12 Operate the printer. Prevent items from falling into the paper...
User Guide
Page 14
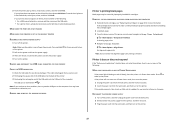
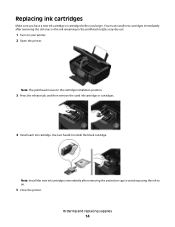
... you begin. You must install new cartridges immediately after removing the protective cap to avoid exposing the ink to air. 5 Close the printer. Note: The printhead moves to install the black cartridge. Note: Install the new ink cartridges immediately after removing the old ones or the ink remaining in the...
... you begin. You must install new cartridges immediately after removing the protective cap to avoid exposing the ink to air. 5 Close the printer. Note: The printhead moves to install the black cartridge. Note: Install the new ink cartridges immediately after removing the old ones or the ink remaining in the...
User Guide
Page 24
Lexmark Wireless Setup Assistant Set up the printer on a wireless network. (referred to as Wireless Setup Assistant) Note: Your printer may not come with cartridge installation. • Print a test page. • Print an alignment page. • Clean the printhead nozzles. • Order ink or supplies. • Register the ...site, select your printer and download the driver. 5 Install additional or optional software. Using the printer software 24 Use the To Lexmark Network Card Reader (referred to as Network Card Reader) • View the contents of the printer that you purchased...
Lexmark Wireless Setup Assistant Set up the printer on a wireless network. (referred to as Wireless Setup Assistant) Note: Your printer may not come with cartridge installation. • Print a test page. • Print an alignment page. • Clean the printhead nozzles. • Order ink or supplies. • Register the ...site, select your printer and download the driver. 5 Install additional or optional software. Using the printer software 24 Use the To Lexmark Network Card Reader (referred to as Network Card Reader) • View the contents of the printer that you purchased...

User Guide
Page 97
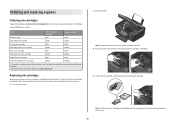
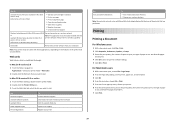
... Home. 4 Choose your printer from the Maintenance tab. Note: Do not remove the alignment page until printing is plugged into an electrical outlet. Aligning the printhead If the characters or lines on if it is finished. Checking ink levels Using the printer control panel From the home screen, touch . Maintaining the... list. 5 From the Maintenance tab, click Check ink levels. Using the printer control panel 1 Load plain paper. 2 From the home screen, navigate to align the printhead.
... Home. 4 Choose your printer from the Maintenance tab. Note: Do not remove the alignment page until printing is plugged into an electrical outlet. Aligning the printhead If the characters or lines on if it is finished. Checking ink levels Using the printer control panel From the home screen, touch . Maintaining the... list. 5 From the Maintenance tab, click Check ink levels. Using the printer control panel 1 Load plain paper. 2 From the home screen, navigate to align the printhead.

User Guide
Page 98
...cartridges before you aligned the cartridges to improve print quality, then print your prints. If print quality has not improved, then clean the printhead nozzles. For Macintosh users 1 Load plain paper. 2 From the Finder desktop, double-click the printer program folder. 3 Select Printer ...so clean them only when necessary. • Deep cleaning uses more ink, so try the Clean Printhead option first to Clean Printhead or Deep Clean Printhead: > More Options > Clean Printhead or Deep Clean Printhead A cleaning page prints. Using the printer software For Windows users 1 Click or Start. 2 ...
...cartridges before you aligned the cartridges to improve print quality, then print your prints. If print quality has not improved, then clean the printhead nozzles. For Macintosh users 1 Load plain paper. 2 From the Finder desktop, double-click the printer program folder. 3 Select Printer ...so clean them only when necessary. • Deep cleaning uses more ink, so try the Clean Printhead option first to Clean Printhead or Deep Clean Printhead: > More Options > Clean Printhead or Deep Clean Printhead A cleaning page prints. Using the printer software For Windows users 1 Click or Start. 2 ...
User Guide
Page 101
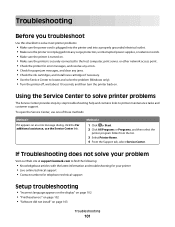
...find the following: • Knowledgebase articles with the latest information and troubleshooting for your problem Visit our Web site at support.lexmark.com to printer maintenance tasks and customer support. If Troubleshooting does not solve your printer • Live online technical support •... errors. • Check for telephone technical support Setup troubleshooting • "Incorrect language appears on the display" on page 102 • "Printhead errors" on page 102 • "Software did not install" on page 103 Troubleshooting 101 To open the Service Center, use one of ...
...find the following: • Knowledgebase articles with the latest information and troubleshooting for your problem Visit our Web site at support.lexmark.com to printer maintenance tasks and customer support. If Troubleshooting does not solve your printer • Live online technical support •... errors. • Check for telephone technical support Setup troubleshooting • "Incorrect language appears on the display" on page 102 • "Printhead errors" on page 102 • "Software did not install" on page 103 Troubleshooting 101 To open the Service Center, use one of ...
User Guide
Page 102
... USING THE PRINTER MENUS 1 From the home screen, navigate to Use Factory Defaults: > Use Factory Defaults 2 Touch Yes. Warning-Potential Damage: Do not touch the printhead nozzles. The printer resets and starts the initial printer setup. 3 Complete the initial printer setup. • "Print job does not print or is missing pages... Incorrect language appears on the display If the "Before you troubleshoot" checklist does not solve the problem, then try the following : REMOVE AND REINSERT THE PRINTHEAD 1 Open the printer and lift the latch. 2 Remove the...
... USING THE PRINTER MENUS 1 From the home screen, navigate to Use Factory Defaults: > Use Factory Defaults 2 Touch Yes. Warning-Potential Damage: Do not touch the printhead nozzles. The printer resets and starts the initial printer setup. 3 Complete the initial printer setup. • "Print job does not print or is missing pages... Incorrect language appears on the display If the "Before you troubleshoot" checklist does not solve the problem, then try the following : REMOVE AND REINSERT THE PRINTHEAD 1 Open the printer and lift the latch. 2 Remove the...

User Guide
Page 103
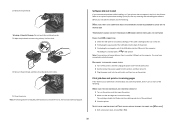
... BEFORE INSTALLING THE SOFTWARE CHECK THE USB CONNECTION 1 Check the USB cable for any obvious damage. Note: If you continue to a defective port. 3 Wipe the printhead contacts using a clean, lint-free cloth. 4 Reinsert the printhead, and then close the latch until it clicks. 5 Close the printer. Note: If removing and reinserting the...
... BEFORE INSTALLING THE SOFTWARE CHECK THE USB CONNECTION 1 Check the USB cable for any obvious damage. Note: If you continue to a defective port. 3 Wipe the printhead contacts using a clean, lint-free cloth. 4 Reinsert the printhead, and then close the latch until it clicks. 5 Close the printer. Note: If removing and reinserting the...

User Guide
Page 104
... square end of the USB cable into the back of the printer. 3 Firmly plug the rectangular end of the USB cable into the matching color slot of the printhead. 3 Close the printer. The USB port is damaged, then use a new one or more of the computer. Note: If you troubleshoot" checklist does...
... square end of the USB cable into the back of the printer. 3 Firmly plug the rectangular end of the USB cable into the matching color slot of the printhead. 3 Close the printer. The USB port is damaged, then use a new one or more of the computer. Note: If you troubleshoot" checklist does...
User Guide
Page 105
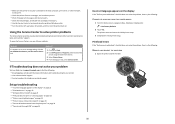
...not respond If the "Before you have jobs stuck in Power Saver mode. REINSTALL THE INK CARTRIDGES AND DEEP CLEAN AND ALIGN THE PRINTHEAD 1 Reinstall the ink cartridges, see "Replacing ink cartridges" on page 14 for your printer software or firmware. An alignment page prints....then try installing the cartridges again. 2 Load plain paper. 3 From the home screen of the printer control panel, navigate to Deep Clean Printhead: > More Options > Deep Clean Printhead A cleaning page prints. 4 Navigate to Align Printer: > More Options > Align Printer. If this problem persists, then check our Web...
...not respond If the "Before you have jobs stuck in Power Saver mode. REINSTALL THE INK CARTRIDGES AND DEEP CLEAN AND ALIGN THE PRINTHEAD 1 Reinstall the ink cartridges, see "Replacing ink cartridges" on page 14 for your printer software or firmware. An alignment page prints....then try installing the cartridges again. 2 Load plain paper. 3 From the home screen of the printer control panel, navigate to Deep Clean Printhead: > More Options > Deep Clean Printhead A cleaning page prints. 4 Navigate to Align Printer: > More Options > Align Printer. If this problem persists, then check our Web...
User Guide
Page 110
SELECT A HIGHER PRINT QUALITY FROM THE PRINTER SOFTWARE MAKE SURE THE INK CARTRIDGES ARE PROPERLY INSTALLED ALIGN THE PRINTHEAD CLEAN OR DEEP CLEAN THE PRINTHEAD NOZZLES Note: If these solutions do not remove the streaks or lines on page 111 Troubleshooting 110 Try one or more RAM. Copy and scan ...
SELECT A HIGHER PRINT QUALITY FROM THE PRINTER SOFTWARE MAKE SURE THE INK CARTRIDGES ARE PROPERLY INSTALLED ALIGN THE PRINTHEAD CLEAN OR DEEP CLEAN THE PRINTHEAD NOZZLES Note: If these solutions do not remove the streaks or lines on page 111 Troubleshooting 110 Try one or more RAM. Copy and scan ...


