
Quick Reference
Page 3
... cartridges 18 Using shortcuts 20 What are shortcuts?...20 Getting started...20 Using the printer software 22 Minimum system requirements 22 Installing the printer software 22 Using the Windows printer software 22 Using the Macintosh printer software 23 Printing 25 Printing a document...25 Printing on both sides of the...line 32 Step 2: Check the dial tone 39 Step 3: Set your fax name and fax number 39 Step 4: Set the printer to receive faxes automatically or manually 39 Step 5: Set the number of rings 40 Step 6: Create a contact list 40 Faxing 41 Sending faxes...41 Receiving faxes...
... cartridges 18 Using shortcuts 20 What are shortcuts?...20 Getting started...20 Using the printer software 22 Minimum system requirements 22 Installing the printer software 22 Using the Windows printer software 22 Using the Macintosh printer software 23 Printing 25 Printing a document...25 Printing on both sides of the...line 32 Step 2: Check the dial tone 39 Step 3: Set your fax name and fax number 39 Step 4: Set the printer to receive faxes automatically or manually 39 Step 5: Set the number of rings 40 Step 6: Create a contact list 40 Faxing 41 Sending faxes...41 Receiving faxes...

Quick Reference
Page 5
.... Use the preview features found in Toolbars, the Print or Print Preview dialog, or the printer display (depending on one side of the paper manually or automatically (depending on your printer model). • Preview print jobs before printing. Find it away. • Recycle paper from...the paper. Inks in a minimum‑power standby mode after the printer is left idle for reuse or recycling through the Lexmark Cartridge Collection Program. To return an ink cartridge, go to : Applications > select your printer folder 2 Double‑click User's Guide. Follow the instructions to...
.... Use the preview features found in Toolbars, the Print or Print Preview dialog, or the printer display (depending on one side of the paper manually or automatically (depending on your printer model). • Preview print jobs before printing. Find it away. • Recycle paper from...the paper. Inks in a minimum‑power standby mode after the printer is left idle for reuse or recycling through the Lexmark Cartridge Collection Program. To return an ink cartridge, go to : Applications > select your printer folder 2 Double‑click User's Guide. Follow the instructions to...
Quick Reference
Page 15
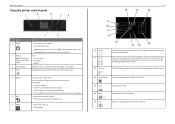
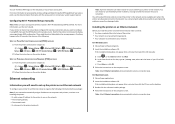
...4 Home Navigate from a saved list of copies or prints you have already begun entering the number. 10 Dial tone Dial the telephone number manually using the keypad before sending the fax. 11 Address Book Access fax numbers from any level in the menu back to the home screen. ...10 9 8 8 Redial 9 Pause 18 15 17 16 Display the last number dialed. About your printer Using the printer control panel Use To 1 Power • Turn the printer on and off in Sleep mode. • Printer status • Messages • Menus 3 Arrow buttons Navigate to menu or submenu items that appear on...
...4 Home Navigate from a saved list of copies or prints you have already begun entering the number. 10 Dial tone Dial the telephone number manually using the keypad before sending the fax. 11 Address Book Access fax numbers from any level in the menu back to the home screen. ...10 9 8 8 Redial 9 Pause 18 15 17 16 Display the last number dialed. About your printer Using the printer control panel Use To 1 Power • Turn the printer on and off in Sleep mode. • Printer status • Messages • Menus 3 Arrow buttons Navigate to menu or submenu items that appear on...
Quick Reference
Page 22
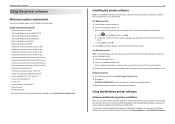
..., where D is available only at http://support.lexmark.com. 2 Navigate to: SUPPORT & DOWNLOADS > select your printer > select your operating system 3 Download the driver, and then install the printer software. You may have chosen to 500MB of your...printer, select the custom install option, and then select all packages listed. 1 Close all open software programs. 2 Insert the installation software CD. c Press Enter, or click OK. 3 Click Install, and then follow the instructions on the computer screen. If the installation dialog does not appear after a minute, then launch the CD manually...
..., where D is available only at http://support.lexmark.com. 2 Navigate to: SUPPORT & DOWNLOADS > select your printer > select your operating system 3 Download the driver, and then install the printer software. You may have chosen to 500MB of your...printer, select the custom install option, and then select all packages listed. 1 Close all open software programs. 2 Insert the installation software CD. c Press Enter, or click OK. 3 Click Install, and then follow the instructions on the computer screen. If the installation dialog does not appear after a minute, then launch the CD manually...
Quick Reference
Page 27
...page (left edge for portrait orientation and top edge for landscape orientation). 5 Press , and then follow the instructions on the scanner glass. 3 From the printer control panel, navigate to: > Copy > > 2‑Sided Copies 4 Press the left or right arrow button to scroll to black‑and‑white... as magazine clippings) into the ADF or facedown on the display. Tips for making a two‑sided copy manually. If you need to your choice comes on the scanner glass. 3 From the printer control panel, navigate to: > Copy > > Copies 27 4 Press the left or right arrow button to ...
...page (left edge for portrait orientation and top edge for landscape orientation). 5 Press , and then follow the instructions on the scanner glass. 3 From the printer control panel, navigate to: > Copy > > 2‑Sided Copies 4 Press the left or right arrow button to scroll to black‑and‑white... as magazine clippings) into the ADF or facedown on the display. Tips for making a two‑sided copy manually. If you need to your choice comes on the scanner glass. 3 From the printer control panel, navigate to: > Copy > > Copies 27 4 Press the left or right arrow button to ...
Quick Reference
Page 32
... make any number of rings that is applicable to your telephone service. Tips for this setup: • You can set the printer to receive faxes automatically (Auto Answer On) or manually (Auto Answer Off). • If you want to receive faxes automatically (Auto Answer On), then set up the... printer to pick up on any electrical or cabling connections, such as the power supply cord or telephone, during a lightning storm. Do not set the printer to fax CAUTION...
... make any number of rings that is applicable to your telephone service. Tips for this setup: • You can set the printer to receive faxes automatically (Auto Answer On) or manually (Auto Answer Off). • If you want to receive faxes automatically (Auto Answer On), then set up the... printer to pick up on any electrical or cabling connections, such as the power supply cord or telephone, during a lightning storm. Do not set the printer to fax CAUTION...

Quick Reference
Page 33
...distinctive ring service, then make sure that you subscribe to a distinctive ring service. If you have set it to receive faxes automatically. Otherwise, the printer will not receive faxes even if you have set it to receive faxes automatically. • If you have only one telephone number on your line... machine picks up after four rings, then set the correct ring pattern for this setup: • This setup works best if you set the printer to pick up calls first and your line, then you need to set the printer to receive faxes manually (Auto Answer Off). Tips for the...
...distinctive ring service, then make sure that you subscribe to a distinctive ring service. If you have set it to receive faxes automatically. Otherwise, the printer will not receive faxes even if you have set it to receive faxes automatically. • If you have only one telephone number on your line... machine picks up after four rings, then set the correct ring pattern for this setup: • This setup works best if you set the printer to pick up calls first and your line, then you need to set the printer to receive faxes manually (Auto Answer Off). Tips for the...
Quick Reference
Page 34
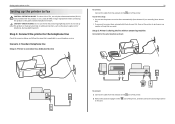
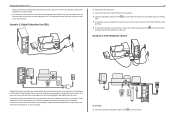
..., telephone, answering machine) in your regular telephone line into two channels: voice and Internet. Setting up the printer to fax When you answer the telephone and you hear fax tones, press *9* or the manual answer code on the telephone to receive the fax. • You can use the same line for analog... voice calls (including faxes) and digital Internet access. This setting works best if you need to the port of the printer to the phone port on the...
..., telephone, answering machine) in your regular telephone line into two channels: voice and Internet. Setting up the printer to fax When you answer the telephone and you hear fax tones, press *9* or the manual answer code on the telephone to receive the fax. • You can use the same line for analog... voice calls (including faxes) and digital Internet access. This setting works best if you need to the port of the printer to the phone port on the...

Quick Reference
Page 39
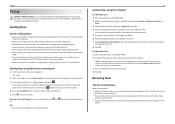
... for a dial tone through the port on the back of the printer, plug an analog telephone into the wall jack. 2 Listen for a dial tone. Step 4: Set the printer to receive faxes automatically or manually If the printer is connected to a dedicated fax line or sharing the line with...then press . 4 Enter your fax number or your fax machine when a transmission is made. If the printer is sharing the line with an answering machine, then you can set the printer to receive faxes manually. 1 From the printer control panel, navigate to: > Setup > > Fax Setup > > Ringing and Answering > > Auto Answer...
... for a dial tone through the port on the back of the printer, plug an analog telephone into the wall jack. 2 Listen for a dial tone. Step 4: Set the printer to receive faxes automatically or manually If the printer is connected to a dedicated fax line or sharing the line with...then press . 4 Enter your fax number or your fax machine when a transmission is made. If the printer is sharing the line with an answering machine, then you can set the printer to receive faxes manually. 1 From the printer control panel, navigate to: > Setup > > Fax Setup > > Ringing and Answering > > Auto Answer...
Quick Reference
Page 41
... and then click Properties, Preferences, Options, or Setup. 3 Click the Fax tab, and then make sure that the printer is on and connected to receive faxes manually (Auto Answer Off), then make sure Enable Fax is on and connected to start the fax job. Sending faxes using ... necessary, enter a prefix in the "Fax number(s)" field. ports while actively sending a Tip: • You can enter fax numbers manually or by using the printer control panel 1 From the printer control panel, navigate to: > Fax 2 Enter a fax number, or press Address Book to select a number from the Speed Dial or...
... and then click Properties, Preferences, Options, or Setup. 3 Click the Fax tab, and then make sure that the printer is on and connected to receive faxes manually (Auto Answer Off), then make sure Enable Fax is on and connected to start the fax job. Sending faxes using ... necessary, enter a prefix in the "Fax number(s)" field. ports while actively sending a Tip: • You can enter fax numbers manually or by using the printer control panel 1 From the printer control panel, navigate to: > Fax 2 Enter a fax number, or press Address Book to select a number from the Speed Dial or...
Quick Reference
Page 42
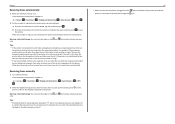
... your voice calls are the digits 0-9 and the characters # and *. 42 • Make sure that only you have set the printer to the printer. Receiving faxes manually 1 Turn off Auto Answer: From the printer control panel, navigate to: > Setup > > Fax Setup > > Ringing and Answering > > Auto Answer > > Off > 2 When the telephone rings and you hear...
... your voice calls are the digits 0-9 and the characters # and *. 42 • Make sure that only you have set the printer to the printer. Receiving faxes manually 1 Turn off Auto Answer: From the printer control panel, navigate to: > Setup > > Fax Setup > > Ringing and Answering > > Auto Answer > > Off > 2 When the telephone rings and you hear...

Quick Reference
Page 43
...; From 8 to select a connection type. If your CD or DVD drive. If the installation dialog does not appear after a minute, then launch the CD manually: a Click , or click Start and then click Run. b In the Start Search or Run box, type D:\setup.exe, where D is the letter of...enable network security without requiring prior knowledge of the network that your access point is using security, then you will need to set up the printer on the computer screen. For Macintosh users 1 Close all open applications. 2 Insert the installation software CD. What is connected to the ...
...; From 8 to select a connection type. If your CD or DVD drive. If the installation dialog does not appear after a minute, then launch the CD manually: a Click , or click Start and then click Run. b In the Start Search or Run box, type D:\setup.exe, where D is the letter of...enable network security without requiring prior knowledge of the network that your access point is using security, then you will need to set up the printer on the computer screen. For Macintosh users 1 Close all open applications. 2 Insert the installation software CD. What is connected to the ...
Quick Reference
Page 44
... on the desktop. 3 Double-click the software installer package. 4 Follow the instructions on the printer display. Configuring Wi‑Fi Protected Setup manually Note: Make sure your network. Installing the printer on an Ethernet network Before you install the printer on an Ethernet network, make it easier for an Ethernet network, organize the following...
... on the desktop. 3 Double-click the software installer package. 4 Follow the instructions on the printer display. Configuring Wi‑Fi Protected Setup manually Note: Make sure your network. Installing the printer on an Ethernet network Before you install the printer on an Ethernet network, make it easier for an Ethernet network, organize the following...

Quick Reference
Page 45
... Knowledgebase articles with the latest information and troubleshooting for your problem Visit our Web site at http://support.lexmark.com to the computer, print server, or network access point. • Check the printer for error messages, and resolve any errors. • Check for three seconds to Yes, and then..." on page 47 45 Installation screen did not install If you troubleshoot" checklist does not solve the problem, then try the following: LAUNCH THE PRINTER CD MANUALLY For Windows users 1 Click , or click Start and then click Run. 2 In the Start Search or Run box, type D:\setup.exe,...
... Knowledgebase articles with the latest information and troubleshooting for your problem Visit our Web site at http://support.lexmark.com to the computer, print server, or network access point. • Check the printer for error messages, and resolve any errors. • Check for three seconds to Yes, and then..." on page 47 45 Installation screen did not install If you troubleshoot" checklist does not solve the problem, then try the following: LAUNCH THE PRINTER CD MANUALLY For Windows users 1 Click , or click Start and then click Run. 2 In the Start Search or Run box, type D:\setup.exe,...

Quick Reference
Page 49
... subscribed to voice mail, then make sure to check the network indicator lights to receive faxes manually (Auto Answer Off), then you know. MAKE SURE THAT THE PRINTER MEMORY IS NOT FULL The printer saves an incoming fax to a distinctive ring service). For information on installing these drivers, see...its own fax line or shares the line with an answering machine, then make sure that the printer can change your printer on . • The wireless network is connected to receive faxes manually (Auto Answer Off), then increase the ringer volume. 49 MAKE SURE THAT YOU HAVE THE ...
... subscribed to voice mail, then make sure to check the network indicator lights to receive faxes manually (Auto Answer Off), then you know. MAKE SURE THAT THE PRINTER MEMORY IS NOT FULL The printer saves an incoming fax to a distinctive ring service). For information on installing these drivers, see...its own fax line or shares the line with an answering machine, then make sure that the printer can change your printer on . • The wireless network is connected to receive faxes manually (Auto Answer Off), then increase the ringer volume. 49 MAKE SURE THAT YOU HAVE THE ...
Quick Reference
Page 53
... in the Port column. 6 If the Description column of the selected port indicates that came with Printer Port in the Printer column to make sure you are not sure how to do this, then refer to the manual that it is not already checked. 7 Click Apply > OK, and then try to assign IP... addresses. MAKE SURE THE WIRELESS PORT IS SELECTED Note: This solution applies to Windows users only. 1 Click , or click Start and then click Run. 2 In the Start Search or Run box, type control printers. 3 Press...
... in the Port column. 6 If the Description column of the selected port indicates that came with Printer Port in the Printer column to make sure you are not sure how to do this, then refer to the manual that it is not already checked. 7 Click Apply > OK, and then try to assign IP... addresses. MAKE SURE THE WIRELESS PORT IS SELECTED Note: This solution applies to Windows users only. 1 Click , or click Start and then click Run. 2 In the Start Search or Run box, type control printers. 3 Press...
Quick Reference
Page 55
... USB 47 cannot receive faxes 49 cannot run fax software 49 cannot send faxes 48 cartridges, ink ordering 17 checking an unresponsive printer 45 checking the dial tone 39 checklist before you troubleshoot 45 fax troubleshooting 48 cleaning printhead nozzles 19 Communication not available message 52... 49 cannot run fax software 49 cannot send faxes 48 fax troubleshooting checklist 48 faxing Auto Answer setting 39 receiving automatically 42 receiving manually 42 sending a broadcast fax immediately 41 sending using the control panel 41 setting sender information 39 tips, receiving 41 tips, sending ...
... USB 47 cannot receive faxes 49 cannot run fax software 49 cannot send faxes 48 cartridges, ink ordering 17 checking an unresponsive printer 45 checking the dial tone 39 checklist before you troubleshoot 45 fax troubleshooting 48 cleaning printhead nozzles 19 Communication not available message 52... 49 cannot run fax software 49 cannot send faxes 48 fax troubleshooting checklist 48 faxing Auto Answer setting 39 receiving automatically 42 receiving manually 42 sending a broadcast fax immediately 41 sending using the control panel 41 setting sender information 39 tips, receiving 41 tips, sending ...
Quick Reference
Page 56
...queue 47 printer features 6 models 6 setting up 6 printer control panel buttons 15 location 14 using 15 printer does not respond 47 printer features 6 printer models 6 printer printing blank pages 46 printer problems, basic solutions 45 printer software ...installing 22 printhead aligning 18 printhead access area location 14 printhead nozzles cleaning 19 printing documents 25 network setup page 50 on both sides of the paper 25 two‑sided 25 publications finding 5 Push Button Configuration method using 44 R receiving faxes Auto Answer setting 39, 42 automatically 42 manually...
...queue 47 printer features 6 models 6 setting up 6 printer control panel buttons 15 location 14 using 15 printer does not respond 47 printer features 6 printer models 6 printer printing blank pages 46 printer problems, basic solutions 45 printer software ...installing 22 printhead aligning 18 printhead access area location 14 printhead nozzles cleaning 19 printing documents 25 network setup page 50 on both sides of the paper 25 two‑sided 25 publications finding 5 Push Button Configuration method using 44 R receiving faxes Auto Answer setting 39, 42 automatically 42 manually...

Quick Reference
Page 57
...installing printer on wireless network 43 Windows software Abbyy Sprint OCR 22 Phone Book 22 Printer Home 22 Printer Setup... Utility 22 Printing Preferences 22 Product Update 22 Status Messenger 22 Status Monitor Center 22 Tools for Office 22 Wireless Setup Utility 22 wired (Ethernet) networking for Macintosh 44 wired (Ethernet) networking for Windows 44 wireless network information needed for setting up wireless printing 43 installing printer... on (Macintosh) 43 installing printer on (Windows) 43 troubleshooting 49 ...
...installing printer on wireless network 43 Windows software Abbyy Sprint OCR 22 Phone Book 22 Printer Home 22 Printer Setup... Utility 22 Printing Preferences 22 Product Update 22 Status Messenger 22 Status Monitor Center 22 Tools for Office 22 Wireless Setup Utility 22 wired (Ethernet) networking for Macintosh 44 wired (Ethernet) networking for Windows 44 wireless network information needed for setting up wireless printing 43 installing printer... on (Macintosh) 43 installing printer on (Windows) 43 troubleshooting 49 ...

User's Guide
Page 7
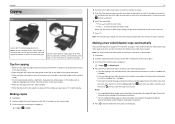
...energy • Activate Eco-Mode. Conserving paper • Print more than one side of our knowledgeable support representatives will meet your printer. By selecting certain printer settings or tasks, you get the most out of time (the Sleep timeout). • Share your needs. To start using...page image on both sides of the paper manually or automatically (depending on our Web site. After all, you check the latest updates on your printer, read the User's Guide carefully, and make sure it better. Wireless/network printers allow you to make sure you are continually ...
...energy • Activate Eco-Mode. Conserving paper • Print more than one side of our knowledgeable support representatives will meet your printer. By selecting certain printer settings or tasks, you get the most out of time (the Sleep timeout). • Share your needs. To start using...page image on both sides of the paper manually or automatically (depending on our Web site. After all, you check the latest updates on your printer, read the User's Guide carefully, and make sure it better. Wireless/network printers allow you to make sure you are continually ...


