Quick Reference
Page 4
... the Applications folder in Windows and Mac OS X 10.6 or later. • Print more pages with fewer cartridges. • Clean the printhead. By selecting certain printer settings or tasks, you print on how to accomplish common printer tasks like printing, copying, and scanning. This feature sets... "Deep Clean Printhead" features. The "Pages per sheet" feature allows you looking for a set amount of the paper (duplex) for copy and fax jobs, and for reuse or recycling through the Lexmark Cartridge Collection Program. Find it away. 4 These modes can scan documents or photographs and...
... the Applications folder in Windows and Mac OS X 10.6 or later. • Print more pages with fewer cartridges. • Clean the printhead. By selecting certain printer settings or tasks, you print on how to accomplish common printer tasks like printing, copying, and scanning. This feature sets... "Deep Clean Printhead" features. The "Pages per sheet" feature allows you looking for a set amount of the paper (duplex) for copy and fax jobs, and for reuse or recycling through the Lexmark Cartridge Collection Program. Find it away. 4 These modes can scan documents or photographs and...
Quick Reference
Page 6
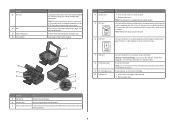
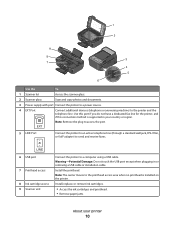
... clippings) into the paper slot. Warning-Potential Damage: Do not touch the USB port except when plugging in the ADF. Install the printhead. Note: The carrier moves to a properly grounded electrical outlet that is available only on select models. Use this connection method is installed...Access the scanner glass. 2 Scanner glass Scan and copy photos and documents. 3 Power supply with port Connect the printer to the printhead access area when no printhead is supported in the printer. Place these items on both sides of a sheet of paper. • Remove paper jams. Note:...
... clippings) into the paper slot. Warning-Potential Damage: Do not touch the USB port except when plugging in the ADF. Install the printhead. Note: The carrier moves to a properly grounded electrical outlet that is available only on select models. Use this connection method is installed...Access the scanner glass. 2 Scanner glass Scan and copy photos and documents. 3 Power supply with port Connect the printer to the printhead access area when no printhead is supported in the printer. Place these items on both sides of a sheet of paper. • Remove paper jams. Note:...
Quick Reference
Page 10
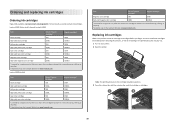
... immediately after removing the old ones, or the ink remaining in the printhead nozzles may dry out. 1 Turn on the Lexmark Web site at www.lexmark.com/pageyields. Item Return Program Regular cartridge2 Cartridge1 Magenta color cartridge 108 108A High yield magenta color cartridge 108XL 108XLA 1 Licensed for remanufacturing, refilling, or recycling. 2 Available only on...
... immediately after removing the old ones, or the ink remaining in the printhead nozzles may dry out. 1 Turn on the Lexmark Web site at www.lexmark.com/pageyields. Item Return Program Regular cartridge2 Cartridge1 Magenta color cartridge 108 108A High yield magenta color cartridge 108XL 108XLA 1 Licensed for remanufacturing, refilling, or recycling. 2 Available only on...

Quick Reference
Page 11
... ink to : > Maintenance > > Align Printer > > An alignment page prints. Maintaining ink cartridges In addition to the following tasks that you may need to align the printhead. Aligning the printhead If the characters or lines on the computer screen. If print quality has not improved, then clean the... printhead nozzles. 11 If your ink cartridge comes with a twist cap, then twist and remove the cap. 5 Install each ink cartridge. Use two hands to improve ...
... ink to : > Maintenance > > Align Printer > > An alignment page prints. Maintaining ink cartridges In addition to the following tasks that you may need to align the printhead. Aligning the printhead If the characters or lines on the computer screen. If print quality has not improved, then clean the... printhead nozzles. 11 If your ink cartridge comes with a twist cap, then twist and remove the cap. 5 Install each ink cartridge. Use two hands to improve ...
Quick Reference
Page 12
... CD or DVD drive. 3 Follow the instructions on this operating system is available only at http://support.lexmark.com. Clean the printhead nozzles to improve the quality of free disk space. Notes: • Cleaning the printhead nozzles uses ink, so clean them only when necessary. • Deep cleaning uses more ink, so try...
... CD or DVD drive. 3 Follow the instructions on this operating system is available only at http://support.lexmark.com. Clean the printhead nozzles to improve the quality of free disk space. Notes: • Cleaning the printhead nozzles uses ink, so clean them only when necessary. • Deep cleaning uses more ink, so try...
Quick Reference
Page 14
... or supplies. Use the To Print dialog Adjust the print settings and schedule print jobs. Use Customer Support Lexmark Software Updates Lexmark Online Order Supplies Online Printer Registration To Contact technical support. Using the Macintosh printer software Software installed during installation...; Print a test page. • Print an alignment page. • Clean the printhead nozzles. • Order ink or supplies. • Register the printer. • Contact technical support. or Lexmark Wireless Setup Assistant (in Mac OS X version 10.6) (referred to as Printer Utility)...
... or supplies. Use the To Print dialog Adjust the print settings and schedule print jobs. Use Customer Support Lexmark Software Updates Lexmark Online Order Supplies Online Printer Registration To Contact technical support. Using the Macintosh printer software Software installed during installation...; Print a test page. • Print an alignment page. • Clean the printhead nozzles. • Order ink or supplies. • Register the printer. • Contact technical support. or Lexmark Wireless Setup Assistant (in Mac OS X version 10.6) (referred to as Printer Utility)...

Quick Reference
Page 19
...find the following: • Knowledgebase articles with the latest information and troubleshooting for your problem Visit our Web site at http://support.lexmark.com to printer maintenance tasks and customer support. area on the computer screen. If Troubleshooting does not solve your printer • Live...clear any errors. • Check for telephone technical support Setup troubleshooting • "Incorrect language appears on the display" on page 19 • "Printhead errors" on page 20 • "Software did not install" on page 21 • "Print job does not print or is missing pages" ...
...find the following: • Knowledgebase articles with the latest information and troubleshooting for your problem Visit our Web site at http://support.lexmark.com to printer maintenance tasks and customer support. area on the computer screen. If Troubleshooting does not solve your printer • Live...clear any errors. • Check for telephone technical support Setup troubleshooting • "Incorrect language appears on the display" on page 19 • "Printhead errors" on page 20 • "Software did not install" on page 21 • "Print job does not print or is missing pages" ...
Quick Reference
Page 20
...Note: If you troubleshoot" checklist does not solve the problem, then try the following: REMOVE AND REINSERT THE PRINTHEAD 1 Open the printer and lift the latch. 2 Remove the printhead. CHANGE THE LANGUAGE USING A BUTTON COMBINATION (IF YOU CANNOT READ THE CURRENT LANGUAGE) 1 Turn the printer...has been reset. 3 Complete the initial printer setup. Warning-Potential Damage: Do not touch the printhead nozzles. 3 Wipe the printhead contacts using a clean, lint-free cloth. 4 Reinsert the printhead, and then close the latch until Language Selection appears on . Note: If removing and reinserting ...
...Note: If you troubleshoot" checklist does not solve the problem, then try the following: REMOVE AND REINSERT THE PRINTHEAD 1 Open the printer and lift the latch. 2 Remove the printhead. CHANGE THE LANGUAGE USING A BUTTON COMBINATION (IF YOU CANNOT READ THE CURRENT LANGUAGE) 1 Turn the printer...has been reset. 3 Complete the initial printer setup. Warning-Potential Damage: Do not touch the printhead nozzles. 3 Wipe the printhead contacts using a clean, lint-free cloth. 4 Reinsert the printhead, and then close the latch until Language Selection appears on . Note: If removing and reinserting ...

Quick Reference
Page 21
... square end of the USB cable into the back of the printer. 3 Firmly plug the rectangular end of the USB cable into the matching color slot of the printhead. 3 Close the printer. REMOVE AND RECONNECT THE USB CABLE CONNECTED TO YOUR PRINTER CHECK THE USB CONNECTION 1 Check the USB cable for any...
... square end of the USB cable into the back of the printer. 3 Firmly plug the rectangular end of the USB cable into the matching color slot of the printhead. 3 Close the printer. REMOVE AND RECONNECT THE USB CABLE CONNECTED TO YOUR PRINTER CHECK THE USB CONNECTION 1 Check the USB cable for any...
Quick Reference
Page 22
...printing blank pages Blank pages may not be caused by improperly installed ink cartridges. REINSTALL THE INK CARTRIDGES AND DEEP CLEAN AND ALIGN THE PRINTHEAD 1 Reinstall the ink cartridges, see the computer documentation. Note: Do not remove the alignment page until printing is marked with a USB .... The Device Manager opens. 4 Click the plus sign (+) beside Universal Serial Bus controllers. If the cartridges do not seem to Deep Clean Printhead, and then press . If this problem persists, then check our Web site for updates for more of Power Saver mode, then reset the ...
...printing blank pages Blank pages may not be caused by improperly installed ink cartridges. REINSTALL THE INK CARTRIDGES AND DEEP CLEAN AND ALIGN THE PRINTHEAD 1 Reinstall the ink cartridges, see the computer documentation. Note: Do not remove the alignment page until printing is marked with a USB .... The Device Manager opens. 4 Click the plus sign (+) beside Universal Serial Bus controllers. If the cartridges do not seem to Deep Clean Printhead, and then press . If this problem persists, then check our Web site for updates for more of Power Saver mode, then reset the ...

User Guide
Page 7
... is also available on the installation software CD. Before replacing and recycling your printer 7 These features clean the printhead nozzles to improve the quality of throwing it here Setup documentation The setup documentation came with the printer and is available on ...the Lexmark Web site at www.lexmark.com/publications/. Follow the instructions to www.lexmark.com/recycle. Initial setup instructions: • Connecting the printer • Installing the printer software Find...
... is also available on the installation software CD. Before replacing and recycling your printer 7 These features clean the printhead nozzles to improve the quality of throwing it here Setup documentation The setup documentation came with the printer and is available on ...the Lexmark Web site at www.lexmark.com/publications/. Follow the instructions to www.lexmark.com/recycle. Initial setup instructions: • Connecting the printer • Installing the printer software Find...
User Guide
Page 10
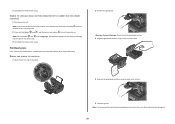
... to the printer and the telephone line. Warning-Potential Damage: Do not touch the USB port except when plugging in your printer 10 Install the printhead. 1 2 9 8 7 MAC: XX XX XX XX XX XX W I F I PRINTING W I F I PRINTING 6 3 4 5 Use the To 1 Scanner lid Access the scanner glass. 2...USB cable. Note: The carrier moves to send and receive faxes. Install, replace, or remove ink cartridges. • Access the ink cartridges and printhead. • Remove paper jams. About your country or region. Note: Remove the plug to access the port. 5 LINE Port Connect the printer...
... to the printer and the telephone line. Warning-Potential Damage: Do not touch the USB port except when plugging in your printer 10 Install the printhead. 1 2 9 8 7 MAC: XX XX XX XX XX XX W I F I PRINTING W I F I PRINTING 6 3 4 5 Use the To 1 Scanner lid Access the scanner glass. 2...USB cable. Note: The carrier moves to send and receive faxes. Install, replace, or remove ink cartridges. • Access the ink cartridges and printhead. • Remove paper jams. About your country or region. Note: Remove the plug to access the port. 5 LINE Port Connect the printer...

User Guide
Page 12
... caused by non-Lexmark ink or ink cartridges. Replacing ink cartridges Make sure you have a new ink cartridge or cartridges before you begin. You must install new cartridges immediately after removing the protective cap to avoid exposing the ink to air. 5 Close the printer. WI F I PRINTING Note: The printhead moves to install... cartridge or cartridges. 4 Install each ink cartridge. Note: Install the new ink cartridges immediately after removing the old ones or the ink remaining in the printhead nozzles may dry out. 1 Turn on your printer. 2 Open the printer.
... caused by non-Lexmark ink or ink cartridges. Replacing ink cartridges Make sure you have a new ink cartridge or cartridges before you begin. You must install new cartridges immediately after removing the protective cap to avoid exposing the ink to air. 5 Close the printer. WI F I PRINTING Note: The printhead moves to install... cartridge or cartridges. 4 Install each ink cartridge. Note: Install the new ink cartridges immediately after removing the old ones or the ink remaining in the printhead nozzles may dry out. 1 Turn on your printer. 2 Open the printer.
User Guide
Page 22
...network. (referred to as Network Card Reader) • View the contents of the printer that you purchased. Using the printer software 22 Lexmark Wireless Setup Assistant Set up the printer on the features of a memory device inserted into a network printer. • Transfer photos and ... click Customer Support. 4 From the Web site, select your printer from a memory device to the computer over a network. Use the To Lexmark Network Card Reader (referred to as Wireless Setup Assistant) Note: Your printer may not come with cartridge installation. • Print a test page....
...network. (referred to as Network Card Reader) • View the contents of the printer that you purchased. Using the printer software 22 Lexmark Wireless Setup Assistant Set up the printer on the features of a memory device inserted into a network printer. • Transfer photos and ... click Customer Support. 4 From the Web site, select your printer from a memory device to the computer over a network. Use the To Lexmark Network Card Reader (referred to as Wireless Setup Assistant) Note: Your printer may not come with cartridge installation. • Print a test page....

User Guide
Page 110
...tab, click Check ink levels. Maintaining the printer Maintaining ink cartridges In addition to the following tasks that you may need to align the printhead. It will briefly come out of Power Saver mode or will temporarily power on your printer image appear jagged or wavy, then you can... control panel, press . 3 Press the arrow buttons to scroll to check the ink level in each cartridge. Maintaining the printer 110 Aligning the printhead If the characters or lines on if it is turned off. Checking ink levels Using the printer control panel 1 From the printer control panel, ...
...tab, click Check ink levels. Maintaining the printer Maintaining ink cartridges In addition to the following tasks that you may need to align the printhead. It will briefly come out of Power Saver mode or will temporarily power on your printer image appear jagged or wavy, then you can... control panel, press . 3 Press the arrow buttons to scroll to check the ink level in each cartridge. Maintaining the printer 110 Aligning the printhead If the characters or lines on if it is turned off. Checking ink levels Using the printer control panel 1 From the printer control panel, ...
User Guide
Page 111
...Printer Home. 5 Choose your document again. If print quality has not improved, then clean the printhead nozzles. Cleaning the printhead nozzles Poor print quality is finished. Notes: • Cleaning the printhead nozzles uses ink, so clean them only when necessary. • Deep cleaning uses more ink,... 6 From the Maintenance tab, click Align cartridges. 7 Follow the instructions on the computer screen. If you can clean the printhead nozzles. Clean the printhead nozzles to improve print quality, then print your printer from the list. 4 From the Maintenance tab of your prints. Note...
...Printer Home. 5 Choose your document again. If print quality has not improved, then clean the printhead nozzles. Cleaning the printhead nozzles Poor print quality is finished. Notes: • Cleaning the printhead nozzles uses ink, so clean them only when necessary. • Deep cleaning uses more ink,... 6 From the Maintenance tab, click Align cartridges. 7 Follow the instructions on the computer screen. If you can clean the printhead nozzles. Clean the printhead nozzles to improve print quality, then print your printer from the list. 4 From the Maintenance tab of your prints. Note...
User Guide
Page 112
.... 2 Remove paper from the list. 3 From the Maintenance tab, select Clean Print Nozzles. Note: Make sure all cables to clean the printhead nozzles. Using the printer software For Windows users 1 Click or Start. 2 Click All Programs or Programs, and then select the printer program ...the exterior of the printer 1 Make sure that has accumulated on the paper exit tray. 3 Press the arrow buttons to scroll to Clean Printhead or Deep Clean Printhead, and then press . 4 Press to the printer before placing the document on the scanner glass. A cleaning page prints. Warning-Potential ...
.... 2 Remove paper from the list. 3 From the Maintenance tab, select Clean Print Nozzles. Note: Make sure all cables to clean the printhead nozzles. Using the printer software For Windows users 1 Click or Start. 2 Click All Programs or Programs, and then select the printer program ...the exterior of the printer 1 Make sure that has accumulated on the paper exit tray. 3 Press the arrow buttons to scroll to Clean Printhead or Deep Clean Printhead, and then press . 4 Press to the printer before placing the document on the scanner glass. A cleaning page prints. Warning-Potential ...
User Guide
Page 113
If Troubleshooting does not solve your problem Visit our Web site at support.lexmark.com to find the following: • Knowledgebase articles with the latest information and troubleshooting for your printer • Live online technical support • ...messages, and clear any errors. • Check for telephone technical support Setup troubleshooting • "Incorrect language appears on the display" on page 114 • "Printhead errors" on page 114 • "Software did not install" on page 116 Troubleshooting 113 To open the Service Center, use one of these methods: Method...
If Troubleshooting does not solve your problem Visit our Web site at support.lexmark.com to find the following: • Knowledgebase articles with the latest information and troubleshooting for your printer • Live online technical support • ...messages, and clear any errors. • Check for telephone technical support Setup troubleshooting • "Incorrect language appears on the display" on page 114 • "Printhead errors" on page 114 • "Software did not install" on page 116 Troubleshooting 113 To open the Service Center, use one of these methods: Method...

User Guide
Page 114
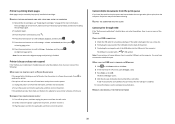
Printhead errors If the "Before you troubleshoot" checklist does not solve the problem, then try one or more of the following : Troubleshooting 114 Note: If you ...
Printhead errors If the "Before you troubleshoot" checklist does not solve the problem, then try one or more of the following : Troubleshooting 114 Note: If you ...
User Guide
Page 115
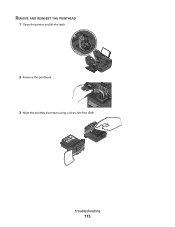
Troubleshooting 115 REMOVE AND REINSERT THE PRINTHEAD 1 Open the printer and lift the latch. 2 WI F I PRINTING 2 Remove the printhead. 3 Wipe the printhead contacts using a clean, lint-free cloth.
Troubleshooting 115 REMOVE AND REINSERT THE PRINTHEAD 1 Open the printer and lift the latch. 2 WI F I PRINTING 2 Remove the printhead. 3 Wipe the printhead contacts using a clean, lint-free cloth.


