
Quick Reference
Page 3
... you will need to set up the printer on a wireless network 41 Installing the printer on a wireless network 41 What is Wi‑Fi Protected Setup 41
... you will need to set up the printer on a wireless network 41 Installing the printer on a wireless network 41 What is Wi‑Fi Protected Setup 41
Quick Reference
Page 4
Contents 4 Configuring Wi‑Fi Protected Setup manually 42 Troubleshooting 43 Notices 52 Edition notice...52 Index 53
Contents 4 Configuring Wi‑Fi Protected Setup manually 42 Troubleshooting 43 Notices 52 Edition notice...52 Index 53
Quick Reference
Page 5
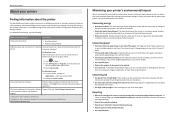
...printer has been idle for using less ink than one page image on one side of throwing it here Initial setup instructions • Quick Setup Sheet • Hardware Setup Wizard1 Additional setup and instructions for a set amount of time (the Sleep timeout). • Share your printer's environmental impact... copies, you adjust the darkness of the colors. • Use high‑yield cartridges. To return an ink cartridge, go to www.lexmark.com/recycle, and then follow the instructions to request a postage‑paid bag. • Recycle the product packaging. • Recycle your...
...printer has been idle for using less ink than one page image on one side of throwing it here Initial setup instructions • Quick Setup Sheet • Hardware Setup Wizard1 Additional setup and instructions for a set amount of time (the Sleep timeout). • Share your printer's environmental impact... copies, you adjust the darkness of the colors. • Use high‑yield cartridges. To return an ink cartridge, go to www.lexmark.com/recycle, and then follow the instructions to request a postage‑paid bag. • Recycle the product packaging. • Recycle your...
Quick Reference
Page 6
... frequently used printer settings available for the following printer models: • Lexmark Pro715 • Lexmark Pro719 Printer features Depending on the model, your printer comes with your custom settings, and download them to do so. • Place the printer near the computer during setup. Easily scan to a memory device or to multiple laptops or...
... frequently used printer settings available for the following printer models: • Lexmark Pro715 • Lexmark Pro719 Printer features Depending on the model, your printer comes with your custom settings, and download them to do so. • Place the printer near the computer during setup. Easily scan to a memory device or to multiple laptops or...
Quick Reference
Page 7
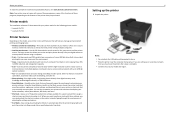
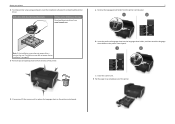
... sheet holder, and then attach the language sheet holder to replace the language sheet on the printer control panel. About your printer 2 To initiate printer setup using a computer, insert the installation software CD, or download the printer driver. Note: If the installation screen does not appear after a minute, then see "Installation... xxxxxxxx xxxx xx xxxxx xxxxxxxx c Close the scanner unit. 5 Pull the paper tray completely out of the printer. 7 a Remove the language sheet holder from www.lexmark.com.
... sheet holder, and then attach the language sheet holder to replace the language sheet on the printer control panel. About your printer 2 To initiate printer setup using a computer, insert the installation software CD, or download the printer driver. Note: If the installation screen does not appear after a minute, then see "Installation... xxxxxxxx xxxx xx xxxxx xxxxxxxx c Close the scanner unit. 5 Pull the paper tray completely out of the printer. 7 a Remove the language sheet holder from www.lexmark.com.
Quick Reference
Page 10
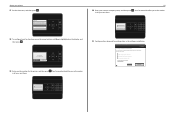
... . Your fax number identifies you as the sender in all your device. Your fax name identifies you want to set up fax now? Fax Setup Do you as the sender in the software installation. How can now print, but there are additional steps required to send and receive faxes What... Now Later 19 Enter your printer 17 Set the time zone, and then press . Get my printer ready to scan directly to my computer Configure Lexmark SmartSolutions and standalone email Get my printer ready to access all your name or company name, and then press . Please choose a time zone and press...
... . Your fax number identifies you as the sender in all your device. Your fax name identifies you want to set up fax now? Fax Setup Do you as the sender in the software installation. How can now print, but there are additional steps required to send and receive faxes What... Now Later 19 Enter your printer 17 Set the time zone, and then press . Get my printer ready to scan directly to my computer Configure Lexmark SmartSolutions and standalone email Get my printer ready to access all your name or company name, and then press . Please choose a time zone and press...
Quick Reference
Page 14
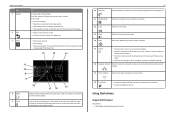
... is selected. 15 Cancel • Cancel a print, copy, scan, or fax job in a fax number to feed or eject paper from a menu level of the Setup menu to the top level of the previous mode. • Clear current settings or error messages, and return to default settings. 16 Network indicator Check...
... is selected. 15 Cancel • Cancel a print, copy, scan, or fax job in a fax number to feed or eject paper from a menu level of the Setup menu to the top level of the previous mode. • Clear current settings or error messages, and return to default settings. 16 Network indicator Check...

Quick Reference
Page 18
...low, you must replace the ink cartridges before you can clean the printhead nozzles. 1 Load paper. 2 From the printer control panel, navigate to: > Setup > > Maintenance > 3 Press the up or down arrow button to scroll to Clean Printhead or Deep Clean Printhead, and then press . Keep your ...image appear jagged or wavy, then you may need to align the printhead. 1 Load plain paper. 2 From the printer control panel, navigate to: > Setup > >Maintenance > An alignment page prints. > Align Printer > Note: Do not remove the alignment page until printing is plugged into an electrical outlet. ...
...low, you must replace the ink cartridges before you can clean the printhead nozzles. 1 Load paper. 2 From the printer control panel, navigate to: > Setup > > Maintenance > 3 Press the up or down arrow button to scroll to Clean Printhead or Deep Clean Printhead, and then press . Keep your ...image appear jagged or wavy, then you may need to align the printhead. 1 Load plain paper. 2 From the printer control panel, navigate to: > Setup > >Maintenance > An alignment page prints. > Align Printer > Note: Do not remove the alignment page until printing is plugged into an electrical outlet. ...
Quick Reference
Page 19
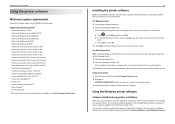
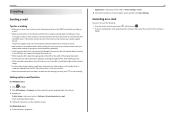
b In the Start Search or Run box, type D:\setup.exe, where D is available only at http://support.lexmark.com. 2 Navigate to: SUPPORT & DOWNLOADS > select your printer > select your operating system 3 Download the driver, and then install the printer software. You may have ... after a minute, then launch the CD manually: a Click , or click Start and then click Run. Using the Internet 1 Go to the Lexmark Web site at http://support.lexmark.com. 19 Installing the printer software Note: If you installed the printer software on the computer screen. Using the Windows printer software Software...
b In the Start Search or Run box, type D:\setup.exe, where D is available only at http://support.lexmark.com. 2 Navigate to: SUPPORT & DOWNLOADS > select your printer > select your operating system 3 Download the driver, and then install the printer software. You may have ... after a minute, then launch the CD manually: a Click , or click Start and then click Run. Using the Internet 1 Go to the Lexmark Web site at http://support.lexmark.com. 19 Installing the printer software Note: If you installed the printer software on the computer screen. Using the Windows printer software Software...
Quick Reference
Page 20
...• Select the paper type. • Add a watermark. • Enhance images. • Save settings. Use the Printer Settings Shortcuts Wireless Setup Assistant Uninstaller To • Customize settings for the printer. • Order supplies. • Maintain ink cartridges. • Register the printer. &#... software Use the LexmarkTM Printer Home (referred to as Printer Home) Lexmark Phone Book (referred to as Phone Book) Abbyy Sprint OCR Lexmark Wireless Setup Utility (referred to as Wireless Setup Utility) Lexmark Tools for Office (referred to as the following: • Select ...
...• Select the paper type. • Add a watermark. • Enhance images. • Save settings. Use the Printer Settings Shortcuts Wireless Setup Assistant Uninstaller To • Customize settings for the printer. • Order supplies. • Maintain ink cartridges. • Register the printer. &#... software Use the LexmarkTM Printer Home (referred to as Printer Home) Lexmark Phone Book (referred to as Phone Book) Abbyy Sprint OCR Lexmark Wireless Setup Utility (referred to as Wireless Setup Utility) Lexmark Tools for Office (referred to as the following: • Select ...
Quick Reference
Page 22
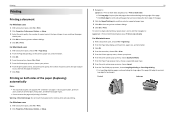
... duplex latch or latches while actively printing. For Windows users 1 With a document open, click File > Print. 2 Click Properties, Preferences, Options, or Setup. 22 3 Navigate to close any printer software dialogs. 6 Click OK or Print. To return to single-sided printing, repeat steps 1 and 2, and ...paper types. • Do not remove the page until printing is finished. For Macintosh users 1 With a document open , choose File > Page Setup. 2 From the Page Setup dialog, set the printer, paper size, and orientation. 3 Click OK. 4 From the menu bar, choose File > Print. 5 From the ...
... duplex latch or latches while actively printing. For Windows users 1 With a document open, click File > Print. 2 Click Properties, Preferences, Options, or Setup. 22 3 Navigate to close any printer software dialogs. 6 Click OK or Print. To return to single-sided printing, repeat steps 1 and 2, and ...paper types. • Do not remove the page until printing is finished. For Macintosh users 1 With a document open , choose File > Page Setup. 2 From the Page Setup dialog, set the printer, paper size, and orientation. 3 Click OK. 4 From the menu bar, choose File > Print. 5 From the ...
Quick Reference
Page 29
... printer to an Ethernet or wireless network before sending an e‑mail. • Make sure the printer is connected to e‑mail The E‑mail Setup Wizard opens. 4 Follow the instructions on the ADF to the width of the following: • From the printer control panel, press , and then press . •...
... printer to an Ethernet or wireless network before sending an e‑mail. • Make sure the printer is connected to e‑mail The E‑mail Setup Wizard opens. 4 Follow the instructions on the ADF to the width of the following: • From the printer control panel, press , and then press . •...
Quick Reference
Page 30
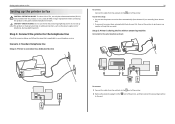
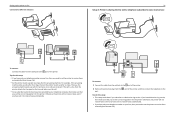
...telephone, during a lightning storm. Step 1: Connect the printer to the telephone line Check the scenarios below and follow the setup that you want . Scenario 1: Standard telephone line Setup 1: Printer is sharing the line with this product or a UL Listed 26 AWG or larger replacement when connecting this product... or make any number of rings that is applicable to the port of the printer, and then connect the answering machine Setup 2: Printer is connected to a dedicated fax line 30 To connect: Connect the cable from the to the port. port of the printer...
...telephone, during a lightning storm. Step 1: Connect the printer to the telephone line Check the scenarios below and follow the setup that you want . Scenario 1: Standard telephone line Setup 1: Printer is sharing the line with this product or a UL Listed 26 AWG or larger replacement when connecting this product... or make any number of rings that is applicable to the port of the printer, and then connect the answering machine Setup 2: Printer is connected to a dedicated fax line 30 To connect: Connect the cable from the to the port. port of the printer...
Quick Reference
Page 31
... then set the correct ring pattern for the printer. port of the printer, and then connect the telephone to the Tips for this setup: • This setup works best if you need to set the printer to receive faxes automatically. • If you have distinctive ring service, then make sure... that you set it to receive faxes automatically. Tips for this setup: • If you have set the correct ring pattern for the printer. Otherwise, the printer will not receive faxes even if you have ...
... then set the correct ring pattern for the printer. port of the printer, and then connect the telephone to the Tips for this setup: • This setup works best if you need to set the printer to receive faxes automatically. • If you have distinctive ring service, then make sure... that you set it to receive faxes automatically. Tips for this setup: • If you have set the correct ring pattern for the printer. Otherwise, the printer will not receive faxes even if you have ...
Quick Reference
Page 33
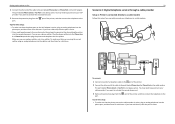
...You can use a phone splitter, not a line splitter. You may need two phone ports for a dial tone. 33 Scenario 4: Digital telephone service through a cable provider Setup 1: Printer is connected directly to pay extra, then do not plug the printer into the splitter. If you hear a dial tone, then the port is... active. Make sure you hear a dial tone, then the port is active. • If you want to a cable modem Follow this setup: • To make sure that the phone port on the cable modem is active, plug an analog telephone into the phone port, and then listen...
...You can use a phone splitter, not a line splitter. You may need two phone ports for a dial tone. 33 Scenario 4: Digital telephone service through a cable provider Setup 1: Printer is connected directly to pay extra, then do not plug the printer into the splitter. If you hear a dial tone, then the port is... active. Make sure you hear a dial tone, then the port is active. • If you want to a cable modem Follow this setup: • To make sure that the phone port on the cable modem is active, plug an analog telephone into the phone port, and then listen...
Quick Reference
Page 34
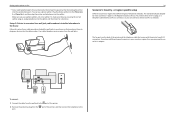
... extra, then do not have different types of the printer. 2 Remove the protective plug from the wall jack to the port of telephone wall jacks. Setup 2: Printer is the Registered Jack-11 (RJ-11). port of connector in your house so that you use a phone splitter. Make sure you do...connector, so you may need to a wall jack; Your cable telephone service comes from the wall jacks. 34 Scenario 5: Country‑ or region‑specific setup Different countries or regions have to the To connect: 1 Connect the cable from the port. You need to an RJ‑11 wall jack. You...
... extra, then do not have different types of the printer. 2 Remove the protective plug from the wall jack to the port of telephone wall jacks. Setup 2: Printer is the Registered Jack-11 (RJ-11). port of connector in your house so that you use a phone splitter. Make sure you do...connector, so you may need to a wall jack; Your cable telephone service comes from the wall jacks. 34 Scenario 5: Country‑ or region‑specific setup Different countries or regions have to the To connect: 1 Connect the cable from the port. You need to an RJ‑11 wall jack. You...

Quick Reference
Page 37
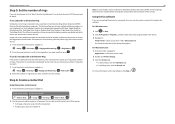
... if the printer is properly connected to the telephone line. This information appears in your printer. 1 From the printer control panel, navigate to: > Setup > > Fax Setup > > Dialing and Sending > > Fax Name > 2 Enter your name or your company name, and then press . • To change a...fax number or your telephone number, unless you can set the printer to receive faxes manually. 1 From the printer control panel, navigate to: > Setup > > Fax Setup > > Ringing and Answering > > Auto Answer > 2 Press the arrow buttons to scroll to the setting you enter this information. Make sure...
... if the printer is properly connected to the telephone line. This information appears in your printer. 1 From the printer control panel, navigate to: > Setup > > Fax Setup > > Dialing and Sending > > Fax Name > 2 Enter your name or your company name, and then press . • To change a...fax number or your telephone number, unless you can set the printer to receive faxes manually. 1 From the printer control panel, navigate to: > Setup > > Fax Setup > > Ringing and Answering > > Auto Answer > 2 Press the arrow buttons to scroll to the setting you enter this information. Make sure...
Quick Reference
Page 38
...if you subscribe to : Printer Home > select your printer > Fax > Edit contact list The Contacts tab of the Printer Setup Utility opens. You can add up to : > Setup > > Fax Setup > > Ringing and Answering > > Pick Up On > 2 Select the number of rings that number. Enter the entry number... list Using the printer control panel 1 From the printer control panel, navigate to: Touch‑screen models Arrow‑button models > Address Book > Setup > > Fax Setup > > Address Book > 2 Use the menus to On in Step 4, then do not subscribe to Distinctive Ring If the printer is set incorrectly,...
...if you subscribe to : Printer Home > select your printer > Fax > Edit contact list The Contacts tab of the Printer Setup Utility opens. You can add up to : > Setup > > Fax Setup > > Ringing and Answering > > Pick Up On > 2 Select the number of rings that number. Enter the entry number... list Using the printer control panel 1 From the printer control panel, navigate to: Touch‑screen models Arrow‑button models > Address Book > Setup > > Fax Setup > > Address Book > 2 Use the menus to On in Step 4, then do not subscribe to Distinctive Ring If the printer is set incorrectly,...
Quick Reference
Page 39
... the fax. For Macintosh users 1 With a document open , click File > Print. 2 Make sure the appropriate printer is selected, and then click Properties, Preferences, Options, or Setup. 3 Click the Fax tab, and then make sure that the printer is in the Dialing Prefix dialog. 6 Select the appropriate paper size and page orientation...
... the fax. For Macintosh users 1 With a document open , click File > Print. 2 Make sure the appropriate printer is selected, and then click Properties, Preferences, Options, or Setup. 3 Click the Fax tab, and then make sure that the printer is in the Dialing Prefix dialog. 6 Select the appropriate paper size and page orientation...
Quick Reference
Page 40
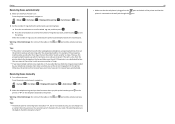
...to scroll to Pick Up On, and then press . Receiving faxes manually 1 Turn off Auto Answer: From the printer control panel, navigate to: > Setup > > Fax Setup > > Ringing and Answering > > Auto Answer > > Off > 2 When the telephone rings and you hear fax tones when you subscribe to ...The valid characters are received. Faxing Receiving faxes automatically 1 Make sure that Auto Answer is on: From the printer control panel, navigate to: > Setup > > Fax Setup > > Ringing and Answering > > Auto Answer > > On > 2 Set the number of the printer and that the printer is connected to ...
...to scroll to Pick Up On, and then press . Receiving faxes manually 1 Turn off Auto Answer: From the printer control panel, navigate to: > Setup > > Fax Setup > > Ringing and Answering > > Auto Answer > > Off > 2 When the telephone rings and you hear fax tones when you subscribe to ...The valid characters are received. Faxing Receiving faxes automatically 1 Make sure that Auto Answer is on: From the printer control panel, navigate to: > Setup > > Fax Setup > > Ringing and Answering > > Auto Answer > > On > 2 Set the number of the printer and that the printer is connected to ...


