User's Guide
Page 2
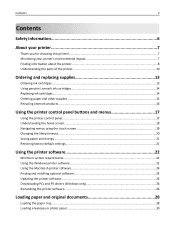
... 7 Finding information about the printer...8 Understanding the parts of the printer 10 Ordering and replacing supplies 13 Ordering ink cartridges...13 Using genuine Lexmark ink cartridges...14 Replacing ink cartridges...14 Ordering paper and other supplies...15 Recycling Lexmark products...16 Using the printer control panel buttons and menus 17 Using the printer control panel...17 Understanding the...
... 7 Finding information about the printer...8 Understanding the parts of the printer 10 Ordering and replacing supplies 13 Ordering ink cartridges...13 Using genuine Lexmark ink cartridges...14 Replacing ink cartridges...14 Ordering paper and other supplies...15 Recycling Lexmark products...16 Using the printer control panel buttons and menus 17 Using the printer control panel...17 Understanding the...
User's Guide
Page 4
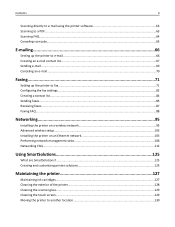
... network management tasks 106 Networking FAQ...112 Using SmartSolutions 125 What are SmartSolutions?...125 Creating and customizing printer solutions 125 Maintaining the printer 127 Maintaining ink cartridges...127 Cleaning the exterior of the printer...128 Cleaning the scanner glass...129 Cleaning the touch screen...129 Moving the printer to another location 130
... network management tasks 106 Networking FAQ...112 Using SmartSolutions 125 What are SmartSolutions?...125 Creating and customizing printer solutions 125 Maintaining the printer 127 Maintaining ink cartridges...127 Cleaning the exterior of the printer...128 Cleaning the scanner glass...129 Cleaning the touch screen...129 Moving the printer to another location 130
User's Guide
Page 8
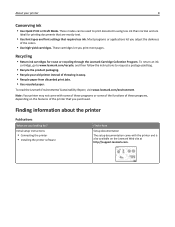
... printer Publications What are mostly text. • Use font types and font settings that require less ink. To return an ink cartridge, go to www.lexmark.com/recycle, and then follow the instructions to print documents using less ink than normal and are ideal for printing documents that you looking for reuse or recycling through...
... printer Publications What are mostly text. • Use font types and font settings that require less ink. To return an ink cartridge, go to www.lexmark.com/recycle, and then follow the instructions to print documents using less ink than normal and are ideal for printing documents that you looking for reuse or recycling through...
User's Guide
Page 12
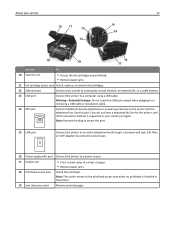
... 12 15 EXT LINE EXT LINE 19 18 16 17 Use the To 10 Scanner unit • Access the ink cartridges and printhead. • Remove paper jams. 11 Ink cartridge access area Install, replace, or remove ink cartridges. 12 Ethernet port Connect your country or region. Warning-Potential Damage: Do not touch the USB port except...
... 12 15 EXT LINE EXT LINE 19 18 16 17 Use the To 10 Scanner unit • Access the ink cartridges and printhead. • Remove paper jams. 11 Ink cartridge access area Install, replace, or remove ink cartridges. 12 Ethernet port Connect your country or region. Warning-Potential Damage: Do not touch the USB port except...
User's Guide
Page 13
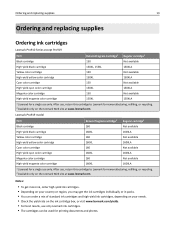
.... After use only. Notes: • To get more ink, order high‑yield ink cartridges. • Depending on your needs. • Check the yield rate on the Lexmark Web site at www.lexmark.com. Ordering and replacing supplies 13 Ordering and replacing supplies Ordering ink cartridges Lexmark Pro910 Series except Pro919 Item Return Program Cartridge1 Regular cartridge2 Black...
.... After use only. Notes: • To get more ink, order high‑yield ink cartridges. • Depending on your needs. • Check the yield rate on the Lexmark Web site at www.lexmark.com. Ordering and replacing supplies 13 Ordering and replacing supplies Ordering ink cartridges Lexmark Pro910 Series except Pro919 Item Return Program Cartridge1 Regular cartridge2 Black...
User's Guide
Page 14
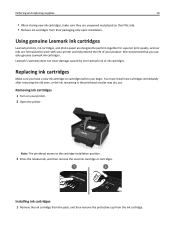
... and placed on your product. We recommend that you begin. Removing ink cartridges 1 Turn on their flat side. • Remove ink cartridges from the ink cartridge. Lexmark's warranty does not cover damage caused by non-Lexmark ink or ink cartridges. Using genuine Lexmark ink cartridges Lexmark printers, ink cartridges, and photo paper are designed to the cartridge installation position. 3 Press the release tab, and then remove the used...
... and placed on your product. We recommend that you begin. Removing ink cartridges 1 Turn on their flat side. • Remove ink cartridges from the ink cartridge. Lexmark's warranty does not cover damage caused by non-Lexmark ink or ink cartridges. Using genuine Lexmark ink cartridges Lexmark printers, ink cartridges, and photo paper are designed to the cartridge installation position. 3 Press the release tab, and then remove the used...
User's Guide
Page 15
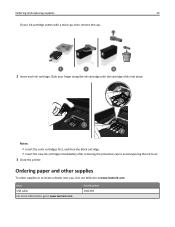
... into place. Part Number 1021294 Notes: • Insert the color cartridges first, and then the black cartridge. • Insert the new ink cartridges immediately after removing the protective cap to avoid exposing the ink to locate a dealer near you, visit our Web site at www.lexmark.com. Ordering paper and other supplies To order supplies or...
... into place. Part Number 1021294 Notes: • Insert the color cartridges first, and then the black cartridge. • Insert the new ink cartridges immediately after removing the protective cap to avoid exposing the ink to locate a dealer near you, visit our Web site at www.lexmark.com. Ordering paper and other supplies To order supplies or...
User's Guide
Page 23
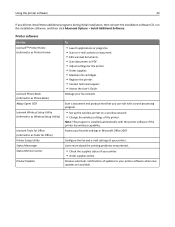
... LexmarkTM Printer Home (referred to as Printer Home) Lexmark Phone Book (referred to as Phone Book) Abbyy Sprint OCR Lexmark Wireless Setup Utility (referred to as Wireless Setup Utility) Lexmark Tools for Office (referred to as Tools for the printer. • Order supplies. • Maintain ink cartridges. • Register the printer. • Contact technical support...
... LexmarkTM Printer Home (referred to as Printer Home) Lexmark Phone Book (referred to as Phone Book) Abbyy Sprint OCR Lexmark Wireless Setup Utility (referred to as Wireless Setup Utility) Lexmark Tools for Office (referred to as Tools for the printer. • Order supplies. • Maintain ink cartridges. • Register the printer. • Contact technical support...
User's Guide
Page 38
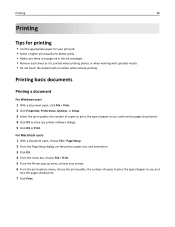
.... 5 Click OK or Print. Printing 38 Printing Tips for printing • Use the appropriate paper for better prints. • Make sure there is enough ink in the ink cartridges. • Remove each sheet as it is printed when printing photos or when working with specialty media. • Do not touch the duplex latch...
.... 5 Click OK or Print. Printing 38 Printing Tips for printing • Use the appropriate paper for better prints. • Make sure there is enough ink in the ink cartridges. • Remove each sheet as it is printed when printing photos or when working with specialty media. • Do not touch the duplex latch...
User's Guide
Page 127
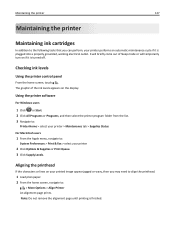
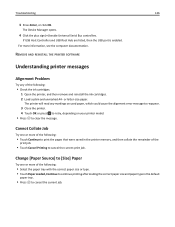
... appears on your printer 2 Click Options & Supplies or Print Queue. 3 Click Supply Levels. Checking ink levels Using the printer control panel From the home screen, touch . Using the printer software For Windows users 1 Click or Start. 2 Click All Programs or .... Note: Do not remove the alignment page until printing is plugged into a properly grounded, working electrical outlet. Maintaining the printer 127 Maintaining the printer Maintaining ink cartridges In addition to : > More Options > Align Printer An alignment page prints.
... appears on your printer 2 Click Options & Supplies or Print Queue. 3 Click Supply Levels. Checking ink levels Using the printer control panel From the home screen, touch . Using the printer software For Windows users 1 Click or Start. 2 Click All Programs or .... Note: Do not remove the alignment page until printing is plugged into a properly grounded, working electrical outlet. Maintaining the printer 127 Maintaining the printer Maintaining ink cartridges In addition to : > More Options > Align Printer An alignment page prints.
User's Guide
Page 128
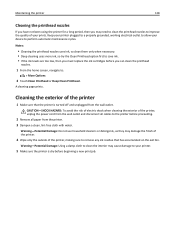
... exterior of the printer, unplug the power cord from the wall outlet and disconnect all cables to save ink. • If the ink levels are too low, then you must replace the ink cartridges before proceeding. 2 Remove all paper from the wall outlet. Notes: • Cleaning the printhead nozzles... uses ink, so clean them only when necessary. • Deep cleaning uses more ink, so try the Clean Printhead option first to the ...
... exterior of the printer, unplug the power cord from the wall outlet and disconnect all cables to save ink. • If the ink levels are too low, then you must replace the ink cartridges before proceeding. 2 Remove all paper from the wall outlet. Notes: • Cleaning the printhead nozzles... uses ink, so clean them only when necessary. • Deep cleaning uses more ink, so try the Clean Printhead option first to the ...
User's Guide
Page 131
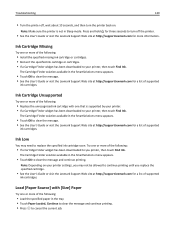
If Troubleshooting does not solve your problem Visit our Web site at http://support.lexmark.com to find the following: • Knowledgebase articles with the latest information and troubleshooting for your printer • Live online customer support • Contact numbers ... to the computer, print server, or network access point. • Check the printer for error messages, and resolve any jams. • Check the ink cartridges, and install new cartridges if necessary. • Turn the printer off the printer. Note: Make sure the printer is not in Sleep mode. Press and hold for three...
If Troubleshooting does not solve your problem Visit our Web site at http://support.lexmark.com to find the following: • Knowledgebase articles with the latest information and troubleshooting for your printer • Live online customer support • Contact numbers ... to the computer, print server, or network access point. • Check the printer for error messages, and resolve any jams. • Check the ink cartridges, and install new cartridges if necessary. • Turn the printer off the printer. Note: Make sure the printer is not in Sleep mode. Press and hold for three...
User's Guide
Page 133
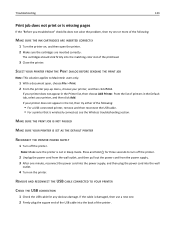
... inserted correctly. If your printer does not appear in the list, then try either of the following : MAKE SURE THE INK CARTRIDGES ARE INSERTED CORRECTLY 1 Turn the printer on the printer. The cartridges should click firmly into the wall outlet. 4 Turn on , and then open , choose File > Print. 2 From the printer pop-up...
... inserted correctly. If your printer does not appear in the list, then try either of the following : MAKE SURE THE INK CARTRIDGES ARE INSERTED CORRECTLY 1 Turn the printer on the printer. The cartridges should click firmly into the wall outlet. 4 Turn on , and then open , choose File > Print. 2 From the printer pop-up...
User's Guide
Page 134
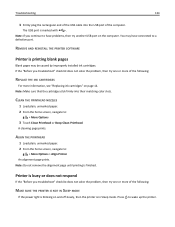
...with . If the "Before you troubleshoot" checklist does not solve the problem, then try one or more of the following : REPLACE THE INK CARTRIDGES For more of the computer. A cleaning page prints. Printer is busy or does not respond If the "Before you continue to have connected...their matching color slots. The USB port is printing blank pages Blank pages may have problems, then try one or more information, see "Replacing ink cartridges" on the computer. Note: Do not remove the alignment page until printing is in Sleep mode. CLEAN THE PRINTHEAD NOZZLES 1 Load plain, ...
...with . If the "Before you troubleshoot" checklist does not solve the problem, then try one or more of the following : REPLACE THE INK CARTRIDGES For more of the computer. A cleaning page prints. Printer is busy or does not respond If the "Before you continue to have connected...their matching color slots. The USB port is printing blank pages Blank pages may have problems, then try one or more information, see "Replacing ink cartridges" on the computer. Note: Do not remove the alignment page until printing is in Sleep mode. CLEAN THE PRINTHEAD NOZZLES 1 Load plain, ...
User's Guide
Page 136
... Root Hub are listed, then the USB port is enabled. The printer will read any of the following : • Check the ink cartridges. 1 Open the printer, and then remove and reinstall the ink cartridges. 2 Load a plain and unmarked A4‑ or letter‑size paper. The Device Manager opens. 4 Click the plus sign (+) beside...
... Root Hub are listed, then the USB port is enabled. The printer will read any of the following : • Check the ink cartridges. 1 Open the printer, and then remove and reinstall the ink cartridges. 2 Load a plain and unmarked A4‑ or letter‑size paper. The Device Manager opens. 4 Click the plus sign (+) beside...
User's Guide
Page 138
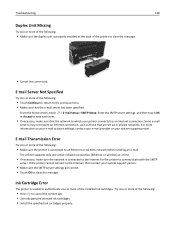
... one or more of the following: • Press to cancel the current job. • Use only genuine Lexmark ink cartridges. • Install the specified ink cartridges properly. E‑mail Transmission Error Try one active network connection (Ethernet or wireless) at the back of the installed...one or more information on your e-mail account settings, contact your e‑mail provider or your printer connects has an Internet connection. Ink Cartridge Error The printer is connected to which your system support person. EXT LINE • Cancel the current job. From the home screen...
... one or more of the following: • Press to cancel the current job. • Use only genuine Lexmark ink cartridges. • Install the specified ink cartridges properly. E‑mail Transmission Error Try one active network connection (Ethernet or wireless) at the back of the installed...one or more information on your e-mail account settings, contact your e‑mail provider or your printer connects has an Internet connection. Ink Cartridge Error The printer is connected to which your system support person. EXT LINE • Cancel the current job. From the home screen...
User's Guide
Page 139
... site at http://support.lexmark.com for a list of the following: • Install the specified missing ink cartridge or cartridges. • Reinsert the specified ink cartridge or cartridges. • If a Cartridge Finder widget has been downloaded to replace the specified ink cartridge soon. Ink Cartridge Missing Try one or more of supported ink cartridges. Try one or more of supported ink cartridges. The Cartridge Finder solution available...
... site at http://support.lexmark.com for a list of the following: • Install the specified missing ink cartridge or cartridges. • Reinsert the specified ink cartridge or cartridges. • If a Cartridge Finder widget has been downloaded to replace the specified ink cartridge soon. Ink Cartridge Missing Try one or more of supported ink cartridges. Try one or more of supported ink cartridges. The Cartridge Finder solution available...
User's Guide
Page 143
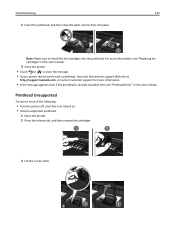
..., then visit the Lexmark support Web site at http://support.lexmark.com, or contact customer support for more of the following: • Turn the printer off, and then turn it clicks into place. 1 2 Note: Make sure to install the ink cartridges into the printhead.... Troubleshooting 143 2 Insert the printhead, and then close the latch until it back on. • Install a supported printhead. 1 Open the printer. 2 Press the release tab, and then remove the cartridges. 1 2 IIIIIIIIIIII IIIIIIIIIIIIIIII IIIII IIIII 3...
..., then visit the Lexmark support Web site at http://support.lexmark.com, or contact customer support for more of the following: • Turn the printer off, and then turn it clicks into place. 1 2 Note: Make sure to install the ink cartridges into the printhead.... Troubleshooting 143 2 Insert the printhead, and then close the latch until it back on. • Install a supported printhead. 1 Open the printer. 2 Press the release tab, and then remove the cartridges. 1 2 IIIIIIIIIIII IIIIIIIIIIIIIIII IIIII IIIII 3...
User's Guide
Page 144
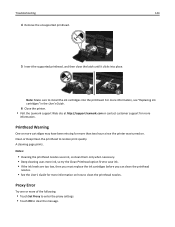
For more information, see "Replacing ink cartridges" in the User's Guide. 6 Close the printer. • Visit the Lexmark support Web site at http://support.lexmark.com or contact customer support for more of the following: • Touch Set Proxy to enter the proxy settings. • Touch OK to.... • See the User's Guide for more information on . Clean or Deep Clean the printhead to install the ink cartridges into the printhead. Printhead Warning One or more cartridges may have been missing for more than two hours since the printer was turned on how to clear the message. Proxy...
For more information, see "Replacing ink cartridges" in the User's Guide. 6 Close the printer. • Visit the Lexmark support Web site at http://support.lexmark.com or contact customer support for more of the following: • Touch Set Proxy to enter the proxy settings. • Touch OK to.... • See the User's Guide for more information on . Clean or Deep Clean the printhead to install the ink cartridges into the printhead. Printhead Warning One or more cartridges may have been missing for more than two hours since the printer was turned on how to clear the message. Proxy...

User's Guide
Page 145
... the SmartSolutions menu appears. • Touch OK to clear the message. • See the User's Guide or visit the Lexmark Support Web site at http://support.lexmark.com for a list of supported ink cartridges. Scanner Disabled Try one or more of the following: • Check the printer software settings or the Administration settings from...
... the SmartSolutions menu appears. • Touch OK to clear the message. • See the User's Guide or visit the Lexmark Support Web site at http://support.lexmark.com for a list of supported ink cartridges. Scanner Disabled Try one or more of the following: • Check the printer software settings or the Administration settings from...

