Quick Reference
Page 23
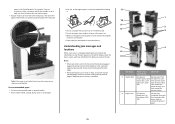
paper is available. 11 1 10 9 2 8 3 7 4 6 5 Area name Printer control panel message What to do 1 Stapler doors [x]‑page jam, Remove paper from remove paper, open the stapler paper in the same tray. • Make sure the paper size and type are printing on the display to clear the jam ...indicating the jam location and information to remove the jam. For example, if you are set to an overfilled bin. Leave then open the stapler bin, and stapler door. Open the doors, covers, and trays indicated on a letter-size paper and the bin extender is set to legal-size, then...
paper is available. 11 1 10 9 2 8 3 7 4 6 5 Area name Printer control panel message What to do 1 Stapler doors [x]‑page jam, Remove paper from remove paper, open the stapler paper in the same tray. • Make sure the paper size and type are printing on the display to clear the jam ...indicating the jam location and information to remove the jam. For example, if you are set to an overfilled bin. Leave then open the stapler bin, and stapler door. Open the doors, covers, and trays indicated on a letter-size paper and the bin extender is set to legal-size, then...
Quick Reference
Page 31
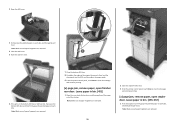
Leave paper in bin. [455-457] 1 From the stapler bin, firmly grasp the jammed paper on each side, and then gently pull it out. Note: Make sure all paper fragments are removed. 7 Close the ... 2 Close the staple finisher door. 3 From the printer control panel, touch Done to clear the message and continue printing. [x]‑page jam, remove paper, open stapler door.
Leave paper in bin. [455-457] 1 From the stapler bin, firmly grasp the jammed paper on each side, and then gently pull it out. Note: Make sure all paper fragments are removed. 7 Close the ... 2 Close the staple finisher door. 3 From the printer control panel, touch Done to clear the message and continue printing. [x]‑page jam, remove paper, open stapler door.

Quick Reference
Page 32
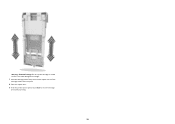
3 Pull down the staple guard until it clicks into place. 2 Open the stapler outer and inner doors. 1 2 4 Use the metal tab to bring the staples near the metal bracket. 32 Note: If the staples are at the rear of the printer. 5 Press down the latch of the staple cartridge holder, and then pull the holder out of the cartridge, then shake the cartridge downward to lift the staple guard, and then remove any loose staples. 6 Slide the staples toward the metal bracket.
3 Pull down the staple guard until it clicks into place. 2 Open the stapler outer and inner doors. 1 2 4 Use the metal tab to bring the staples near the metal bracket. 32 Note: If the staples are at the rear of the printer. 5 Press down the latch of the staple cartridge holder, and then pull the holder out of the cartridge, then shake the cartridge downward to lift the staple guard, and then remove any loose staples. 6 Slide the staples toward the metal bracket.
Quick Reference
Page 33
This could damage the cartridge. 7 Push the cartridge holder firmly back into the stapler unit until the cartridge holder clicks into place. 8 Close the stapler door. 9 From the printer control panel, touch Done to clear the message and continue printing. 33 Warning-Potential Damage: Do not tap the cartridge on a hard surface.
This could damage the cartridge. 7 Push the cartridge holder firmly back into the stapler unit until the cartridge holder clicks into place. 8 Close the stapler door. 9 From the printer control panel, touch Done to clear the message and continue printing. 33 Warning-Potential Damage: Do not tap the cartridge on a hard surface.


