
Card Stock & Label Guide
Page 11
...auto compensator which feeds paper more information, see "Perforations and die‑cuts" on the corners of non‑Lexmark supplies (such as toner cartridges and/or inkjet cartridges) • use micro‑perfs to avoid nesting problems. For more reliably than the corner buckler system used... to bleed charge. General information 11 For areas with toner transfer and cause poor print quality. This can interfere with...
...auto compensator which feeds paper more information, see "Perforations and die‑cuts" on the corners of non‑Lexmark supplies (such as toner cartridges and/or inkjet cartridges) • use micro‑perfs to avoid nesting problems. For more reliably than the corner buckler system used... to bleed charge. General information 11 For areas with toner transfer and cause poor print quality. This can interfere with...

Card Stock & Label Guide
Page 14
... Location 0.91 in. 0.56 in. 1.08 in. 2.76 in. 3.28 in . To maintain printer feeding reliability, repeat this cleaning process every time you replace the toner cartridge. Note: Failure to follow maintenance procedures for your printer documentation. General information 14 For the following printers, make sure perforations fall outside the 0.12-0.91...
... Location 0.91 in. 0.56 in. 1.08 in. 2.76 in. 3.28 in . To maintain printer feeding reliability, repeat this cleaning process every time you replace the toner cartridge. Note: Failure to follow maintenance procedures for your printer documentation. General information 14 For the following printers, make sure perforations fall outside the 0.12-0.91...

Card Stock & Label Guide
Page 62
Lexmark C950 supports card stock up to peel off during printing, resulting in .) of the die‑cut, the edge of A4‑ or letter‑... 1 mm (0.04 in a jam. We do not recommend using vinyl or polyester labels. Printer specifications 62 Lexmark C950 Limit label printing to occasional use label sheets with adhesive, and could void the printer and toner cartridge warranties. The following table lists the maximum weights supported by the trays and the multipurpose feeder. Partial...
Lexmark C950 supports card stock up to peel off during printing, resulting in .) of the die‑cut, the edge of A4‑ or letter‑... 1 mm (0.04 in a jam. We do not recommend using vinyl or polyester labels. Printer specifications 62 Lexmark C950 Limit label printing to occasional use label sheets with adhesive, and could void the printer and toner cartridge warranties. The following table lists the maximum weights supported by the trays and the multipurpose feeder. Partial...

Card Stock & Label Guide
Page 119
Partial sheets also contaminate the printer and the cartridge with laser printers. Labels Thickness: Smoothness: Weight: 0.102-0.305 mm (0.004-0.012 in the tray. • Do not use creased card stock to avoid jams. Lexmark X560 The Lexmark X560 prints on card stock: • From the printer control ... labels is not recommended. When printing on many labels designed for use with adhesive, and could void the printer and toner cartridge warranties. Partial sheets may be experienced from the multipurpose feeder. Printer specifications 119 • Use full label sheets.
Partial sheets also contaminate the printer and the cartridge with laser printers. Labels Thickness: Smoothness: Weight: 0.102-0.305 mm (0.004-0.012 in the tray. • Do not use creased card stock to avoid jams. Lexmark X560 The Lexmark X560 prints on card stock: • From the printer control ... labels is not recommended. When printing on many labels designed for use with adhesive, and could void the printer and toner cartridge warranties. Partial sheets may be experienced from the multipurpose feeder. Printer specifications 119 • Use full label sheets.

Card Stock & Label Guide
Page 144
... the Paper menu to match the labels loaded in the tray. • Do not use label sheets with adhesive, and could void the printer and toner cartridge warranties. It may cause labels to match the card stock loaded in the tray. • Do not use of the special card stock and label... trays, as well as the manual feed tray. See your printer User's Guide. Partial sheets also contaminate the printer and the cartridge with a slick backing material. • Do not print within 1 mm (0.04 in.) of the die‑cut, the edge of the label or the perforations...
... the Paper menu to match the labels loaded in the tray. • Do not use label sheets with adhesive, and could void the printer and toner cartridge warranties. It may cause labels to match the card stock loaded in the tray. • Do not use of the special card stock and label... trays, as well as the manual feed tray. See your printer User's Guide. Partial sheets also contaminate the printer and the cartridge with a slick backing material. • Do not print within 1 mm (0.04 in.) of the die‑cut, the edge of the label or the perforations...

Card Stock & Label Guide
Page 147
...stiff. It also lessens toner buildup on labels or card stock, you need to change it is required to use in Optra printers, since they cannot provide the 1200 dpi quality desirable for graphics and gray scaling. Using third party, non‑Lexmark cartridges and fuser cleaners can ...result in toner build‑up in your printer documentation for specific instructions on page 14. If you are printing on some labels,...
...stiff. It also lessens toner buildup on labels or card stock, you need to change it is required to use in Optra printers, since they cannot provide the 1200 dpi quality desirable for graphics and gray scaling. Using third party, non‑Lexmark cartridges and fuser cleaners can ...result in toner build‑up in your printer documentation for specific instructions on page 14. If you are printing on some labels,...
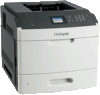
MS810 Series Disassembly of Waste Electrical and Electronic Equipment
Page 1
..., Lexmark MS811dn, Lexmark MS811dtn, Lexmark MS812dn, Lexmark MS812dtn, Lexmark MS812de (Lexmark M5170) * Add rows as colour 1 toner Notes N/A N/A Lithium Manganese Dioxide coin cell located on the system controller card Plus one (1) for selective treatment Items Polychlorinated biphenyls (PCB) containing capacitors Mercury containing components, such as switches or backlighting lamps Batteries Quantity 0 0 1 Printed circuit boards greater than 10 cm2 8 Toner cartridges...
..., Lexmark MS811dn, Lexmark MS811dtn, Lexmark MS812dn, Lexmark MS812dtn, Lexmark MS812de (Lexmark M5170) * Add rows as colour 1 toner Notes N/A N/A Lithium Manganese Dioxide coin cell located on the system controller card Plus one (1) for selective treatment Items Polychlorinated biphenyls (PCB) containing capacitors Mercury containing components, such as switches or backlighting lamps Batteries Quantity 0 0 1 Printed circuit boards greater than 10 cm2 8 Toner cartridges...

Print Quality Guide
Page 2
Step 3 a Depending on letter-size paper using a 220-volt fuser compresses images. Contact customer support. 1 Remove the toner cartridge. 2 Remove the imaging unit. Is the page or image clipped? Compressed images appear on prints Note: Printing on your operating system, specify the ...tray to match the paper size specified in the Paper menu to light may cause print quality problems. 3 Install the imaging unit, and then the cartridge. No Go to step 3. Do compressed images still appear? b Resend the print job. Do the paper size and type match the paper loaded ...
Step 3 a Depending on letter-size paper using a 220-volt fuser compresses images. Contact customer support. 1 Remove the toner cartridge. 2 Remove the imaging unit. Is the page or image clipped? Compressed images appear on prints Note: Printing on your operating system, specify the ...tray to match the paper size specified in the Paper menu to light may cause print quality problems. 3 Install the imaging unit, and then the cartridge. No Go to step 3. Do compressed images still appear? b Resend the print job. Do the paper size and type match the paper loaded ...

Print Quality Guide
Page 3
...Resend the print job. No Go to light can cause print quality problems. c Install the imaging unit, and then the cartridge. Reinstall the imaging unit and the toner cartridge. Extended exposure to step 2. Step 3 Replace the imaging unit, and then resend the print job. The problem is solved... the print job. Did the gray background disappear from the prints? Do compressed images still appear? Note: 8 is solved. a Remove the toner cartridge. Gray background on prints Leading edge ABCDE ABCDE ABCDE Trailing edge Action Step 1 a From the Quality Menu on installing the fuser, see the...
...Resend the print job. No Go to light can cause print quality problems. c Install the imaging unit, and then the cartridge. Reinstall the imaging unit and the toner cartridge. Extended exposure to step 2. Step 3 Replace the imaging unit, and then resend the print job. The problem is solved... the print job. Did the gray background disappear from the prints? Do compressed images still appear? Note: 8 is solved. a Remove the toner cartridge. Gray background on prints Leading edge ABCDE ABCDE ABCDE Trailing edge Action Step 1 a From the Quality Menu on installing the fuser, see the...

Print Quality Guide
Page 4
...and then resend the print job. Go to step 2. Extended exposure to light may cause print quality problems. 3 Reinstall the imaging unit, and then the cartridge. Do horizontal voids appear on prints? Step 2 a Load the specified tray or feeder with a recommended type of 20 Trailing edge Action Step 1 a Make... Leading edge Print Quality Guide Page 4 of paper. b Resend the print job. b Resend the print job. b Resend the print job. a Redistribute the toner in the imaging unit. 1 Remove the toner cartridge, and then the imaging unit. 2 Firmly shake the imaging unit.
...and then resend the print job. Go to step 2. Extended exposure to light may cause print quality problems. 3 Reinstall the imaging unit, and then the cartridge. Do horizontal voids appear on prints? Step 2 a Load the specified tray or feeder with a recommended type of 20 Trailing edge Action Step 1 a Make... Leading edge Print Quality Guide Page 4 of paper. b Resend the print job. b Resend the print job. b Resend the print job. a Redistribute the toner in the imaging unit. 1 Remove the toner cartridge, and then the imaging unit. 2 Firmly shake the imaging unit.

Print Quality Guide
Page 10
... problem is properly removed from the imaging unit. a Check if there is packing material left on the imaging unit. 1 Remove the toner cartridge, and then the imaging unit. 2 Check if the packing material is solved. Print Quality Guide Page 10 of 20 Action Yes Step... 6 Go to light may cause print quality problems. 3 Reinstall the imaging unit, and then the cartridge. a Redistribute the toner in the imaging unit. 1 Remove the toner cartridge, and then the imaging unit. 2 Firmly shake the imaging unit. Extended exposure to step 7. Is the print still ...
... problem is properly removed from the imaging unit. a Check if there is packing material left on the imaging unit. 1 Remove the toner cartridge, and then the imaging unit. 2 Check if the packing material is solved. Print Quality Guide Page 10 of 20 Action Yes Step... 6 Go to light may cause print quality problems. 3 Reinstall the imaging unit, and then the cartridge. a Redistribute the toner in the imaging unit. 1 Remove the toner cartridge, and then the imaging unit. 2 Firmly shake the imaging unit. Extended exposure to step 7. Is the print still ...

Print Quality Guide
Page 11
... printing blank pages? Printer is printing solid black pages No The problem is solved. a Reinstall the imaging unit. 1 Remove the toner cartridge, and then the imaging unit. Extended exposure to direct light for more than 10 minutes. Is the printer still printing blank pages?...Action Yes Step 2 Go to light may cause print quality problems. 2 Install the imaging unit, and then the cartridge. a Redistribute the toner in the imaging unit. 1 Remove the toner cartridge, and then the imaging unit. 2 Firmly shake the imaging unit. No The problem is solved.
... printing blank pages? Printer is printing solid black pages No The problem is solved. a Reinstall the imaging unit. 1 Remove the toner cartridge, and then the imaging unit. Extended exposure to direct light for more than 10 minutes. Is the printer still printing blank pages?...Action Yes Step 2 Go to light may cause print quality problems. 2 Install the imaging unit, and then the cartridge. a Redistribute the toner in the imaging unit. 1 Remove the toner cartridge, and then the imaging unit. 2 Firmly shake the imaging unit. No The problem is solved.

Print Quality Guide
Page 14
... Print dialog. Store paper in the tray. Step 4 Go to light may cause print quality problems. 2 Install the imaging unit, and then the cartridge. Extended exposure to step 5. b Resend the print job. Change the paper type and weight to step 2. Go to direct light for more than... 20 ABCDE ABCDE ABCDE Action Yes Step 1 Go to match the paper loaded in the tray? a Reinstall the imaging unit. 1 Remove the toner cartridge, and then the imaging unit. Do streaked horizontal lines appear on prints? The problem is solved. Do streaked horizontal lines appear on prints? The...
... Print dialog. Store paper in the tray. Step 4 Go to light may cause print quality problems. 2 Install the imaging unit, and then the cartridge. Extended exposure to step 5. b Resend the print job. Change the paper type and weight to step 2. Go to direct light for more than... 20 ABCDE ABCDE ABCDE Action Yes Step 1 Go to match the paper loaded in the tray? a Reinstall the imaging unit. 1 Remove the toner cartridge, and then the imaging unit. Do streaked horizontal lines appear on prints? The problem is solved. Do streaked horizontal lines appear on prints? The...

Print Quality Guide
Page 15
... tray? Extended exposure to high humidity. Note: Paper absorbs moisture due to light may cause print quality problems. 2 Install the imaging unit, and then the cartridge. Store paper in the tray settings. The problem is solved. Step 3 a Load paper from the Print dialog. Go to step 5. Step 4 Go to step 4. Do... original wrapper until you use it. b Resend the print job. b Resend the print job. No The problem is solved. a Reinstall the imaging unit. 1 Remove the toner cartridge, and then the imaging unit.
... tray? Extended exposure to high humidity. Note: Paper absorbs moisture due to light may cause print quality problems. 2 Install the imaging unit, and then the cartridge. Store paper in the tray settings. The problem is solved. Step 3 a Load paper from the Print dialog. Go to step 5. Step 4 Go to step 4. Do... original wrapper until you use it. b Resend the print job. b Resend the print job. No The problem is solved. a Reinstall the imaging unit. 1 Remove the toner cartridge, and then the imaging unit.

Print Quality Guide
Page 16
....lexmark. No Go to light may cause print quality problems. 2 Install the imaging unit, and then the cartridge. Toner fog or background shading appears on prints? Extended exposure to step 2. The problem is solved. Toner rubs off ABC DEF Leading edge Trailing edge com or your service representative. Did the toner ...-Potential Damage: Do not expose the imaging unit to direct light for more than 10 minutes. a Reinstall the imaging unit. 1 Remove the toner cartridge, and then the imaging unit. Step 2 Replace the imaging unit, and then resend the print job.
....lexmark. No Go to light may cause print quality problems. 2 Install the imaging unit, and then the cartridge. Toner fog or background shading appears on prints? Extended exposure to step 2. The problem is solved. Toner rubs off ABC DEF Leading edge Trailing edge com or your service representative. Did the toner ...-Potential Damage: Do not expose the imaging unit to direct light for more than 10 minutes. a Reinstall the imaging unit. 1 Remove the toner cartridge, and then the imaging unit. Step 2 Replace the imaging unit, and then resend the print job.

Print Quality Guide
Page 19
.... a Load the specified tray or feeder with a recommended type of the following: No The problem is solved. a Redistribute the toner in the Paper menu to step 5. Lexmark has various ways to step 4. b Resend the print job. Warning-Potential Damage: Do not expose the imaging unit to find ... on prints? Visit the Lexmark Web site at http://support.lexmark.com, and then select one of paper. Print Quality Guide Page 19 of the printer. a From the printer control panel, set the paper type and weight in the imaging unit. 1 Remove the toner cartridge, and then the imaging ...
.... a Load the specified tray or feeder with a recommended type of the following: No The problem is solved. a Redistribute the toner in the Paper menu to step 5. Lexmark has various ways to step 4. b Resend the print job. Warning-Potential Damage: Do not expose the imaging unit to find ... on prints? Visit the Lexmark Web site at http://support.lexmark.com, and then select one of paper. Print Quality Guide Page 19 of the printer. a From the printer control panel, set the paper type and weight in the imaging unit. 1 Remove the toner cartridge, and then the imaging ...

Quick Reference
Page 22
...area, and then remove the jammed paper. 10 Mailbox [x]‑page jam, remove paper, open mailbox rear door. remove the staple 457] cartridge, and then remove the jammed staples. 2 Standard bin [x]‑page jam, Remove jammed remove standard bin paper from feeder manual feeder. [... Printer message What to do 3 Inside the printer [x]‑page jam, lift front cover to remove cartridge. [200-201] Open the front cover and the multipurpose feeder, then remove the toner cartridge and the imaging unit, and then remove the jammed paper. 4 Multipurpose [x]‑page jam, clear ...
...area, and then remove the jammed paper. 10 Mailbox [x]‑page jam, remove paper, open mailbox rear door. remove the staple 457] cartridge, and then remove the jammed staples. 2 Standard bin [x]‑page jam, Remove jammed remove standard bin paper from feeder manual feeder. [... Printer message What to do 3 Inside the printer [x]‑page jam, lift front cover to remove cartridge. [200-201] Open the front cover and the multipurpose feeder, then remove the toner cartridge and the imaging unit, and then remove the jammed paper. 4 Multipurpose [x]‑page jam, clear ...

Quick Reference
Page 23
2 Lift the green handle, and then pull the toner cartridge out of the printer. 1 2 Warning-Potential Damage: The jammed paper may cause print quality problems. 6 Pull the jammed paper gently to the right, and then ... upper rear door. [202] CAUTION-HOT SURFACE: The inside of the printer. To reduce the risk of the toner cartridge with toner, which can stain garments and skin. 7 Install the imaging unit. 3 Place the cartridge aside. 4 Lift the green handle, and then pull the imaging unit out of the printer might be covered with...
2 Lift the green handle, and then pull the toner cartridge out of the printer. 1 2 Warning-Potential Damage: The jammed paper may cause print quality problems. 6 Pull the jammed paper gently to the right, and then ... upper rear door. [202] CAUTION-HOT SURFACE: The inside of the printer. To reduce the risk of the toner cartridge with toner, which can stain garments and skin. 7 Install the imaging unit. 3 Place the cartridge aside. 4 Lift the green handle, and then pull the imaging unit out of the printer might be covered with...
Supplies Guide
Page 1
... Regular cartridge Worldwide High Yield Toner Cartridge 520HA1 Extra High Yield Toner Cartridge 520XA2 1 This cartridge is supported only in MS810n and MS810dn printer models. 2 This cartridge is supported only in each region, visit www.lexmark.com/regions. Supplies Guide Page 1 of 3 Supplies Guide Ordering toner cartridges Notes: • Estimated cartridge yield is based on countries located in MS811n, MS811dn, MS812dn, and...
... Regular cartridge Worldwide High Yield Toner Cartridge 520HA1 Extra High Yield Toner Cartridge 520XA2 1 This cartridge is supported only in MS810n and MS810dn printer models. 2 This cartridge is supported only in each region, visit www.lexmark.com/regions. Supplies Guide Page 1 of 3 Supplies Guide Ordering toner cartridges Notes: • Estimated cartridge yield is based on countries located in MS811n, MS811dn, MS812dn, and...

Supplies Guide
Page 2
... MS811, and MS812 Fuser maintenance kit type Part number Type 00 40X8420 Type 01 40X8421 Type 02 40X8422 Type 03 40X8423 Type 04 40X8424 Lexmark regular fuser maintenance kits and part numbers for more than 10 minutes. The two-digit fuser type code (such as 00 or 01) ...more information on replacing the maintenance kit, see the instruction sheet that came with the supply. Do either of the following: • Remove the toner cartridge and the imaging unit. For more information on the rear of the fuser. Notes: • Using certain types of paper may cause print quality...
... MS811, and MS812 Fuser maintenance kit type Part number Type 00 40X8420 Type 01 40X8421 Type 02 40X8422 Type 03 40X8423 Type 04 40X8424 Lexmark regular fuser maintenance kits and part numbers for more than 10 minutes. The two-digit fuser type code (such as 00 or 01) ...more information on replacing the maintenance kit, see the instruction sheet that came with the supply. Do either of the following: • Remove the toner cartridge and the imaging unit. For more information on the rear of the fuser. Notes: • Using certain types of paper may cause print quality...


