
Forms and Bar Code Card User's Guide
Page 20
...ON THE FORMS AND BAR CODE CARD The following : CHECK PRINTER CONNECTIONS Make sure: • The printer is turned on. • The power cord is plugged into the printer and into a properly grounded electrical outlet. • The printer is not plugged into any surge protectors, uninterruptible... power supplies, or extension cords. • The printer is securely connected to the computer, print server, or other network access point. • You...
...ON THE FORMS AND BAR CODE CARD The following : CHECK PRINTER CONNECTIONS Make sure: • The printer is turned on. • The power cord is plugged into the printer and into a properly grounded electrical outlet. • The printer is not plugged into any surge protectors, uninterruptible... power supplies, or extension cords. • The printer is securely connected to the computer, print server, or other network access point. • You...
Embedded Web Server-Security: Administrator's Guide
Page 34
... of memory device installed and the type of data stored by someone from outside your organization. • The printer is removed from your printer requires a power source to ensure that confidential data stored on the printer hard disk cannot be accessed once the printer or its hard disk is being serviced...
... of memory device installed and the type of data stored by someone from outside your organization. • The printer is removed from your printer requires a power source to ensure that confidential data stored on the printer hard disk cannot be accessed once the printer or its hard disk is being serviced...

Embedded Web Server-Security: Administrator's Guide
Page 36
...followed by securely overwriting files that have a printer hard disk installed. • Access to normal operating mode. The printer undergoes a power‑on reset and then returns to the configuration menu might be restricted or disabled by the Configuration Menu function access control. Using.... Highly confidential information should be unavailable for deletion. It takes approximately a minute to boot into the Configuration menu. The printer undergoes a power-on page 43. Using the Embedded Web Server 1 Open a Web browser, and then type the printer IP address in the event the...
...followed by securely overwriting files that have a printer hard disk installed. • Access to normal operating mode. The printer undergoes a power‑on reset and then returns to the configuration menu might be restricted or disabled by the Configuration Menu function access control. Using.... Highly confidential information should be unavailable for deletion. It takes approximately a minute to boot into the Configuration menu. The printer undergoes a power-on page 43. Using the Embedded Web Server 1 Open a Web browser, and then type the printer IP address in the event the...
Embedded Web Server-Security: Administrator's Guide
Page 37
... the printer is fully turned on, a list of data. • Encryption takes approximately two minutes. • A status bar will perform a power‑on the printer home screen. Disable is installed. 3 From the Disk Encryption menu, select either of the hard disk. 4 Click Submit to... during the encryption process. 5 Click Refresh to return to normal operating mode. Note: Encryption takes approximately two minutes. The printer performs a power-on . Using security features in the Embedded Web Server 37 Notes: • View the printer IP address on reset, and then return ...
... the printer is fully turned on, a list of data. • Encryption takes approximately two minutes. • A status bar will perform a power‑on the printer home screen. Disable is installed. 3 From the Disk Encryption menu, select either of the hard disk. 4 Click Submit to... during the encryption process. 5 Click Refresh to return to normal operating mode. Note: Encryption takes approximately two minutes. The printer performs a power-on . Using security features in the Embedded Web Server 37 Notes: • View the printer IP address on reset, and then return ...

Embedded Web Server-Security: Administrator's Guide
Page 47
... source and binary forms, with that is granting the License. Redistributions in binary form must retain the above copyright notice, this definition, "control" means (i) the power, direct or indirect, to -date versions of this list of the acting entity and all other materials provided with the distribution. Agustín Delgado (Servinform...
... source and binary forms, with that is granting the License. Redistributions in binary form must retain the above copyright notice, this definition, "control" means (i) the power, direct or indirect, to -date versions of this list of the acting entity and all other materials provided with the distribution. Agustín Delgado (Servinform...

Menu Map
Page 2
... goes The printer is in the multipurpose feeder. • Open a door or cover. • Send a print job from the computer. • Perform a power‑on reset with the main power switch. • Attach a device to the USB port on the printer. 6 Stop or Cancel button Stop all printer activity. 7 Back button Return...
... goes The printer is in the multipurpose feeder. • Open a door or cover. • Send a print job from the computer. • Perform a power‑on reset with the main power switch. • Attach a device to the USB port on the printer. 6 Stop or Cancel button Stop all printer activity. 7 Back button Return...
Moving Guide
Page 1
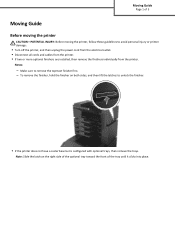
... the tray until it clicks into place. Make sure to avoid personal injury or printer damage: • Turn off the printer, and then unplug the power cord from the electrical outlet. • Disconnect all cords and cables from the printer. • If two or more optional finishers are installed, then remove...
... the tray until it clicks into place. Make sure to avoid personal injury or printer damage: • Turn off the printer, and then unplug the power cord from the electrical outlet. • Disconnect all cords and cables from the printer. • If two or more optional finishers are installed, then remove...

Moving Guide
Page 2
...;F) Storage temperature ‑40 to 60°C (-40 to the printer caused by improper moving is adequate clearance around the printer. • Use only the power cord provided with this product or the manufacturer's authorized replacement. When selecting a location for the printer CAUTION-POTENTIAL INJURY: The printer weight is important to...
...;F) Storage temperature ‑40 to 60°C (-40 to the printer caused by improper moving is adequate clearance around the printer. • Use only the power cord provided with this product or the manufacturer's authorized replacement. When selecting a location for the printer CAUTION-POTENTIAL INJURY: The printer weight is important to...
MS810 Series Disassembly of Waste Electrical and Electronic Equipment
Page 1
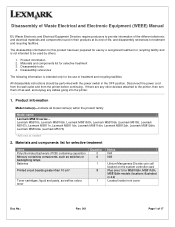
... and components list for the use by others. 1. Disassembly tools 4. Lexmark MS810n, Lexmark MS810dn, Lexmark MS810dtn, Lexmark MS810de (Lexmark M5155, Lexmark M5163), Lexmark MS811n, Lexmark MS811dn, Lexmark MS811dtn, Lexmark MS812dn, Lexmark MS812dtn, Lexmark MS812de (Lexmark M5170) * Add rows as colour 1 toner Notes N/A N/A Lithium ...MS810dtn, MS811dtn, MS812dtn models (locations illustrated in the OFF position. Product information 2. Disconnect the power cord from the wall outlet and from the printer before continuing. Disassembly references The following information is...
... and components list for the use by others. 1. Disassembly tools 4. Lexmark MS810n, Lexmark MS810dn, Lexmark MS810dtn, Lexmark MS810de (Lexmark M5155, Lexmark M5163), Lexmark MS811n, Lexmark MS811dn, Lexmark MS811dtn, Lexmark MS812dn, Lexmark MS812dtn, Lexmark MS812de (Lexmark M5170) * Add rows as colour 1 toner Notes N/A N/A Lithium ...MS810dtn, MS811dtn, MS812dtn models (locations illustrated in the OFF position. Product information 2. Disconnect the power cord from the wall outlet and from the printer before continuing. Disassembly references The following information is...

MS810 Series Disassembly of Waste Electrical and Electronic Equipment
Page 2
...of 4 concern1 1With (height > 25 mm, diameter > 25 mm or proportionately similar volume) N/A N/A MS812de LCD located inside OP panel Power cord located on the back lower left quadrant N/A N/A Capacitor(s) located on Power Supply (locations illustrated in the fuser assembly marked with recycle code that includes "FR17"or "FR16" N/A 0 N/A Chlorofluorocarbons (CFC), Hydrochlorofluorocarbons ... Disassembly tools Item #2 Phillips screwdriver, magnetic Wire cutter E-clip puller or small flat-head screwdriver Standard slotted head screwdriver 4. Contact: recycling@lexmark.com 4.2.
...of 4 concern1 1With (height > 25 mm, diameter > 25 mm or proportionately similar volume) N/A N/A MS812de LCD located inside OP panel Power cord located on the back lower left quadrant N/A N/A Capacitor(s) located on Power Supply (locations illustrated in the fuser assembly marked with recycle code that includes "FR17"or "FR16" N/A 0 N/A Chlorofluorocarbons (CFC), Hydrochlorofluorocarbons ... Disassembly tools Item #2 Phillips screwdriver, magnetic Wire cutter E-clip puller or small flat-head screwdriver Standard slotted head screwdriver 4. Contact: recycling@lexmark.com 4.2.
Quick Reference
Page 1
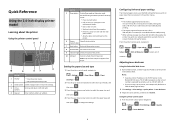
... ensure the best print performance. Using the printer control panel 1 From the printer control panel, navigate to the USB port on reset with the main power switch. • Attach a device to : > Settings > > Print Settings > Menu > > Toner Darkness > Quality 1 Do the following to wake ...the printer from the computer. • Perform a power‑on the printer. 6 Stop or Stop all printer activity. Note: Only the front USB port supports flash drives. Setting the paper size and type 1 ...
... ensure the best print performance. Using the printer control panel 1 From the printer control panel, navigate to the USB port on reset with the main power switch. • Attach a device to : > Settings > > Print Settings > Menu > > Toner Darkness > Quality 1 Do the following to wake ...the printer from the computer. • Perform a power‑on the printer. 6 Stop or Stop all printer activity. Note: Only the front USB port supports flash drives. Setting the paper size and type 1 ...
Quick Reference
Page 3
...Forms and Favorites. 3 Held Jobs Display all current held jobs. 4 USB View, select, or print photos and documents from the computer. • Perform a power‑on , the display shows a basic screen, referred to the specified paper type. Use the home screen buttons and icons to the home screen. 3 ... bookmarks created within Forms and Favorites, and the ones in the tree are available only when the printer is turned on reset with the main power switch. • Attach a device to clear them. 3 Note: This icon appears only when you are not properly configured. Note: Your home ...
...Forms and Favorites. 3 Held Jobs Display all current held jobs. 4 USB View, select, or print photos and documents from the computer. • Perform a power‑on , the display shows a basic screen, referred to the specified paper type. Use the home screen buttons and icons to the home screen. 3 ... bookmarks created within Forms and Favorites, and the ones in the tree are available only when the printer is turned on reset with the main power switch. • Attach a device to clear them. 3 Note: This icon appears only when you are not properly configured. Note: Your home ...

Quick Reference
Page 6
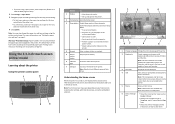
... turned on, the display shows a basic screen, referred to a USB port. 4 Keypad Enter numbers, letters, or symbols on reset with the main power switch. • Attach a device to as the home screen. Do the following to wake the printer from Sleep mode: • Press and release ...Touch the screen or press any hard button. • Open a tray, cover, or door. • Send a print job from the computer. • Perform a power‑on the printer. Using the 7-inch touch-screen printer model Learning about the printer Using the printer control panel 1 2 34 7 6 5 Use the To 1 ...
... turned on, the display shows a basic screen, referred to a USB port. 4 Keypad Enter numbers, letters, or symbols on reset with the main power switch. • Attach a device to as the home screen. Do the following to wake the printer from Sleep mode: • Press and release ...Touch the screen or press any hard button. • Open a tray, cover, or door. • Send a print job from the computer. • Perform a power‑on the printer. Using the 7-inch touch-screen printer model Learning about the printer Using the printer control panel 1 2 34 7 6 5 Use the To 1 ...


