Print Drivers for UNIX and LINUX Systems
Page 48
Index A Add Print Queue Wizard 19 administrative group adding a user 17 changing the group name 16 removing user 17 administrator mode 34 B banner program using 29 writing 29 C collating copies 26 command line 33 creating print queues 19 creating virtual devices 18 printing from 24 CUPS 39 Customer Support, contacting 40 D default settings 34 Device Manager 17 duplex printing 26 H holding print jobs 28 hostname troubleshooting 38 I installing printer drivers before installing 8 finding space 13 on Debian Linux 11...
Index A Add Print Queue Wizard 19 administrative group adding a user 17 changing the group name 16 removing user 17 administrator mode 34 B banner program using 29 writing 29 C collating copies 26 command line 33 creating print queues 19 creating virtual devices 18 printing from 24 CUPS 39 Customer Support, contacting 40 D default settings 34 Device Manager 17 duplex printing 26 H holding print jobs 28 hostname troubleshooting 38 I installing printer drivers before installing 8 finding space 13 on Debian Linux 11...
Universal Print Driver Version 2.0 White Paper
Page 4
... a printer model automatically. Connecting the driver to a specific printer automatically updates the driver settings to show only the paper sizes, trays, types, finishing options, and other data that work across all printer models. You can also create subset driver configurations that is stored in a Driver Configuration File (DCF). The Universal Print Driver is a group of print jobs from different users or departments and bill those print jobs to a specific account. Combining the custom installation package with a printer hard disk installed. A driver configuration is...
... a printer model automatically. Connecting the driver to a specific printer automatically updates the driver settings to show only the paper sizes, trays, types, finishing options, and other data that work across all printer models. You can also create subset driver configurations that is stored in a Driver Configuration File (DCF). The Universal Print Driver is a group of print jobs from different users or departments and bill those print jobs to a specific account. Combining the custom installation package with a printer hard disk installed. A driver configuration is...
Universal Print Driver Version 2.0 White Paper
Page 13
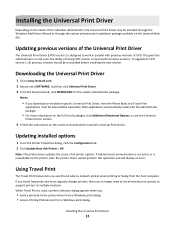
Updating previous versions of the Universal Print Driver The Universal Print Driver (UPD) version 2 is designed to support printers at multiple locations. Installing the Universal Print Driver 13 Installing the Universal Print Driver Depending on the needs of the individual administrator, the Universal Print Driver may be installed through the Windows Add Printer Wizard or through the system administrator installation package available on the screen to www.lexmark.com. 2 Mouse over SOFTWARE, and then click Universal Print Driver. 3 From the Download tab, click DOWNLOAD for...
Updating previous versions of the Universal Print Driver The Universal Print Driver (UPD) version 2 is designed to support printers at multiple locations. Installing the Universal Print Driver 13 Installing the Universal Print Driver Depending on the needs of the individual administrator, the Universal Print Driver may be installed through the Windows Add Printer Wizard or through the system administrator installation package available on the screen to www.lexmark.com. 2 Mouse over SOFTWARE, and then click Universal Print Driver. 3 From the Download tab, click DOWNLOAD for...
Universal Print Driver Version 2.0 White Paper
Page 17
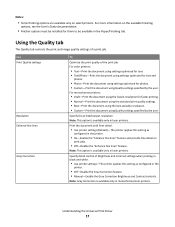
...available only in monochrome laser printers. Understanding the Universal Print Driver 17 Specify the printed output resolution. Note: This option is available only in laser printers. Use Print Quality settings Resolution Enhance fine lines Gray Correction To Optimize the print quality of a print job. Specify detail control of Brightness and Contrast settings when printing in black and white. • Use printer settings-The printer applies this setting as configured in laser printers. For color printers: • Text-Print the document using settings optimized for text. •...
...available only in monochrome laser printers. Understanding the Universal Print Driver 17 Specify the printed output resolution. Note: This option is available only in laser printers. Use Print Quality settings Resolution Enhance fine lines Gray Correction To Optimize the print quality of a print job. Specify detail control of Brightness and Contrast settings when printing in black and white. • Use printer settings-The printer applies this setting as configured in laser printers. For color printers: • Text-Print the document using settings optimized for text. •...
Card Stock & Label Guide
Page 54
... menu) to Heavy, and set Paper Type to Smooth. • Do not load labels together with a dry web cleaner may cause paper jams. For more number of the most difficult print materials for laser printers. Print on page 14 Lexmark C792e, C792de, C792dte, and C792dhe Using media higher than 50 Sheffield such as coated paper, polyester, vinyl, or other glossy print media, then install a dry web cleaner upgrade kit (P/N 40X1856). Partial sheets may contaminate your local service...
... menu) to Heavy, and set Paper Type to Smooth. • Do not load labels together with a dry web cleaner may cause paper jams. For more number of the most difficult print materials for laser printers. Print on page 14 Lexmark C792e, C792de, C792dte, and C792dhe Using media higher than 50 Sheffield such as coated paper, polyester, vinyl, or other glossy print media, then install a dry web cleaner upgrade kit (P/N 40X1856). Partial sheets may contaminate your local service...
Card Stock & Label Guide
Page 55
... service representative for label applications to optimize feed reliability. For vinyl and other glossy print media, then install a dry web cleaner upgrade kit (P/N 40X1856). Printer specifications 55 The Lexmark C792e, C792de, C792dte, and C792dhe printer models print on labels: • From the printer control panel, set Labels Texture (under the Paper Weight menu) to Heavy, and set Paper Type to Labels in the Paper Menu. For paper and transparency specifications, see the printer publications CD. When printing on many labels designed for laser printers. A fuser equipped...
... service representative for label applications to optimize feed reliability. For vinyl and other glossy print media, then install a dry web cleaner upgrade kit (P/N 40X1856). Printer specifications 55 The Lexmark C792e, C792de, C792dte, and C792dhe printer models print on labels: • From the printer control panel, set Labels Texture (under the Paper Weight menu) to Heavy, and set Paper Type to Labels in the Paper Menu. For paper and transparency specifications, see the printer publications CD. When printing on many labels designed for laser printers. A fuser equipped...
Card Stock & Label Guide
Page 140
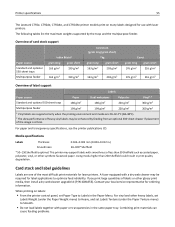
... vinyl and other glossy print media, then install a dry web cleaner upgrade kit (P/N 40X1856). Adhesive material may cause labels to Smooth. • Do not load labels together with more information, see the printer User's Guide on labels: • From the printer control panel, set Labels Texture (under the Paper Weight menu) to Heavy, and set Paper Type to improve registration. Printer specifications 140 Overview of label support Labels Paper source Paper Dual‑web paper Polyester Vinyl1, 2 500‑sheet drawers 180 g/m2...
... vinyl and other glossy print media, then install a dry web cleaner upgrade kit (P/N 40X1856). Adhesive material may cause labels to Smooth. • Do not load labels together with more information, see the printer User's Guide on labels: • From the printer control panel, set Labels Texture (under the Paper Weight menu) to Heavy, and set Paper Type to improve registration. Printer specifications 140 Overview of label support Labels Paper source Paper Dual‑web paper Polyester Vinyl1, 2 500‑sheet drawers 180 g/m2...

Card Stock & Label Guide
Page 171
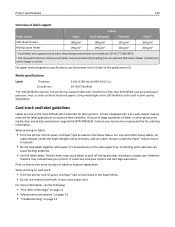
... cause feeding problems. • Use full label sheets. Note: Optional 250‑sheet Universally Adjustable Trays designed for this type of 5 inches when installed either in the integral tray location or in a paper jam. See your printer and cartridge warranties. When you install a special oil fuser cleaner, P/N 99A0725. For vinyl and other heavy labels, set the Paper Type to Smooth. • Do not load labels together with a minimum length of label, and you must install a special fuser wiper. Printing labels on...
... cause feeding problems. • Use full label sheets. Note: Optional 250‑sheet Universally Adjustable Trays designed for this type of 5 inches when installed either in the integral tray location or in a paper jam. See your printer and cartridge warranties. When you install a special oil fuser cleaner, P/N 99A0725. For vinyl and other heavy labels, set the Paper Type to Smooth. • Do not load labels together with a minimum length of label, and you must install a special fuser wiper. Printing labels on...

Forms and Bar Code Card Technical Reference Guide
Page 98
... postal code 03 = Structured carrier message with alphanumeric postal code 04 = Standard symbol with standard error correction 05 = Full symbol with enhanced error correction 06 = Reader program with standard error correction Sets the quiet zone in an array of two numbers Notes: Depending on the mode, the input data sent with a label-number and number-of QR symbology used. Arguments for MaxiCode bar code symbology Key /Symbology /Mode /QuietZone...
... postal code 03 = Structured carrier message with alphanumeric postal code 04 = Standard symbol with standard error correction 05 = Full symbol with enhanced error correction 06 = Reader program with standard error correction Sets the quiet zone in an array of two numbers Notes: Depending on the mode, the input data sent with a label-number and number-of QR symbology used. Arguments for MaxiCode bar code symbology Key /Symbology /Mode /QuietZone...

PRESCRIBE Emulation Technical Reference Guide
Page 3
... prints is a PRESCRIBE emulation STAT page with customer application test files and an extensive set up the PRESCRIBE FRPO (Firmware RePrOgram) defaults to factory default settings. Under the Printer Information section, there should be restored. For more information on the FRPO settings supported by the PRESCRIBE emulation option, see the installation instructions that any non-default settings can be an effective replacement for Kyocera printers in their certification testing. Programming is used. After installing...
... prints is a PRESCRIBE emulation STAT page with customer application test files and an extensive set up the PRESCRIBE FRPO (Firmware RePrOgram) defaults to factory default settings. Under the Printer Information section, there should be restored. For more information on the FRPO settings supported by the PRESCRIBE emulation option, see the installation instructions that any non-default settings can be an effective replacement for Kyocera printers in their certification testing. Programming is used. After installing...

Print Quality Guide
Page 15
.... Step 5 Replace the imaging unit, and then resend the print job. Contact customer The problem is solved. From the printer control panel, set the paper texture, type, and weight in the tray. Store paper in the tray? The problem is solved. a Reinstall the imaging unit. 1 Remove the toner cartridge, and then the imaging unit. Extended exposure to match the paper loaded in the Paper menu to light may cause print quality problems. 2 Install the imaging unit, and then the cartridge. b Resend the print job. Do streaked vertical lines appear on prints
.... Step 5 Replace the imaging unit, and then resend the print job. Contact customer The problem is solved. From the printer control panel, set the paper texture, type, and weight in the tray. Store paper in the tray? The problem is solved. a Reinstall the imaging unit. 1 Remove the toner cartridge, and then the imaging unit. Extended exposure to match the paper loaded in the Paper menu to light may cause print quality problems. 2 Install the imaging unit, and then the cartridge. b Resend the print job. Do streaked vertical lines appear on prints

Quick Reference
Page 1
... Sleep mode: • Press any hard button. • Pull out Tray 1 or load paper in the multipurpose feeder. • Open a door or cover. • Send a print job from the computer. • Perform a power‑on reset with the main power switch. • Attach a device to the USB port on paper sizes that are using a proxy server, then temporarily disable it to load the Web page correctly. 2 Click Settings > Print Settings > Quality Menu > Toner Darkness. 3 Adjust the toner darkness, and then click Submit. From the printer control panel, navigate to change...
... Sleep mode: • Press any hard button. • Pull out Tray 1 or load paper in the multipurpose feeder. • Open a door or cover. • Send a print job from the computer. • Perform a power‑on reset with the main power switch. • Attach a device to the USB port on paper sizes that are using a proxy server, then temporarily disable it to load the Web page correctly. 2 Click Settings > Print Settings > Quality Menu > Toner Darkness. 3 Adjust the toner darkness, and then click Submit. From the printer control panel, navigate to change...

User's Guide
Page 9
... updates, visit our Web site at http://support.lexmark.com. User's Guide and Quick Reference Guide-The guides are listed on the cover page. Overview 9 Overview Using this guide This User's Guide provides general and specific information on using the printer software • Configuring the printer on a network • Caring for and maintaining the printer • Troubleshooting and solving problems Instructions for ? The following chapters contain information applicable to all printer models: • Selecting a location for the printer • Additional printer setup...
... updates, visit our Web site at http://support.lexmark.com. User's Guide and Quick Reference Guide-The guides are listed on the cover page. Overview 9 Overview Using this guide This User's Guide provides general and specific information on using the printer software • Configuring the printer on a network • Caring for and maintaining the printer • Troubleshooting and solving problems Instructions for ? The following chapters contain information applicable to all printer models: • Selecting a location for the printer • Additional printer setup...

User's Guide
Page 43
... the page. f Print a test page to your printer has Ethernet or wireless capability and is attached to expand the list of the CD or DVD drive. 3 Press Enter, or click OK. "Printing a menu settings page" on page 122 or "Printing a menu settings page" on page 76 for touch‑screen printer models • Network setup page-Use this page to verify the network connection. c Follow the instructions on , verify that the printer is set in the COM port assigned to : Add port > select a port type...
... the page. f Print a test page to your printer has Ethernet or wireless capability and is attached to expand the list of the CD or DVD drive. 3 Press Enter, or click OK. "Printing a menu settings page" on page 122 or "Printing a menu settings page" on page 76 for touch‑screen printer models • Network setup page-Use this page to verify the network connection. c Follow the instructions on , verify that the printer is set in the COM port assigned to : Add port > select a port type...

User's Guide
Page 314
... print server is listed in the Installed Options list. Step 2 The problem is below the maximum paper fill indicator. • Make sure paper lies flat in the Installed Options list. Contact customer support. a Open the tray and do one or more of the paper. • Make sure the paper is solved. Is the tray working ? Print a menu settings page, and then check if the tray is securely connected to the internal print server. Reinstall the tray. Check the cable and the internal print server connection. b Resend the print job...
... print server is listed in the Installed Options list. Step 2 The problem is below the maximum paper fill indicator. • Make sure paper lies flat in the Installed Options list. Contact customer support. a Open the tray and do one or more of the paper. • Make sure the paper is solved. Is the tray working ? Print a menu settings page, and then check if the tray is securely connected to the internal print server. Reinstall the tray. Check the cable and the internal print server connection. b Resend the print job...

User's Guide
Page 332
...; Change the paper loaded in the tray to match the paper loaded in its original wrapper until you use it. Extended exposure to step 5. b Resend the print job. Contact customer The problem is solved. From the printer control panel, set the paper texture, type, and weight in the Paper menu to match the paper texture, type, and weight specified in the tray? Step 3 a Load paper from the Print dialog. Step 4 Go to light may cause print quality problems. 2 Install the imaging unit...
...; Change the paper loaded in the tray to match the paper loaded in its original wrapper until you use it. Extended exposure to step 5. b Resend the print job. Contact customer The problem is solved. From the printer control panel, set the paper texture, type, and weight in the Paper menu to match the paper texture, type, and weight specified in the tray? Step 3 a Load paper from the Print dialog. Step 4 Go to light may cause print quality problems. 2 Install the imaging unit...
User's Guide
Page 355
... tray installing 31 550‑sheet tray installing 31 Symbols [x]‑page jam, clear manual feeder. [250] 273 [x]‑page jam, lift front cover to [paper type] [paper size] load [orientation] 285 Check tray [x] connection 285 checking an unresponsive printer 302 checking status of parts and supplies 77, 123, 170 checking the status of parts and supplies 77, 123, 171 checking the virtual display using the Embedded Web Server 74, 120, 168 checking virtual display using the Embedded Web Server 168 cleaning exterior of the printer 257 cleaning the printer 257 Close door or insert cartridge...
... tray installing 31 550‑sheet tray installing 31 Symbols [x]‑page jam, clear manual feeder. [250] 273 [x]‑page jam, lift front cover to [paper type] [paper size] load [orientation] 285 Check tray [x] connection 285 checking an unresponsive printer 302 checking status of parts and supplies 77, 123, 170 checking the status of parts and supplies 77, 123, 171 checking the virtual display using the Embedded Web Server 74, 120, 168 checking virtual display using the Embedded Web Server 168 cleaning exterior of the printer 257 cleaning the printer 257 Close door or insert cartridge...

User's Guide
Page 359
... checking, from printer control panel 123 checking, on the printer control panel 170 checking, using the Embedded Web Server 77, 123, 171 using genuine Lexmark 248 parts and supplies, status of checking, on printer control panel 77 PCL Emul menu 239 PDF menu 238 Personal Identification Number method using 39 port settings configuring 41 PostScript menu 239 PPDS font error [50] 294 preparing to set up the printer on an Ethernet network 37 print irregularities 323 print job canceling from the printer control panel 73 canceling, from computer 74, 120, 167 print quality troubleshooting blank pages...
... checking, from printer control panel 123 checking, on the printer control panel 170 checking, using the Embedded Web Server 77, 123, 171 using genuine Lexmark 248 parts and supplies, status of checking, on printer control panel 77 PCL Emul menu 239 PDF menu 238 Personal Identification Number method using 39 port settings configuring 41 PostScript menu 239 PPDS font error [50] 294 preparing to set up the printer on an Ethernet network 37 print irregularities 323 print job canceling from the printer control panel 73 canceling, from computer 74, 120, 167 print quality troubleshooting blank pages...
User's Guide
Page 360
... 292 Load manual feeder with [custom type name] [paper orientation] 292 Load manual feeder with [paper size] [paper orientation] 292 Load manual feeder with [paper type] [paper size] [paper orientation] 293 Load staples 291 Maintenance kit low [80.xy] 293 Maintenance kit nearly low [80.xy] 293 Maintenance kit very low [80.xy] 293 Memory full [38] 293 Remove hub. 287 Fuser kit early wear warning [81.xx] 287 Fuser kit near full. Leave paper in bin. [43y.xx] 281 [x]‑page jam, remove paper, open finisher rear door. Remove USB. 287 Error reading USB hub. Securely clearing disk space...
... 292 Load manual feeder with [custom type name] [paper orientation] 292 Load manual feeder with [paper size] [paper orientation] 292 Load manual feeder with [paper type] [paper size] [paper orientation] 293 Load staples 291 Maintenance kit low [80.xy] 293 Maintenance kit nearly low [80.xy] 293 Maintenance kit very low [80.xy] 293 Memory full [38] 293 Remove hub. 287 Fuser kit early wear warning [81.xx] 287 Fuser kit near full. Leave paper in bin. [43y.xx] 281 [x]‑page jam, remove paper, open finisher rear door. Remove USB. 287 Error reading USB hub. Securely clearing disk space...
User's Guide
Page 363
... Web Server 337 checking an unresponsive printer 302 contacting customer support 337 solving basic printer problems 302 troubleshooting, display printer display is blank 304 troubleshooting, paper feed message remains after jam is cleared 317 troubleshooting, print envelope seals when printing 305 error reading flash drive 305 held jobs do not print 304 incorrect characters print 306 incorrect margins on prints 321 jammed pages are not reprinted 316 job prints from wrong tray 306 job prints on wrong paper 306 jobs do not print 309 Large jobs do not collate 307 multiple‑language PDF files...
... Web Server 337 checking an unresponsive printer 302 contacting customer support 337 solving basic printer problems 302 troubleshooting, display printer display is blank 304 troubleshooting, paper feed message remains after jam is cleared 317 troubleshooting, print envelope seals when printing 305 error reading flash drive 305 held jobs do not print 304 incorrect characters print 306 incorrect margins on prints 321 jammed pages are not reprinted 316 job prints from wrong tray 306 job prints on wrong paper 306 jobs do not print 309 Large jobs do not collate 307 multiple‑language PDF files...


