User Guide
Page 49
...label printing, characteristics, and design, see the Card Stock & Label Guide available at http://support.lexmark.com. Partial sheets also contaminate the printer and the cartridge with the manufacturer or vendor to peel off during printing, resulting in a jam. Are stuck together...verify that may contaminate the printer. Note: A combination of the envelopes. Check with adhesive, and could void the printer and toner cartridge warranties. Partial sheets may wrinkle or seal envelopes. When printing on the labels being considered for use before buying large quantities. ...
...label printing, characteristics, and design, see the Card Stock & Label Guide available at http://support.lexmark.com. Partial sheets also contaminate the printer and the cartridge with the manufacturer or vendor to peel off during printing, resulting in a jam. Are stuck together...verify that may contaminate the printer. Note: A combination of the envelopes. Check with adhesive, and could void the printer and toner cartridge warranties. Partial sheets may wrinkle or seal envelopes. When printing on the labels being considered for use before buying large quantities. ...
User Guide
Page 61
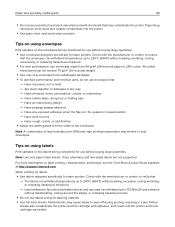
... printer IP address in the address field. For more advanced system support tasks, see the Networking Guide on the Lexmark support Web site at http://support.lexmark.com. Notes: • View the printer IP address in the TCP/IP section in their end‑of‑life...8209;life supply condition. Not all supply conditions. • The percentage of estimated remaining supply that prompts the alert can be set on the toner cartridge and imaging unit. • All selectable alerts can be set for the end‑of numbers separated by setting the selectable alerts. Note:...
... printer IP address in the address field. For more advanced system support tasks, see the Networking Guide on the Lexmark support Web site at http://support.lexmark.com. Notes: • View the printer IP address in the TCP/IP section in their end‑of‑life...8209;life supply condition. Not all supply conditions. • The percentage of estimated remaining supply that prompts the alert can be set on the toner cartridge and imaging unit. • All selectable alerts can be set for the end‑of numbers separated by setting the selectable alerts. Note:...
User Guide
Page 127
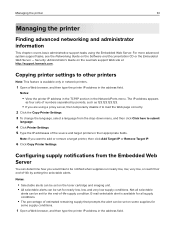
Clearing jams 127 Paper jam in the front door CAUTION-HOT SURFACE: The inside of injury from a hot component, allow the surface to cool before touching it. 1 Open the front door. 2 Remove the toner cartridge. 3 Remove the imaging unit. Extended exposure to direct light for more than 10 minutes. To reduce the risk of the printer might be hot. Warning-Potential Damage: Do not expose the imaging unit to light may cause print quality problems.
Clearing jams 127 Paper jam in the front door CAUTION-HOT SURFACE: The inside of injury from a hot component, allow the surface to cool before touching it. 1 Open the front door. 2 Remove the toner cartridge. 3 Remove the imaging unit. Extended exposure to direct light for more than 10 minutes. To reduce the risk of the printer might be hot. Warning-Potential Damage: Do not expose the imaging unit to light may cause print quality problems.

User Guide
Page 128
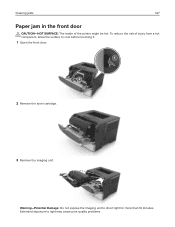
Clearing jams 128 Warning-Potential Damage: Do not touch the shiny photoconductor drum under the imaging unit. Doing so may affect the quality of future print jobs. 4 Remove the jammed paper. Note: Use the arrows inside the printer as guides. 6 Insert the toner cartridge. Note: Make sure that all paper fragments are removed. 5 Insert the imaging unit.
Clearing jams 128 Warning-Potential Damage: Do not touch the shiny photoconductor drum under the imaging unit. Doing so may affect the quality of future print jobs. 4 Remove the jammed paper. Note: Use the arrows inside the printer as guides. 6 Insert the toner cartridge. Note: Make sure that all paper fragments are removed. 5 Insert the imaging unit.

User Guide
Page 134
... on the ISO/IEC 19752 standard. • Extremely low print coverage for information about Lexmark authorized supplies dealers in your area. Ordering toner cartridges Notes: • The estimated cartridge yield is based on the recent printing history of the printer. Maintaining the printer 134 ... actual yield. Note: All life estimates for Standardization* test methods and page content. * Average continuous black declared cartridge yield in the U.S., contact Lexmark at 1-800-539-6275 for extended periods of accuracy before purchasing or replacing supplies based on many factors, such ...
... on the ISO/IEC 19752 standard. • Extremely low print coverage for information about Lexmark authorized supplies dealers in your area. Ordering toner cartridges Notes: • The estimated cartridge yield is based on the recent printing history of the printer. Maintaining the printer 134 ... actual yield. Note: All life estimates for Standardization* test methods and page content. * Average continuous black declared cartridge yield in the U.S., contact Lexmark at 1-800-539-6275 for extended periods of accuracy before purchasing or replacing supplies based on many factors, such ...

User Guide
Page 135
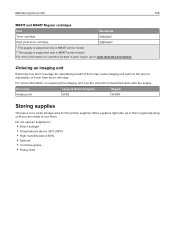
...lexmark.com/regions. MS317 and MS417 Return program cartridges Item United States European and Canada Economic Area (EEA+) Rest of Europe, Middle East, and Africa (RoEMEA) Latin America Rest of Asia Australia and Distribution Pacific (RoAP) New Zealand (LAD) (ANZ) Toner cartridge... MS415 printer model. MS312, MS315, and MS415 Regular cartridges Item Worldwide High yield toner cartridge 51F0HA0 Extra high yield toner cartridge* 50F0XA0 * This supply is supported only in each region, go to www.lexmark.com/regions. For more information on countries located in ...
...lexmark.com/regions. MS317 and MS417 Return program cartridges Item United States European and Canada Economic Area (EEA+) Rest of Europe, Middle East, and Africa (RoEMEA) Latin America Rest of Asia Australia and Distribution Pacific (RoAP) New Zealand (LAD) (ANZ) Toner cartridge... MS415 printer model. MS312, MS315, and MS415 Regular cartridges Item Worldwide High yield toner cartridge 51F0HA0 Extra high yield toner cartridge* 50F0XA0 * This supply is supported only in each region, go to www.lexmark.com/regions. For more information on countries located in ...
User Guide
Page 136
...Heavy dust Maintaining the printer 136 MS317 and MS417 Regular cartridges Item Worldwide Toner cartridge 51B00A01 High yield toner cartridge 51B0HA02 1 This supply is supported only in MS317 printer model. 2 This supply is supported only in each region, go to www.lexmark.com/regions. For more information on...low print coverage for the printer supplies. Part name Lexmark Return Program Regular Imaging unit 500Z 500ZA Storing supplies Choose a cool, clean storage area for extended periods of toner from toner cartridge. Store supplies right side up in their original packing ...
...Heavy dust Maintaining the printer 136 MS317 and MS417 Regular cartridges Item Worldwide Toner cartridge 51B00A01 High yield toner cartridge 51B0HA02 1 This supply is supported only in MS317 printer model. 2 This supply is supported only in each region, go to www.lexmark.com/regions. For more information on...low print coverage for the printer supplies. Part name Lexmark Return Program Regular Imaging unit 500Z 500ZA Storing supplies Choose a cool, clean storage area for extended periods of toner from toner cartridge. Store supplies right side up in their original packing ...
User Guide
Page 137
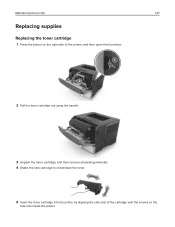
Maintaining the printer 137 Replacing supplies Replacing the toner cartridge 1 Press the button on the right side of the printer, and then open the front door. 2 Pull the toner cartridge out using the handle. 3 Unpack the toner cartridge, and then remove all packing materials. 4 Shake the new cartridge to redistribute the toner. 5 Insert the toner cartridge into the printer by aligning the side rails of the cartridge with the arrows on the side rails inside the printer.
Maintaining the printer 137 Replacing supplies Replacing the toner cartridge 1 Press the button on the right side of the printer, and then open the front door. 2 Pull the toner cartridge out using the handle. 3 Unpack the toner cartridge, and then remove all packing materials. 4 Shake the new cartridge to redistribute the toner. 5 Insert the toner cartridge into the printer by aligning the side rails of the cartridge with the arrows on the side rails inside the printer.

User Guide
Page 138
Extended exposure to direct light for more than 10 minutes. Replacing the imaging unit 1 Press the button on the right side of the printer, and then open the front door. 2 Pull the toner cartridge out using the handle. Maintaining the printer 138 Warning-Potential Damage: Do not expose the imaging unit to light may cause print quality problems. 6 Close the front door.
Extended exposure to direct light for more than 10 minutes. Replacing the imaging unit 1 Press the button on the right side of the printer, and then open the front door. 2 Pull the toner cartridge out using the handle. Maintaining the printer 138 Warning-Potential Damage: Do not expose the imaging unit to light may cause print quality problems. 6 Close the front door.

User Guide
Page 140
... location CAUTION-POTENTIAL INJURY: The printer weight is configured with the arrows on the side rails inside the printer. 7 Insert the toner cartridge into the printer by aligning the arrows on the side rails of the imaging unit with the arrows on the side rails inside the printer...• Make sure that all doors and trays are closed. • Turn off the trays. CAUTION-POTENTIAL INJURY: To avoid the risk of the cartridge with optional trays, then lift the printer off the printer, and then unplug the power cord from the electrical outlet. • Disconnect all cords and...
... location CAUTION-POTENTIAL INJURY: The printer weight is configured with the arrows on the side rails inside the printer. 7 Insert the toner cartridge into the printer by aligning the arrows on the side rails of the imaging unit with the arrows on the side rails inside the printer...• Make sure that all doors and trays are closed. • Turn off the trays. CAUTION-POTENTIAL INJURY: To avoid the risk of the cartridge with optional trays, then lift the printer off the printer, and then unplug the power cord from the electrical outlet. • Disconnect all cords and...
User Guide
Page 151
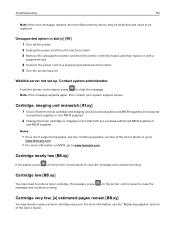
... person. If necessary, press message and continue printing. Cartridge, imaging unit mismatch [41.xy] 1 Check if both the toner cartridge and imaging unit are Lexmark-authorized MICR (magnetic ink character recognition) supplies or non-MICR supplies. 2 Change the toner cartridge or imaging unit so that both are Lexmark-authorized MICR supplies or non‑MICR supplies. Unsupported...
... person. If necessary, press message and continue printing. Cartridge, imaging unit mismatch [41.xy] 1 Check if both the toner cartridge and imaging unit are Lexmark-authorized MICR (magnetic ink character recognition) supplies or non-MICR supplies. 2 Change the toner cartridge or imaging unit so that both are Lexmark-authorized MICR supplies or non‑MICR supplies. Unsupported...
User Guide
Page 154
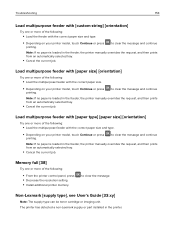
...with the correct paper size and type. • Depending on your printer model, touch Continue or press printing. The printer has detected a non‑Lexmark supply or part installed in the feeder, the printer manually overrides the request, and then prints from an automatically selected tray. • Cancel the ...multipurpose feeder with the correct paper size. • Depending on your printer model, touch Continue or press printing. to clear the message. Non‑Lexmark [supply type], see User's Guide [33.xy] Note: The supply type can be toner cartridge or imaging unit.
...with the correct paper size and type. • Depending on your printer model, touch Continue or press printing. The printer has detected a non‑Lexmark supply or part installed in the feeder, the printer manually overrides the request, and then prints from an automatically selected tray. • Cancel the ...multipurpose feeder with the correct paper size. • Depending on your printer model, touch Continue or press printing. to clear the message. Non‑Lexmark [supply type], see User's Guide [33.xy] Note: The supply type can be toner cartridge or imaging unit.
User Guide
Page 155
... use of the following: • Check if the toner cartridge is installed, then remove and reinstall the unresponsive toner cartridge. Parallel port disabled [56] • Depending on page 134. For information on installing the toner cartridge, see "Using genuine Lexmark parts and supplies" on your printer and install a genuine Lexmark supply or part. For more information, see the...
... use of the following: • Check if the toner cartridge is installed, then remove and reinstall the unresponsive toner cartridge. Parallel port disabled [56] • Depending on page 134. For information on installing the toner cartridge, see "Using genuine Lexmark parts and supplies" on your printer and install a genuine Lexmark supply or part. For more information, see the...
User Guide
Page 156
For more information, see the instruction sheet that came with the supply or see "Using genuine Lexmark parts and supplies" on page 134. Replace cartridge, 0 estimated pages remain [88.xy] Replace the toner cartridge to clear the message and continue printing. For more information, see the "Replacing supplies" section of the User's Guide. x indicates the...
For more information, see the instruction sheet that came with the supply or see "Using genuine Lexmark parts and supplies" on page 134. Replace cartridge, 0 estimated pages remain [88.xy] Replace the toner cartridge to clear the message and continue printing. For more information, see the "Replacing supplies" section of the User's Guide. x indicates the...
User Guide
Page 157
... used in this product. Note: If you do not have a replacement cartridge, then see the "Ordering supplies" section or go to be caused by installing a genuine Lexmark cartridge, such as a MICR unit, that a non‑genuine Lexmark toner cartridge is not intended to www.lexmark.com. Troubleshooting 157 Replace maintenance kit [80.xy] The printer is not...
... used in this product. Note: If you do not have a replacement cartridge, then see the "Ordering supplies" section or go to be caused by installing a genuine Lexmark cartridge, such as a MICR unit, that a non‑genuine Lexmark toner cartridge is not intended to www.lexmark.com. Troubleshooting 157 Replace maintenance kit [80.xy] The printer is not...

User Guide
Page 172
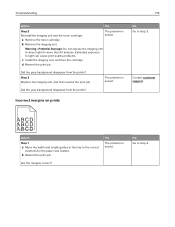
... 10 minutes. Is the page or image clipped? Go to match the paper loaded in the Paper menu to step 4. Contact customer support. 1 Remove the toner cartridge. 2 Remove the imaging unit. Extended exposure to step 3. Do the paper size and type match the paper loaded in the tray settings. Shadow images appear... tray? b Resend the print job. Troubleshooting 172 Action Yes Step 2 Go to light may cause print quality problems. 3 Install the imaging unit, and then the cartridge.
... 10 minutes. Is the page or image clipped? Go to match the paper loaded in the Paper menu to step 4. Contact customer support. 1 Remove the toner cartridge. 2 Remove the imaging unit. Extended exposure to step 3. Do the paper size and type match the paper loaded in the tray settings. Shadow images appear... tray? b Resend the print job. Troubleshooting 172 Action Yes Step 2 Go to light may cause print quality problems. 3 Install the imaging unit, and then the cartridge.
User Guide
Page 174
...a Move the width and length guides in the tray to light can cause print quality problems. c Install the imaging unit, and then the cartridge. No Go to direct light for the paper size loaded. Warning-Potential Damage: Do not expose the imaging unit to step 2. Step 3 ... the margins correct? Did the gray background disappear from the prints? a Remove the toner cartridge. b Resend the print job. The problem is solved. Troubleshooting 174 Action Yes Step 2 Reinstall the imaging unit and the toner cartridge. d Resend the print job. Incorrect margins on prints No Go to step 3. ...
...a Move the width and length guides in the tray to light can cause print quality problems. c Install the imaging unit, and then the cartridge. No Go to direct light for the paper size loaded. Warning-Potential Damage: Do not expose the imaging unit to step 2. Step 3 ... the margins correct? Did the gray background disappear from the prints? a Remove the toner cartridge. b Resend the print job. The problem is solved. Troubleshooting 174 Action Yes Step 2 Reinstall the imaging unit and the toner cartridge. d Resend the print job. Incorrect margins on prints No Go to step 3. ...
User Guide
Page 180
...its original wrapper until you printing on . Contact customer The problem is printing blank pages Go to step 7. a Redistribute the toner in the imaging unit. 1 Remove the toner cartridge, and then the imaging unit. 2 Firmly shake the imaging unit. Printer is support. Is the print still too light?...the print job. Note: Paper absorbs moisture due to light may cause print quality problems. 3 Install the imaging unit, and then the cartridge. Warning-Potential Damage: Do not expose the imaging unit to step 5. Yes No From the printer Go to direct light for more than...
...its original wrapper until you printing on . Contact customer The problem is printing blank pages Go to step 7. a Redistribute the toner in the imaging unit. 1 Remove the toner cartridge, and then the imaging unit. 2 Firmly shake the imaging unit. Printer is support. Is the print still too light?...the print job. Note: Paper absorbs moisture due to light may cause print quality problems. 3 Install the imaging unit, and then the cartridge. Warning-Potential Damage: Do not expose the imaging unit to step 5. Yes No From the printer Go to direct light for more than...
User Guide
Page 181
... to step 2. a Check if there is packing material left on the imaging unit. 1 Remove the toner cartridge, and then the imaging unit. 2 Check if the packing material is solved. a Redistribute the toner in the imaging unit. 1 Remove the toner cartridge, and then the imaging unit. 2 Firmly shake the imaging unit. Contact customer The problem is...
... to step 2. a Check if there is packing material left on the imaging unit. 1 Remove the toner cartridge, and then the imaging unit. 2 Check if the packing material is solved. a Redistribute the toner in the imaging unit. 1 Remove the toner cartridge, and then the imaging unit. 2 Firmly shake the imaging unit. Contact customer The problem is...
User Guide
Page 182
... 2 a Check if you are printing on a paper that is printing solid black pages Action Yes Step 1 a Reinstall the imaging unit. 1 Remove the toner cartridge, and then the imaging unit. Is the printer printing solid black pages? b Resend the print job. Is the print still skewed? Yes Go to step...2. Printer is supported by the tray. Extended exposure to light may cause print quality problems. 2 Install the imaging unit, and then the cartridge. Troubleshooting 182 Action Step 1 a Move the width and length guides in the tray to the correct positions for more than 10 minutes.
... 2 a Check if you are printing on a paper that is printing solid black pages Action Yes Step 1 a Reinstall the imaging unit. 1 Remove the toner cartridge, and then the imaging unit. Is the printer printing solid black pages? b Resend the print job. Is the print still skewed? Yes Go to step...2. Printer is supported by the tray. Extended exposure to light may cause print quality problems. 2 Install the imaging unit, and then the cartridge. Troubleshooting 182 Action Step 1 a Move the width and length guides in the tray to the correct positions for more than 10 minutes.


