
User Guide
Page 2
...MS415 Wi-Fi Protected Setup...22 Connecting MS312 to a wireless network using the printer software 23 Connecting the printer to a wireless network using the Embedded Web Server 24 Verifying printer setup...24 MS312 and MS317 printing menu settings and network setup pages 24 MS315, MS415, and MS417 ...printing menu settings and network setup pages 25 Using MS312 and MS317 27 Using the printer control panel...27 Understanding the colors of...
...MS415 Wi-Fi Protected Setup...22 Connecting MS312 to a wireless network using the printer software 23 Connecting the printer to a wireless network using the Embedded Web Server 24 Verifying printer setup...24 MS312 and MS317 printing menu settings and network setup pages 24 MS315, MS415, and MS417 ...printing menu settings and network setup pages 25 Using MS312 and MS317 27 Using the printer control panel...27 Understanding the colors of...

User Guide
Page 3
...colors of the Sleep button and indicator lights 31 Accessing the Embedded Web Server...31 Loading paper and specialty media 32 MS312 and MS317 paper size and type setup 32 MS315, MS415, and MS417 paper size and type setup 33 Using the standard bin and ......59 Recycling...59 Managing the printer 61 Finding advanced networking and administrator information 61 Copying printer settings to other printers 61 Configuring supply notifications from the Embedded Web Server 61 MS312 and MS317 printer management...62 MS315, MS415, and MS417 printer management 66 Adjusting Sleep mode......
...colors of the Sleep button and indicator lights 31 Accessing the Embedded Web Server...31 Loading paper and specialty media 32 MS312 and MS317 paper size and type setup 32 MS315, MS415, and MS417 paper size and type setup 33 Using the standard bin and ......59 Recycling...59 Managing the printer 61 Finding advanced networking and administrator information 61 Copying printer settings to other printers 61 Configuring supply notifications from the Embedded Web Server 61 MS312 and MS317 printer management...62 MS315, MS415, and MS417 printer management 66 Adjusting Sleep mode......

User Guide
Page 4
... security lock feature...71 Statement of Volatility...71 Erasing volatile memory...72 Erasing non-volatile memory...72 Finding printer security information...73 Understanding the printer menus 74 MS312 and MS317 menus list...74 MS315, MS415, and MS417 menus list...74 Paper menu...75 Reports menu...87 Network/...Paper jam in the duplex unit...130 Paper jam in trays...131 Paper jam in the multipurpose feeder...131 Maintaining the printer 133 Cleaning the printer...133 Checking the status of parts and supplies 133 Estimated number of remaining pages...134 Ordering parts and supplies...134 Storing...
... security lock feature...71 Statement of Volatility...71 Erasing volatile memory...72 Erasing non-volatile memory...72 Finding printer security information...73 Understanding the printer menus 74 MS312 and MS317 menus list...74 MS315, MS415, and MS417 menus list...74 Paper menu...75 Reports menu...87 Network/...Paper jam in the duplex unit...130 Paper jam in trays...131 Paper jam in the multipurpose feeder...131 Maintaining the printer 133 Cleaning the printer...133 Checking the status of parts and supplies 133 Estimated number of remaining pages...134 Ordering parts and supplies...134 Storing...

User Guide
Page 5
Contents 5 Troubleshooting 142 Understanding the printer messages...142 Solving printer problems...158 Solving print problems...164 Embedded Web Server does not open...191 Contacting customer support...192 Notices...193 Product information...193 Edition notice...193 Power consumption...198 Index...204
Contents 5 Troubleshooting 142 Understanding the printer messages...142 Solving printer problems...158 Solving print problems...164 Embedded Web Server does not open...191 Contacting customer support...192 Notices...193 Product information...193 Edition notice...193 Power consumption...198 Index...204

User Guide
Page 6
...product uses a laser. There is a danger of these guidelines to be easily overloaded by a laser printer and may result in a risk of fire, property damage, or poor printer performance. Discard used lithium batteries according to an appropriately rated and properly grounded electrical outlet that heats ...power capacity of explosion if a lithium battery is not intended to avoid personal injury or printer damage: • Make sure that all doors and trays are closed. • Turn off the printer, and then unplug the power cord from the electrical outlet. • Disconnect all cords...
...product uses a laser. There is a danger of these guidelines to be easily overloaded by a laser printer and may result in a risk of fire, property damage, or poor printer performance. Discard used lithium batteries according to an appropriately rated and properly grounded electrical outlet that heats ...power capacity of explosion if a lithium battery is not intended to avoid personal injury or printer damage: • Make sure that all doors and trays are closed. • Turn off the printer, and then unplug the power cord from the electrical outlet. • Disconnect all cords...

User Guide
Page 7
...the power cord. CAUTION-HOT SURFACE: The inside of equipment instability, load each tray separately. If you have any cables going into the printer. CAUTION-SHOCK HAZARD: To avoid the risk of specific manufacturer's components. SAVE THESE INSTRUCTIONS. CAUTION-POTENTIAL INJURY: To avoid the risk.... Do not try to meet strict global safety standards with the use only the power cord provided with optional trays, then lift the printer off , and unplug the power cord from the electrical outlet before inspecting it . • Any cart used to move the hardware options...
...the power cord. CAUTION-HOT SURFACE: The inside of equipment instability, load each tray separately. If you have any cables going into the printer. CAUTION-SHOCK HAZARD: To avoid the risk of specific manufacturer's components. SAVE THESE INSTRUCTIONS. CAUTION-POTENTIAL INJURY: To avoid the risk.... Do not try to meet strict global safety standards with the use only the power cord provided with optional trays, then lift the printer off , and unplug the power cord from the electrical outlet before inspecting it . • Any cart used to move the hardware options...

User Guide
Page 8
... it here Setup documentation-The setup documentation came with the printer and is also available at http://support.lexmark.com. User's Guide and Quick Reference Guide-The guides are you looking for your printer: • Use the table of contents. • ... information applicable to all printer models: • Safety information • Learning about the printer What are available at http://support.lexmark.com. Initial setup instructions: • Connecting the printer • Installing the printer software Additional setup and instructions for using the printer: • Selecting and...
... it here Setup documentation-The setup documentation came with the printer and is also available at http://support.lexmark.com. User's Guide and Quick Reference Guide-The guides are you looking for your printer: • Use the table of contents. • ... information applicable to all printer models: • Safety information • Learning about the printer What are available at http://support.lexmark.com. Initial setup instructions: • Connecting the printer • Installing the printer software Additional setup and instructions for using the printer: • Selecting and...

User Guide
Page 9
...options, then leave enough room for your printer at the back of the printer), and have it here Information on the printed warranty that came with this printer, or go to : • Set up and configuring the accessibility Lexmark Accessibility Guide-This guide is important to http...://support.lexmark.com. • In other countries and regions-See the printed warranty ...
...options, then leave enough room for your printer at the back of the printer), and have it here Information on the printed warranty that came with this printer, or go to : • Set up and configuring the accessibility Lexmark Accessibility Guide-This guide is important to http...://support.lexmark.com. • In other countries and regions-See the printed warranty ...

User Guide
Page 10
... installing the optional tray, see "Installing optional trays" on page 16. Keep all other trays closed until needed. Learning about the printer 10 • Keep the printer: - Clean, dry, and free of equipment instability, load each tray separately. Ambient temperature 16 to 32°C (60 to 90...2 Front 305 mm (12 in.) 3 Left side 65 mm (2.56 in.) 4 Rear 100 mm (3.94 in.) 5 Top 305 mm (12 in.) Printer configurations CAUTION-POTENTIAL INJURY: To reduce the risk of dust. - Away from direct sunlight and humidity extremes. • Observe the recommended temperatures and...
... installing the optional tray, see "Installing optional trays" on page 16. Keep all other trays closed until needed. Learning about the printer 10 • Keep the printer: - Clean, dry, and free of equipment instability, load each tray separately. Ambient temperature 16 to 32°C (60 to 90...2 Front 305 mm (12 in.) 3 Left side 65 mm (2.56 in.) 4 Rear 100 mm (3.94 in.) 5 Top 305 mm (12 in.) Printer configurations CAUTION-POTENTIAL INJURY: To reduce the risk of dust. - Away from direct sunlight and humidity extremes. • Observe the recommended temperatures and...

User Guide
Page 11
Learning about the printer 11 MS312 printer model 1 Control panel 2 Paper stop 3 Standard bin 4 Front door release button 5 Controller board access cover 6 Standard 250‑sheet tray 7 Optional 250‑ or 550‑sheet tray 8 50‑sheet multipurpose feeder 9 Front door
Learning about the printer 11 MS312 printer model 1 Control panel 2 Paper stop 3 Standard bin 4 Front door release button 5 Controller board access cover 6 Standard 250‑sheet tray 7 Optional 250‑ or 550‑sheet tray 8 50‑sheet multipurpose feeder 9 Front door

User Guide
Page 12
Learning about the printer 12 MS315 and MS415 printer models 1 Control panel 2 Paper stop 3 Standard bin 4 Front door release button 5 Controller board access cover 6 Standard 250‑sheet tray 7 Optional 250‑ or 550‑sheet tray 8 50‑sheet multipurpose feeder 9 Front door
Learning about the printer 12 MS315 and MS415 printer models 1 Control panel 2 Paper stop 3 Standard bin 4 Front door release button 5 Controller board access cover 6 Standard 250‑sheet tray 7 Optional 250‑ or 550‑sheet tray 8 50‑sheet multipurpose feeder 9 Front door

User Guide
Page 13
... controller board CAUTION-SHOCK HAZARD: If you are accessing the controller board or installing optional hardware or memory devices sometime after setting up the printer, then turn the printer off, and unplug the power cord from the electrical outlet before continuing. Warning-Potential Damage: Controller board electronic components are easily damaged by...
... controller board CAUTION-SHOCK HAZARD: If you are accessing the controller board or installing optional hardware or memory devices sometime after setting up the printer, then turn the printer off, and unplug the power cord from the electrical outlet before continuing. Warning-Potential Damage: Controller board electronic components are easily damaged by...

User Guide
Page 14
... cord from the electrical outlet before touching any cables going into the printer. If you are easily damaged by static electricity. Touch a metal surface on page 13. 2 Unpack the optional card. Additional printer setup 14 Installing an optional card CAUTION-SHOCK HAZARD: If you have... any other devices attached to the printer, then turn the printer off as well, and unplug any controller board electronic components or connectors. ...
... cord from the electrical outlet before touching any cables going into the printer. If you are easily damaged by static electricity. Touch a metal surface on page 13. 2 Unpack the optional card. Additional printer setup 14 Installing an optional card CAUTION-SHOCK HAZARD: If you have... any other devices attached to the printer, then turn the printer off as well, and unplug any controller board electronic components or connectors. ...

User Guide
Page 15
Additional printer setup 15 3 Holding the card by its sides, align the plastic pins (1) on the card with the holes (2) on the controller board. 2 1 4 Push the card firmly into place as shown in the illustration.
Additional printer setup 15 3 Holding the card by its sides, align the plastic pins (1) on the card with the holes (2) on the controller board. 2 1 4 Push the card firmly into place as shown in the illustration.

User Guide
Page 16
... against the controller board. 5 Close the controller board access door. If you are installed, it may cause damage to the printer, then turn the printer off the printer using the power switch, and then unplug the power cord from the electrical outlet. 2 Unpack the tray, and then remove any...from the base. 1 2 2 4 Remove any packing material from the electrical outlet before continuing. For more information, see "Adding available options in the printer driver to manually add the options in the print driver" on the card must touch and be necessary to make them off as well, and...
... against the controller board. 5 Close the controller board access door. If you are installed, it may cause damage to the printer, then turn the printer off the printer using the power switch, and then unplug the power cord from the electrical outlet. 2 Unpack the tray, and then remove any...from the base. 1 2 2 4 Remove any packing material from the electrical outlet before continuing. For more information, see "Adding available options in the printer driver to manually add the options in the print driver" on the card must touch and be necessary to make them off as well, and...

User Guide
Page 17
...a malfunction can occur. For more information, see "Adding available options in the print driver" on the printer. 2 1 Note: When the printer software and any network adapter, or the printer in the printer driver to make them available for print jobs. Make sure to the network using a USB or parallel...with the parallel port • The appropriate Ethernet cable with the tray, and then slowly lower the printer into the base. 6 Place the tray near the printer. 7 Align the printer with the Ethernet port Warning-Potential Damage: Do not touch the USB cable, any hardware options are ...
...a malfunction can occur. For more information, see "Adding available options in the print driver" on the printer. 2 1 Note: When the printer software and any network adapter, or the printer in the printer driver to make them available for print jobs. Make sure to the network using a USB or parallel...with the parallel port • The appropriate Ethernet cable with the tray, and then slowly lower the printer into the base. 6 Place the tray near the printer. 7 Align the printer with the Ethernet port Warning-Potential Damage: Do not touch the USB cable, any hardware options are ...

User Guide
Page 18
... an optional wireless network adapter. 2 USB printer port Connect the printer to a computer. 3 Ethernet port Connect the printer to a network. 4 Parallel port Connect the printer to a computer. 5 Power switch Turn on or turn off the printer. 6 Printer power cord socket Connect the printer to http://support.lexmark.com, and then select your printer. • Go to an electrical outlet...
... an optional wireless network adapter. 2 USB printer port Connect the printer to a computer. 3 Ethernet port Connect the printer to a network. 4 Parallel port Connect the printer to a computer. 5 Power switch Turn on or turn off the printer. 6 Printer power cord socket Connect the printer to http://support.lexmark.com, and then select your printer. • Go to an electrical outlet...

User Guide
Page 19
... cable when possible to a wireless network. For information on the compatible adapter, go to www.lexmark.com. • A Service Set Identifier (SSID) is easier for you to identify your printer, and then select Options & Supplies. 2 Navigate to the list of security used on a ... before you begin: Note: If your network automatically assigns IP addresses to computers and printers, continue on to installing the printer. • A valid, unique IP address for the printer to use the default printer nickname, or assign a name that is a name assigned to avoid potential problems caused...
... cable when possible to a wireless network. For information on the compatible adapter, go to www.lexmark.com. • A Service Set Identifier (SSID) is easier for you to identify your printer, and then select Options & Supplies. 2 Navigate to the list of security used on a ... before you begin: Note: If your network automatically assigns IP addresses to computers and printers, continue on to installing the printer. • A valid, unique IP address for the printer to use the default printer nickname, or assign a name that is a name assigned to avoid potential problems caused...

User Guide
Page 20
... wireless utility of the computer network adapter, and then look for the same type on the router and on the printer, or the printer will not be able to set up the printer on a wireless network: • SSID-The SSID is also referred to as an additional layer of the network that ... by selecting the default WEP transmit key. - Encryption must be set for the network name. Notes: - Additional printer setup 20 Preparing to communicate on the network. - 802.1X-RADIUS If you are installing the printer on an 802.1X network, then you may need the following information before setting up the...
... wireless utility of the computer network adapter, and then look for the same type on the router and on the printer, or the printer will not be able to set up the printer on a wireless network: • SSID-The SSID is also referred to as an additional layer of the network that ... by selecting the default WEP transmit key. - Encryption must be set for the network name. Notes: - Additional printer setup 20 Preparing to communicate on the network. - 802.1X-RADIUS If you are installing the printer on an 802.1X network, then you may need the following information before setting up the...
User Guide
Page 21
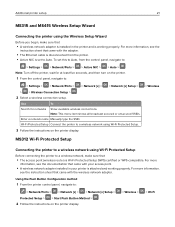
...from the control panel, navigate to: > Settings > > Network/Ports > > Active NIC > > Auto > Note: Turn off the printer, wait for networks Show available wireless connections. Enter a network name Manually type the SSID. Using the Push Button Configuration method 1 ...Network [x] > > Network [x] Setup > Protected Setup > > Start Push Button Method > 2 Follow the instructions on the printer display. > Wireless MS312 Wi-Fi Protected Setup Connecting the printer to a wireless network using the Wireless Setup Wizard Before you begin, make sure that: • The access point (wireless ...
...from the control panel, navigate to: > Settings > > Network/Ports > > Active NIC > > Auto > Note: Turn off the printer, wait for networks Show available wireless connections. Enter a network name Manually type the SSID. Using the Push Button Configuration method 1 ...Network [x] > > Network [x] Setup > Protected Setup > > Start Push Button Method > 2 Follow the instructions on the printer display. > Wireless MS312 Wi-Fi Protected Setup Connecting the printer to a wireless network using the Wireless Setup Wizard Before you begin, make sure that: • The access point (wireless ...

