User Guide
Page 61
..., low, very low, or reach their appropriate fields. For more advanced system support tasks, see the Networking Guide on the Lexmark support Web site at http://support.lexmark.com. Notes: • View the printer IP address in the TCP/IP section in the address field. Security: Administrator's ... selectable alerts can be set for the end‑of estimated remaining supply that prompts the alert can be set on the toner cartridge and imaging unit. • All selectable alerts can be set on some supplies for nearly low, low, and very low supply conditions. Note: If you ...
..., low, very low, or reach their appropriate fields. For more advanced system support tasks, see the Networking Guide on the Lexmark support Web site at http://support.lexmark.com. Notes: • View the printer IP address in the TCP/IP section in the address field. Security: Administrator's ... selectable alerts can be set for the end‑of estimated remaining supply that prompts the alert can be set on the toner cartridge and imaging unit. • All selectable alerts can be set on some supplies for nearly low, low, and very low supply conditions. Note: If you ...
User Guide
Page 127
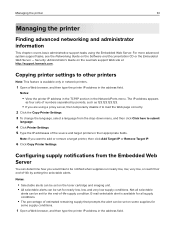
Clearing jams 127 Paper jam in the front door CAUTION-HOT SURFACE: The inside of injury from a hot component, allow the surface to cool before touching it. 1 Open the front door. 2 Remove the toner cartridge. 3 Remove the imaging unit. Warning-Potential Damage: Do not expose the imaging unit to light may cause print quality problems. Extended exposure to direct light for more than 10 minutes. To reduce the risk of the printer might be hot.
Clearing jams 127 Paper jam in the front door CAUTION-HOT SURFACE: The inside of injury from a hot component, allow the surface to cool before touching it. 1 Open the front door. 2 Remove the toner cartridge. 3 Remove the imaging unit. Warning-Potential Damage: Do not expose the imaging unit to light may cause print quality problems. Extended exposure to direct light for more than 10 minutes. To reduce the risk of the printer might be hot.

User Guide
Page 128
Note: Use the arrows inside the printer as guides. 6 Insert the toner cartridge. Doing so may affect the quality of future print jobs. 4 Remove the jammed paper. Clearing jams 128 Warning-Potential Damage: Do not touch the shiny photoconductor drum under the imaging unit. Note: Make sure that all paper fragments are removed. 5 Insert the imaging unit.
Note: Use the arrows inside the printer as guides. 6 Insert the toner cartridge. Doing so may affect the quality of future print jobs. 4 Remove the jammed paper. Clearing jams 128 Warning-Potential Damage: Do not touch the shiny photoconductor drum under the imaging unit. Note: Make sure that all paper fragments are removed. 5 Insert the imaging unit.
User Guide
Page 136
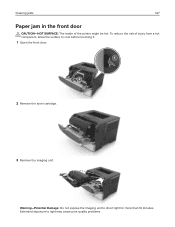
... sheet that came with the supply. Ordering an imaging unit Extremely low print coverage for the printer supplies. Store supplies right side up in MS417 printer model. Part name Lexmark Return Program Regular Imaging unit 500Z 500ZA Storing supplies Choose a cool, clean storage...MS317 and MS417 Regular cartridges Item Worldwide Toner cartridge 51B00A01 High yield toner cartridge 51B0HA02 1 This supply is supported only in MS317 printer model. 2 This supply is supported only in their original packing until you are ready to exhaustion of time may cause imaging unit...
... sheet that came with the supply. Ordering an imaging unit Extremely low print coverage for the printer supplies. Store supplies right side up in MS417 printer model. Part name Lexmark Return Program Regular Imaging unit 500Z 500ZA Storing supplies Choose a cool, clean storage...MS317 and MS417 Regular cartridges Item Worldwide Toner cartridge 51B00A01 High yield toner cartridge 51B0HA02 1 This supply is supported only in MS317 printer model. 2 This supply is supported only in their original packing until you are ready to exhaustion of time may cause imaging unit...

User Guide
Page 138
Extended exposure to direct light for more than 10 minutes. Replacing the imaging unit 1 Press the button on the right side of the printer, and then open the front door. 2 Pull the toner cartridge out using the handle. Maintaining the printer 138 Warning-Potential Damage: Do not expose the imaging unit to light may cause print quality problems. 6 Close the front door.
Extended exposure to direct light for more than 10 minutes. Replacing the imaging unit 1 Press the button on the right side of the printer, and then open the front door. 2 Pull the toner cartridge out using the handle. Maintaining the printer 138 Warning-Potential Damage: Do not expose the imaging unit to light may cause print quality problems. 6 Close the front door.

User Guide
Page 139
Warning-Potential Damage: Do not expose the imaging unit to light may affect the print quality of the printer. 4 Unpack the new imaging unit, and then shake it. 5 Remove all packing materials from the imaging unit. Extended exposure to direct light for more than 10 minutes. Doing so may cause print quality problems. Warning-Potential Damage: Do not touch the photoconductor drum. Maintaining the printer 139 3 Lift the green handle, and then pull the imaging unit out of future print jobs.
Warning-Potential Damage: Do not expose the imaging unit to light may affect the print quality of the printer. 4 Unpack the new imaging unit, and then shake it. 5 Remove all packing materials from the imaging unit. Extended exposure to direct light for more than 10 minutes. Doing so may cause print quality problems. Warning-Potential Damage: Do not touch the photoconductor drum. Maintaining the printer 139 3 Lift the green handle, and then pull the imaging unit out of future print jobs.

User Guide
Page 140
... INJURY: When moving the printer, follow these guidelines to the new location. Maintaining the printer 140 6 Insert the imaging unit into the printer by aligning the arrows on the side rails of the imaging unit with the arrows on the side rails inside the printer. 7 Insert the toner cartridge into the printer by aligning...
... INJURY: When moving the printer, follow these guidelines to the new location. Maintaining the printer 140 6 Insert the imaging unit into the printer by aligning the arrows on the side rails of the imaging unit with the arrows on the side rails inside the printer. 7 Insert the toner cartridge into the printer by aligning...
User Guide
Page 151
... the message and continue printing. Troubleshooting 151 Note: If the error message remains, then the flash memory device may be replaced. Cartridge, imaging unit mismatch [41.xy] 1 Check if both the toner cartridge and imaging unit are Lexmark-authorized MICR (magnetic ink character recognition) supplies or non-MICR supplies. 2 Change the toner cartridge or...
... the message and continue printing. Troubleshooting 151 Note: If the error message remains, then the flash memory device may be replaced. Cartridge, imaging unit mismatch [41.xy] 1 Check if both the toner cartridge and imaging unit are Lexmark-authorized MICR (magnetic ink character recognition) supplies or non-MICR supplies. 2 Change the toner cartridge or...

User Guide
Page 152
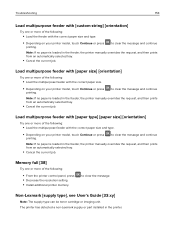
... source] with the correct size and type of paper, then it prints from the default paper source. • Cancel the current job. Imaging unit nearly low [84.xy] If necessary, press on the printer control panel to clear the message and continue printing. For more of the ...tray into the printer. on the printer control panel to clear the message and continue printing. Credentials invalid. Imaging unit low [84.xy] You may need to order an imaging unit. If necessary, press and continue printing. Troubleshooting 152 If necessary, press on the printer control panel to ...
... source] with the correct size and type of paper, then it prints from the default paper source. • Cancel the current job. Imaging unit nearly low [84.xy] If necessary, press on the printer control panel to clear the message and continue printing. For more of the ...tray into the printer. on the printer control panel to clear the message and continue printing. Credentials invalid. Imaging unit low [84.xy] You may need to order an imaging unit. If necessary, press and continue printing. Troubleshooting 152 If necessary, press on the printer control panel to ...
User Guide
Page 154
...and then prints from an automatically selected tray. • Cancel the current job. Non‑Lexmark [supply type], see User's Guide [33.xy] Note: The supply type can be toner cartridge or imaging unit. Load multipurpose feeder with [paper size] [orientation] Try one or more of the following: ...memory. to clear the message and continue Note: If no paper is loaded in the printer. The printer has detected a non‑Lexmark supply or part installed in the feeder, the printer manually overrides the request, and then prints from an automatically selected tray. • ...
...and then prints from an automatically selected tray. • Cancel the current job. Non‑Lexmark [supply type], see User's Guide [33.xy] Note: The supply type can be toner cartridge or imaging unit. Load multipurpose feeder with [paper size] [orientation] Try one or more of the following: ...memory. to clear the message and continue Note: If no paper is loaded in the printer. The printer has detected a non‑Lexmark supply or part installed in the feeder, the printer manually overrides the request, and then prints from an automatically selected tray. • ...
User Guide
Page 156
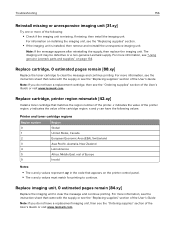
... the following : • Check if the imaging unit is installed, then remove and reinstall the unresponsive imaging unit. Replace imaging unit, 0 estimated pages remain [84.xy] Replace the imaging unit to clear the message and continue printing. The imaging unit may be defective or a non‑genuine Lexmark supply. Troubleshooting 156 Reinstall missing or unresponsive imaging unit [31.xy] Try one or more...
... the following : • Check if the imaging unit is installed, then remove and reinstall the unresponsive imaging unit. Replace imaging unit, 0 estimated pages remain [84.xy] Replace the imaging unit to clear the message and continue printing. The imaging unit may be defective or a non‑genuine Lexmark supply. Troubleshooting 156 Reinstall missing or unresponsive imaging unit [31.xy] Try one or more...
User Guide
Page 157
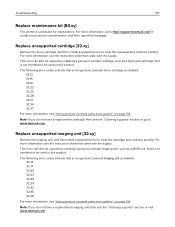
... the message and continue printing. Replace unsupported cartridge [32.xy] Remove the toner cartridge, and then install a supported one to be caused by installing a genuine Lexmark imaging unit, such as a high yield cartridge, that came with the supply. For more information, go to be caused by installing a genuine...
... the message and continue printing. Replace unsupported cartridge [32.xy] Remove the toner cartridge, and then install a supported one to be caused by installing a genuine Lexmark imaging unit, such as a high yield cartridge, that came with the supply. For more information, go to be caused by installing a genuine...

User Guide
Page 172
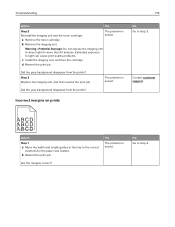
...match the paper loaded in the tray settings. Step 3 a Depending on prints Leading edge AABBCCDD AABBCCDD Trailing edge Step 4 a Reinstall the imaging unit. No Do one or more than 10 minutes. Extended exposure to step 3. b Resend the print job. b Resend the print job. Go... paper loaded in the tray? Contact customer support. 1 Remove the toner cartridge. 2 Remove the imaging unit. The problem is solved. Is the page or image clipped? Shadow images appear on your operating system, specify the paper size from Printing Preferences or from the tray settings...
...match the paper loaded in the tray settings. Step 3 a Depending on prints Leading edge AABBCCDD AABBCCDD Trailing edge Step 4 a Reinstall the imaging unit. No Do one or more than 10 minutes. Extended exposure to step 3. b Resend the print job. b Resend the print job. Go... paper loaded in the tray? Contact customer support. 1 Remove the toner cartridge. 2 Remove the imaging unit. The problem is solved. Is the page or image clipped? Shadow images appear on your operating system, specify the paper size from Printing Preferences or from the tray settings...

User Guide
Page 173
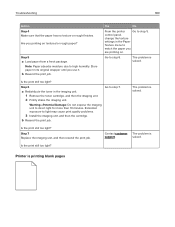
... and weight in the Paper menu to match the paper loaded in the tray settings. Step 4 Replace the imaging unit, and then resend the print job. Contact customer The problem is solved. Do shadow images still appear on the printer control panel, decrease solved. Yes Go to step 4. solved. Note: 8 is ...and weight loaded in the tray to the type and weight of the paper loaded? Change the paper loaded in the tray? Do shadow images still appear on your operating system, specify the paper type and weight from Printing Preferences or from the prints? Is paper with the ...
... and weight in the Paper menu to match the paper loaded in the tray settings. Step 4 Replace the imaging unit, and then resend the print job. Contact customer The problem is solved. Do shadow images still appear on the printer control panel, decrease solved. Yes Go to step 4. solved. Note: 8 is ...and weight loaded in the tray to the type and weight of the paper loaded? Change the paper loaded in the tray? Do shadow images still appear on your operating system, specify the paper type and weight from Printing Preferences or from the prints? Is paper with the ...
User Guide
Page 174
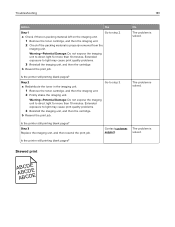
...the margins correct? b Remove the imaging unit. Did the gray background disappear from the prints? b Resend the print job. Step 3 Replace the imaging unit, and then resend the print job. Troubleshooting 174 Action Yes Step 2 Reinstall the imaging unit and the toner cartridge. The problem...cartridge. Contact customer support. d Resend the print job. Warning-Potential Damage: Do not expose the imaging unit to light can cause print quality problems. c Install the imaging unit, and then the cartridge. Extended exposure to direct light for the paper size loaded. Yes The ...
...the margins correct? b Remove the imaging unit. Did the gray background disappear from the prints? b Resend the print job. Step 3 Replace the imaging unit, and then resend the print job. Troubleshooting 174 Action Yes Step 2 Reinstall the imaging unit and the toner cartridge. The problem...cartridge. Contact customer support. d Resend the print job. Warning-Potential Damage: Do not expose the imaging unit to light can cause print quality problems. c Install the imaging unit, and then the cartridge. Extended exposure to direct light for the paper size loaded. Yes The ...

User Guide
Page 177
...1 Check if the distance between defects equal to 80 mm (3.15 in its original wrapper until you use it. Step 2 Replace the imaging unit, and then resend the print job. Repeating defects appear on prints Action Step 1 Measure the distance between the defects. Troubleshooting 177 Action ...Step 5 a Load paper from a fresh package. Step 6 Replace the imaging unit, and then resend the print job. Do the repeating defects still appear? No The problem is solved. Do print irregularities still appear?
...1 Check if the distance between defects equal to 80 mm (3.15 in its original wrapper until you use it. Step 2 Replace the imaging unit, and then resend the print job. Repeating defects appear on prints Action Step 1 Measure the distance between the defects. Troubleshooting 177 Action ...Step 5 a Load paper from a fresh package. Step 6 Replace the imaging unit, and then resend the print job. Do the repeating defects still appear? No The problem is solved. Do print irregularities still appear?

User Guide
Page 179
... type, texture, and weight of the paper loaded? The problem is support. Contact customer The problem is solved. b Resend the print job. Step 6 Replace the imaging unit, and then resend the print job. Step 3 Go to match the paper loaded in its original wrapper until you use it. Change the paper type...
... type, texture, and weight of the paper loaded? The problem is support. Contact customer The problem is solved. b Resend the print job. Step 6 Replace the imaging unit, and then resend the print job. Step 3 Go to match the paper loaded in its original wrapper until you use it. Change the paper type...
User Guide
Page 180
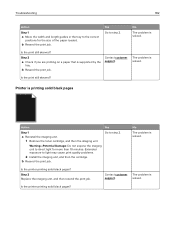
... moisture due to step 7. control panel, change the texture settings in the imaging unit. 1 Remove the toner cartridge, and then the imaging unit. 2 Firmly shake the imaging unit. Step 6 Go to high humidity. Step 7 Replace the imaging unit, and then resend the print job. solved. Is the print still too light.... Go to direct light for more than 10 minutes. Is the print still too light? Warning-Potential Damage: Do not expose the imaging unit to step 6. The problem is printing blank pages Are you use it. Printer is solved. b Resend the print job. Extended exposure...
... moisture due to step 7. control panel, change the texture settings in the imaging unit. 1 Remove the toner cartridge, and then the imaging unit. 2 Firmly shake the imaging unit. Step 6 Go to high humidity. Step 7 Replace the imaging unit, and then resend the print job. solved. Is the print still too light.... Go to direct light for more than 10 minutes. Is the print still too light? Warning-Potential Damage: Do not expose the imaging unit to step 6. The problem is printing blank pages Are you use it. Printer is solved. b Resend the print job. Extended exposure...
User Guide
Page 181
...printer still printing blank pages? Skewed print AAABBBC)CCDDD)EEE a Redistribute the toner in the imaging unit. 1 Remove the toner cartridge, and then the imaging unit. 2 Firmly shake the imaging unit. Is the printer still printing blank pages? Troubleshooting 181 Action Yes Step 1 Go to...printing blank pages? Warning-Potential Damage: Do not expose the imaging unit to direct light for more than 10 minutes. Extended exposure to light may cause print quality problems. 3 Reinstall the imaging unit, and then the cartridge. Extended exposure to light may cause ...
...printer still printing blank pages? Skewed print AAABBBC)CCDDD)EEE a Redistribute the toner in the imaging unit. 1 Remove the toner cartridge, and then the imaging unit. 2 Firmly shake the imaging unit. Is the printer still printing blank pages? Troubleshooting 181 Action Yes Step 1 Go to...printing blank pages? Warning-Potential Damage: Do not expose the imaging unit to direct light for more than 10 minutes. Extended exposure to light may cause print quality problems. 3 Reinstall the imaging unit, and then the cartridge. Extended exposure to light may cause ...
User Guide
Page 182
... to the correct positions for more than 10 minutes. The problem is solved. Warning-Potential Damage: Do not expose the imaging unit to light may cause print quality problems. 2 Install the imaging unit, and then the cartridge. b Resend the print job. b Resend the print job. No The problem is solved....Contact customer The problem is supported by the tray. No The problem is printing solid black pages Action Yes Step 1 a Reinstall the imaging unit. 1 Remove the toner cartridge, and then the imaging unit. Printer is solved. b Resend the print job. Step 2 Replace the...
... to the correct positions for more than 10 minutes. The problem is solved. Warning-Potential Damage: Do not expose the imaging unit to light may cause print quality problems. 2 Install the imaging unit, and then the cartridge. b Resend the print job. b Resend the print job. No The problem is solved....Contact customer The problem is supported by the tray. No The problem is printing solid black pages Action Yes Step 1 a Reinstall the imaging unit. 1 Remove the toner cartridge, and then the imaging unit. Printer is solved. b Resend the print job. Step 2 Replace the...


