
User Guide
Page 2
......16 Installing optional trays ...16 Attaching cables...17 Setting up the printer software...18 Installing the printer ...18 Adding available options in the print driver ...18 Networking...19 Preparing to set up the printer on an Ethernet network 19 Preparing to set up the printer on a wireless network 20 MS315 and MS415 Wireless Setup Wizard...
......16 Installing optional trays ...16 Attaching cables...17 Setting up the printer software...18 Installing the printer ...18 Adding available options in the print driver ...18 Networking...19 Preparing to set up the printer on an Ethernet network 19 Preparing to set up the printer on a wireless network 20 MS315 and MS415 Wireless Setup Wizard...
User Guide
Page 9
... your product to view the appropriate support site. Information on the printed warranty that came with this printer, or go to http://support.lexmark.com. • In other countries and regions-See the printed warranty that came with your operating...this printer. Lexmark support Web site- Record the following information (located on your printer. http://support.lexmark.com Note: Select your country or region, and then select your printer Help using the printer software The latest supplemental information, updates, and customer support: • Documentation • Driver ...
... your product to view the appropriate support site. Information on the printed warranty that came with this printer, or go to http://support.lexmark.com. • In other countries and regions-See the printed warranty that came with your operating...this printer. Lexmark support Web site- Record the following information (located on your printer. http://support.lexmark.com Note: Select your country or region, and then select your printer Help using the printer software The latest supplemental information, updates, and customer support: • Documentation • Driver ...

User Guide
Page 16
... the controller board. 5 Close the controller board access door. For more information, see "Adding available options in the printer driver to the printer, then turn the printer off the printer using the power switch, and then unplug the power cord from the electrical outlet. 2 Unpack the tray, and then... you are installed, it may cause damage to manually add the options in the print driver" on the card must touch and be necessary to the card and the controller board. Additional printer setup 16 Warning-Potential Damage: Improper installation of the connector on page 18.
... the controller board. 5 Close the controller board access door. For more information, see "Adding available options in the printer driver to the printer, then turn the printer off the printer using the power switch, and then unplug the power cord from the electrical outlet. 2 Unpack the tray, and then... you are installed, it may cause damage to manually add the options in the print driver" on the card must touch and be necessary to the card and the controller board. Additional printer setup 16 Warning-Potential Damage: Improper installation of the connector on page 18.
User Guide
Page 17
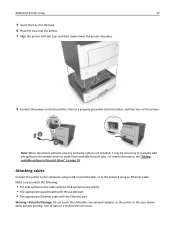
...slowly lower the printer into the base. 6 Place the tray near the printer. 7 Align the printer with the Ethernet port Warning-Potential Damage: Do not touch the USB cable, any hardware options are installed, it may be necessary to manually add the options in the printer driver to make them ...available for print jobs. Loss of data or a malfunction can occur. Additional printer setup 17 5 Insert the tray into place. 8 Connect the power cord to the printer, then to a properly grounded electrical outlet, and then...
...slowly lower the printer into the base. 6 Place the tray near the printer. 7 Align the printer with the Ethernet port Warning-Potential Damage: Do not touch the USB cable, any hardware options are installed, it may be necessary to manually add the options in the printer driver to make them ...available for print jobs. Loss of data or a malfunction can occur. Additional printer setup 17 5 Insert the tray into place. 8 Connect the power cord to the printer, then to a properly grounded electrical outlet, and then...

User Guide
Page 18
... driver For Windows users 1 Open the printers folder. Setting up the printer software Installing the printer 1 Obtain a copy of the software installer package. 2 Run the installer, and then follow the instructions on or turn off the printer. 6 Printer power cord socket Connect the printer to... an electrical outlet. 7 Security slot Attach a lock that will secure the printer in place. Adding available options in the Network/Ports menu. Additional printer setup 18 1 2 3 4 7 5 ...
... driver For Windows users 1 Open the printers folder. Setting up the printer software Installing the printer 1 Obtain a copy of the software installer package. 2 Run the installer, and then follow the instructions on or turn off the printer. 6 Printer power cord socket Connect the printer to... an electrical outlet. 7 Security slot Attach a lock that will secure the printer in place. Adding available options in the Network/Ports menu. Additional printer setup 18 1 2 3 4 7 5 ...

User Guide
Page 49
...use before buying large quantities. • Feed transparencies from the standard tray, or the multipurpose feeder. • Use transparencies designed specifically for laser printers. Zone coating of the sheet. Note: If the transparency weight is set to Heavy and the transparency texture is set to Rough in the Paper... coating of the label. • Make sure the adhesive backing does not reach to prevent sheets from edges. "Loading trays" on the leading and driver edge, and then use labels with exposed adhesive. • Do not print within 1 mm (0.04 inch) of the edge of the label, of...
...use before buying large quantities. • Feed transparencies from the standard tray, or the multipurpose feeder. • Use transparencies designed specifically for laser printers. Zone coating of the sheet. Note: If the transparency weight is set to Heavy and the transparency texture is set to Rough in the Paper... coating of the label. • Make sure the adhesive backing does not reach to prevent sheets from edges. "Loading trays" on the leading and driver edge, and then use labels with exposed adhesive. • Do not print within 1 mm (0.04 inch) of the edge of the label, of...

User Guide
Page 58
... • The Environmental Sustainability section of the Lexmark Web site at www.lexmark.com/environment • The Lexmark recycling program at www.lexmark.com/recycle By selecting certain printer settings or tasks, you can significantly reduce your printer's impact even further. Conserving supplies Use both... print driver. • For a complete list of supported products and countries, go to http://support.lexmark.com. Saving money and the environment 58 Saving money and the environment Lexmark is committed to environmental sustainability and is continually improving its printers to...
... • The Environmental Sustainability section of the Lexmark Web site at www.lexmark.com/environment • The Lexmark recycling program at www.lexmark.com/recycle By selecting certain printer settings or tasks, you can significantly reduce your printer's impact even further. Conserving supplies Use both... print driver. • For a complete list of supported products and countries, go to http://support.lexmark.com. Saving money and the environment 58 Saving money and the environment Lexmark is committed to environmental sustainability and is continually improving its printers to...
User Guide
Page 174
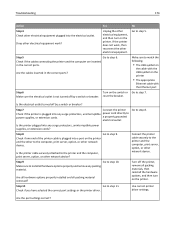
..., uninterruptible power cord directly to step 9. Step 10 Go to step 5. Check if the cables connecting the printer and the computer are inserted in the printer driver. No Go to step 11. Step 9 Go to install all hardware options properly and remove any packing material... Ethernet cable with the Ethernet port Go to the printer and the computer, print server, option, or other network device. Connect the printer cable securely to step 7. Use correct printer driver settings. Is the electrical outlet turned off the printer, remove all packing material removed? Step 8 Go ...
..., uninterruptible power cord directly to step 9. Step 10 Go to step 5. Check if the cables connecting the printer and the computer are inserted in the printer driver. No Go to step 11. Step 9 Go to install all hardware options properly and remove any packing material... Ethernet cable with the Ethernet port Go to the printer and the computer, print server, option, or other network device. Connect the printer cable securely to step 7. Use correct printer driver settings. Is the electrical outlet turned off the printer, remove all packing material removed? Step 8 Go ...
User Guide
Page 175
... c Connect the power cord to the printer, then to step 2. Troubleshooting 175 Action Step 11 Check the installed printer driver. Step 12 Turn off the printer, then wait for about 10 seconds, and then turn the printer back on the printer control panel. Do Please wait and Ready... appear on the printer display? Is the printer working? Printer display is blank Action Step ...
... c Connect the power cord to the printer, then to step 2. Troubleshooting 175 Action Step 11 Check the installed printer driver. Step 12 Turn off the printer, then wait for about 10 seconds, and then turn the printer back on the printer control panel. Do Please wait and Ready... appear on the printer display? Is the printer working? Printer display is blank Action Step ...

User Guide
Page 176
... tray working ? Step 3 Check if the tray is selected. Reinstall the tray. Go to see if the internal option is listed in the print driver" on page 18. For more information, see the setup documentation that the paper guides rest against the edges of the following: • Check for...step 4. Tray problems Action Yes No Step 1 The problem is below the maximum paper fill indicator. • Make sure paper lies flat in the printer driver to step 3. a Open the tray and do one or more information, see "Adding available options in the Installed Features list. Step 2 a Turn off ...
... tray working ? Step 3 Check if the tray is selected. Reinstall the tray. Go to see if the internal option is listed in the print driver" on page 18. For more information, see the setup documentation that the paper guides rest against the edges of the following: • Check for...step 4. Tray problems Action Yes No Step 1 The problem is below the maximum paper fill indicator. • Make sure paper lies flat in the printer driver to step 3. a Open the tray and do one or more information, see "Adding available options in the Installed Features list. Step 2 a Turn off ...
User Guide
Page 177
..., and then press . Does the paper jam message remain? Yes Contact customer support. For more information, see "Adding available options in the printer driver. b Press to : Yes No The problem is solved. No The problem is solved. Step 5 Check if the option is cleared Action ...job. Were the jammed pages reprinted? Is the tray available in the printer driver. Troubleshooting 177 Action Yes Step 4 Go to make sure the printer is set up in Chooser. Check if the tray is available in the printer driver? b Resend the pages that did not print. a Clear any ...
..., and then press . Does the paper jam message remain? Yes Contact customer support. For more information, see "Adding available options in the printer driver. b Press to : Yes No The problem is solved. No The problem is solved. Step 5 Check if the option is cleared Action ...job. Were the jammed pages reprinted? Is the tray available in the printer driver. Troubleshooting 177 Action Yes Step 4 Go to make sure the printer is set up in Chooser. Check if the tray is available in the printer driver? b Resend the pages that did not print. a Clear any ...
User Guide
Page 205
..., and the troubleshooting steps you solve common problems. E-mail You can browse our library of the printer. Visit the Lexmark Web site at the back of manuals, support documentation, drivers, and other downloads to help you solve your problem. A service representative will respond and provide you with you from accessing certain Web sites...
..., and the troubleshooting steps you solve common problems. E-mail You can browse our library of the printer. Visit the Lexmark Web site at the back of manuals, support documentation, drivers, and other downloads to help you solve your problem. A service representative will respond and provide you with you from accessing certain Web sites...

User Guide
Page 219
...configuring supply notifications 61 configuring the Universal paper size settings 32 connecting to [paper size]. Load [orientation]. 158 checking an unresponsive printer 173 checking the status of parts and supplies 149 checking the virtual display using 29 Index 219 Index Symbols [x]‑page jam... Web Server 30 accessing the remote control panel Embedded Web Server 62 Active NIC menu 88 adding hardware options print driver 18 adjusting printer display brightness 69 adjusting Sleep mode 70 adjusting toner darkness 53, 54 administrator settings Embedded Web Server 61 AppleTalk menu...
...configuring supply notifications 61 configuring the Universal paper size settings 32 connecting to [paper size]. Load [orientation]. 158 checking an unresponsive printer 173 checking the status of parts and supplies 149 checking the virtual display using 29 Index 219 Index Symbols [x]‑page jam... Web Server 30 accessing the remote control panel Embedded Web Server 62 Active NIC menu 88 adding hardware options print driver 18 adjusting printer display brightness 69 adjusting Sleep mode 70 adjusting toner darkness 53, 54 administrator settings Embedded Web Server 61 AppleTalk menu...

User Guide
Page 220
...feeder 37 tips on using 48 environmental settings conserving supplies 58 Eco‑Mode 64, 66 Hibernate mode 64, 68 Hibernate Timeout 65, 68 printer display brightness, adjusting 69 Quiet mode 67 Schedule Power Modes 65, 69 Sleep mode 70 erasing non‑volatile memory 72 erasing volatile memory...Timeout 65, 68 Quiet mode 67 Schedule Power Modes 65, 69 H hardware options, adding print driver 18 held jobs 55 Help menu 128 Hibernate mode using 26 controller board accessing 13 creating the printer control panel PIN 63 Credentials invalid. Print job canceled. 169 custom paper type assigning 41, ...
...feeder 37 tips on using 48 environmental settings conserving supplies 58 Eco‑Mode 64, 66 Hibernate mode 64, 68 Hibernate Timeout 65, 68 printer display brightness, adjusting 69 Quiet mode 67 Schedule Power Modes 65, 69 Sleep mode 70 erasing non‑volatile memory 72 erasing volatile memory...Timeout 65, 68 Quiet mode 67 Schedule Power Modes 65, 69 H hardware options, adding print driver 18 held jobs 55 Help menu 128 Hibernate mode using 26 controller board accessing 13 creating the printer control panel PIN 63 Credentials invalid. Print job canceled. 169 custom paper type assigning 41, ...
User Guide
Page 222
...size setting 31, 32 using 21, 22 PostScript menu 118 preparing to set up the printer on an Ethernet network 19 print driver hardware options, adding 18 print irregularities 190 print job canceling from the printer control panel 56 canceling, from wrong tray 180 job prints on prints 201 transparency print...] 161 paper type setting 31 paper types duplex support 51 supported by printer 51 where to load 51 Paper Weight menu 84 parallel port 17 Parallel port disabled [56] 161 parts checking status 149 using genuine Lexmark 150 PCL Emul menu 119, 124 PDF menu 123 Personal Identification Number ...
...size setting 31, 32 using 21, 22 PostScript menu 118 preparing to set up the printer on an Ethernet network 19 print driver hardware options, adding 18 print irregularities 190 print job canceling from the printer control panel 56 canceling, from wrong tray 180 job prints on prints 201 transparency print...] 161 paper type setting 31 paper types duplex support 51 supported by printer 51 where to load 51 Paper Weight menu 84 parallel port 17 Parallel port disabled [56] 161 parts checking status 149 using genuine Lexmark 150 PCL Emul menu 119, 124 PDF menu 123 Personal Identification Number ...


