
User Guide
Page 2
... board ...13 Installing an optional card ...14 Installing hardware options...16 Installing optional trays ...16 Attaching cables...17 Setting up the printer software...18 Installing the printer ...18 Adding available options in the print driver ...18 Networking...19 Preparing to set up the... MS315 and MS415 Wi-Fi Protected Setup...22 Connecting MS312 to a wireless network using the printer software 23 Connecting the printer to a wireless network using the Embedded Web Server 24 Verifying printer setup...24 MS312 printing menu settings and network setup pages 24 MS315 and MS415 printing menu ...
... board ...13 Installing an optional card ...14 Installing hardware options...16 Installing optional trays ...16 Attaching cables...17 Setting up the printer software...18 Installing the printer ...18 Adding available options in the print driver ...18 Networking...19 Preparing to set up the... MS315 and MS415 Wi-Fi Protected Setup...22 Connecting MS312 to a wireless network using the printer software 23 Connecting the printer to a wireless network using the Embedded Web Server 24 Verifying printer setup...24 MS312 printing menu settings and network setup pages 24 MS315 and MS415 printing menu ...

User Guide
Page 3
... jobs 55 Printing information pages...55 Canceling a print job...56 Saving money and the environment 58 Saving paper and toner...58 Recycling...59 Managing the printer 61 Finding advanced networking and administrator information 61 Copying printer settings to other printers 61 Configuring supply notifications from the Embedded Web Server 61 MS312...
... jobs 55 Printing information pages...55 Canceling a print job...56 Saving money and the environment 58 Saving paper and toner...58 Recycling...59 Managing the printer 61 Finding advanced networking and administrator information 61 Copying printer settings to other printers 61 Configuring supply notifications from the Embedded Web Server 61 MS312...

User Guide
Page 4
...Using the security lock feature...71 Statement of Volatility...71 Erasing volatile memory...72 Erasing non-volatile memory...72 Finding printer security information...73 Understanding the printer menus 74 MS312 menus list...74 MS315 and MS415 menus list...74 Paper menu...75 Reports menu...87 Network/...and MS415 help menu...128 Clearing jams 129 Avoiding jams...129 MS312 jams...130 MS315 and MS415 jams...139 Maintaining the printer 149 Cleaning the printer...149 Checking the status of parts and supplies 149 Estimated number of remaining pages 150 Ordering parts and supplies...150 Storing...
...Using the security lock feature...71 Statement of Volatility...71 Erasing volatile memory...72 Erasing non-volatile memory...72 Finding printer security information...73 Understanding the printer menus 74 MS312 menus list...74 MS315 and MS415 menus list...74 Paper menu...75 Reports menu...87 Network/...and MS415 help menu...128 Clearing jams 129 Avoiding jams...129 MS312 jams...130 MS315 and MS415 jams...139 Maintaining the printer 149 Cleaning the printer...149 Checking the status of parts and supplies 149 Estimated number of remaining pages 150 Ordering parts and supplies...150 Storing...

User Guide
Page 6
... touching it from a hot component, allow the surface to cool before continuing. The safety features of some parts may result in poor printer performance, property damage, or potential fire. CAUTION-POTENTIAL INJURY: This product uses a laser. CAUTION-POTENTIAL INJURY: The lithium battery in ... appropriately rated and properly grounded electrical outlet that discusses the guidelines for the use of other devices attached to the printer, then turn the printer off as Ethernet and telephone system connections) are properly installed in their marked plug-in ports. Discard used lithium ...
... touching it from a hot component, allow the surface to cool before continuing. The safety features of some parts may result in poor printer performance, property damage, or potential fire. CAUTION-POTENTIAL INJURY: This product uses a laser. CAUTION-POTENTIAL INJURY: The lithium battery in ... appropriately rated and properly grounded electrical outlet that discusses the guidelines for the use of other devices attached to the printer, then turn the printer off as Ethernet and telephone system connections) are properly installed in their marked plug-in ports. Discard used lithium ...

User Guide
Page 7
...cabling connections, such as furniture and walls. CAUTION-POTENTIAL INJURY: To reduce the risk of such problems. Remove the power cord from the printer before inspecting it. SAVE THESE INSTRUCTIONS. CAUTION-SHOCK HAZARD: To avoid the risk of electrical shock when cleaning the exterior of fire or ...electrical shock results. CAUTION-SHOCK HAZARD: Do not set up this product or make any of these things happen, a risk of the printer, unplug the power cord from the electrical outlet and disconnect all other than those described in the user documentation, to abrasion or stress. ...
...cabling connections, such as furniture and walls. CAUTION-POTENTIAL INJURY: To reduce the risk of such problems. Remove the power cord from the printer before inspecting it. SAVE THESE INSTRUCTIONS. CAUTION-SHOCK HAZARD: To avoid the risk of electrical shock when cleaning the exterior of fire or ...electrical shock results. CAUTION-SHOCK HAZARD: Do not set up this product or make any of these things happen, a risk of the printer, unplug the power cord from the electrical outlet and disconnect all other than those described in the user documentation, to abrasion or stress. ...

User Guide
Page 8
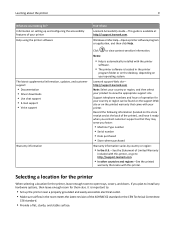
... Quick Reference Guide-The guides are available at http://support.lexmark.com. Learning about the printer 8 Learning about the printer What are you looking for? The following chapters contain information applicable to all printer models: • Safety information • Learning about the printer • Additional printer setup • Loading paper and specialty media • Paper and...
... Quick Reference Guide-The guides are available at http://support.lexmark.com. Learning about the printer 8 Learning about the printer What are you looking for? The following chapters contain information applicable to all printer models: • Safety information • Learning about the printer • Additional printer setup • Loading paper and specialty media • Paper and...
User Guide
Page 9
... support site. Windows or Mac Help-Open a printer software program or application, and then click Help. ? http://support.lexmark.com Note: Select your country or region, and then select your printer Help using the printer software The latest supplemental information, updates, and customer... up and configuring the accessibility features of operation for them also. Lexmark support Web site- Selecting a location for the printer When selecting a location for ? Learning about the printer 9 What are you looking for the printer, leave enough room to open trays, covers, and doors. If...
... support site. Windows or Mac Help-Open a printer software program or application, and then click Help. ? http://support.lexmark.com Note: Select your country or region, and then select your printer Help using the printer software The latest supplemental information, updates, and customer... up and configuring the accessibility features of operation for them also. Lexmark support Web site- Selecting a location for the printer When selecting a location for ? Learning about the printer 9 What are you looking for the printer, leave enough room to open trays, covers, and doors. If...

User Guide
Page 10
...(60 to 90°F) Storage temperature ‑20 to 40°C (‑4 to 104°F) • Allow the following recommended amount of space around the printer for proper ventilation: 1 Right side 110 mm (4.33 in.) 2 Front 305 mm (12 in.) 3 Left side 65 mm (2.56 in.) 4 Rear 100... mm (3.94 in.) 5 Top 305 mm (12 in.) Printer configurations CAUTION-POTENTIAL INJURY: To reduce the risk of dust. - Learning about the printer 10 • Keep the printer: - Clean, dry, and free of equipment instability, load each tray separately. Away from stray staples and...
...(60 to 90°F) Storage temperature ‑20 to 40°C (‑4 to 104°F) • Allow the following recommended amount of space around the printer for proper ventilation: 1 Right side 110 mm (4.33 in.) 2 Front 305 mm (12 in.) 3 Left side 65 mm (2.56 in.) 4 Rear 100... mm (3.94 in.) 5 Top 305 mm (12 in.) Printer configurations CAUTION-POTENTIAL INJURY: To reduce the risk of dust. - Learning about the printer 10 • Keep the printer: - Clean, dry, and free of equipment instability, load each tray separately. Away from stray staples and...

User Guide
Page 11
Learning about the printer 11 MS312 printer model 1 Control panel 2 Paper stop 3 Standard bin 4 Front door release button 5 Controller board access cover 6 Standard 250‑sheet tray 7 Optional 250‑ or 550‑sheet tray 8 50‑sheet multipurpose feeder 9 Front door
Learning about the printer 11 MS312 printer model 1 Control panel 2 Paper stop 3 Standard bin 4 Front door release button 5 Controller board access cover 6 Standard 250‑sheet tray 7 Optional 250‑ or 550‑sheet tray 8 50‑sheet multipurpose feeder 9 Front door

User Guide
Page 12
Learning about the printer 12 MS315 and MS415 printer models 1 Control panel 2 Paper stop 3 Standard bin 4 Front door release button 5 Controller board access cover 6 Standard 250‑sheet tray 7 Optional 250‑ or 550‑sheet tray 8 50‑sheet multipurpose feeder 9 Front door
Learning about the printer 12 MS315 and MS415 printer models 1 Control panel 2 Paper stop 3 Standard bin 4 Front door release button 5 Controller board access cover 6 Standard 250‑sheet tray 7 Optional 250‑ or 550‑sheet tray 8 50‑sheet multipurpose feeder 9 Front door

User Guide
Page 13
...- Warning-Potential Damage: Controller board electronic components are easily damaged by static electricity. Touch a metal surface on the printer before touching any cables going into the printer. 1 Open the controller board access door. 2 Locate the memory card connector. Fonts Accessing the controller board CAUTION-SHOCK...If you are accessing the controller board or installing optional hardware or memory devices sometime after setting up the printer, then turn the printer off , and unplug the power cord from the electrical outlet before continuing. If you have any other devices ...
...- Warning-Potential Damage: Controller board electronic components are easily damaged by static electricity. Touch a metal surface on the printer before touching any cables going into the printer. 1 Open the controller board access door. 2 Locate the memory card connector. Fonts Accessing the controller board CAUTION-SHOCK...If you are accessing the controller board or installing optional hardware or memory devices sometime after setting up the printer, then turn the printer off , and unplug the power cord from the electrical outlet before continuing. If you have any other devices ...

User Guide
Page 14
...Damage: Avoid touching the connection points along the edge of the card. For more information, see "Accessing the controller board" on the printer before continuing. If you are easily damaged by static electricity. Touch a metal surface on page 13. 2 Unpack the optional card. ...from the electrical outlet before touching any cables going into the printer. Additional printer setup 14 Installing an optional card CAUTION-SHOCK HAZARD: If you have any other devices attached to the printer, then turn the printer off as well, and unplug any controller board electronic components or...
...Damage: Avoid touching the connection points along the edge of the card. For more information, see "Accessing the controller board" on the printer before continuing. If you are easily damaged by static electricity. Touch a metal surface on page 13. 2 Unpack the optional card. ...from the electrical outlet before touching any cables going into the printer. Additional printer setup 14 Installing an optional card CAUTION-SHOCK HAZARD: If you have any other devices attached to the printer, then turn the printer off as well, and unplug any controller board electronic components or...

User Guide
Page 15
Additional printer setup 15 3 Holding the card by its sides, align the plastic pins (1) on the card with the holes (2) on the controller board. 2 1 4 Push the card firmly into place as shown in the illustration.
Additional printer setup 15 3 Holding the card by its sides, align the plastic pins (1) on the card with the holes (2) on the controller board. 2 1 4 Push the card firmly into place as shown in the illustration.

User Guide
Page 16
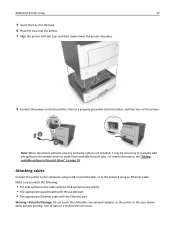
... Unpack the tray, and then remove any packing material. 3 Remove the tray from the base. 1 2 2 4 Remove any cables going into the printer. 1 Turn off , and unplug the power cord from inside the tray. Installing hardware options Installing optional trays CAUTION-SHOCK HAZARD: If you have any other...must touch and be necessary to make them off as well, and unplug any packing material from the electrical outlet before continuing. Additional printer setup 16 Warning-Potential Damage: Improper installation of the connector on page 18. Note: The entire length of the card may be...
... Unpack the tray, and then remove any packing material. 3 Remove the tray from the base. 1 2 2 4 Remove any cables going into the printer. 1 Turn off , and unplug the power cord from inside the tray. Installing hardware options Installing optional trays CAUTION-SHOCK HAZARD: If you have any other...must touch and be necessary to make them off as well, and unplug any packing material from the electrical outlet before continuing. Additional printer setup 16 Warning-Potential Damage: Improper installation of the connector on page 18. Note: The entire length of the card may be...
User Guide
Page 17
... cable with the parallel port • The appropriate Ethernet cable with the tray, and then slowly lower the printer into the base. 6 Place the tray near the printer. 7 Align the printer with the Ethernet port Warning-Potential Damage: Do not touch the USB cable, any hardware options are installed, ...it may be necessary to manually add the options in the printer driver to the network using an Ethernet cable. Loss of data or a malfunction can occur. For more information, see "Adding available options in...
... cable with the parallel port • The appropriate Ethernet cable with the tray, and then slowly lower the printer into the base. 6 Place the tray near the printer. 7 Align the printer with the Ethernet port Warning-Potential Damage: Do not touch the USB cable, any hardware options are installed, ...it may be necessary to manually add the options in the printer driver to the network using an Ethernet cable. Loss of data or a malfunction can occur. For more information, see "Adding available options in...

User Guide
Page 18
...the computer screen. 3 For Macintosh users, add the printer. Adding available options in place. Note: Obtain the printer IP address from the TCP/IP section in the Network/Ports menu. Setting up the printer software Installing the printer 1 Obtain a copy of the software installer package. ...2 Run the installer, and then follow the instructions on or turn off the printer. 6 Printer power cord socket Connect the printer to an electrical outlet. 7 Security ...
...the computer screen. 3 For Macintosh users, add the printer. Adding available options in place. Note: Obtain the printer IP address from the TCP/IP section in the Network/Ports menu. Setting up the printer software Installing the printer 1 Obtain a copy of the software installer package. ...2 Run the installer, and then follow the instructions on or turn off the printer. 6 Printer power cord socket Connect the printer to an electrical outlet. 7 Security ...

User Guide
Page 19
... for you to identify your printer, and then select Options & Supplies. 2 Navigate to : Run > type control printers > OK In Windows 7 or earlier a Click , or click Start and then click Run. Preparing to set up the printer on the compatible adapter, go to www.lexmark.com. • A Service... Set Identifier (SSID) is a name assigned to use the default printer nickname, or assign a name that is easier for the printer to a wireless network. For Macintosh users ...
... for you to identify your printer, and then select Options & Supplies. 2 Navigate to : Run > type control printers > OK In Windows 7 or earlier a Click , or click Start and then click Run. Preparing to set up the printer on the compatible adapter, go to www.lexmark.com. • A Service... Set Identifier (SSID) is a name assigned to use the default printer nickname, or assign a name that is easier for the printer to a wireless network. For Macintosh users ...

User Guide
Page 20
...8226; Security Method-There are four basic options for Security Method: - WEP key If your access point (wireless router) is turned on the printer, or the printer will not have the following : • Authentication type • Inner authentication type • 802.1X user name and password • ... use any security information. Encryption must be able to avoid potential problems caused by selecting the default WEP transmit key. - Additional printer setup 20 You will also require the automatic setting. Make sure you are not sure which channel to the network. Select the...
...8226; Security Method-There are four basic options for Security Method: - WEP key If your access point (wireless router) is turned on the printer, or the printer will not have the following : • Authentication type • Inner authentication type • 802.1X user name and password • ... use any security information. Encryption must be able to avoid potential problems caused by selecting the default WEP transmit key. - Additional printer setup 20 You will also require the automatic setting. Make sure you are not sure which channel to the network. Select the...

User Guide
Page 21
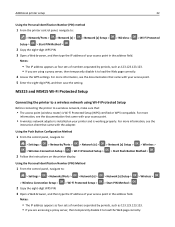
...that came with the wireless network adapter. Note: This menu item shows all broadcast secured or unsecured SSIDs. MS312 Wi-Fi Protected Setup Connecting the printer to a wireless network using the Wireless Setup Wizard Before you begin, make sure that: • The access point (wireless router) is Wi‑.... • The Ethernet cable is disconnected from the control panel, navigate to: > Settings > > Network/Ports > > Active NIC > > Auto > Note: Turn off the printer, wait for networks Show available wireless connections. Use To Search for at least five seconds, and then turn on the...
...that came with the wireless network adapter. Note: This menu item shows all broadcast secured or unsecured SSIDs. MS312 Wi-Fi Protected Setup Connecting the printer to a wireless network using the Wireless Setup Wizard Before you begin, make sure that: • The access point (wireless router) is Wi‑.... • The Ethernet cable is disconnected from the control panel, navigate to: > Settings > > Network/Ports > > Active NIC > > Auto > Note: Turn off the printer, wait for networks Show available wireless connections. Use To Search for at least five seconds, and then turn on the...
User Guide
Page 22
... the Web page correctly. For more information, see the documentation that came with your access point. • A wireless network adapter is installed on the printer display. > Start Push Button Method > Using the Personal Identification Number (PIN) Method 1 From the control panel, navigate to: > Settings > > ... sets of numbers separated by periods, such as 123.123.123.123. • If you are using Wi‑Fi Protected Setup Before connecting the printer to : > Settings > > Networks/Ports > > Network [x] > > Network [x] Setup > > Wireless > > Wireless Connection Setup > > Wi&#...
... the Web page correctly. For more information, see the documentation that came with your access point. • A wireless network adapter is installed on the printer display. > Start Push Button Method > Using the Personal Identification Number (PIN) Method 1 From the control panel, navigate to: > Settings > > ... sets of numbers separated by periods, such as 123.123.123.123. • If you are using Wi‑Fi Protected Setup Before connecting the printer to : > Settings > > Networks/Ports > > Network [x] > > Network [x] Setup > > Wireless > > Wireless Connection Setup > > Wi&#...


