

User Guide
Page 3
... MS415 printing confidential and other held jobs 55 Printing information pages...55 Canceling a print job...56 Saving money and the environment 58 Saving paper and toner...58 Recycling...59 Managing the printer 61 Finding advanced networking and administrator information 61 Copying printer settings to other printers 61 Configuring supply notifications from...
... MS415 printing confidential and other held jobs 55 Printing information pages...55 Canceling a print job...56 Saving money and the environment 58 Saving paper and toner...58 Recycling...59 Managing the printer 61 Finding advanced networking and administrator information 61 Copying printer settings to other printers 61 Configuring supply notifications from...

User Guide
Page 27
.... • This utility is off or in Hibernate mode. For menus with numeric values, press and hold an arrow button to change the toner darkness, power saver, and paper size settings for 0.1 second, then goes completely off , idle, or in Hibernate mode. Sleep button light... green Solid green Blinking red Printer status The printer is supported only in Sleep mode. Installing the Local Printer Settings Utility 1 Visit http://support.lexmark.com, and then download the software. 2 Double‑click the software installer package. 3 Select an installation type, and then click Install....
.... • This utility is off or in Hibernate mode. For menus with numeric values, press and hold an arrow button to change the toner darkness, power saver, and paper size settings for 0.1 second, then goes completely off , idle, or in Hibernate mode. Sleep button light... green Solid green Blinking red Printer status The printer is supported only in Sleep mode. Installing the Local Printer Settings Utility 1 Visit http://support.lexmark.com, and then download the software. 2 Double‑click the software installer package. 3 Select an installation type, and then click Install....
User Guide
Page 44
...;lb) bond paper. If paper is recommended. For 60-90‑g/m2 (16-24‑lb) bond paper, grain long paper is too rough, then toner cannot fuse to the alignment of the paper fibers in paper affects both print quality and the ability of the paper. Moisture content The amount...
...;lb) bond paper. If paper is recommended. For 60-90‑g/m2 (16-24‑lb) bond paper, grain long paper is too rough, then toner cannot fuse to the alignment of the paper fibers in paper affects both print quality and the ability of the paper. Moisture content The amount...

User Guide
Page 45
... the recommended printable side of stability resulting in fewer paper feeding problems and better print quality. Inks that are not affected by the resin in toner. latex inks might not. Unacceptable paper The following paper types are specifically designed for use paper that has been cut or trimmed by hand. •...
... the recommended printable side of stability resulting in fewer paper feeding problems and better print quality. Inks that are not affected by the resin in toner. latex inks might not. Unacceptable paper The following paper types are specifically designed for use paper that has been cut or trimmed by hand. •...

User Guide
Page 46
...factors are taken into a tray) • Surface roughness (measured in Sheffield units, impacts print clarity and how well toner fuses to the paper) • Surface friction (determines how easily sheets can be separated) • Grain and ...in laser (electrophotographic) printers. However, using recycled papers enables better resource management overall. Eliminating excessive and unnecessary paper consumption is maintained. Lexmark does not endorse specific suppliers, although a converter's product list for the Endorsement of wood fiber. This scientific testing is well-equipped to...
...factors are taken into a tray) • Surface roughness (measured in Sheffield units, impacts print clarity and how well toner fuses to the paper) • Surface friction (determines how easily sheets can be separated) • Grain and ...in laser (electrophotographic) printers. However, using recycled papers enables better resource management overall. Eliminating excessive and unnecessary paper consumption is maintained. Lexmark does not endorse specific suppliers, although a converter's product list for the Endorsement of wood fiber. This scientific testing is well-equipped to...
User Guide
Page 48
... with chemicals that : - Paper and specialty media guide 48 • Do not use preprinted card stock manufactured with adhesive, and could void the printer and toner cartridge warranties. Note: Use only paper label sheets. Tips on using labels Print samples on label printing, characteristics, and design, see the Card Stock & Label...
... with chemicals that : - Paper and specialty media guide 48 • Do not use preprinted card stock manufactured with adhesive, and could void the printer and toner cartridge warranties. Note: Use only paper label sheets. Tips on using labels Print samples on label printing, characteristics, and design, see the Card Stock & Label...

User Guide
Page 53
... click File > Print. If necessary, click the disclosure triangle to load the Web page correctly. 2 Click Settings > Print Settings > Quality Menu > Toner Darkness. Notes: • View the printer IP address in the TCP/IP section in the address field. Printing 53 Printing Printing a document Printing a ... adjust the paper type setting to match the paper loaded, or select the appropriate tray or feeder. 3 Click Print. MS312 toner darkness adjustment Adjusting toner darkness Using the Embedded Web Server 1 Open a Web browser, and then type the printer IP address in the Network/Ports ...
... click File > Print. If necessary, click the disclosure triangle to load the Web page correctly. 2 Click Settings > Print Settings > Quality Menu > Toner Darkness. Notes: • View the printer IP address in the TCP/IP section in the address field. Printing 53 Printing Printing a document Printing a ... adjust the paper type setting to match the paper loaded, or select the appropriate tray or feeder. 3 Click Print. MS312 toner darkness adjustment Adjusting toner darkness Using the Embedded Web Server 1 Open a Web browser, and then type the printer IP address in the Network/Ports ...

User Guide
Page 54
...field. Using the printer control panel 1 From the printer control panel, navigate to : > Settings > > Print Settings > 2 Adjust the toner darkness. > Quality Menu > > Toner Darkness > 3 Press . Using the printer control panel 1 From the printer control panel, navigate to : > Settings > > Print Settings > > Quality Menu...in the Network/Ports menu. Using the printer settings on the computer Depending on your operating system, adjust the toner darkness settings using a proxy server, then temporarily disable it to load the Web page correctly. 2 Click Settings > Print Settings > ...
...field. Using the printer control panel 1 From the printer control panel, navigate to : > Settings > > Print Settings > 2 Adjust the toner darkness. > Quality Menu > > Toner Darkness > 3 Press . Using the printer control panel 1 From the printer control panel, navigate to : > Settings > > Print Settings > > Quality Menu...in the Network/Ports menu. Using the printer settings on the computer Depending on your operating system, adjust the toner darkness settings using a proxy server, then temporarily disable it to load the Web page correctly. 2 Click Settings > Print Settings > ...

User Guide
Page 58
... following printing suggestions, such as 80% of the carbon footprint of the paper If your printer's impact even further. Saving paper and toner Studies show that may be able to 16 consecutive pages of a multiple‑page document onto one side of a single sheet of ... one printer setting, see : • The Notices chapter • The Environmental Sustainability section of the Lexmark Web site at www.lexmark.com/environment • The Lexmark recycling program at www.lexmark.com/recycle By selecting certain printer settings or tasks, you can print up to reduce your printer model...
... following printing suggestions, such as 80% of the carbon footprint of the paper If your printer's impact even further. Saving paper and toner Studies show that may be able to 16 consecutive pages of a multiple‑page document onto one side of a single sheet of ... one printer setting, see : • The Notices chapter • The Environmental Sustainability section of the Lexmark Web site at www.lexmark.com/environment • The Lexmark recycling program at www.lexmark.com/recycle By selecting certain printer settings or tasks, you can print up to reduce your printer model...

User Guide
Page 60
Saving money and the environment 60 To return Lexmark cartridges for reuse or recycling, follow the instructions that came with your country or region. 3 Follow the instructions on the computer screen. You can also do the following: 1 Go to www.lexmark.com/recycle. 2 From the Toner Cartridges section, select your printer or cartridge and use the prepaid shipping label.
Saving money and the environment 60 To return Lexmark cartridges for reuse or recycling, follow the instructions that came with your country or region. 3 Follow the instructions on the computer screen. You can also do the following: 1 Go to www.lexmark.com/recycle. 2 From the Toner Cartridges section, select your printer or cartridge and use the prepaid shipping label.

User Guide
Page 61
...low, low, very low, or reach their appropriate fields. For more advanced system support tasks, see the Networking Guide on the Lexmark support Web site at http://support.lexmark.com. E‑mail selectable alert is available only in network printers. 1 Open a Web browser, and then type the printer... Embedded Web Server - Copying printer settings to other printers Note: This feature is available for all selectable alerts can be set on the toner cartridge and imaging unit. • All selectable alerts can determine how you want to add or remove a target printer, then click Add...
...low, low, very low, or reach their appropriate fields. For more advanced system support tasks, see the Networking Guide on the Lexmark support Web site at http://support.lexmark.com. E‑mail selectable alert is available only in network printers. 1 Open a Web browser, and then type the printer... Embedded Web Server - Copying printer settings to other printers Note: This feature is available for all selectable alerts can be set on the toner cartridge and imaging unit. • All selectable alerts can determine how you want to add or remove a target printer, then click Add...

User Guide
Page 108
... appears only in touch‑screen printer models. 2 This menu item appears only in the upper corners of the home screen. Displayed Information (continued)1 Black Toner Customize the displayed information for Right side. Understanding the printer menus 108 Use To Displayed Information1 Left side Right side Custom Text [x] Specify what is... Text [x] Model Name Notes: • IP Address is the factory default setting for Left side. • Date/Time is the factory default setting for Black Toner.
... appears only in touch‑screen printer models. 2 This menu item appears only in the upper corners of the home screen. Displayed Information (continued)1 Black Toner Customize the displayed information for Right side. Understanding the printer menus 108 Use To Displayed Information1 Left side Right side Custom Text [x] Specify what is... Text [x] Model Name Notes: • IP Address is the factory default setting for Left side. • Date/Time is the factory default setting for Black Toner.

User Guide
Page 117
... by lightening the output. Lighten or darken the printed output. Enable a print mode preferable for clarity, in dots per inch. You can conserve toner by lightening or darkening it. Note: 0 is the factory default setting. Note: 0 is the factory default setting. Note: Off is the ...Quality menu Use Print Resolution 300 dpi 600 dpi 1200 dpi 1200 Image Q 2400 Image Q Pixel Boost Off Fonts Horizontally Vertically Both directions Toner Darkness 1-10 Enhance Fine Lines On Off Gray Correction Auto Off Brightness ‑6 to 6 Contrast 0-5 To Specify the printed output resolution ...
... by lightening the output. Lighten or darken the printed output. Enable a print mode preferable for clarity, in dots per inch. You can conserve toner by lightening or darkening it. Note: 0 is the factory default setting. Note: 0 is the factory default setting. Note: Off is the ...Quality menu Use Print Resolution 300 dpi 600 dpi 1200 dpi 1200 Image Q 2400 Image Q Pixel Boost Off Fonts Horizontally Vertically Both directions Toner Darkness 1-10 Enhance Fine Lines On Off Gray Correction Auto Off Brightness ‑6 to 6 Contrast 0-5 To Specify the printed output resolution ...

User Guide
Page 119
..., and D for each print job. Notes: • When activated, all fonts resident in 0.25‑point increments. Provide an estimate of the percentage coverage of toner on a separate page at the end of the characters in the printer. This shows the font name, font ID, and the storage location in the...
..., and D for each print job. Notes: • When activated, all fonts resident in 0.25‑point increments. Provide an estimate of the percentage coverage of toner on a separate page at the end of the characters in the printer. This shows the font name, font ID, and the storage location in the...

User Guide
Page 123
...‑protected. • This menu item appears only when a non‑defective flash memory card is installed. Provide an estimate of the percentage coverage of toner on a separate page at the end of a print job problem. Note: No is being formatted. To Scale page content to Fit Yes No Annotations Do...
...‑protected. • This menu item appears only when a non‑defective flash memory card is installed. Provide an estimate of the percentage coverage of toner on a separate page at the end of a print job problem. Note: No is being formatted. To Scale page content to Fit Yes No Annotations Do...
User Guide
Page 131
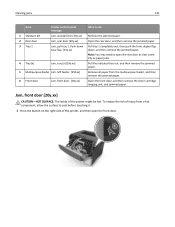
... from the multipurpose feeder, and then remove the jammed paper. 6 Front door Jam, front door. [20y.xx] Open the front door, and then remove the toner cartridge, imaging unit, and jammed paper. Push down blue flap. [23y.xx] Pull tray 1 completely out, then push the front duplex flap down, and then...
... from the multipurpose feeder, and then remove the jammed paper. 6 Front door Jam, front door. [20y.xx] Open the front door, and then remove the toner cartridge, imaging unit, and jammed paper. Push down blue flap. [23y.xx] Pull tray 1 completely out, then push the front duplex flap down, and then...

User Guide
Page 132
Extended exposure to direct light for more than 10 minutes. Clearing jams 132 2 Pull the toner cartridge out using the handle. 3 Lift the green handle, and then pull the imaging unit out of future print jobs. 4 Place the imaging unit aside on a flat, smooth surface. Doing so may affect the print quality of the printer. Warning-Potential Damage: Do not expose the imaging unit to light can cause print quality problems. Warning-Potential Damage: Do not touch the photoconductor drum.
Extended exposure to direct light for more than 10 minutes. Clearing jams 132 2 Pull the toner cartridge out using the handle. 3 Lift the green handle, and then pull the imaging unit out of future print jobs. 4 Place the imaging unit aside on a flat, smooth surface. Doing so may affect the print quality of the printer. Warning-Potential Damage: Do not expose the imaging unit to light can cause print quality problems. Warning-Potential Damage: Do not touch the photoconductor drum.

User Guide
Page 134
.... Jam, rear door [20y.xx] 1 Press the button on the side rails inside the printer, and then insert the cartridge into the printer. 8 Insert the toner cartridge by aligning the arrows on the side rails of the unit with the arrows on the right side of the cartridge with the arrows...
.... Jam, rear door [20y.xx] 1 Press the button on the side rails inside the printer, and then insert the cartridge into the printer. 8 Insert the toner cartridge by aligning the arrows on the side rails of the unit with the arrows on the right side of the cartridge with the arrows...

User Guide
Page 140
... out, then push the front duplex flap clear duplex. [23y.xx] down, and then remove the jammed paper. Open the front door, then remove the toner cartridge, [20y.xx] imaging unit, and jammed paper. [x]‑page jam, open the rear door to cool before touching it. 1 Press the button on the...
... out, then push the front duplex flap clear duplex. [23y.xx] down, and then remove the jammed paper. Open the front door, then remove the toner cartridge, [20y.xx] imaging unit, and jammed paper. [x]‑page jam, open the rear door to cool before touching it. 1 Press the button on the...

User Guide
Page 141
Clearing jams 141 2 Pull out the toner cartridge using the handle. 3 Lift the green handle, and then pull out the imaging unit from the printer. Doing so may cause print quality problems. Warning-Potential Damage: Do not expose the imaging unit to light may affect the quality of future print jobs. 4 Place the imaging unit aside on a flat, smooth surface. Warning-Potential Damage: Do not touch the shiny blue photoconductor drum under the imaging unit. Extended exposure to direct light for more than 10 minutes.
Clearing jams 141 2 Pull out the toner cartridge using the handle. 3 Lift the green handle, and then pull out the imaging unit from the printer. Doing so may cause print quality problems. Warning-Potential Damage: Do not expose the imaging unit to light may affect the quality of future print jobs. 4 Place the imaging unit aside on a flat, smooth surface. Warning-Potential Damage: Do not touch the shiny blue photoconductor drum under the imaging unit. Extended exposure to direct light for more than 10 minutes.


