

User Guide
Page 61
... site at http://support.lexmark.com. Copying printer settings to other printers Note: This feature is available for all selectable alerts can be set for some supplies for the end‑of estimated remaining supply that prompts the alert can be set on the toner cartridge and imaging unit. • All selectable alerts...
... site at http://support.lexmark.com. Copying printer settings to other printers Note: This feature is available for all selectable alerts can be set for some supplies for the end‑of estimated remaining supply that prompts the alert can be set on the toner cartridge and imaging unit. • All selectable alerts...
User Guide
Page 131
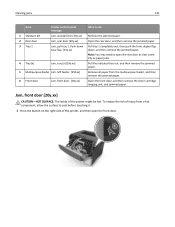
... multipurpose feeder, and then remove the jammed paper. 6 Front door Jam, front door. [20y.xx] Open the front door, and then remove the toner cartridge, imaging unit, and jammed paper. Push down blue flap. [23y.xx] Pull tray 1 completely out, then push the front duplex flap down, and then remove the jammed...
... multipurpose feeder, and then remove the jammed paper. 6 Front door Jam, front door. [20y.xx] Open the front door, and then remove the toner cartridge, imaging unit, and jammed paper. Push down blue flap. [23y.xx] Pull tray 1 completely out, then push the front duplex flap down, and then remove the jammed...

User Guide
Page 132
Warning-Potential Damage: Do not touch the photoconductor drum. Extended exposure to direct light for more than 10 minutes. Doing so may affect the print quality of the printer. Clearing jams 132 2 Pull the toner cartridge out using the handle. 3 Lift the green handle, and then pull the imaging unit out of future print jobs. 4 Place the imaging unit aside on a flat, smooth surface. Warning-Potential Damage: Do not expose the imaging unit to light can cause print quality problems.
Warning-Potential Damage: Do not touch the photoconductor drum. Extended exposure to direct light for more than 10 minutes. Doing so may affect the print quality of the printer. Clearing jams 132 2 Pull the toner cartridge out using the handle. 3 Lift the green handle, and then pull the imaging unit out of future print jobs. 4 Place the imaging unit aside on a flat, smooth surface. Warning-Potential Damage: Do not expose the imaging unit to light can cause print quality problems.

User Guide
Page 134
Clearing jams 134 7 Insert the imaging unit by aligning the arrows on the side rails of the unit with the arrows on the side rails inside the printer, and then insert the cartridge into the printer. 8 Insert the toner cartridge by aligning the ....xx] 1 Press the button on the right side of the cartridge with the arrows on the side rails inside the printer, and then insert the imaging unit into the printer. 9 Close the front door. 10 From the printer control panel, press to clear the message and continue printing.
Clearing jams 134 7 Insert the imaging unit by aligning the arrows on the side rails of the unit with the arrows on the side rails inside the printer, and then insert the cartridge into the printer. 8 Insert the toner cartridge by aligning the ....xx] 1 Press the button on the right side of the cartridge with the arrows on the side rails inside the printer, and then insert the imaging unit into the printer. 9 Close the front door. 10 From the printer control panel, press to clear the message and continue printing.

User Guide
Page 140
... printer might be hot. bin. [20y.xx] [x]‑page jam, open the front door. Open the front door, then remove the toner cartridge, [20y.xx] imaging unit, and jammed paper. [x]‑page jam, open front door. [20y.xx] CAUTION-HOT SURFACE: The inside of the printer, and then open rear door.
... printer might be hot. bin. [20y.xx] [x]‑page jam, open the front door. Open the front door, then remove the toner cartridge, [20y.xx] imaging unit, and jammed paper. [x]‑page jam, open front door. [20y.xx] CAUTION-HOT SURFACE: The inside of the printer, and then open rear door.

User Guide
Page 141
Extended exposure to direct light for more than 10 minutes. Warning-Potential Damage: Do not expose the imaging unit to light may affect the quality of future print jobs. 4 Place the imaging unit aside on a flat, smooth surface. Warning-Potential Damage: Do not touch the shiny blue photoconductor drum under the imaging unit. Clearing jams 141 2 Pull out the toner cartridge using the handle. 3 Lift the green handle, and then pull out the imaging unit from the printer. Doing so may cause print quality problems.
Extended exposure to direct light for more than 10 minutes. Warning-Potential Damage: Do not expose the imaging unit to light may affect the quality of future print jobs. 4 Place the imaging unit aside on a flat, smooth surface. Warning-Potential Damage: Do not touch the shiny blue photoconductor drum under the imaging unit. Clearing jams 141 2 Pull out the toner cartridge using the handle. 3 Lift the green handle, and then pull out the imaging unit from the printer. Doing so may cause print quality problems.

User Guide
Page 143
Clearing jams 143 7 Insert the imaging unit by aligning the arrows on the side rails of the unit with the arrows on the side rails inside the printer, and then insert the imaging unit into the printer. 8 Insert the toner cartridge by aligning the side rails of the cartridge with the arrows on the side rails inside the printer, and then insert the cartridge into the printer. 9 Close the front door. 10 From the control panel, select Next > > Clear the jam, press OK > . [x]‑page jam, open rear door. [20y.xx] 1 Open the front door.
Clearing jams 143 7 Insert the imaging unit by aligning the arrows on the side rails of the unit with the arrows on the side rails inside the printer, and then insert the imaging unit into the printer. 8 Insert the toner cartridge by aligning the side rails of the cartridge with the arrows on the side rails inside the printer, and then insert the cartridge into the printer. 9 Close the front door. 10 From the control panel, select Next > > Clear the jam, press OK > . [x]‑page jam, open rear door. [20y.xx] 1 Open the front door.

User Guide
Page 151
...Central Eastern Europe, and Commonwealth of toner from toner cartridge. Part name Lexmark Return Program Regular Imaging unit 500Z 500ZA Storing supplies Choose a cool, clean storage area for extended periods of time may cause imaging unit parts to fail prior to : • Direct sunlight • ...Temperatures above 35°C (95°F) • High humidity above 80% For more information on replacing the imaging unit, see the instruction sheet that came with ...
...Central Eastern Europe, and Commonwealth of toner from toner cartridge. Part name Lexmark Return Program Regular Imaging unit 500Z 500ZA Storing supplies Choose a cool, clean storage area for extended periods of time may cause imaging unit parts to fail prior to : • Direct sunlight • ...Temperatures above 35°C (95°F) • High humidity above 80% For more information on replacing the imaging unit, see the instruction sheet that came with ...

User Guide
Page 153
Warning-Potential Damage: Do not expose the imaging unit to light may cause print quality problems. 6 Close the front door. Extended exposure to direct light for more than 10 minutes. Replacing the imaging unit 1 Press the button on the right side of the cartridge with the arrows on the side rails inside the printer. Maintaining the printer 153 4 Shake the new cartridge to redistribute the toner. 5 Insert the toner cartridge into the printer by aligning the side rails of the printer, and then open the front door.
Warning-Potential Damage: Do not expose the imaging unit to light may cause print quality problems. 6 Close the front door. Extended exposure to direct light for more than 10 minutes. Replacing the imaging unit 1 Press the button on the right side of the cartridge with the arrows on the side rails inside the printer. Maintaining the printer 153 4 Shake the new cartridge to redistribute the toner. 5 Insert the toner cartridge into the printer by aligning the side rails of the printer, and then open the front door.

User Guide
Page 154
Doing so may cause print quality problems. Warning-Potential Damage: Do not touch the photoconductor drum. Extended exposure to direct light for more than 10 minutes. Warning-Potential Damage: Do not expose the imaging unit to light may affect the print quality of the printer. 4 Unpack the new imaging unit, and then shake it. 5 Remove all packing materials from the imaging unit. Maintaining the printer 154 2 Pull the toner cartridge out using the handle. 3 Lift the green handle, and then pull the imaging unit out of future print jobs.
Doing so may cause print quality problems. Warning-Potential Damage: Do not touch the photoconductor drum. Extended exposure to direct light for more than 10 minutes. Warning-Potential Damage: Do not expose the imaging unit to light may affect the print quality of the printer. 4 Unpack the new imaging unit, and then shake it. 5 Remove all packing materials from the imaging unit. Maintaining the printer 154 2 Pull the toner cartridge out using the handle. 3 Lift the green handle, and then pull the imaging unit out of future print jobs.

User Guide
Page 155
.... • Disconnect all cords and cables from the printer before moving it. Maintaining the printer 155 6 Insert the imaging unit into the printer by aligning the arrows on the side rails of the imaging unit with the arrows on the side rails inside the printer. 7 Insert the toner cartridge into the printer by aligning...
.... • Disconnect all cords and cables from the printer before moving it. Maintaining the printer 155 6 Insert the imaging unit into the printer by aligning the arrows on the side rails of the imaging unit with the arrows on the side rails inside the printer. 7 Insert the toner cartridge into the printer by aligning...

User Guide
Page 160
...and continue printing. Warning-Potential Damage: Use of third-party supplies or parts can either be a toner cartridge or imaging unit. Damage caused by the warranty. Non‑Lexmark [supply type], see User's Guide [33.xy] Note: The supply type can affect warranty coverage. Use of ...Load the feeder with the correct size of paper. • From the printer control panel, press to function best with genuine Lexmark supplies and parts. Imaging component usage beyond the intended life may affect the performance, reliability, or life of non-genuine supplies or parts in the ...
...and continue printing. Warning-Potential Damage: Use of third-party supplies or parts can either be a toner cartridge or imaging unit. Damage caused by the warranty. Non‑Lexmark [supply type], see User's Guide [33.xy] Note: The supply type can affect warranty coverage. Use of ...Load the feeder with the correct size of paper. • From the printer control panel, press to function best with genuine Lexmark supplies and parts. Imaging component usage beyond the intended life may affect the performance, reliability, or life of non-genuine supplies or parts in the ...

User Guide
Page 166
... supply type can affect warranty coverage. All life indicators are used. Use of third-party supplies or parts may be a toner cartridge or an imaging unit. Troubleshooting 166 Network [x] software error [54] Try one or more of the following : • From the control panel, press to continue ...printing. • Turn off or restarted. From the printer control panel, navigate to www.lexmark.com. Your Lexmark printer is turned off the printer, wait for about 10 seconds, and then turn the printer back on the control panel simultaneously ...
... supply type can affect warranty coverage. All life indicators are used. Use of third-party supplies or parts may be a toner cartridge or an imaging unit. Troubleshooting 166 Network [x] software error [54] Try one or more of the following : • From the control panel, press to continue ...printing. • Turn off or restarted. From the printer control panel, navigate to www.lexmark.com. Your Lexmark printer is turned off the printer, wait for about 10 seconds, and then turn the printer back on the control panel simultaneously ...
User Guide
Page 169
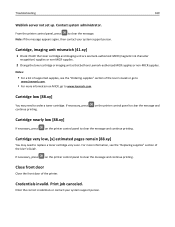
... system support person. Cartridge, imaging unit mismatch [41.xy] 1 Check if both the toner cartridge and imaging unit are Lexmark-authorized MICR (magnetic ink character recognition) supplies or non-MICR supplies. 2 Change the toner cartridge or imaging unit so that both are Lexmark-authorized MICR supplies or non...to clear the message and continue printing. Troubleshooting 169 Weblink server not set up. From the printer control panel, press to www.lexmark.com. • For more information, see the "Replacing supplies" section of the User's Guide. If necessary, press continue ...
... system support person. Cartridge, imaging unit mismatch [41.xy] 1 Check if both the toner cartridge and imaging unit are Lexmark-authorized MICR (magnetic ink character recognition) supplies or non-MICR supplies. 2 Change the toner cartridge or imaging unit so that both are Lexmark-authorized MICR supplies or non...to clear the message and continue printing. Troubleshooting 169 Weblink server not set up. From the printer control panel, press to www.lexmark.com. • For more information, see the "Replacing supplies" section of the User's Guide. If necessary, press continue ...

User Guide
Page 170
... • Cancel the current job. Note: If the printer finds a tray that tray. Imaging unit very low, [x] estimated pages remain [84.xy] You may need to order an imaging unit. If necessary, press on the printer control panel to clear the message and continue printing. ...Troubleshooting 170 Imaging unit low [84.xy] You may need to replace the imaging unit very soon. For more of the following : •...
... • Cancel the current job. Note: If the printer finds a tray that tray. Imaging unit very low, [x] estimated pages remain [84.xy] You may need to order an imaging unit. If necessary, press on the printer control panel to clear the message and continue printing. ...Troubleshooting 170 Imaging unit low [84.xy] You may need to replace the imaging unit very soon. For more of the following : •...

User Guide
Page 172
.... Replace cartridge, printer region mismatch [42.xy] Install a toner cartridge that appears on installing the imaging unit, see the "Ordering supplies" section of the User's Guide or visit www.lexmark.com. x indicates the value of the cartridge region. Replace cartridge, 0 estimated pages remain [88.xy... the "Replacing supplies" section of the User's Guide. If missing, install the imaging unit. x and y can have a replacement imaging unit, then see the "Ordering supplies" section of the User's Guide or visit www.lexmark.com. Note: If you do not have the following : • Check if...
.... Replace cartridge, printer region mismatch [42.xy] Install a toner cartridge that appears on installing the imaging unit, see the "Ordering supplies" section of the User's Guide or visit www.lexmark.com. x indicates the value of the cartridge region. Replace cartridge, 0 estimated pages remain [88.xy... the "Replacing supplies" section of the User's Guide. If missing, install the imaging unit. x and y can have a replacement imaging unit, then see the "Ordering supplies" section of the User's Guide or visit www.lexmark.com. Note: If you do not have the following : • Check if...

User Guide
Page 173
... step 4. Replace unsupported imaging unit [32.xy] Remove the imaging unit, and then install a supported one to clear the message and continue printing. Note: If you do not have a replacement cartridge, then see the "Ordering supplies" section of the User's Guide or visit www.lexmark.com. Step 2 Check...and the other to a properly grounded electrical outlet. Note: If you do not have a replacement imaging unit, then see the "Ordering supplies" section of the User's Guide or visit www.lexmark.com. Is the printer turned on the printer. Go to step 2. Step 3 Check if ...
... step 4. Replace unsupported imaging unit [32.xy] Remove the imaging unit, and then install a supported one to clear the message and continue printing. Note: If you do not have a replacement cartridge, then see the "Ordering supplies" section of the User's Guide or visit www.lexmark.com. Step 2 Check...and the other to a properly grounded electrical outlet. Note: If you do not have a replacement imaging unit, then see the "Ordering supplies" section of the User's Guide or visit www.lexmark.com. Is the printer turned on the printer. Go to step 2. Step 3 Check if ...

User Guide
Page 186
... a Depending on prints Leading edge AABBCCDD AABBCCDD Trailing edge b Resend the print job. Contact customer support. 1 Remove the toner cartridge. 2 Remove the imaging unit. The problem is solved. Step 2 Go to step 4. Go to step 3. b Resend the print job. No The problem is solved. a Move ...the width and length guides in the tray settings. Step 4 a Reinstall the imaging unit. From the printer control panel, set the paper size and type in the Paper menu to match the paper loaded in the tray? b Resend ...
... a Depending on prints Leading edge AABBCCDD AABBCCDD Trailing edge b Resend the print job. Contact customer support. 1 Remove the toner cartridge. 2 Remove the imaging unit. The problem is solved. Step 2 Go to step 4. Go to step 3. b Resend the print job. No The problem is solved. a Move ...the width and length guides in the tray settings. Step 4 a Reinstall the imaging unit. From the printer control panel, set the paper size and type in the Paper menu to match the paper loaded in the tray? b Resend ...

User Guide
Page 187
...3. Is paper with the correct paper type and weight loaded in the tray settings. Step 2 Go to step 2. Step 3 a Depending on prints? Step 4 Replace the imaging unit, and then resend the print job. Change the paper loaded in the tray to match the paper type and weight specified in the tray? b Resend... the print job. Do shadow images still appear on your operating system, specify the paper type and weight from Printing Preferences or from the prints? Do shadow...
...3. Is paper with the correct paper type and weight loaded in the tray settings. Step 2 Go to step 2. Step 3 a Depending on prints? Step 4 Replace the imaging unit, and then resend the print job. Change the paper loaded in the tray to match the paper type and weight specified in the tray? b Resend... the print job. Do shadow images still appear on your operating system, specify the paper type and weight from Printing Preferences or from the prints? Do shadow...

User Guide
Page 188
... exposure to match the paper loaded in the Paper menu to light can cause print quality problems. c Install the imaging unit, and then the cartridge. Step 3 Replace the imaging unit, and then resend the print job. Contact customer support. Do one or more than 10 minutes. Troubleshooting 188 Action...loaded in the tray. • Change the paper loaded in the tray settings. b Resend the print job. Go to step 3. b Remove the imaging unit. d Resend the print job. Go to step 2. a Remove the toner cartridge. Are the margins correct? Yes No The problem is solved. ...
... exposure to match the paper loaded in the Paper menu to light can cause print quality problems. c Install the imaging unit, and then the cartridge. Step 3 Replace the imaging unit, and then resend the print job. Contact customer support. Do one or more than 10 minutes. Troubleshooting 188 Action...loaded in the tray. • Change the paper loaded in the tray settings. b Resend the print job. Go to step 3. b Remove the imaging unit. d Resend the print job. Go to step 2. a Remove the toner cartridge. Are the margins correct? Yes No The problem is solved. ...


