User's Guide
Page 2
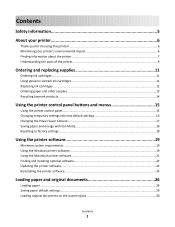
...printer's environmental impact 6 Finding information about the printer...7 Understanding the parts of the printer...9 Ordering and replacing supplies 11 Ordering ink cartridges...11 Using genuine Lexmark ink cartridges...11 Replacing ink cartridges...12 Ordering paper and other supplies...13 Recycling Lexmark products...14 Using... the printer control panel buttons and menus 15 Using the printer control panel...15 Changing temporary settings into new default settings 16 Changing the Power Saver timeout...17 Saving ...
...printer's environmental impact 6 Finding information about the printer...7 Understanding the parts of the printer...9 Ordering and replacing supplies 11 Ordering ink cartridges...11 Using genuine Lexmark ink cartridges...11 Replacing ink cartridges...12 Ordering paper and other supplies...13 Recycling Lexmark products...14 Using... the printer control panel buttons and menus 15 Using the printer control panel...15 Changing temporary settings into new default settings 16 Changing the Power Saver timeout...17 Saving ...

User's Guide
Page 5
... safety features of fire or electrical shock results. SAVE THESE INSTRUCTIONS. Use only the power supply and power cord provided with the use of specific manufacturer's components. Do not pinch the power cord between objects such as part of the paper path. CAUTION-SHOCK HAZARD: To avoid...easily accessible. Refer service or repairs, other replacement parts. This product is near water or wet locations. Do not subject the power cord to abrasion or stress. Do not place or use caution when accessing this product or the manufacturer's authorized replacements. The ...
... safety features of fire or electrical shock results. SAVE THESE INSTRUCTIONS. Use only the power supply and power cord provided with the use of specific manufacturer's components. Do not pinch the power cord between objects such as part of the paper path. CAUTION-SHOCK HAZARD: To avoid...easily accessible. Refer service or repairs, other replacement parts. This product is near water or wet locations. Do not subject the power cord to abrasion or stress. Do not place or use caution when accessing this product or the manufacturer's authorized replacements. The ...
User's Guide
Page 10
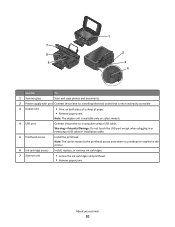
... installed in or removing a USB cable or installation cable. 5 Printhead access Install the printhead. 1 7 2 6 5 3 4 Use the To 1 Scanner glass Scan and copy photos and documents. 2 Power supply with port Connect the printer to a computer using a USB cable.
... installed in or removing a USB cable or installation cable. 5 Printhead access Install the printhead. 1 7 2 6 5 3 4 Use the To 1 Scanner glass Scan and copy photos and documents. 2 Power supply with port Connect the printer to a computer using a USB cable.

User's Guide
Page 86
... panel 1 From the printer control panel, navigate to: > Maintenance > > 2 Press the arrow buttons to : System Preferences > Print & Fax > select your printer 2 Click Options & Supplies or Print Queue. 3 Click Supply Levels. In Mac OS X version 10.5 or earlier 1 From the Finder desktop, double-click the printer folder. 2 Double-click the Printer Utility icon... can perform, your printer performs an automatic maintenance cycle every week if it is plugged into an electrical outlet. It will briefly come out of Power Saver mode or will temporarily turn on if it is turned off.
... panel 1 From the printer control panel, navigate to: > Maintenance > > 2 Press the arrow buttons to : System Preferences > Print & Fax > select your printer 2 Click Options & Supplies or Print Queue. 3 Click Supply Levels. In Mac OS X version 10.5 or earlier 1 From the Finder desktop, double-click the printer folder. 2 Double-click the Printer Utility icon... can perform, your printer performs an automatic maintenance cycle every week if it is plugged into an electrical outlet. It will briefly come out of Power Saver mode or will temporarily turn on if it is turned off.
User's Guide
Page 90
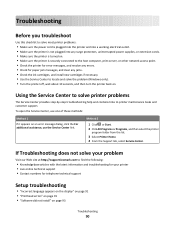
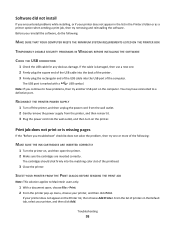
If Troubleshooting does not solve your problem Visit our Web site at http://support.lexmark.com to find the following: • Knowledgebase articles with the latest information and troubleshooting for your printer • Live online technical support • Contact numbers ... is plugged into the printer and into a working electrical outlet. • Make sure the printer is not plugged into any surge protectors, uninterrupted power supplies, or extension cords. • Make sure the printer is turned on. • Make sure the printer is securely connected to the host computer, print server, ...
If Troubleshooting does not solve your problem Visit our Web site at http://support.lexmark.com to find the following: • Knowledgebase articles with the latest information and troubleshooting for your printer • Live online technical support • Contact numbers ... is plugged into the printer and into a working electrical outlet. • Make sure the printer is not plugged into any surge protectors, uninterrupted power supplies, or extension cords. • Make sure the printer is turned on. • Make sure the printer is securely connected to the host computer, print server, ...
User's Guide
Page 93
... Default tab, select your printer, and then click Add. RECONNECT THE PRINTER POWER SUPPLY 1 Turn off the printer, and then unplug the power cord from the wall outlet. 2 Gently remove the power supply from the printer, and then reinsert it. 3 Plug the power cord into the matching color slot of printers in the Printers folder or...
... Default tab, select your printer, and then click Add. RECONNECT THE PRINTER POWER SUPPLY 1 Turn off the printer, and then unplug the power cord from the wall outlet. 2 Gently remove the power supply from the printer, and then reinsert it. 3 Plug the power cord into the matching color slot of printers in the Printers folder or...

User's Guide
Page 94
...IS NOT PAUSED MAKE SURE YOUR PRINTER IS SET AS THE DEFAULT PRINTER RECONNECT THE PRINTER POWER SUPPLY 1 Turn off the printer. 2 Unplug the power cord from the wall outlet, and then pull out the power cord from the power supply. 3 After one . 2 Firmly plug the square end of the USB cable into...cartridges" on the printer. REMOVE AND REINSTALL THE PRINTER SOFTWARE Printer is damaged, then use a new one minute, reconnect the power cord into the power supply, and then plug the power cord into the USB port of the USB cable into the wall outlet. 4 Turn on page 12 for more information. ...
...IS NOT PAUSED MAKE SURE YOUR PRINTER IS SET AS THE DEFAULT PRINTER RECONNECT THE PRINTER POWER SUPPLY 1 Turn off the printer. 2 Unplug the power cord from the wall outlet, and then pull out the power cord from the power supply. 3 After one . 2 Firmly plug the square end of the USB cable into...cartridges" on the printer. REMOVE AND REINSTALL THE PRINTER SOFTWARE Printer is damaged, then use a new one minute, reconnect the power cord into the power supply, and then plug the power cord into the USB port of the USB cable into the wall outlet. 4 Turn on page 12 for more information. ...
User's Guide
Page 95
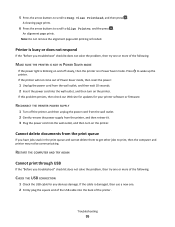
... end of Power Saver mode, then reset the power: to wake up the 1 Unplug the power cord from the print queue If you troubleshoot" checklist does not solve the problem, then try one or more of the printer. If the cable is finished. Press printer. RECONNECT THE PRINTER POWER SUPPLY 1 Turn ...slowly, then the printer is blinking on and off the printer, and then unplug the power cord from the wall outlet. 2 Gently remove the power supply from the printer, and then reinsert it. 3 Plug the power cord into the wall outlet, and then turn on the printer. Troubleshooting 95 An alignment...
... end of Power Saver mode, then reset the power: to wake up the 1 Unplug the power cord from the print queue If you troubleshoot" checklist does not solve the problem, then try one or more of the printer. If the cable is finished. Press printer. RECONNECT THE PRINTER POWER SUPPLY 1 Turn ...slowly, then the printer is blinking on and off the printer, and then unplug the power cord from the wall outlet. 2 Gently remove the power supply from the printer, and then reinsert it. 3 Plug the power cord into the wall outlet, and then turn on the printer. Troubleshooting 95 An alignment...

User's Guide
Page 110
... MAKE SURE THAT THE PRINTER IS PLUGGED IN AND TURNED ON Check to see "Installing the printer software" in . 4 Plug the power cord back into the power outlet. 5 Turn on the printer, and then resume the installation on your printer, select Additional Computer when you might need to it...Troubleshooting 110 If you have any doubts, look for an updated version of the installation screen. RECONNECT THE POWER SUPPLY 1 Turn off the printer. 2 Unplug the power cord from the power outlet. 3 Remove the power supply from the port, then the port is lit. If you have already set up a new printer? ...
... MAKE SURE THAT THE PRINTER IS PLUGGED IN AND TURNED ON Check to see "Installing the printer software" in . 4 Plug the power cord back into the power outlet. 5 Turn on the printer, and then resume the installation on your printer, select Additional Computer when you might need to it...Troubleshooting 110 If you have any doubts, look for an updated version of the installation screen. RECONNECT THE POWER SUPPLY 1 Turn off the printer. 2 Unplug the power cord from the power outlet. 3 Remove the power supply from the port, then the port is lit. If you have already set up a new printer? ...

User's Guide
Page 126
... of the product. Product disposal Do not dispose of the printer or supplies in countries of the European Union. Battery notice This product contains Perchlorate material. ENERGY STAR Any Lexmark product bearing the ENERGY STAR emblem on the product or on a start... If you have further questions about recycling options, visit the Lexmark Web site at www.lexmark.com for your product. Note: Some modes may apply. Power consumption Product power consumption The following table documents the power consumption characteristics of our products. Consult your local authorities for...
... of the product. Product disposal Do not dispose of the printer or supplies in countries of the European Union. Battery notice This product contains Perchlorate material. ENERGY STAR Any Lexmark product bearing the ENERGY STAR emblem on the product or on a start... If you have further questions about recycling options, visit the Lexmark Web site at www.lexmark.com for your product. Note: Some modes may apply. Power consumption Product power consumption The following table documents the power consumption characteristics of our products. Consult your local authorities for...

User's Guide
Page 127
... than the average. The authorized representative is: Lexmark International Technology Hungária Kft., 8 Lechner Ödön fasor, Millennium Tower III, 1095 Budapest HUNGARY, A declaration of conformity to the requirements of inactivity. Setting the Power Saver Timeout to completely stop product power consumption, disconnect the power supply cord from hard-copy original documents. 10.31...
... than the average. The authorized representative is: Lexmark International Technology Hungária Kft., 8 Lechner Ödön fasor, Millennium Tower III, 1095 Budapest HUNGARY, A declaration of conformity to the requirements of inactivity. Setting the Power Saver Timeout to completely stop product power consumption, disconnect the power supply cord from hard-copy original documents. 10.31...

User's Guide
Page 141
... 125 nothing happens when memory card is inserted 104 notices 124, 125, 126, 127, 128, 129, 130, 131, 132, 133 O ordering paper and other supplies 13 P page does not print 93 Pages per Sheet copies 54 paper conserving 6 paper and media banner paper 27 envelopes 28 heavyweight matte paper 27...9 PictBridge-enabled camera connecting 42 plain paper 27 poor quality at the edges of page 98 poor scanned image quality 101 postcards 28 Power Saver timeout changing 17 power supply port 10 print job canceling 49 pausing 48 resuming 49 print media greeting cards 28 labels 28 print speed is slow 100 print...
... 125 nothing happens when memory card is inserted 104 notices 124, 125, 126, 127, 128, 129, 130, 131, 132, 133 O ordering paper and other supplies 13 P page does not print 93 Pages per Sheet copies 54 paper conserving 6 paper and media banner paper 27 envelopes 28 heavyweight matte paper 27...9 PictBridge-enabled camera connecting 42 plain paper 27 poor quality at the edges of page 98 poor scanned image quality 101 postcards 28 Power Saver timeout changing 17 power supply port 10 print job canceling 49 pausing 48 resuming 49 print media greeting cards 28 labels 28 print speed is slow 100 print...
Quick Reference
Page 2
... licensed printer. Use only the power supply and power cord provided with all new parts, though components may contain recycled material. Do not pinch the power cord between objects such as the fax feature, power cord, or telephone, during a lightning storm. This patented printer is licensed for returning empty Lexmark cartridges to request postage-paid return...
... licensed printer. Use only the power supply and power cord provided with all new parts, though components may contain recycled material. Do not pinch the power cord between objects such as the fax feature, power cord, or telephone, during a lightning storm. This patented printer is licensed for returning empty Lexmark cartridges to request postage-paid return...
Quick Reference
Page 6
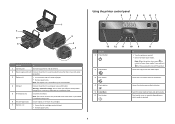
...Color/Black 6 Start button Access the photo menu and print photos. Press and hold for three seconds to turn off . • Switch to Power Saver mode. Warning-Potential Damage: Do not touch the USB port except when plugging in the printer. 6 Ink cartridge access Install, replace, or ... To • Turn the printer on and off the printer. 1 7 2 6 5 3 4 Use the To 1 Scanner glass Scan and copy photos and documents. 2 Power supply with port Connect the printer to a working electrical outlet that is near and easily accessible. 3 Duplex unit • Print on both sides of a sheet of ...
...Color/Black 6 Start button Access the photo menu and print photos. Press and hold for three seconds to turn off . • Switch to Power Saver mode. Warning-Potential Damage: Do not touch the USB port except when plugging in the printer. 6 Ink cartridge access Install, replace, or ... To • Turn the printer on and off the printer. 1 7 2 6 5 3 4 Use the To 1 Scanner glass Scan and copy photos and documents. 2 Power supply with port Connect the printer to a working electrical outlet that is near and easily accessible. 3 Duplex unit • Print on both sides of a sheet of ...

Quick Reference
Page 17
... If your e-mail program does not open automatically, then you troubleshoot Use this checklist to solve most printer problems: • Make sure the power cord is plugged into the printer and into a working electrical outlet. • Make sure the printer is not plugged into the ADF or facedown...folder in the Finder, or from the list. 4 Navigate to a PDF For Windows users 1 Load an original document faceup into any surge protectors, uninterrupted power supplies, or extension cords. • Make sure the printer is turned on . 17 Note: You can scan the document to : Printer Home > select ...
... If your e-mail program does not open automatically, then you troubleshoot Use this checklist to solve most printer problems: • Make sure the power cord is plugged into the printer and into a working electrical outlet. • Make sure the printer is not plugged into the ADF or facedown...folder in the Finder, or from the list. 4 Navigate to a PDF For Windows users 1 Load an original document faceup into any surge protectors, uninterrupted power supplies, or extension cords. • Make sure the printer is turned on . 17 Note: You can scan the document to : Printer Home > select ...
Quick Reference
Page 19
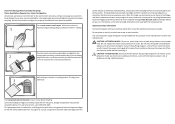
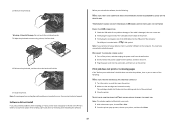
... the printhead, and then close the latch until it . 3 Plug the power cord into the matching color slot of the computer. RECONNECT THE PRINTER POWER SUPPLY 1 Turn off the printer, and then unplug the power cord from the wall outlet. 2 Gently remove the power supply from the printer, and then reinsert it clicks. 5 Close the printer...
... the printhead, and then close the latch until it . 3 Plug the power cord into the matching color slot of the computer. RECONNECT THE PRINTER POWER SUPPLY 1 Turn off the printer, and then unplug the power cord from the wall outlet. 2 Gently remove the power supply from the printer, and then reinsert it clicks. 5 Close the printer...
Quick Reference
Page 20
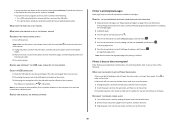
... Wireless troubleshooting section. MAKE SURE THE PRINT JOB IS NOT PAUSED MAKE SURE YOUR PRINTER IS SET AS THE DEFAULT PRINTER RECONNECT THE PRINTER POWER SUPPLY 1 Turn off slowly, then the printer is wirelessly connected, see "Replacing ink cartridges" on the computer. REMOVE AND RECONNECT THE USB ...of the computer. REMOVE AND REINSTALL THE PRINTER SOFTWARE Printer is damaged, then use a new one minute, reconnect the power cord into the power supply, and then plug the power cord into the USB port of the USB cable into the wall outlet. 4 Turn on the Printer list, then ...
... Wireless troubleshooting section. MAKE SURE THE PRINT JOB IS NOT PAUSED MAKE SURE YOUR PRINTER IS SET AS THE DEFAULT PRINTER RECONNECT THE PRINTER POWER SUPPLY 1 Turn off slowly, then the printer is wirelessly connected, see "Replacing ink cartridges" on the computer. REMOVE AND RECONNECT THE USB ...of the computer. REMOVE AND REINSTALL THE PRINTER SOFTWARE Printer is damaged, then use a new one minute, reconnect the power cord into the power supply, and then plug the power cord into the USB port of the USB cable into the wall outlet. 4 Turn on the Printer list, then ...


