

Quick Reference
Page 6
.... c From the Form Source list box, select the source containing the paper you before the photoconductor kit reaches a page maximum by showing 84 PC Kit life warning or 84 Replace PC Kit on the display. e From the Form Size list box, select the paper size. While the printer...a job appears, and then press . Submitting Changes appears, followed by printing a menu settings page. The Stopped screen appears. When 84 PC Kit life warning or 84 Replace PC Kit first appears, you want to match the loaded paper. 3 Click OK. b Click Properties, Preferences, Options, or Setup. b Customize the...
.... c From the Form Source list box, select the source containing the paper you before the photoconductor kit reaches a page maximum by showing 84 PC Kit life warning or 84 Replace PC Kit on the display. e From the Form Size list box, select the paper size. While the printer...a job appears, and then press . Submitting Changes appears, followed by printing a menu settings page. The Stopped screen appears. When 84 PC Kit life warning or 84 Replace PC Kit first appears, you want to match the loaded paper. 3 Click OK. b Click Properties, Preferences, Options, or Setup. b Customize the...
Service Manual
Page 35
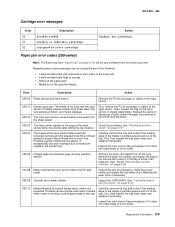
...the flag is too loose. 200.06 Imaged page not expected page (bouncy passthru sensor) Remove the toner cartridge/PC kit. If so, then inspect the tray wear strips and replace if necessary. Finally, check the paper size settings in the paper path. • Media not of these errors ...-420, -430 Cartridge error messages Error 30 31 32 Description Invalid refill Missing or defective cartridge Unsupported print cartridge Action Replace the cartridge. First, remove the PC kit and paper or debric at the input sensor. 200.01 200.02 Classic input jam. Inspect the input sensor flag and...
...the flag is too loose. 200.06 Imaged page not expected page (bouncy passthru sensor) Remove the toner cartridge/PC kit. If so, then inspect the tray wear strips and replace if necessary. Finally, check the paper size settings in the paper path. • Media not of these errors ...-420, -430 Cartridge error messages Error 30 31 32 Description Invalid refill Missing or defective cartridge Unsupported print cartridge Action Replace the cartridge. First, remove the PC kit and paper or debric at the input sensor. 200.01 200.02 Classic input jam. Inspect the input sensor flag and...
Service Manual
Page 36
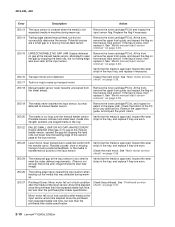
...guide, and inspect the flag on page 2-37. Inspect the wear strips in the tray, and replace if they are a small gap or a bouncy manual feed sensor. Remove the toner cartridge/PC kit. At the front, remove the upper front guide, and inspect the flag on page 2-26....than the printhead jitter-stable specification. 2-10 Lexmark™ E360d, E360dn Possible causes: slow or missing transport motor positional feedback, or the media is approved. Verify that the media is transferred too quickly to ramp up ) Remove the toner cartridge/PC kit and inspect the input sensor flag. Check ...
...guide, and inspect the flag on page 2-37. Inspect the wear strips in the tray, and replace if they are a small gap or a bouncy manual feed sensor. Remove the toner cartridge/PC kit. At the front, remove the upper front guide, and inspect the flag on page 2-26....than the printhead jitter-stable specification. 2-10 Lexmark™ E360d, E360dn Possible causes: slow or missing transport motor positional feedback, or the media is approved. Verify that the media is transferred too quickly to ramp up ) Remove the toner cartridge/PC kit and inspect the input sensor flag. Check ...
Service Manual
Page 37
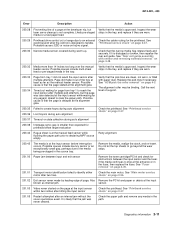
...media is approved. if the media continues to an external Check the cable routing for obstructions between input and exit sensor Remove the toner cartridge/PC kit and check for the printhead. Check the main motor. See "Printhead service check" on page 2-37. 201.05 Restart attempted after hitting the... stalled at the alignment gate. Page did not reach the input sensor after two tries. Inspect the wear strips in the fuser, then replace the fuser. It is likely that the media is smaller than 14 inches too long over the manual feeder sensor. Possible causes include bouncy...
...media is approved. if the media continues to an external Check the cable routing for obstructions between input and exit sensor Remove the toner cartridge/PC kit and check for the printhead. Check the main motor. See "Printhead service check" on page 2-37. 201.05 Restart attempted after hitting the... stalled at the alignment gate. Page did not reach the input sensor after two tries. Inspect the wear strips in the fuser, then replace the fuser. It is likely that the media is smaller than 14 inches too long over the manual feeder sensor. Possible causes include bouncy...

Service Manual
Page 38
Page at fuser earlier than intended Remove the toner cartridge/PC kit and check for damage at the exit sensor. 202.02 Exit ...input sensor and the fuser. Note: Print a page with sensor and reversing solenoid removal" on page 4-48. 2-12 Lexmark™ E360d, E360dn See "Fuser removal" on the trailing edge of the sheet at the fuser, rear door, exit guide, and... 202.06 Exit sensor bounced 202.13 Exit sensor covered, media not expected (media not in the fuser, then replace the fuser. The flag is located behind the fuser exit rollers, about mid printer. See "Fuser removal" on page...
Page at fuser earlier than intended Remove the toner cartridge/PC kit and check for damage at the exit sensor. 202.02 Exit ...input sensor and the fuser. Note: Print a page with sensor and reversing solenoid removal" on page 4-48. 2-12 Lexmark™ E360d, E360dn See "Fuser removal" on the trailing edge of the sheet at the fuser, rear door, exit guide, and... 202.06 Exit sensor bounced 202.13 Exit sensor covered, media not expected (media not in the fuser, then replace the fuser. The flag is located behind the fuser exit rollers, about mid printer. See "Fuser removal" on page...
Service Manual
Page 56
... not being properly charged. Try a different toner cartridge and PC kit. • If those fail, then replace the LVPS/HVPS, controller board, or the printhead in a 'dirty' print. c. e. Try a different PC kit. • With the cartridge out, check the spring loaded contacts on page 2-34. 2-30 Lexmark™ E360d, E360dn Also, see "Solving print quality problems" on...
... not being properly charged. Try a different toner cartridge and PC kit. • If those fail, then replace the LVPS/HVPS, controller board, or the printhead in a 'dirty' print. c. e. Try a different PC kit. • With the cartridge out, check the spring loaded contacts on page 2-34. 2-30 Lexmark™ E360d, E360dn Also, see "Solving print quality problems" on...
Service Manual
Page 57
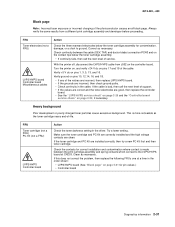
...next level of -life. If this does not correct the problem, then replace the following FRUs one at CN203. Always verify the same results from J502 on page 2-22, if necessary. FRU Toner cartridge (not a FRU) PC Kit (not a FRU) LVPS/HVPS Controller board Action Check the toner darkness ... Try a lower setting. If the toner cartridge and PC Kit are clean. 4513-420, -430 Black page Note: Incorrect laser exposure or incorrect charging of the values are incorrect, then replace LVPS/HVPS board. • If the grounds are good, then replace the controller board. • See the "LVPS/HVPS...
...next level of -life. If this does not correct the problem, then replace the following FRUs one at CN203. Always verify the same results from J502 on page 2-22, if necessary. FRU Toner cartridge (not a FRU) PC Kit (not a FRU) LVPS/HVPS Controller board Action Check the toner darkness ... Try a lower setting. If the toner cartridge and PC Kit are clean. 4513-420, -430 Black page Note: Incorrect laser exposure or incorrect charging of the values are incorrect, then replace LVPS/HVPS board. • If the grounds are good, then replace the controller board. • See the "LVPS/HVPS...

Service Manual
Page 58
...low, then try a new one. A heavier media may require higher heat to prevent damage from finger oils or hand lotion. Try a new PC Kit. Replace the transfer roll assembly if the springs or bearings show signs of image FRU Fuser Media (not a FRU) Action The fuser may have an...toner. Make sure recommended media is being used . Variation in the printer driver. 2-32 Lexmark™ E360d, E360dn Poor fusing of damage, or fatigue. Check the media settings in image density horizontally across page FRU PC Kit (not a FRU) Transfer roll Action The charge roll may not be operating at its...
...low, then try a new one. A heavier media may require higher heat to prevent damage from finger oils or hand lotion. Try a new PC Kit. Replace the transfer roll assembly if the springs or bearings show signs of image FRU Fuser Media (not a FRU) Action The fuser may have an...toner. Make sure recommended media is being used . Variation in the printer driver. 2-32 Lexmark™ E360d, E360dn Poor fusing of damage, or fatigue. Check the media settings in image density horizontally across page FRU PC Kit (not a FRU) Transfer roll Action The charge roll may not be operating at its...
Service Manual
Page 59
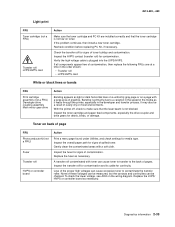
Recheck condition before replacing PC Kit, if necessary. If all components appear free of contamination, then replace the following FRUs one at a time in the order shown: • Transfer roll • LVPS/HVPS card White or black lines or bands FRU Print ... paper feed components, especially the drive coupler and drive gears for continuity. Replace the fuser as necessary. 4513-420, -430 Light print FRU Toner cartridge (not a FRU) Transfer roll LVPS/HVPS card Action Make sure the toner cartridge and PC Kit are installed correctly and that the laser beam is not blocked. With...
Recheck condition before replacing PC Kit, if necessary. If all components appear free of contamination, then replace the following FRUs one at a time in the order shown: • Transfer roll • LVPS/HVPS card White or black lines or bands FRU Print ... paper feed components, especially the drive coupler and drive gears for continuity. Replace the fuser as necessary. 4513-420, -430 Light print FRU Toner cartridge (not a FRU) Transfer roll LVPS/HVPS card Action Make sure the toner cartridge and PC Kit are installed correctly and that the laser beam is not blocked. With...

Service Manual
Page 60
...and recheck. Vertical white lines may be caused by the laser beam, which may be full. Try a different toner cartridge. Replace the PC kit. 2-34 Lexmark™ E360d, E360dn Light print See "Light print" on page 2-33 for more information. Try a different toner cartridge. The toner cartridge...back of the manual for debris. • Make sure the media is straight and unwrinkled. • Replace the PC Kit, and recheck before replacing the toner cartridge. Replace as needed. Toner smudges appear on the page Vertical streaks Something could be the cause due to the ...
...and recheck. Vertical white lines may be caused by the laser beam, which may be full. Try a different toner cartridge. Replace the PC kit. 2-34 Lexmark™ E360d, E360dn Light print See "Light print" on page 2-33 for more information. Try a different toner cartridge. The toner cartridge...back of the manual for debris. • Make sure the media is straight and unwrinkled. • Replace the PC Kit, and recheck before replacing the toner cartridge. Replace as needed. Toner smudges appear on the page Vertical streaks Something could be the cause due to the ...


