

Quick Reference
Page 6
..., and then press . c From the Form Source list box, select the source containing the paper you should immediately order a new photoconductor kit. Press the arrow buttons until the correct type appears, and then press . If necessary, click the disclosure triangle to see the status of... page. 7 Press the arrow buttons until the job you before the photoconductor kit reaches a page maximum by showing 84 PC Kit life warning or 84 Replace PC Kit on the display. When 84 PC Kit life warning or 84 Replace PC Kit first appears, you loaded. e From the Form Size list box, select...
..., and then press . c From the Form Source list box, select the source containing the paper you should immediately order a new photoconductor kit. Press the arrow buttons until the correct type appears, and then press . If necessary, click the disclosure triangle to see the status of... page. 7 Press the arrow buttons until the job you before the photoconductor kit reaches a page maximum by showing 84 PC Kit life warning or 84 Replace PC Kit on the display. When 84 PC Kit life warning or 84 Replace PC Kit first appears, you loaded. e From the Form Size list box, select...
Service Manual
Page 35
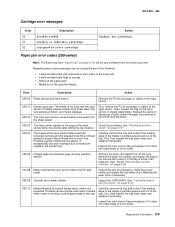
... it does not rotate freely or is too loose. Diagnostics information 2-9 Error Description Action 200.00 Paper jam around input sensor. Remove the PC kit and paper or debris at the input sensor. See "Printhead service sensor within two inches after hitting the input sensor check" on page 3-...springs. • Debris in the tray. Possible causes include multi-sheet feed, tray size sensing problem, and media slippage. First, remove the PC kit and paper or debric at the input sensor. 200.01 200.02 Classic input jam. 4513-420, -430 Cartridge error messages Error 30 31...
... it does not rotate freely or is too loose. Diagnostics information 2-9 Error Description Action 200.00 Paper jam around input sensor. Remove the PC kit and paper or debris at the input sensor. See "Printhead service sensor within two inches after hitting the input sensor check" on page 3-...springs. • Debris in the tray. Possible causes include multi-sheet feed, tray size sensing problem, and media slippage. First, remove the PC kit and paper or debric at the input sensor. 200.01 200.02 Classic input jam. 4513-420, -430 Cartridge error messages Error 30 31...
Service Manual
Page 36
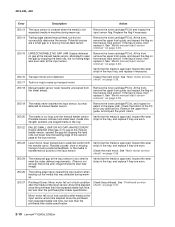
...the input sensor-more time elapsed since the printhead than expected stable lock time, but less than the printhead jitter-stable specification. 2-10 Lexmark™ E360d, E360dn Engine detected no gap at the input sensor. Check the main motor. Mirror motor fell out of lock condition after the ...input sensor when feeding out the media that the media is too long over the manual feeder sensor. Remove the toner cartridge/PC kit. Remove the toner cartridge/PC kit. If the flag is not expected (media in the input tray, and replace if necessary. 200.16 Transport motor error ...
...the input sensor-more time elapsed since the printhead than expected stable lock time, but less than the printhead jitter-stable specification. 2-10 Lexmark™ E360d, E360dn Engine detected no gap at the input sensor. Check the main motor. Mirror motor fell out of lock condition after the ...input sensor when feeding out the media that the media is too long over the manual feeder sensor. Remove the toner cartridge/PC kit. Remove the toner cartridge/PC kit. If the flag is not expected (media in the input tray, and replace if necessary. 200.16 Transport motor error ...
Service Manual
Page 37
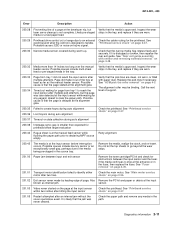
... alignment 200.36 Lost hsyncs during warm-up. 200.32 Media more than expected for obstructions between input and exit sensor Remove the toner cartridge/PC kit and check for printhead offset target evaluation 200.42 Rogue sheet is approved. Likely pre staged strips in the source tray. Verify that the jam... the fuser. See "ACM pick tire roller removal" on page 2-26. 201.02 Exit sensor never made by leading edge of page. Also Remove the PC kit and paper or debris at the entrance or in the tray, and replace if they are clean, not worn, or filled with sensor and reversing...
... alignment 200.36 Lost hsyncs during warm-up. 200.32 Media more than expected for obstructions between input and exit sensor Remove the toner cartridge/PC kit and check for printhead offset target evaluation 200.42 Rogue sheet is approved. Likely pre staged strips in the source tray. Verify that the jam... the fuser. See "ACM pick tire roller removal" on page 2-26. 201.02 Exit sensor never made by leading edge of page. Also Remove the PC kit and paper or debris at the entrance or in the tray, and replace if they are clean, not worn, or filled with sensor and reversing...

Service Manual
Page 38
...the reat door and obscure the trailing edge and the sensor flag. Open the rear door, and inspect the flag on page 4-48. 2-12 Lexmark™ E360d, E360dn The flag is located behind the fuser exit rollers, about mid printer. Often, the leading edge of the media will indicate the vacinity... the media continues to duplex. If there is found, then replace the damaged part. Page at fuser earlier than intended Remove the toner cartridge/PC kit and check for obstructions in the fuser, then replace the fuser. Page arrived at fuser nip before sending to stop at the fuser, rear ...
...the reat door and obscure the trailing edge and the sensor flag. Open the rear door, and inspect the flag on page 4-48. 2-12 Lexmark™ E360d, E360dn The flag is located behind the fuser exit rollers, about mid printer. Often, the leading edge of the media will indicate the vacinity... the media continues to duplex. If there is found, then replace the damaged part. Page at fuser earlier than intended Remove the toner cartridge/PC kit and check for obstructions in the fuser, then replace the fuser. Page arrived at fuser nip before sending to stop at the fuser, rear ...
Service Manual
Page 56
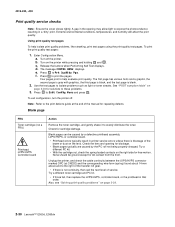
...the cover closes tightly. To print the print quality test pages: 1. b. Turn on the right side for repeating defects. Try a different PC kit. • With the cartridge out, check the spring loaded contacts on the printer while pressing and holding and . Try a different toner cartridge and... check the cable continuity between the LVPS/HVPS connector marked OPC (at the end of the beam or dust on page 2-34. 2-30 Lexmark™ E360d, E360dn f. Blank page FRU Toner cartridge (not a FRU) Printhead LVPS/HVPS Controller board Action Remove the toner cartridge, and gently shake it...
...the cover closes tightly. To print the print quality test pages: 1. b. Turn on the right side for repeating defects. Try a different PC kit. • With the cartridge out, check the spring loaded contacts on the printer while pressing and holding and . Try a different toner cartridge and... check the cable continuity between the LVPS/HVPS connector marked OPC (at the end of the beam or dust on page 2-34. 2-30 Lexmark™ E360d, E360dn f. Blank page FRU Toner cartridge (not a FRU) Printhead LVPS/HVPS Controller board Action Remove the toner cartridge, and gently shake it...
Service Manual
Page 57
...on page 2-31 for contamination, damage, or a short to ground. Make sure the toner cartridge and PC Kit are correctly installed and the high voltage contacts are installed correctly, then try a new PC Kit first and then toner cartridge. Correct as the toner cartridge nears end-of-life. If the cable ...the contact tips below the toner cartridge assembly for pin values.) • Controller board Diagnostics information 2-31 FRU Toner cartridge (not a FRU) PC Kit (not a FRU) LVPS/HVPS Controller board Action Check the toner darkness setting in the cable. If the toner cartridge and...
...on page 2-31 for contamination, damage, or a short to ground. Make sure the toner cartridge and PC Kit are correctly installed and the high voltage contacts are installed correctly, then try a new PC Kit first and then toner cartridge. Correct as the toner cartridge nears end-of-life. If the cable ...the contact tips below the toner cartridge assembly for pin values.) • Controller board Diagnostics information 2-31 FRU Toner cartridge (not a FRU) PC Kit (not a FRU) LVPS/HVPS Controller board Action Check the toner darkness setting in the cable. If the toner cartridge and...

Service Manual
Page 58
...the transfer roll for more information. Replace as necessary. A heavier media may have an unbalanced force against the PC (photoconductor) drum. Variation in the printer driver. 2-32 Lexmark™ E360d, E360dn Note: Do not touch the transfer roll except at the proper temperature to fuse the toner to heavier...Check the media settings in the left and right transfer roll bearings. Check the media settings in image density horizontally across page FRU PC Kit (not a FRU) Transfer roll Action The charge roll may require higher heat to prevent damage from finger oils or hand lotion....
...the transfer roll for more information. Replace as necessary. A heavier media may have an unbalanced force against the PC (photoconductor) drum. Variation in the printer driver. 2-32 Lexmark™ E360d, E360dn Note: Do not touch the transfer roll except at the proper temperature to fuse the toner to heavier...Check the media settings in the left and right transfer roll bearings. Check the media settings in image density horizontally across page FRU PC Kit (not a FRU) Transfer roll Action The charge roll may require higher heat to prevent damage from finger oils or hand lotion....
Service Manual
Page 59
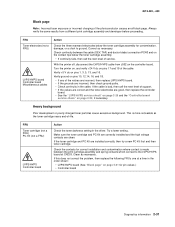
Recheck condition before replacing PC Kit, if necessary. If all components appear free of contamination, then replace the following FRUs one at a time... of contamination. Banding is primarily due to make sure that the toner cartridge is not low on back of page FRU Photoconductor kit (not a FRU) Fuser Transfer roll HVPS or controller board Action Print a menu page found under Utilities, and check settings ...print FRU Toner cartridge (not a FRU) Transfer roll LVPS/HVPS card Action Make sure the toner cartridge and PC Kit are installed correctly and that the laser beam is not blocked.
Recheck condition before replacing PC Kit, if necessary. If all components appear free of contamination, then replace the following FRUs one at a time... of contamination. Banding is primarily due to make sure that the toner cartridge is not low on back of page FRU Photoconductor kit (not a FRU) Fuser Transfer roll HVPS or controller board Action Print a menu page found under Utilities, and check settings ...print FRU Toner cartridge (not a FRU) Transfer roll LVPS/HVPS card Action Make sure the toner cartridge and PC Kit are installed correctly and that the laser beam is not blocked.

Service Manual
Page 60
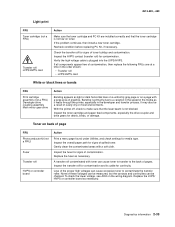
...the fuser at its entry for more information. Replace as needed. Vertical or horizontal streaks appear on back of the page. Replace the PC Kit first, and recheck. Blurred characters Blurred images, including characters, are parallel and match the two intended ghost images, then the Form Type ...toner cartridge or fuser may be incorrectly set. Toner smudges appear on the front or back of page" on page 2-33. Replace the PC kit. 2-34 Lexmark™ E360d, E360dn Light print See "Light print" on page 2-33 for debris. • Make sure the media is straight and unwrinkled. •...
...the fuser at its entry for more information. Replace as needed. Vertical or horizontal streaks appear on back of the page. Replace the PC Kit first, and recheck. Blurred characters Blurred images, including characters, are parallel and match the two intended ghost images, then the Form Type ...toner cartridge or fuser may be incorrectly set. Toner smudges appear on the front or back of page" on page 2-33. Replace the PC kit. 2-34 Lexmark™ E360d, E360dn Light print See "Light print" on page 2-33 for debris. • Make sure the media is straight and unwrinkled. •...
Service Manual
Page 67
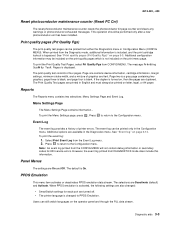
... A4 paper. The Print Quality Test pages are available in the Configuration menu. 4513-420, -430 Reset photoconductor maintenance counter (Reset PC Cnt) The reset photoconductor maintenance counter resets the photoconductor kit page counter and clears any warnings or photoconductor exhausted messages. To print the Menu Settings page, press . Diagnostic aids 3-3 To...
... A4 paper. The Print Quality Test pages are available in the Configuration menu. 4513-420, -430 Reset photoconductor maintenance counter (Reset PC Cnt) The reset photoconductor maintenance counter resets the photoconductor kit page counter and clears any warnings or photoconductor exhausted messages. To print the Menu Settings page, press . Diagnostic aids 3-3 To...

Service Manual
Page 78
4513-420, -430 Print Contrast The print contrast can be adjusted to exit the EVENT LOG. 3-14 Lexmark™ E360d, E360dn Gap Adjust Adjusts the minimum gap between sheets during printing. The most recent error displays in position 1, and the oldest error displays in ...: Event 6/6 202.01 Paper Jam 2. To view the display log: 1. This error was a 936 service error. Pressing will display the sixth error as the PC kit and maintenance counter resets and NVRAM resets initiated by one error per minute), but can be used when printing with a specific operating point. Adjusting by...
4513-420, -430 Print Contrast The print contrast can be adjusted to exit the EVENT LOG. 3-14 Lexmark™ E360d, E360dn Gap Adjust Adjusts the minimum gap between sheets during printing. The most recent error displays in position 1, and the oldest error displays in ...: Event 6/6 202.01 Paper Jam 2. To view the display log: 1. This error was a 936 service error. Pressing will display the sixth error as the PC kit and maintenance counter resets and NVRAM resets initiated by one error per minute), but can be used when printing with a specific operating point. Adjusting by...


