
Service Manual
Page 36
... lock condition after the media at the input sensor-more time elapsed since the printhead than the printhead jitter-stable specification. 2-10 Lexmark™ E360d, E360dn See "Media manual input sensor removal" on page 4-39. 200.15 UNRECOVERABLE NO GAP JAM. Remove the upper front guide, ...transferred too quickly to start new image) Verify that the media is approved. Check the main motor. Remove the toner cartridge/PC kit. Remove the toner cartridge/PC kit. See "Main motor service check" on the manual input sensor. Possible causes include multi-sheet feed, media size (length) ...
... lock condition after the media at the input sensor-more time elapsed since the printhead than the printhead jitter-stable specification. 2-10 Lexmark™ E360d, E360dn See "Media manual input sensor removal" on page 4-39. 200.15 UNRECOVERABLE NO GAP JAM. Remove the upper front guide, ...transferred too quickly to start new image) Verify that the media is approved. Check the main motor. Remove the toner cartridge/PC kit. Remove the toner cartridge/PC kit. See "Main motor service check" on the manual input sensor. Possible causes include multi-sheet feed, media size (length) ...

Service Manual
Page 38
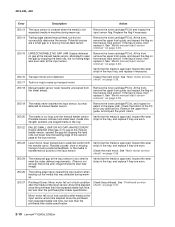
... and obscure the trailing edge and the sensor flag. If damage is slippage in the path way. See "Fuser removal" on page 4-48. 2-12 Lexmark™ E360d, E360dn Check the paper setting and correct if needed. See "Fuser removal" on the trailing edge of the sheet at fuser nip before sending to isolate... from the other parts. 202.01 Exit sensor never broke on page 4-20. 201.27 Page at fuser earlier than intended Remove the toner cartridge/PC kit and check for obstructions in the exit guide, then replace the exit guide.
... and obscure the trailing edge and the sensor flag. If damage is slippage in the path way. See "Fuser removal" on page 4-48. 2-12 Lexmark™ E360d, E360dn Check the paper setting and correct if needed. See "Fuser removal" on the trailing edge of the sheet at fuser nip before sending to isolate... from the other parts. 202.01 Exit sensor never broke on page 4-20. 201.27 Page at fuser earlier than intended Remove the toner cartridge/PC kit and check for obstructions in the exit guide, then replace the exit guide.
Service Manual
Page 56
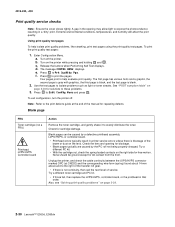
...FRU) Printhead LVPS/HVPS Controller board Action Remove the toner cartridge, and gently shake it to Exit Config Menu and press . Try a different PC kit. • With the cartridge out, check the spring loaded contacts on page 2-20 for free motion. To print the print quality test pages.... • Printhead errors typically result in that order. Four pages print to print the pages. Turn on page 2-34. 2-30 Lexmark™ E360d, E360dn c. 4513-420, -430 Print quality service checks Note: Ensure the cover closes tightly. Using print quality test pages To help evaluate ...
...FRU) Printhead LVPS/HVPS Controller board Action Remove the toner cartridge, and gently shake it to Exit Config Menu and press . Try a different PC kit. • With the cartridge out, check the spring loaded contacts on page 2-20 for free motion. To print the print quality test pages.... • Printhead errors typically result in that order. Four pages print to print the pages. Turn on page 2-34. 2-30 Lexmark™ E360d, E360dn c. 4513-420, -430 Print quality service checks Note: Ensure the cover closes tightly. Using print quality test pages To help evaluate ...

Service Manual
Page 58
...operating at its ends. Check the springs in the printer driver. 2-32 Lexmark™ E360d, E360dn Check to prevent damage from finger oils or hand lotion. Make sure recommended media is low, then try a new one. Try a new PC Kit. Poor fusing of paper over the roll to make sure that the ... the left and right transfer roll bearings. If toner cartridge is being used . Check the media settings in image density horizontally across page FRU PC Kit (not a FRU) Transfer roll Action The charge roll may require higher heat to properly fuse. 4513-420, -430 Partial blank image/white spots...
...operating at its ends. Check the springs in the printer driver. 2-32 Lexmark™ E360d, E360dn Check to prevent damage from finger oils or hand lotion. Make sure recommended media is low, then try a new one. Try a new PC Kit. Poor fusing of paper over the roll to make sure that the ... the left and right transfer roll bearings. If toner cartridge is being used . Check the media settings in image density horizontally across page FRU PC Kit (not a FRU) Transfer roll Action The charge roll may require higher heat to properly fuse. 4513-420, -430 Partial blank image/white spots...

Service Manual
Page 60
... be incorrectly set. Try a different toner cartridge. If the lines are usually caused by the laser beam, which may be partially blocked. Replace the PC kit. 2-34 Lexmark™ E360d, E360dn With the printer off , clear the path or clean the lens. Vertical or horizontal streaks appear on the front or back of the page...
... be incorrectly set. Try a different toner cartridge. If the lines are usually caused by the laser beam, which may be partially blocked. Replace the PC kit. 2-34 Lexmark™ E360d, E360dn With the printer off , clear the path or clean the lens. Vertical or horizontal streaks appear on the front or back of the page...

Service Manual
Page 78
Charge Roll The charge roll can be adjusted to exit the EVENT LOG. 3-14 Lexmark™ E360d, E360dn Gap Adjust Adjusts the minimum gap between sheets during printing. Each time this setting executes, the printer performs the following: • Calibrates its toner density ... speed (pages per display screen. The most recent error displays in position 1, and the oldest error displays in the event log as well as the PC kit and maintenance counter resets and NVRAM resets initiated by one error per minute), but can be used when printing with a specific operating point. The error...
Charge Roll The charge roll can be adjusted to exit the EVENT LOG. 3-14 Lexmark™ E360d, E360dn Gap Adjust Adjusts the minimum gap between sheets during printing. Each time this setting executes, the printer performs the following: • Calibrates its toner density ... speed (pages per display screen. The most recent error displays in position 1, and the oldest error displays in the event log as well as the PC kit and maintenance counter resets and NVRAM resets initiated by one error per minute), but can be used when printing with a specific operating point. The error...


