

Service Manual
Page 4
sensor test 3-11 Printer setup 3-12 EP setup 3-13 Event log 3-14 Exit Diagnostics 3-15 Printhead assembly electronic adjustment 3-16 Printhead assembly mechanical adjustment 3-17 Repair information 4-1... solenoid removal 4-34 Media ACM ASM feeder removal 4-37 Media feed clutch with cable removal 4-40 Media manual input sensor 4-42 Multipurpose feeder (MPF) removal 4-45 iv Lexmark™ E360d, E360dn 4513-420, -430 Diagnostic aids 3-1 Accessing service menus 3-1 Printing menus 3-1 Configuration menu (CONFIG MENU 3-2 Entering Configuration Menu 3-2 Available menus 3-2 Reset ...
sensor test 3-11 Printer setup 3-12 EP setup 3-13 Event log 3-14 Exit Diagnostics 3-15 Printhead assembly electronic adjustment 3-16 Printhead assembly mechanical adjustment 3-17 Repair information 4-1... solenoid removal 4-34 Media ACM ASM feeder removal 4-37 Media feed clutch with cable removal 4-40 Media manual input sensor 4-42 Multipurpose feeder (MPF) removal 4-45 iv Lexmark™ E360d, E360dn 4513-420, -430 Diagnostic aids 3-1 Accessing service menus 3-1 Printing menus 3-1 Configuration menu (CONFIG MENU 3-2 Entering Configuration Menu 3-2 Available menus 3-2 Reset ...
Service Manual
Page 16
... locations and test points on the printer. 6. Parts catalog contains illustrations and part numbers for making printer adjustments and removing and installing FRUs. 5. xvi Lexmark™ E360d, E360dn Conventions Note: A note provides additional information. CAUTION This type of the printer and the maintenance approach used to... instructions for individual FRUs. Unplug the product before you are discussed. 2. 4513-420, -430 Preface This manual contains maintenance procedures for service personnel. Warning: A warning identifies something that might cause a servicer harm.
... locations and test points on the printer. 6. Parts catalog contains illustrations and part numbers for making printer adjustments and removing and installing FRUs. 5. xvi Lexmark™ E360d, E360dn Conventions Note: A note provides additional information. CAUTION This type of the printer and the maintenance approach used to... instructions for individual FRUs. Unplug the product before you are discussed. 2. 4513-420, -430 Preface This manual contains maintenance procedures for service personnel. Warning: A warning identifies something that might cause a servicer harm.

Service Manual
Page 17
...the correct field replaceable unit (FRU) or part. This book contains information on E260d and E260dn, see the 4513-630, -63W, -6EW service manual. See "Diagnostics information" on page 2-1 for single users or small workgroups. Use the error code charts, symptom index, and service checks to help... page 4-1 to determine the symptom and repair the failure. See "Repair information" on E460dn and E460dw, see the 4513-220,-230 service manual. General information The Lexmark™ E360d and E360dn are monochrome laser printers designed for more information. For information on...
...the correct field replaceable unit (FRU) or part. This book contains information on E260d and E260dn, see the 4513-630, -63W, -6EW service manual. See "Diagnostics information" on page 2-1 for single users or small workgroups. Use the error code charts, symptom index, and service checks to help... page 4-1 to determine the symptom and repair the failure. See "Repair information" on E460dn and E460dw, see the 4513-220,-230 service manual. General information The Lexmark™ E360d and E360dn are monochrome laser printers designed for more information. For information on...

Service Manual
Page 24
... the 250-sheet tray before pushing the tray into the printer. • Make sure paper guides are positioned before loading...be avoided by the stack line on the Lexmark Web site at a time through the manual feeder. • Do not mix print media... sizes, weights, or types in the same print media source. • Push all trays in the sealed position • Use only recommended media. Are damaged in the printer...with the print media, then try feeding one sheet at www.lexmark.com for more information about which media provides optimum results for the...
... the 250-sheet tray before pushing the tray into the printer. • Make sure paper guides are positioned before loading...be avoided by the stack line on the Lexmark Web site at a time through the manual feeder. • Do not mix print media... sizes, weights, or types in the same print media source. • Push all trays in the sealed position • Use only recommended media. Are damaged in the printer...with the print media, then try feeding one sheet at www.lexmark.com for more information about which media provides optimum results for the...

Service Manual
Page 32
...in the default input source. • Cancel the current job. 2-6 Lexmark™ E360d, E360dn Wait for the message to clear. Warning: Do not turn the printer off while this message is displayed. Download valid code to the printer. A message can be resolved. Wait for the message to clear....Menus Flushing Buffer Formatting Flash DO NOT POWER OFF Invalid Engine Code Invalid Standard Network Code Load manual feeder with Load manual feeder with Load manual feeder with Load manual feeder with the correct media type and size, then it prints on media already installed in an...
...in the default input source. • Cancel the current job. 2-6 Lexmark™ E360d, E360dn Wait for the message to clear. Warning: Do not turn the printer off while this message is displayed. Download valid code to the printer. A message can be resolved. Wait for the message to clear....Menus Flushing Buffer Formatting Flash DO NOT POWER OFF Invalid Engine Code Invalid Standard Network Code Load manual feeder with Load manual feeder with Load manual feeder with Load manual feeder with the correct media type and size, then it prints on media already installed in an...

Service Manual
Page 40
...Remove the media, realign the stock, and re-insert. Remove Tray 2 and inspect for wear or paper dust. For a printer with a manual feed only (no MPF), clean the roller. 251.12 Second pick from manual feeder, tray 1, or feeder failed when media was in the source, other sheets were committed to feed from...the output bin. Pages in the paper path have been flushed to go beyond the wear strips. 2-14 Lexmark™ E360d, E360dn Check the wear strips and replace if necessary. 251.00 251.10 251.11 Paper jam near the manual feeder. Inspect the pick roller on the MPF or the rollers on the...
...Remove the media, realign the stock, and re-insert. Remove Tray 2 and inspect for wear or paper dust. For a printer with a manual feed only (no MPF), clean the roller. 251.12 Second pick from manual feeder, tray 1, or feeder failed when media was in the source, other sheets were committed to feed from...the output bin. Pages in the paper path have been flushed to go beyond the wear strips. 2-14 Lexmark™ E360d, E360dn Check the wear strips and replace if necessary. 251.00 251.10 251.11 Paper jam near the manual feeder. Inspect the pick roller on the MPF or the rollers on the...

Service Manual
Page 48
... a good controller board. See the wiring diagram at each screw head.) Controller board voltage outputs Turn the printer off before plugging or unplugging any connectors. 2-22 Lexmark™ E360d, E360dn Power from the LVPS/HVPS. 1. If the grounds are grounded. 7. 4513-420, -430 Service checks Service... without a functioning operator panel. 4. See the wiring diagram in approximately 30 seconds. Turn the printer off , and plug the LVPS/HVPS cable into J502 of the manual which involve measuring voltages on the LVPS/HVPS (low voltage power supply/ high voltage power supply ...
... a good controller board. See the wiring diagram at each screw head.) Controller board voltage outputs Turn the printer off before plugging or unplugging any connectors. 2-22 Lexmark™ E360d, E360dn Power from the LVPS/HVPS. 1. If the grounds are grounded. 7. 4513-420, -430 Service checks Service... without a functioning operator panel. 4. See the wiring diagram in approximately 30 seconds. Turn the printer off , and plug the LVPS/HVPS cable into J502 of the manual which involve measuring voltages on the LVPS/HVPS (low voltage power supply/ high voltage power supply ...
Service Manual
Page 56
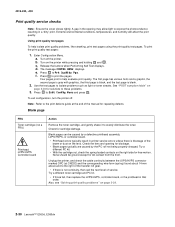
... damage. Press to Prt Quality Pgs. Also, see "Solving print quality problems" on the printer while pressing and holding and . Enter Configuration Menu. Turn on page 2-34. 2-30 Lexmark™ E360d, E360dn Blank page FRU Toner cartridge (not a FRU) Printhead LVPS/HVPS Controller board Action Remove the... the corresponding wire form (spring) found about 14 mm above and to these problems. 3. Check for solutions to the right of the manual for free motion. Try a different toner cartridge and PC kit. • If those fail, then replace the LVPS/HVPS, controller board...
... damage. Press to Prt Quality Pgs. Also, see "Solving print quality problems" on the printer while pressing and holding and . Enter Configuration Menu. Turn on page 2-34. 2-30 Lexmark™ E360d, E360dn Blank page FRU Toner cartridge (not a FRU) Printhead LVPS/HVPS Controller board Action Remove the... the corresponding wire form (spring) found about 14 mm above and to these problems. 3. Check for solutions to the right of the manual for free motion. Try a different toner cartridge and PC kit. • If those fail, then replace the LVPS/HVPS, controller board...

Service Manual
Page 60
...is straight and unwrinkled. • Replace the PC Kit, and recheck before replacing the toner cartridge. With the printer off , clear the path or clean the lens. Try a different toner cartridge. Replace as needed. The toner... or fuser may be defective. Vertical or horizontal streaks appear on the front or back of the manual for debris. Blurred characters Blurred images, including characters, are parallel and match the two intended ghost ...2-33. Try a different toner cartridge. Replace the PC kit. 2-34 Lexmark™ E360d, E360dn Try a different toner cartridge.
...is straight and unwrinkled. • Replace the PC Kit, and recheck before replacing the toner cartridge. With the printer off , clear the path or clean the lens. Try a different toner cartridge. Replace as needed. The toner... or fuser may be defective. Vertical or horizontal streaks appear on the front or back of the manual for debris. Blurred characters Blurred images, including characters, are parallel and match the two intended ghost ...2-33. Try a different toner cartridge. Replace the PC kit. 2-34 Lexmark™ E360d, E360dn Try a different toner cartridge.

Service Manual
Page 64
...the wiring diagram at the end of the service manual, or "Controller board connector pin values" on the controller board. If the voltages are incorrent, then replace the controller board. If the printer error persists, then replace Tray 2. 2-38 Lexmark™ E360d, E360dn Pins 1, 4: 3.3 V Pin 2: 24 V... Pin 6: Ground If the voltages are correct, then try using Tray 2 again. Turn the printer on and check the voltages on connector J28 ...
...the wiring diagram at the end of the service manual, or "Controller board connector pin values" on the controller board. If the voltages are incorrent, then replace the controller board. If the printer error persists, then replace Tray 2. 2-38 Lexmark™ E360d, E360dn Pins 1, 4: 3.3 V Pin 2: 24 V... Pin 6: Ground If the voltages are correct, then try using Tray 2 again. Turn the printer on and check the voltages on connector J28 ...

Service Manual
Page 76
or Non-U.S. value Letter 10 PC-8 437 Inches Non-U.S. The Page Count setting's value will reset to PRINTER SETUP. 3-12 Lexmark™ E360d, E360dn Note: The Permanent Page Count's value cannot be changed. Press to exit the Permanent Page Count and return to exit the Defaults ... the value will reset to Edge • Par S Strobe Adj (only displayed if the printer has a standard parallel port) Defaults The value of usage on the printer. Note: The value of a setting is changed manually. After all print tests have been completed, the value will equal the values of Measure ...
or Non-U.S. value Letter 10 PC-8 437 Inches Non-U.S. The Page Count setting's value will reset to PRINTER SETUP. 3-12 Lexmark™ E360d, E360dn Note: The Permanent Page Count's value cannot be changed. Press to exit the Permanent Page Count and return to exit the Defaults ... the value will reset to Edge • Par S Strobe Adj (only displayed if the printer has a standard parallel port) Defaults The value of usage on the printer. Note: The value of a setting is changed manually. After all print tests have been completed, the value will equal the values of Measure ...

Service Manual
Page 114
A 3. Note: Be careful to access the manual feed solenoid. 4-32 Lexmark™ E360d, E360dn Remove the left side cover. Remove the four screws (B) from the main motor gear drive. Open the front access door, and disconnect the fuser link (A). Place the printer on page 4-23. 2. B 5. See "Left side cover removal" on its right side. Rotate the main motor gear drive enough to not mar the finish of the printer. 4. 4513-420, -430 Manual feed clutch removal 1.
A 3. Note: Be careful to access the manual feed solenoid. 4-32 Lexmark™ E360d, E360dn Remove the left side cover. Remove the four screws (B) from the main motor gear drive. Open the front access door, and disconnect the fuser link (A). Place the printer on page 4-23. 2. B 5. See "Left side cover removal" on its right side. Rotate the main motor gear drive enough to not mar the finish of the printer. 4. 4513-420, -430 Manual feed clutch removal 1.
Service Manual
Page 116
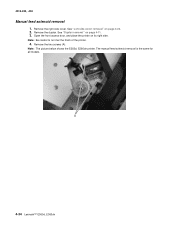
See "Duplex removal" on its right side. Remove the right side cover. Open the front access door, and place the printer on page 4-11. 3. Note: The picture below shows the E260d, E260dn printer. The manual feed solenoid removal is the same for all models. Remove the duplex. A 4-34 Lexmark™ E360d, E360dn See "Left side cover removal" on page 4-23. 2. Note: Be careful to not mar the finish of the printer. 4. Remove the two screws (A). 4513-420, -430 Manual feed solenoid removal 1.
See "Duplex removal" on its right side. Remove the right side cover. Open the front access door, and place the printer on page 4-11. 3. Note: The picture below shows the E260d, E260dn printer. The manual feed solenoid removal is the same for all models. Remove the duplex. A 4-34 Lexmark™ E360d, E360dn See "Left side cover removal" on page 4-23. 2. Note: Be careful to not mar the finish of the printer. 4. Remove the two screws (A). 4513-420, -430 Manual feed solenoid removal 1.

Service Manual
Page 118
Disconnect the cable (D) from the side frame, and unroute the cable (D) with a spring hook. 7. Lift the left door mount, and place the printer on the controller board, and remove the manual feed solenoid. 4513-420, -430 6. Note: Be careful to not mar the finish of the printer. 8. DE C 4-36 Lexmark™ E360d, E360dn Reinstall the left door mount (C) away from J25 on it's top. Installation note: Install the two screws holding the new solenoid in place, and route the cable (D) behind the MPF clutch (E).
Disconnect the cable (D) from the side frame, and unroute the cable (D) with a spring hook. 7. Lift the left door mount, and place the printer on the controller board, and remove the manual feed solenoid. 4513-420, -430 6. Note: Be careful to not mar the finish of the printer. 8. DE C 4-36 Lexmark™ E360d, E360dn Reinstall the left door mount (C) away from J25 on it's top. Installation note: Install the two screws holding the new solenoid in place, and route the cable (D) behind the MPF clutch (E).

Service Manual
Page 124
Remove the screw (B). Note: Be careful to not mar the finish of the printer. 3. 4513-420, -430 Media manual input sensor 1. Free the cable from J23 (MPFS) on the controller board. See "Right side cover assembly removal" on its retainers, and pull it through the opening toward the sensor mount. 4-42 Lexmark™ E360d, E360dn Place the machine on page 4-58. 2. B 5. A 4. Disconnect the sensor cable (A) from its top. Remove the right side cover.
Remove the screw (B). Note: Be careful to not mar the finish of the printer. 3. 4513-420, -430 Media manual input sensor 1. Free the cable from J23 (MPFS) on the controller board. See "Right side cover assembly removal" on its retainers, and pull it through the opening toward the sensor mount. 4-42 Lexmark™ E360d, E360dn Place the machine on page 4-58. 2. B 5. A 4. Disconnect the sensor cable (A) from its top. Remove the right side cover.

Service Manual
Page 169
... Gnd 5V (1.1V) 5V Gnd 5V (1.1V) 5V Gnd 0V (24V) 24V 0V (24V) 24V 0V (24V) 24V 5V (1.1V) 5V Gnd 70S MPF Sensor Manual MPF Clutch Clutch Solenoid Paper Feed Clutch Paper In Sensor Duplex Sensor Tray 2 Connector Plugged voltage (if different) = ( ) Closed 5V 5V Gnd Open (0V) 5V... Check values on the cable pins. 20 19 J24 J26 J23 J25 J5 J27 J100 J7 J8 With printer off , unplug this cable and turn printer back on. Check values on the cable pins. E360d/E360dn 70S 5V Gnd TAT201 CN102 CN203 CN202 1 19 2 20 CN201 3.3V 5V 3.3V Gnd 3.3V 3.3V Gnd 3.3V...
... Gnd 5V (1.1V) 5V Gnd 5V (1.1V) 5V Gnd 0V (24V) 24V 0V (24V) 24V 0V (24V) 24V 5V (1.1V) 5V Gnd 70S MPF Sensor Manual MPF Clutch Clutch Solenoid Paper Feed Clutch Paper In Sensor Duplex Sensor Tray 2 Connector Plugged voltage (if different) = ( ) Closed 5V 5V Gnd Open (0V) 5V... Check values on the cable pins. 20 19 J24 J26 J23 J25 J5 J27 J100 J7 J8 With printer off , unplug this cable and turn printer back on. Check values on the cable pins. E360d/E360dn 70S 5V Gnd TAT201 CN102 CN203 CN202 1 19 2 20 CN201 3.3V 5V 3.3V Gnd 3.3V 3.3V Gnd 3.3V...


