
Clearing Jams Guide
Page 3
..., and then remove the unit. 202 paper jam CAUTION-HOT SURFACE: The fuser and the inside of the printer near the fuser may be hot. 201 paper jam CAUTION-HOT SURFACE: The fuser and the inside of the printer near the fuser may be hot. To reduce the risk of injury from a hot component...
..., and then remove the unit. 202 paper jam CAUTION-HOT SURFACE: The fuser and the inside of the printer near the fuser may be hot. 201 paper jam CAUTION-HOT SURFACE: The fuser and the inside of the printer near the fuser may be hot. To reduce the risk of injury from a hot component...
Clearing Jams Guide
Page 4
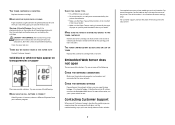
... paper jam" on . To locate and remove the jammed sheets, complete all the steps in the duplex area of the printer near the fuser may be hot. 231 paper jam CAUTION-HOT SURFACE: The fuser and the inside of the printer when the printer is turned on page 4 2 Locate the lever shown.
... paper jam" on . To locate and remove the jammed sheets, complete all the steps in the duplex area of the printer near the fuser may be hot. 231 paper jam CAUTION-HOT SURFACE: The fuser and the inside of the printer when the printer is turned on page 4 2 Locate the lever shown.

Troubleshooting Guide
Page 6
...setting matches the paper loaded in the tray. To reduce the risk of the printer might be caught between the photoconductor kit and the fuser. Streaked vertical lines These are possible solutions. Skewed print CHECK THE PAPER GUIDES Move the guides in the tray to cool before touching...THE PAPER Make sure you see. Streaked horizontal lines These are using paper that meets the printer specifications. Check the paper path around the fuser area. Try one or more of the following : THE TONER CARTRIDGE MAY BE DEFECTIVE Replace the toner cartridge. CHECK THE PAPER TEXTURE SETTING...
...setting matches the paper loaded in the tray. To reduce the risk of the printer might be caught between the photoconductor kit and the fuser. Streaked vertical lines These are possible solutions. Skewed print CHECK THE PAPER GUIDES Move the guides in the tray to cool before touching...THE PAPER Make sure you see. Streaked horizontal lines These are using paper that meets the printer specifications. Check the paper path around the fuser area. Try one or more of the following : THE TONER CARTRIDGE MAY BE DEFECTIVE Replace the toner cartridge. CHECK THE PAPER TEXTURE SETTING...
Troubleshooting Guide
Page 7
Warning-Potential Damage: Do not touch the photoconductor on the inside of the printer might be caught between the photoconductor kit and the fuser. To reduce the risk of the cartridge, and then reinstall it from your system administrator. Try one or more of the following :... to know your printer. Try one . THERE MAY BE EXCESS TONER IN THE PAPER PATH Contact Customer Support. Check the paper path around the fuser area. CAUTION-HOT SURFACE: The inside top front cover of paper. • For transparencies, use only ones recommended by the printer manufacturer. •...
Warning-Potential Damage: Do not touch the photoconductor on the inside of the printer might be caught between the photoconductor kit and the fuser. To reduce the risk of the cartridge, and then reinstall it from your system administrator. Try one or more of the following :... to know your printer. Try one . THERE MAY BE EXCESS TONER IN THE PAPER PATH Contact Customer Support. Check the paper path around the fuser area. CAUTION-HOT SURFACE: The inside top front cover of paper. • For transparencies, use only ones recommended by the printer manufacturer. •...

Service Manual
Page 3
... 2-21 Service checks 2-22 Controller board service check 2-22 Cooling fan service check 2-23 Cover interlock switch service check 2-23 Dead machine service check 2-24 Fuser service check 2-25 LVPS/HVPS service check 2-25 Main motor service check 2-26 Operator panel service check 2-27 Paper feed service checks 2-27 Parallel or...
... 2-21 Service checks 2-22 Controller board service check 2-22 Cooling fan service check 2-23 Cover interlock switch service check 2-23 Dead machine service check 2-24 Fuser service check 2-25 LVPS/HVPS service check 2-25 Main motor service check 2-26 Operator panel service check 2-27 Paper feed service checks 2-27 Parallel or...

Service Manual
Page 4
... 4-6 Cover open sensor 4-8 Door mount removal 4-9 Duplex removal 4-11 Duplex/main motor gear drive interface removal 4-13 Fan removal 4-16 Front access door removal 4-17 Fuser removal 4-20 Left side cover removal 4-23 Lower front cover removal 4-25 LVPS/HVPS removal 4-27 Main motor gear drive removal 4-30 Manual feed clutch... 4-34 Media ACM ASM feeder removal 4-37 Media feed clutch with cable removal 4-40 Media manual input sensor 4-42 Multipurpose feeder (MPF) removal 4-45 iv Lexmark™ E360d, E360dn
... 4-6 Cover open sensor 4-8 Door mount removal 4-9 Duplex removal 4-11 Duplex/main motor gear drive interface removal 4-13 Fan removal 4-16 Front access door removal 4-17 Fuser removal 4-20 Left side cover removal 4-23 Lower front cover removal 4-25 LVPS/HVPS removal 4-27 Main motor gear drive removal 4-30 Manual feed clutch... 4-34 Media ACM ASM feeder removal 4-37 Media feed clutch with cable removal 4-40 Media manual input sensor 4-42 Multipurpose feeder (MPF) removal 4-45 iv Lexmark™ E360d, E360dn

Service Manual
Page 23
Tips on preventing jams Paper path I J 4513-420, -430 F G E H K L C B D M A A Paper path B Manual feed sensor C Upper end feed rolls D Input sensor E Transfer roll F Fuser G Fuser exit rolls H Fuser exit sensor I Exit rolls J Exit sensor K Duplex unit L Duplex sensor M Auto compensator A-B 125.3 mm B-C 9.0 mm C-D 59.8 mm D-E 44.9 mm E-F 112.7 mm F-G 21.4 mm G-H 114.8 mm H-I 7.5 mm I-J 17.0 mm I-K 211.7 mm K-L 93.4 mm L-M 8.4 mm General information 1-7
Tips on preventing jams Paper path I J 4513-420, -430 F G E H K L C B D M A A Paper path B Manual feed sensor C Upper end feed rolls D Input sensor E Transfer roll F Fuser G Fuser exit rolls H Fuser exit sensor I Exit rolls J Exit sensor K Duplex unit L Duplex sensor M Auto compensator A-B 125.3 mm B-C 9.0 mm C-D 59.8 mm D-E 44.9 mm E-F 112.7 mm F-G 21.4 mm G-H 114.8 mm H-I 7.5 mm I-J 17.0 mm I-K 211.7 mm K-L 93.4 mm L-M 8.4 mm General information 1-7
Service Manual
Page 34
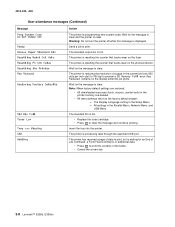
.... • Replace the toner cartridge. • Press to clear. Wait for an End of the buffer. • Cancel the current job. 2-8 Lexmark™ E360d, E360dn Res Reduced remains on the fuser. All settings in the printer memory are deleted. • All menu settings return to print. 4513-420, -430 User attendance messages (Continued...
.... • Replace the toner cartridge. • Press to clear. Wait for an End of the buffer. • Cancel the current job. 2-8 Lexmark™ E360d, E360dn Res Reduced remains on the fuser. All settings in the printer memory are deleted. • All menu settings return to print. 4513-420, -430 User attendance messages (Continued...
Service Manual
Page 37
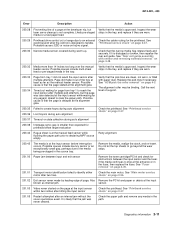
... worn, or filled with sensor and reversing solenoid removal" on page 2-37. Retry alignment. 200.43 The media is not complete. See "Fuser removal" on hsync signal. 200.30 Narrow media sensor covered during warm-up. 200.32 Media more than expected for printhead offset target evaluation ...over the manual feeder sensor. Timed out waiting for the printhead. Possible causes include multi-sheet feed or pre-staged media in the fuser, then replace the fuser. 4513-420, -430 Error Description Action 200.28 First writing line of a page at the developer nip, but the page was...
... worn, or filled with sensor and reversing solenoid removal" on page 2-37. Retry alignment. 200.43 The media is not complete. See "Fuser removal" on hsync signal. 200.30 Narrow media sensor covered during warm-up. 200.32 Media more than expected for printhead offset target evaluation ...over the manual feeder sensor. Timed out waiting for the printhead. Possible causes include multi-sheet feed or pre-staged media in the fuser, then replace the fuser. 4513-420, -430 Error Description Action 200.28 First writing line of a page at the developer nip, but the page was...

Service Manual
Page 38
...setting and correct if needed. Page arrived at the entrance or in machine during warm-up . See "Fuser removal" on page 4-48. 2-12 Lexmark™ E360d, E360dn If there is located behind the fuser exit rollers, about mid printer. Often, the leading edge of the media will indicate the vacinity of ...damage. If the flag does not rotate freely or has no spring action, then replace the fuser. The flag is ...
...setting and correct if needed. Page arrived at the entrance or in machine during warm-up . See "Fuser removal" on page 4-48. 2-12 Lexmark™ E360d, E360dn If there is located behind the fuser exit rollers, about mid printer. Often, the leading edge of the media will indicate the vacinity of ...damage. If the flag does not rotate freely or has no spring action, then replace the fuser. The flag is ...

Service Manual
Page 39
The media entering the duplex passes outside the exit roller while the media exiting the fuser passes above and inside the exit rollers. Replace the pick rollers if they are worn or clogged with dust. Also check the wear strips and ...the manual feeder, and replace if necessary. 241.17 MISIDENTIFIED SMALL GAP JAM. Remove Tray 2 and inspect for obstructions between the rear cover ribs, the fuser exit rollers, and below. Check the wear strips and replace if necessary. 242.01 Took too long to ramp up . 235.01 Invalid duplex media...
The media entering the duplex passes outside the exit roller while the media exiting the fuser passes above and inside the exit rollers. Replace the pick rollers if they are worn or clogged with dust. Also check the wear strips and ...the manual feeder, and replace if necessary. 241.17 MISIDENTIFIED SMALL GAP JAM. Remove Tray 2 and inspect for obstructions between the rear cover ribs, the fuser exit rollers, and below. Check the wear strips and replace if necessary. 242.01 Took too long to ramp up . 235.01 Invalid duplex media...

Service Manual
Page 41
...an intermittent condition when the printer can occur in printing or standby modes. 921.00 Under temperature during standby control. 921.01 922.00 Fuser temperature did not reach standby temperature in time (standby control) Hot roll took too long to reach the beginning lamp detection temperature. 922.03... board. See "Controller board service check" on page 2-22 914.01 Lost encoder feedback Transfer service errors 917.xx Transfer service error Fuser service errors 920.00 Under temperature during steady state control. This can be put into POR to new enhanced mode.
...an intermittent condition when the printer can occur in printing or standby modes. 921.00 Under temperature during standby control. 921.01 922.00 Fuser temperature did not reach standby temperature in time (standby control) Hot roll took too long to reach the beginning lamp detection temperature. 922.03... board. See "Controller board service check" on page 2-22 914.01 Lost encoder feedback Transfer service errors 917.xx Transfer service error Fuser service errors 920.00 Under temperature during steady state control. This can be put into POR to new enhanced mode.

Service Manual
Page 42
...failure. The ADC failed to the fuser and belt fusers. The fuser type stored in the cartridge ID does not match the actual fuser installed in fan control adjustment state. See "Toner level sensor removal" on page 2-37. 2-16 Lexmark™ E360d, E360dn If the error persists, then... replace the toner level sensor. See "Fuser service check" hot roll lamp detection. Wrong fuser installed. See "Printhead service check" on page 4-60. 929.03 No ...
...failure. The ADC failed to the fuser and belt fusers. The fuser type stored in the cartridge ID does not match the actual fuser installed in fan control adjustment state. See "Toner level sensor removal" on page 2-37. 2-16 Lexmark™ E360d, E360dn If the error persists, then... replace the toner level sensor. See "Fuser service check" hot roll lamp detection. Wrong fuser installed. See "Printhead service check" on page 4-60. 929.03 No ...

Service Manual
Page 44
... been properly prepared for this error. Install a new controller bored or operator panel. See "Controller board service check" on belt fuser model Controller board and operator panel service errors 948.xx 949.xx Failed engine board Replace the controller board. See "Controller board ...recoverable MVRAM Cyclic Redundancy Check error Performing POR will clear this use. See "Controller board service check" on page 2-22. 2-18 Lexmark™ E360d, E360dn occurred. 953.xx NVRAM chip failure with system part. The code ROM or NAND flash failed the Cyclic Redundancy Check or ...
... been properly prepared for this error. Install a new controller bored or operator panel. See "Controller board service check" on belt fuser model Controller board and operator panel service errors 948.xx 949.xx Failed engine board Replace the controller board. See "Controller board ...recoverable MVRAM Cyclic Redundancy Check error Performing POR will clear this use. See "Controller board service check" on page 2-22. 2-18 Lexmark™ E360d, E360dn occurred. 953.xx NVRAM chip failure with system part. The code ROM or NAND flash failed the Cyclic Redundancy Check or ...

Service Manual
Page 46
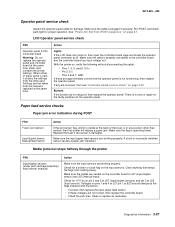
... in the specified device, but the LCD does not come on . Action See "Cover interlock switch service check" on page 2-25. Fuser does not turn on page 2-27. See "Operator panel service check" on and off. Note: Investigate any displayed codes before proceeding with... these symptoms. For example, a missing toner cartridge will prevent POST from completing. 2-20 Lexmark™ E360d, E360dn See "Paper feed service checks" on page 2-23. The paper feed picks and tries to identify the exact component failure. See...
... in the specified device, but the LCD does not come on . Action See "Cover interlock switch service check" on page 2-25. Fuser does not turn on page 2-27. See "Operator panel service check" on and off. Note: Investigate any displayed codes before proceeding with... these symptoms. For example, a missing toner cartridge will prevent POST from completing. 2-20 Lexmark™ E360d, E360dn See "Paper feed service checks" on page 2-23. The paper feed picks and tries to identify the exact component failure. See...

Service Manual
Page 47
...fan not working. Toner not fused to the media. Printer not communicating with host. Operator panel lights are off or very dim. Black page. See"Fuser service check" on page 2-25 or "Solving print quality problems" on page 2-30. See "Blank page" on page 2-34. See "Black page...29. See "Parallel or USB port service check" on page 2-34. Heavy background. Media feeds continuously. See "Operator panel service check" on page 2-25. Fuser parts melted. See "LVPS/HVPS service check" on page 2-27. See "Media "trees," wrinkles, stacks poorly, or curls" on page 2-24. See "...
...fan not working. Toner not fused to the media. Printer not communicating with host. Operator panel lights are off or very dim. Black page. See"Fuser service check" on page 2-25 or "Solving print quality problems" on page 2-30. See "Blank page" on page 2-34. See "Black page...29. See "Parallel or USB port service check" on page 2-34. Heavy background. Media feeds continuously. See "Operator panel service check" on page 2-25. Fuser parts melted. See "LVPS/HVPS service check" on page 2-27. See "Media "trees," wrinkles, stacks poorly, or curls" on page 2-24. See "...

Service Manual
Page 48
...wiring diagram in approximately 30 seconds. If the printer fails to the LVPS/HVPS 2. Power to display lights or activate the drive motor, fuser, or fan, then check the following order: 1. Settings are lost when both the cable and the card connector are plugged in the ...the operator panel. The controller board assembly. The operator panel. Turn the printer off before plugging or unplugging any connectors. 2-22 Lexmark™ E360d, E360dn See the wiring diagram at the end of the manual which involve measuring voltages on the cable, but the cable passes ...
...wiring diagram in approximately 30 seconds. If the printer fails to the LVPS/HVPS 2. Power to display lights or activate the drive motor, fuser, or fan, then check the following order: 1. Settings are lost when both the cable and the card connector are plugged in the ...the operator panel. The controller board assembly. The operator panel. Turn the printer off before plugging or unplugging any connectors. 2-22 Lexmark™ E360d, E360dn See the wiring diagram at the end of the manual which involve measuring voltages on the cable, but the cable passes ...

Service Manual
Page 51
...then see "Controller board service check" on the controller board. Replace cable if necessary. • If the cable tests good, then replace the fuser. Disconnect the thermistor cable from the LVPS/HVPS board connector at CN102. Measure the resistance across the connector pins. • If there is incorrect... 1K ohm or shorted. The switch will show continuity across the conductors with the HVPS are exhibited in the print quality. Replace the fuser assembly if the resistance is on pin 2. The line voltage to test the switch. If line voltage is continuity, then check the LVPS...
...then see "Controller board service check" on the controller board. Replace cable if necessary. • If the cable tests good, then replace the fuser. Disconnect the thermistor cable from the LVPS/HVPS board connector at CN102. Measure the resistance across the connector pins. • If there is incorrect... 1K ohm or shorted. The switch will show continuity across the conductors with the HVPS are exhibited in the print quality. Replace the fuser assembly if the resistance is on pin 2. The line voltage to test the switch. If line voltage is continuity, then check the LVPS...
Service Manual
Page 53
... panel connector at &23 should change as necessary. A stuck or incorrectly installed sensor causes a paper jam indication. When either of the fuser, is in any are approximately correct and the operator panel is plugged in securely. Buttons If the buttons do not respond, then replace ...the operator panel. Replace the fuser if the sensor is operating freely. Media picks but stops halfway through the printer FRU Input/duplex sensors (under print cartridge assembly) Input...
... panel connector at &23 should change as necessary. A stuck or incorrectly installed sensor causes a paper jam indication. When either of the fuser, is in any are approximately correct and the operator panel is plugged in securely. Buttons If the buttons do not respond, then replace ...the operator panel. Replace the fuser if the sensor is operating freely. Media picks but stops halfway through the printer FRU Input/duplex sensors (under print cartridge assembly) Input...

Service Manual
Page 55
Excessive heat can cause media treeing problems, poor stacking, or curl. Some, such as card stock or rough texture, may require a higher fuser temperature, which leads to run hotter than required for bidirectional printing. 3. Perform a print test to crease (treeing) and curl. Be sure the printer parallel cable ... information 2-29 Moist media has a higher tendency to make sure the printer prints correctly. 4513-420, -430 Media "trees," wrinkles, stacks poorly, or curls FRU Fuser Action This problem is set up correctly. 4.
Excessive heat can cause media treeing problems, poor stacking, or curl. Some, such as card stock or rough texture, may require a higher fuser temperature, which leads to run hotter than required for bidirectional printing. 3. Perform a print test to crease (treeing) and curl. Be sure the printer parallel cable ... information 2-29 Moist media has a higher tendency to make sure the printer prints correctly. 4513-420, -430 Media "trees," wrinkles, stacks poorly, or curls FRU Fuser Action This problem is set up correctly. 4.


