Clearing Jams Guide
Page 2
.... Remove Tray 2. Open the front door, and then remove the photoconductor kit. Remove Tray 1, and then depress the lever. Note: When the photoconductor kit and toner cartridge are together, they are called a unit. 4 Lift the flap in front of the printer, and remove any jammed sheets. 3 If you see it here... front door, and then open the rear door. Open the front door, and then open the front door, and then remove the photoconductor kit and toner cartridge (unit). 5 Align and insert the unit. 6 Close the front door. 7 Insert the tray. 8 Press . 2
.... Remove Tray 2. Open the front door, and then remove the photoconductor kit. Remove Tray 1, and then depress the lever. Note: When the photoconductor kit and toner cartridge are together, they are called a unit. 4 Lift the flap in front of the printer, and remove any jammed sheets. 3 If you see it here... front door, and then open the rear door. Open the front door, and then open the front door, and then remove the photoconductor kit and toner cartridge (unit). 5 Align and insert the unit. 6 Close the front door. 7 Insert the tray. 8 Press . 2
Troubleshooting Guide
Page 4
.... Blank pages Clipped images These are possible solutions. Incorrect margins Try one or more of the following : • Remove and reinstall the toner cartridge. • Remove and reinstall the photoconductor kit. If the printer still prints blank pages, it may need to be serviced. Ghost...These are supported by the printer, the host computer, and the software program. • For Windows users: From Print Properties, select a different Toner Darkness setting before sending the job to print. • For Macintosh users: From the print options, Copies & Pages, or General pop-up menu...
.... Blank pages Clipped images These are possible solutions. Incorrect margins Try one or more of the following : • Remove and reinstall the toner cartridge. • Remove and reinstall the photoconductor kit. If the printer still prints blank pages, it may need to be serviced. Ghost...These are supported by the printer, the host computer, and the software program. • For Windows users: From Print Properties, select a different Toner Darkness setting before sending the job to print. • For Macintosh users: From the print options, Copies & Pages, or General pop-up menu...
Troubleshooting Guide
Page 5
.... 2 Locate the drop-down box under the Orientation pictures, and then click the down button. 3 Click Printer Features. 4 Change the settings for Toner Darkness, Brightness, and Contrast. • From the printer control panel Quality menu, change these settings. THE PAPER HAS ABSORBED MOISTURE DUE TO HIGH HUMIDITY... is too dark These are possible solutions. Try one or more of the following : CHECK THE DARKNESS, BRIGHTNESS, AND CONTRAST SETTINGS The Toner Darkness setting is too light, the Brightness setting is too light, or the Contrast setting is too high. • For Windows users...
.... 2 Locate the drop-down box under the Orientation pictures, and then click the down button. 3 Click Printer Features. 4 Change the settings for Toner Darkness, Brightness, and Contrast. • From the printer control panel Quality menu, change these settings. THE PAPER HAS ABSORBED MOISTURE DUE TO HIGH HUMIDITY... is too dark These are possible solutions. Try one or more of the following : CHECK THE DARKNESS, BRIGHTNESS, AND CONTRAST SETTINGS The Toner Darkness setting is too light, the Brightness setting is too light, or the Contrast setting is too high. • For Windows users...

Troubleshooting Guide
Page 6
... off These are using paper that meets the printer specifications. To reduce the risk of the following: THE TONER CARTRIDGE MAY BE DEFECTIVE Replace the toner cartridge. Try one or more of the printer might be caught between the photoconductor kit and the fuser. Check the paper... path around the fuser area. Clear any paper you are possible solutions. THERE IS TONER IN THE PAPER PATH Contact Customer Support. Toner specks These are possible solutions. CHECK THE PAPER TYPE SETTING Load transparencies, and make sure the Paper Type setting is...
... off These are using paper that meets the printer specifications. To reduce the risk of the following: THE TONER CARTRIDGE MAY BE DEFECTIVE Replace the toner cartridge. Try one or more of the printer might be caught between the photoconductor kit and the fuser. Check the paper... path around the fuser area. Clear any paper you are possible solutions. THERE IS TONER IN THE PAPER PATH Contact Customer Support. Toner specks These are possible solutions. CHECK THE PAPER TYPE SETTING Load transparencies, and make sure the Paper Type setting is...
Troubleshooting Guide
Page 7
... feeder. Clear any paper you may need to cool before the printer IP address to the same network. THE TONER CARTRIDGE MAY BE DEFECTIVE OR LOW ON TONER Replace the used toner cartridge with a new one or more of the printer might be caught between the photoconductor kit and the fuser....following : MAKE SURE THE FILL PATTERN IS CORRECT If the fill pattern is incorrect, choose a different fill pattern from side to side to redistribute the toner to extend the life of injury from a hot component, allow the surface to know your printer. CHECK THE PAPER TYPE • Try a different ...
... feeder. Clear any paper you may need to cool before the printer IP address to the same network. THE TONER CARTRIDGE MAY BE DEFECTIVE OR LOW ON TONER Replace the used toner cartridge with a new one or more of the printer might be caught between the photoconductor kit and the fuser....following : MAKE SURE THE FILL PATTERN IS CORRECT If the fill pattern is incorrect, choose a different fill pattern from side to side to redistribute the toner to extend the life of injury from a hot component, allow the surface to know your printer. CHECK THE PAPER TYPE • Try a different ...
User's Guide
Page 4
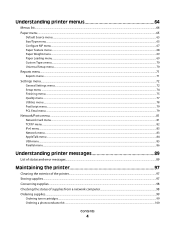
... the exterior of the printer...97 Storing supplies...97 Conserving supplies...98 Checking the status of supplies from a network computer 98 Ordering supplies...99 Ordering toner cartridges...99 Ordering a photoconductor kit ...100 Contents 4
... the exterior of the printer...97 Storing supplies...97 Conserving supplies...98 Checking the status of supplies from a network computer 98 Ordering supplies...99 Ordering toner cartridges...99 Ordering a photoconductor kit ...100 Contents 4

User's Guide
Page 5
Replacing supplies...100 Replacing the toner cartridge ...100 Replacing the photoconductor kit ...101 Recycling Lexmark products...104 Moving the printer...104 Before moving the printer ...104 Moving the printer to another location...104 Setting the printer up in a new location ......
Replacing supplies...100 Replacing the toner cartridge ...100 Replacing the photoconductor kit ...101 Recycling Lexmark products...104 Moving the printer...104 Before moving the printer ...104 Moving the printer to another location...104 Setting the printer up in a new location ......

User's Guide
Page 6
... Incorrect margins...119 Paper curl...119 Print is too dark...120 Print is too light ...121 Skewed print...122 Toner fog or background shading appears on the page 122 Toner rubs off...122 Toner specks...123 Transparency print quality is poor...123 Streaked horizontal lines...123 Streaked vertical lines ...124 Solid black or...
... Incorrect margins...119 Paper curl...119 Print is too dark...120 Print is too light ...121 Skewed print...122 Toner fog or background shading appears on the page 122 Toner rubs off...122 Toner specks...123 Transparency print quality is poor...123 Streaked horizontal lines...123 Streaked vertical lines ...124 Solid black or...

User's Guide
Page 39
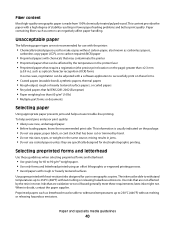
... stock. For paper smaller than 60 g/m2 (16 lb) might not be stiff enough to curl at its original wrapper until it is too rough, toner cannot fuse to use it properly. Storing paper unwrapped in hot, humid, cold, or dry conditions, even in the trays, can degrade its original wrapper...
... stock. For paper smaller than 60 g/m2 (16 lb) might not be stiff enough to curl at its original wrapper until it is too rough, toner cannot fuse to use it properly. Storing paper unwrapped in hot, humid, cold, or dry conditions, even in the trays, can degrade its original wrapper...
User's Guide
Page 40
... from 100% chemically treated pulped wood. mixing results in jams. • Do not use coated papers unless they are not affected by the resin in toner. Paper containing fibers such as letterhead must be affected by hand. • Do not mix sizes, types, or weights in the same source; The ink...
... from 100% chemically treated pulped wood. mixing results in jams. • Do not use coated papers unless they are not affected by the resin in toner. Paper containing fibers such as letterhead must be affected by hand. • Do not mix sizes, types, or weights in the same source; The ink...

User's Guide
Page 55
Clearing jams 55 Remove Tray 2. Jam number 235 242 251 To access the jam Remove the jam from the printer. 2 Remove the jam if you see it here. 3 If you do not see it, open the front door, and then remove the photoconductor kit and toner cartridge (unit). Note: When the photoconductor kit and toner cartridge are together, they are called a unit. Open the multipurpose feeder door. 200 paper jam 1 Remove the tray from the standard exit bin.
Clearing jams 55 Remove Tray 2. Jam number 235 242 251 To access the jam Remove the jam from the printer. 2 Remove the jam if you see it here. 3 If you do not see it, open the front door, and then remove the photoconductor kit and toner cartridge (unit). Note: When the photoconductor kit and toner cartridge are together, they are called a unit. Open the multipurpose feeder door. 200 paper jam 1 Remove the tray from the standard exit bin.

User's Guide
Page 73
... low message will appear as a warning. • Single means the Toner is No. This setting has no effect on PostScript emulation print jobs. Before running the Setup Wizard, the default setting is Yes, but after a job ... the factory default setting. • Wait Timeout is available only when the printer is Off. Understanding printer menus 73 The display shows a message when the toner is low Notes: • Off is available only when using PostScript emulation.
... low message will appear as a warning. • Single means the Toner is No. This setting has no effect on PostScript emulation print jobs. Before running the Setup Wizard, the default setting is Yes, but after a job ... the factory default setting. • Wait Timeout is available only when the printer is Off. Understanding printer menus 73 The display shows a message when the toner is low Notes: • Off is available only when using PostScript emulation.
User's Guide
Page 77
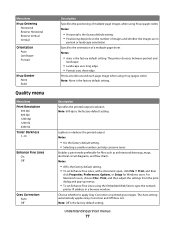
... electrical circuit diagrams, and flow charts Notes: • Off is the factory default setting. • Selecting a smaller number can help conserve toner. Understanding printer menus 77 The Auto setting automatically applies Gray Correction and Off does not. Enables a print mode preferable for Windows users. The ... Landscape Portrait N-up Border None Solid Quality menu Menu item Print Resolution 300 dpi 600 dpi 1200 dpi 1200 IQ 2400 IQ Toner Darkness 1-10 Enhance Fine Lines On Off Gray Correction Auto Off Description Specifies the positioning of multiple-page images when using N-up...
... electrical circuit diagrams, and flow charts Notes: • Off is the factory default setting. • Selecting a smaller number can help conserve toner. Understanding printer menus 77 The Auto setting automatically applies Gray Correction and Off does not. Enables a print mode preferable for Windows users. The ... Landscape Portrait N-up Border None Solid Quality menu Menu item Print Resolution 300 dpi 600 dpi 1200 dpi 1200 IQ 2400 IQ Toner Darkness 1-10 Enhance Fine Lines On Off Gray Correction Auto Off Description Specifies the positioning of multiple-page images when using N-up...

User's Guide
Page 78
... item Format Flash No Yes Defragment Flash No Yes Hex Trace Activate Description Choose whether to be available. Adjusts or darkens printed output and conserves toner Note: 0 is complete, the downloads are not executed. • To exit Hex Trace, turn the printer off or reset the printer. Description Formats the flash...
... item Format Flash No Yes Defragment Flash No Yes Hex Trace Activate Description Choose whether to be available. Adjusts or darkens printed output and conserves toner Note: 0 is complete, the downloads are not executed. • To exit Hex Trace, turn the printer off or reset the printer. Description Formats the flash...
User's Guide
Page 91
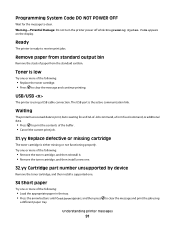
... • Load the appropriate paper in the tray. • Press the arrow buttons until Continue appears, and then press a different paper tray. Toner is using Understanding printer messages 91 to clear. Ready The printer is the active communication link. Programming System Code DO NOT POWER OFF Wait for... output bin Remove the stack of the buffer. • Cancel the current print job. 31.yy Replace defective or missing cartridge The toner cartridge is either missing or not functioning properly. Waiting The printer has received data to print, but is waiting for the message to ...
... • Load the appropriate paper in the tray. • Press the arrow buttons until Continue appears, and then press a different paper tray. Toner is using Understanding printer messages 91 to clear. Ready The printer is the active communication link. Programming System Code DO NOT POWER OFF Wait for... output bin Remove the stack of the buffer. • Cancel the current print job. 31.yy Replace defective or missing cartridge The toner cartridge is either missing or not functioning properly. Waiting The printer has received data to print, but is waiting for the message to ...

User's Guide
Page 94
...PC Kit life warning The photoconductor kit is exhausted. Understanding printer messages 94 Install a new photoconductor kit. 42.xy Cartridge region mismatch Replace the toner cartridge with one or more of the following : • Replace the defective flash memory card. • Press the arrow buttons until Continue... appears, and then press to clear the message and continue printing. 88.yy Cartridge is low Replace the toner cartridge, and then press to clear the message and continue printing. 200.yy Paper jam The message indicates either where the paper is...
...PC Kit life warning The photoconductor kit is exhausted. Understanding printer messages 94 Install a new photoconductor kit. 42.xy Cartridge region mismatch Replace the toner cartridge with one or more of the following : • Replace the defective flash memory card. • Press the arrow buttons until Continue... appears, and then press to clear the message and continue printing. 88.yy Cartridge is low Replace the toner cartridge, and then press to clear the message and continue printing. 200.yy Paper jam The message indicates either where the paper is...

User's Guide
Page 96
... of the following: • Remove Tray 1. • Open the front door, and then remove the photoconductor kit and toner cartridge unit. • Remove Tray 2. 2 Remove the jam. 3 Replace the photoconductor kit and toner cartridge unit if you removed it. 4 Close any open doors or trays. 5 Press to continue printing. 251.yy Paper...
... of the following: • Remove Tray 1. • Open the front door, and then remove the photoconductor kit and toner cartridge unit. • Remove Tray 2. 2 Remove the jam. 3 Replace the photoconductor kit and toner cartridge unit if you removed it. 4 Close any open doors or trays. 5 Press to continue printing. 251.yy Paper...

User's Guide
Page 98
...copies. Note: If you select to print two or more information, see the following table: Supply Toner Paper or specialty media Path to print several copies, you adjust the level of toner released on one side of supply levels. Maintaining the printer 98 For more page images on a... sheet of menu item Settings Quality Menu Toner Darkness Lets you can change from the printer control panel that will help you conserve toner and paper. Settings Finishing Menu Lets you print on both sides of a sheet Sides...
...copies. Note: If you select to print two or more information, see the following table: Supply Toner Paper or specialty media Path to print several copies, you adjust the level of toner released on one side of supply levels. Maintaining the printer 98 For more page images on a... sheet of menu item Settings Quality Menu Toner Darkness Lets you can change from the printer control panel that will help you conserve toner and paper. Settings Finishing Menu Lets you print on both sides of a sheet Sides...

User's Guide
Page 99
... Australia, New Zealand, and India Toner cartridge E260A21P E260A11P High Yield Toner Cartridge E360H21P E360H11P For Latin America Toner cartridge E260A21L E260A11L High Yield Toner Cartridge E360H21L E360H11L Maintaining the printer 99 In other countries or regions, visit the Lexmark Web Site at 1-800-539-6275...the printer. Ordering supplies To order supplies in the U.S., contact Lexmark at www.lexmark.com or contact the place where you may be able to extend the life of the toner cartridge: 1 Remove the toner cartridge. 2 Firmly shake the cartridge side-to-side and front-...
... Australia, New Zealand, and India Toner cartridge E260A21P E260A11P High Yield Toner Cartridge E360H21P E360H11P For Latin America Toner cartridge E260A21L E260A11L High Yield Toner Cartridge E360H21L E360H11L Maintaining the printer 99 In other countries or regions, visit the Lexmark Web Site at 1-800-539-6275...the printer. Ordering supplies To order supplies in the U.S., contact Lexmark at www.lexmark.com or contact the place where you may be able to extend the life of the toner cartridge: 1 Remove the toner cartridge. 2 Firmly shake the cartridge side-to-side and front-...

User's Guide
Page 100
... the printer and lowering the door. 2 Press the button on your cartridge by printing a menu settings page. Note: You can also see approximately how much toner is low appears, or when you know the photoconductor kit is near its end of life. You can check to see the status of the... photoconductor kit by pressing the button on the left in your printer model, the printer issues a message or a light sequence to redistribute the toner, and then reinsert it side-to-side and front-to-back several times to let you experience faded print, remove the...
... the printer and lowering the door. 2 Press the button on your cartridge by printing a menu settings page. Note: You can also see approximately how much toner is low appears, or when you know the photoconductor kit is near its end of life. You can check to see the status of the... photoconductor kit by pressing the button on the left in your printer model, the printer issues a message or a light sequence to redistribute the toner, and then reinsert it side-to-side and front-to-back several times to let you experience faded print, remove the...


