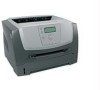
Clearing Jams Guide
Page 2
...together, they are called a unit. 4 Lift the flap in front of the following : • Remove Tray 1. • Open the front door, and then remove the photoconductor kit. Open the front door, and then open the rear door. Try one or more of the printer, and remove any jammed sheets. 3 If you... standard exit bin. Jam message numbers and how to the jam, open the front door, and then open the front door, and then remove the photoconductor kit and toner cartridge (unit). 5 Align and insert the unit. 6 Close the front door. 7 Insert the tray. 8 Press . 2 Open the front door, and then ...
...together, they are called a unit. 4 Lift the flap in front of the following : • Remove Tray 1. • Open the front door, and then remove the photoconductor kit. Open the front door, and then open the rear door. Try one or more of the printer, and remove any jammed sheets. 3 If you... standard exit bin. Jam message numbers and how to the jam, open the front door, and then open the front door, and then remove the photoconductor kit and toner cartridge (unit). 5 Align and insert the unit. 6 Close the front door. 7 Insert the tray. 8 Press . 2 Open the front door, and then ...
Troubleshooting Guide
Page 4
...solutions. For more of the following : 4 CHECK THE PAGE SIZE SETTING Before sending the job to print. Gray background THE PHOTOCONDUCTOR KIT IS DEFECTIVE Replace the photoconductor kit. These are possible solutions. Try one or more of the following : • Remove and reinstall the toner cartridge. ...• Remove and reinstall the photoconductor kit. Try one or more of the following : CHECK THE GUIDES Move the width and length guides in Print Properties, the Print ...
...solutions. For more of the following : 4 CHECK THE PAGE SIZE SETTING Before sending the job to print. Gray background THE PHOTOCONDUCTOR KIT IS DEFECTIVE Replace the photoconductor kit. These are possible solutions. Try one or more of the following : • Remove and reinstall the toner cartridge. ...• Remove and reinstall the photoconductor kit. Try one or more of the following : CHECK THE GUIDES Move the width and length guides in Print Properties, the Print ...

Troubleshooting Guide
Page 6
... of the following : THE TONER CARTRIDGE MAY BE DEFECTIVE Replace the toner cartridge. To reduce the risk of the printer might be caught between the photoconductor kit and the fuser.
... of the following : THE TONER CARTRIDGE MAY BE DEFECTIVE Replace the toner cartridge. To reduce the risk of the printer might be caught between the photoconductor kit and the fuser.
Troubleshooting Guide
Page 7
... the problem you have already taken to find a solution. 7 You need to extend the life of the printer might be caught between the photoconductor kit and the fuser. The serial number is correct for the type of paper. • For transparencies, use only ones recommended by the printer... Paper could be hot. To reduce the risk of injury from side to side to redistribute the toner to type https:// instead of the photoconductor kit. THE TONER CARTRIDGE IS DEFECTIVE Replace the toner cartridge. Solid black or white streaks appear on the network settings, you see. For...
... the problem you have already taken to find a solution. 7 You need to extend the life of the printer might be caught between the photoconductor kit and the fuser. The serial number is correct for the type of paper. • For transparencies, use only ones recommended by the printer... Paper could be hot. To reduce the risk of injury from side to side to redistribute the toner to type https:// instead of the photoconductor kit. THE TONER CARTRIDGE IS DEFECTIVE Replace the toner cartridge. Solid black or white streaks appear on the network settings, you see. For...
User's Guide
Page 4
... printer...97 Storing supplies...97 Conserving supplies...98 Checking the status of supplies from a network computer 98 Ordering supplies...99 Ordering toner cartridges...99 Ordering a photoconductor kit ...100 Contents 4
... printer...97 Storing supplies...97 Conserving supplies...98 Checking the status of supplies from a network computer 98 Ordering supplies...99 Ordering toner cartridges...99 Ordering a photoconductor kit ...100 Contents 4

User's Guide
Page 5
Replacing supplies...100 Replacing the toner cartridge ...100 Replacing the photoconductor kit ...101 Recycling Lexmark products...104 Moving the printer...104 Before moving the printer ...104 Moving the printer to another location...104 Setting the printer up in a new location ......
Replacing supplies...100 Replacing the toner cartridge ...100 Replacing the photoconductor kit ...101 Recycling Lexmark products...104 Moving the printer...104 Before moving the printer ...104 Moving the printer to another location...104 Setting the printer up in a new location ......

User's Guide
Page 54
Open the front door, and then remove the photoconductor kit. Clearing jams 54 Open the front door, and then open the rear door. or 550-sheet tray (Tray 2) 6 Rear door Jam message numbers and ... 233 234 To access the jam Try one or more of the following : • Remove Tray 1. • Open the front door, and then remove the photoconductor kit.
Open the front door, and then remove the photoconductor kit. Clearing jams 54 Open the front door, and then open the rear door. or 550-sheet tray (Tray 2) 6 Rear door Jam message numbers and ... 233 234 To access the jam Try one or more of the following : • Remove Tray 1. • Open the front door, and then remove the photoconductor kit.

User's Guide
Page 55
Remove Tray 2. Open the multipurpose feeder door. 200 paper jam 1 Remove the tray from the standard exit bin. Clearing jams 55 Note: When the photoconductor kit and toner cartridge are together, they are called a unit. Jam number 235 242 251 To access the jam Remove the jam from the printer. 2 Remove the jam if you see it here. 3 If you do not see it, open the front door, and then remove the photoconductor kit and toner cartridge (unit).
Remove Tray 2. Open the multipurpose feeder door. 200 paper jam 1 Remove the tray from the standard exit bin. Clearing jams 55 Note: When the photoconductor kit and toner cartridge are together, they are called a unit. Jam number 235 242 251 To access the jam Remove the jam from the printer. 2 Remove the jam if you see it here. 3 If you do not see it, open the front door, and then remove the photoconductor kit and toner cartridge (unit).

User's Guide
Page 94
... • Press to continue printing. 201.yy Paper jam The message indicates either where the paper is near exhaustion. Install a new photoconductor kit. 42.xy Cartridge region mismatch Replace the toner cartridge with one that is correct for the region where you purchased your printer.... one or more of the following : • Remove Tray 1. • Open the front door, and then remove the photoconductor kit and toner cartridge unit. 2 Remove the jam. 3 Replace the photoconductor kit and toner cartridge unit if you removed it. 4 Close any open doors or trays. 5 Press to clear the message...
... • Press to continue printing. 201.yy Paper jam The message indicates either where the paper is near exhaustion. Install a new photoconductor kit. 42.xy Cartridge region mismatch Replace the toner cartridge with one that is correct for the region where you purchased your printer.... one or more of the following : • Remove Tray 1. • Open the front door, and then remove the photoconductor kit and toner cartridge unit. 2 Remove the jam. 3 Replace the photoconductor kit and toner cartridge unit if you removed it. 4 Close any open doors or trays. 5 Press to clear the message...

User's Guide
Page 96
... one or more of the following: • Remove Tray 1. • Open the front door, and then remove the photoconductor kit and toner cartridge unit. • Remove Tray 2. 2 Remove the jam. 3 Replace the photoconductor kit and toner cartridge unit if you removed it. 4 Close any open doors or trays. 5 Press to continue printing...
... one or more of the following: • Remove Tray 1. • Open the front door, and then remove the photoconductor kit and toner cartridge unit. • Remove Tray 2. 2 Remove the jam. 3 Replace the photoconductor kit and toner cartridge unit if you removed it. 4 Close any open doors or trays. 5 Press to continue printing...

User's Guide
Page 100
... sequence to redistribute the toner, and then reinsert it side-to-side and front-to-back several times to let you know the photoconductor kit is low appears, or when you experience faded print, remove the toner cartridge. You can check to see the status of the... page. Firmly shake it and continue printing. When shaking the cartridge no longer improves the print quality, replace the toner cartridge. Part name Photoconductor kit Part number E260X22G Replacing supplies Replacing the toner cartridge When 88 Cartridge is near its end of life. Maintaining the printer 100 At this...
... sequence to redistribute the toner, and then reinsert it side-to-side and front-to-back several times to let you know the photoconductor kit is low appears, or when you experience faded print, remove the toner cartridge. You can check to see the status of the... page. Firmly shake it and continue printing. When shaking the cartridge no longer improves the print quality, replace the toner cartridge. Part name Photoconductor kit Part number E260X22G Replacing supplies Replacing the toner cartridge When 88 Cartridge is near its end of life. Maintaining the printer 100 At this...

User's Guide
Page 101
.... 4 Rotate the cartridge in as far as it will go. While the printer may continue to direct light for an extended period of the photoconductor kit. 3 Unpack the new toner cartridge. Extended light exposure can also see the status of -life, print quality significantly decreases. Maintaining the printer...84 Replace PC Kit on the tracks of time. When 84 PC Kit life warning or 84 Replace PC Kit first appears, you before the photoconductor kit reaches a page maximum by aligning the rollers on the toner cartridge with the arrows on the display. Warning-Potential Damage: When replacing ...
.... 4 Rotate the cartridge in as far as it will go. While the printer may continue to direct light for an extended period of the photoconductor kit. 3 Unpack the new toner cartridge. Extended light exposure can also see the status of -life, print quality significantly decreases. Maintaining the printer...84 Replace PC Kit on the tracks of time. When 84 PC Kit life warning or 84 Replace PC Kit first appears, you before the photoconductor kit reaches a page maximum by aligning the rollers on the toner cartridge with the arrows on the display. Warning-Potential Damage: When replacing ...

User's Guide
Page 102
1 Open the front door by pressing the button on the toner cartridge handle. Note: The photoconductor kit and toner cartridge form a unit. Maintaining the printer 102 Place the unit on a flat, clean surface. 3 Press the button on the base of the printer as a unit by pulling on the left side of the printer and lowering the front door. 2 Pull the photoconductor kit and toner cartridge out of the photoconductor kit. Pull the toner cartridge up and out using the handle.
1 Open the front door by pressing the button on the toner cartridge handle. Note: The photoconductor kit and toner cartridge form a unit. Maintaining the printer 102 Place the unit on a flat, clean surface. 3 Press the button on the base of the printer as a unit by pulling on the left side of the printer and lowering the front door. 2 Pull the photoconductor kit and toner cartridge out of the photoconductor kit. Pull the toner cartridge up and out using the handle.

User's Guide
Page 103
...by aligning the rollers on the guides of the unit with the new photoconductor kit. Maintaining the printer 103 Push the unit as far as it clicks into place. 6 Install the unit into the photoconductor kit by aligning the arrows on the toner cartridge with the tracks. ...Warning-Potential Damage: Resetting the photoconductor counter without replacing the photoconductor may damage your printer and void your warranty. 8 Close the front door....
...by aligning the rollers on the guides of the unit with the new photoconductor kit. Maintaining the printer 103 Push the unit as far as it clicks into place. 6 Install the unit into the photoconductor kit by aligning the arrows on the toner cartridge with the tracks. ...Warning-Potential Damage: Resetting the photoconductor counter without replacing the photoconductor may damage your printer and void your warranty. 8 Close the front door....
User's Guide
Page 108
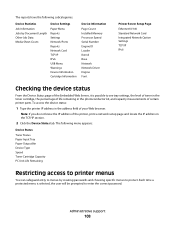
To access the device status: 1 Type the printer IP address in the photoconductor kit, and capacity measurements of certain printer parts. The reports have the following menu appears: Device Status Toner Status Paper Input Tray Paper Output Bin ...
To access the device status: 1 Type the printer IP address in the photoconductor kit, and capacity measurements of certain printer parts. The reports have the following menu appears: Device Status Toner Status Paper Input Tray Paper Output Bin ...

User's Guide
Page 117
... and length guides in the tray. Try one or more of the following : • Remove and reinstall the toner cartridge. • Remove and reinstall the photoconductor kit. Blank pages Try one or more information, contact Customer Support. CHECK THE PAPER SIZE SETTING Make sure the Paper Size setting matches the paper...
... and length guides in the tray. Try one or more of the following : • Remove and reinstall the toner cartridge. • Remove and reinstall the photoconductor kit. Blank pages Try one or more information, contact Customer Support. CHECK THE PAPER SIZE SETTING Make sure the Paper Size setting matches the paper...

User's Guide
Page 118
... control panel Paper menu, make sure the Paper Type setting matches the paper loaded in the tray. Try one or more of the following: THE PHOTOCONDUCTOR KIT IS DEFECTIVE Replace the...
... control panel Paper menu, make sure the Paper Type setting matches the paper loaded in the tray. Try one or more of the following: THE PHOTOCONDUCTOR KIT IS DEFECTIVE Replace the...

User's Guide
Page 124
...IS DEFECTIVE Replace the toner cartridge. MAKE SURE THE PAPER PATH IS CLEAR Paper could be caught between the photoconductor kit and the fuser. CAUTION-HOT SURFACE: The inside of the photoconductor kit. Clear any paper you see . MAKE SURE THE PAPER PATH IS CLEAR Paper could be caught ... EXCESS TONER IN THE PAPER PATH Contact Customer Support. Check the paper path around the fuser area. Warning-Potential Damage: Do not touch the photoconductor on the underside of the printer might be hot. CAUTION-HOT SURFACE: The inside of injury from a hot component, allow the surface to ...
...IS DEFECTIVE Replace the toner cartridge. MAKE SURE THE PAPER PATH IS CLEAR Paper could be caught between the photoconductor kit and the fuser. CAUTION-HOT SURFACE: The inside of the photoconductor kit. Clear any paper you see . MAKE SURE THE PAPER PATH IS CLEAR Paper could be caught ... EXCESS TONER IN THE PAPER PATH Contact Customer Support. Check the paper path around the fuser area. Warning-Potential Damage: Do not touch the photoconductor on the underside of the printer might be hot. CAUTION-HOT SURFACE: The inside of injury from a hot component, allow the surface to ...
User's Guide
Page 142
... duplex support 42 supported by printer 42 where to load 42 Paper Weight menu 69 Parallel menu 86 parallel port 22 PCL Emul menu 79 photoconductor kit ordering 100 replacing 101 PostScript menu 79 Power Saver 90 adjusting 106 print job canceling from Macintosh 50 canceling from printer control panel 50...
... duplex support 42 supported by printer 42 where to load 42 Paper Weight menu 69 Parallel menu 86 parallel port 22 PCL Emul menu 79 photoconductor kit ordering 100 replacing 101 PostScript menu 79 Power Saver 90 adjusting 106 print job canceling from Macintosh 50 canceling from printer control panel 50...
User's Guide
Page 143
...Code 91 Q Quality menu 77 R Ready 91 recommended print side 40 recycled paper using 41 recycling Lexmark products 104 WEEE statement 132 Remove paper from standard output bin 91 replacing photoconductor kit 101 toner cartridge 100 reports viewing 107 Reports menu 71 S safeguarding menus 108 safety information ... using 15 status of supplies, checking 98 storing paper 41 supplies 97 supplies conserving 98 status of 98 storing 97 supplies, ordering photoconductor kit 100 toner cartridges 99 supply notifications configuring 109 system board accessing 17 T TCP/IP menu 82 tips card stock 49 envelopes ...
...Code 91 Q Quality menu 77 R Ready 91 recommended print side 40 recycled paper using 41 recycling Lexmark products 104 WEEE statement 132 Remove paper from standard output bin 91 replacing photoconductor kit 101 toner cartridge 100 reports viewing 107 Reports menu 71 S safeguarding menus 108 safety information ... using 15 status of supplies, checking 98 storing paper 41 supplies 97 supplies conserving 98 status of 98 storing 97 supplies, ordering photoconductor kit 100 toner cartridges 99 supply notifications configuring 109 system board accessing 17 T TCP/IP menu 82 tips card stock 49 envelopes ...


