
Quick Reference
Page 3
... inside the manual feeder door of the printer and can contact the paper guides. 4 Adjust the paper guides to 150 sheets of paper at a time. Warning-Potential Damage: Do not force the paper into the manual feeder only to the point where its leading edge can feed only one sheet of... it stacks. 7 Insert the tray. the manual feeder to the center of the manual feeder. 3 Feed paper into the feeder. You can use 2 When the light is lit, load the paper faceup into the center of the tray.
... inside the manual feeder door of the printer and can contact the paper guides. 4 Adjust the paper guides to 150 sheets of paper at a time. Warning-Potential Damage: Do not force the paper into the manual feeder only to the point where its leading edge can feed only one sheet of... it stacks. 7 Insert the tray. the manual feeder to the center of the manual feeder. 3 Feed paper into the feeder. You can use 2 When the light is lit, load the paper faceup into the center of the tray.
Maintenance Guide
Page 7
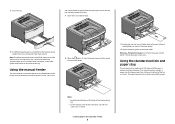
... of the photoconductor kit. The cartridge clicks into place when correctly installed. 6 Close the front door. Extended light exposure can cause print quality problems. 4 Rotate the cartridge in as far as it will go. Warning-Potential Damage: When replacing a toner cartridge, do not leave the new cartridge exposed to distribute the toner...
... of the photoconductor kit. The cartridge clicks into place when correctly installed. 6 Close the front door. Extended light exposure can cause print quality problems. 4 Rotate the cartridge in as far as it will go. Warning-Potential Damage: When replacing a toner cartridge, do not leave the new cartridge exposed to distribute the toner...

Maintenance Guide
Page 8
Light sequences Photoconductor life warning ‑ Blinking ‑ On Replace photoconductor ‑ Blinking ‑ Blinking ‑ On When you first receive either light sequence, you when the photoconductor kit reaches a page maximum. Note: The photoconductor kit is one item only. While the printer may continue to function properly ... the photoconductor kit The printer notifies you should immediately order a new photoconductor kit. Maintaining the printer 8 The printer does this by displaying the "Photoconductor life warning" light sequence or the "Replace photoconductor...
Light sequences Photoconductor life warning ‑ Blinking ‑ On Replace photoconductor ‑ Blinking ‑ Blinking ‑ On When you first receive either light sequence, you when the photoconductor kit reaches a page maximum. Note: The photoconductor kit is one item only. While the printer may continue to function properly ... the photoconductor kit The printer notifies you should immediately order a new photoconductor kit. Maintaining the printer 8 The printer does this by displaying the "Photoconductor life warning" light sequence or the "Replace photoconductor...
User Guide
Page 35
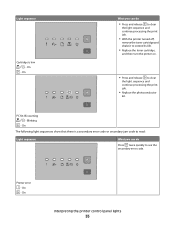
... error - On The following light sequences show that there is low - On Interpreting the printer control panel lights 35 On - PC Kit life warning - On - Blinking - Light sequence Cartridge is a secondary error code or secondary jam code to read: Light sequence What you can do ...• Press and release to clear the light sequence and continue processing the ...
... error - On The following light sequences show that there is low - On Interpreting the printer control panel lights 35 On - PC Kit life warning - On - Blinking - Light sequence Cartridge is a secondary error code or secondary jam code to read: Light sequence What you can do ...• Press and release to clear the light sequence and continue processing the ...

User Guide
Page 46
Warning-Potential Damage: Do not force the paper into the center of 20 lb paper. Forcing the paper causes jams. Using the standard exit bin and ... the stamp area as it stacks. Loading paper and specialty media 46 Notes: • Load letterhead faceup, with the top of the paper. 2 When the light is lit, load the paper faceup into the feeder.
Warning-Potential Damage: Do not force the paper into the center of 20 lb paper. Forcing the paper causes jams. Using the standard exit bin and ... the stamp area as it stacks. Loading paper and specialty media 46 Notes: • Load letterhead faceup, with the top of the paper. 2 When the light is lit, load the paper faceup into the feeder.

User Guide
Page 74
.... The display shows a message when the toner is low Notes: • Off is the factory default setting. The Toner is low message will appear as a warning. • Single means the Toner is No. Before running the Setup Wizard, the default setting is Yes, but after running the wizard, the default setting...
.... The display shows a message when the toner is low Notes: • Off is the factory default setting. The Toner is low message will appear as a warning. • Single means the Toner is No. Before running the Setup Wizard, the default setting is Yes, but after running the wizard, the default setting...

User Guide
Page 86
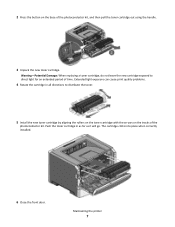
Warning-Potential Damage: When replacing a toner cartridge, do not leave the new cartridge exposed to distribute the toner. Maintaining the printer 86 To replace the toner cartridge: 1 Open the front door by pressing the button on the left side of the printer and lowering the door. 2 Press the button on the base of time. Extended light exposure can cause print quality problems. 4 Rotate the cartridge in all directions to direct light for an extended period of the photoconductor kit, and then pull the toner cartridge out using the handle. 3 Unpack the new toner cartridge.
Warning-Potential Damage: When replacing a toner cartridge, do not leave the new cartridge exposed to distribute the toner. Maintaining the printer 86 To replace the toner cartridge: 1 Open the front door by pressing the button on the left side of the printer and lowering the door. 2 Press the button on the base of time. Extended light exposure can cause print quality problems. 4 Rotate the cartridge in all directions to direct light for an extended period of the photoconductor kit, and then pull the toner cartridge out using the handle. 3 Unpack the new toner cartridge.
User Guide
Page 87
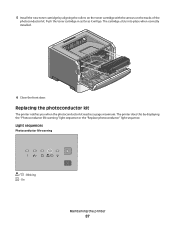
.... Replacing the photoconductor kit The printer notifies you when the photoconductor kit reaches a page maximum. Light sequences Photoconductor life warning - On Maintaining the printer 87 5 Install the new toner cartridge by displaying the "Photoconductor life warning" light sequence or the "Replace photoconductor" light sequence. Push the toner cartridge in as far as it will go.
.... Replacing the photoconductor kit The printer notifies you when the photoconductor kit reaches a page maximum. Light sequences Photoconductor life warning - On Maintaining the printer 87 5 Install the new toner cartridge by displaying the "Photoconductor life warning" light sequence or the "Replace photoconductor" light sequence. Push the toner cartridge in as far as it will go.

User Guide
Page 90
... 8 Close the front door. Note: Use the handholds located on the guides of the unit with this product or the manufacturer's authorized replacement. Warning-Potential Damage: Damage to lift it off the optional drawer, and set it will go. 7 After replacing the photoconductor kit, reset the photoconductor ...counter, open the front door, and press and hold until all cords and cables from the wall outlet. • Disconnect all the lights cycle. Maintaining the printer 90 Moving the printer to another location The printer and options can be safely moved to another location by the ...
... 8 Close the front door. Note: Use the handholds located on the guides of the unit with this product or the manufacturer's authorized replacement. Warning-Potential Damage: Damage to lift it off the optional drawer, and set it will go. 7 After replacing the photoconductor kit, reset the photoconductor ...counter, open the front door, and press and hold until all cords and cables from the wall outlet. • Disconnect all the lights cycle. Maintaining the printer 90 Moving the printer to another location The printer and options can be safely moved to another location by the ...

Service Manual
Page 27
...Warning: Paper clips are commonly used near printers and can become lodged in providing corrective action for a malfunctioning printer. Diagnostics information 2-1 To determine the corrective action to the printer. Always check for the following information: • A description of a problem, see "Diagram of the printer. - Models E260d and E260dn... have an operator panel containing lights and buttons. 2. This is a precaution for personal safety and to prevent damage to repair a printer...
...Warning: Paper clips are commonly used near printers and can become lodged in providing corrective action for a malfunctioning printer. Diagnostics information 2-1 To determine the corrective action to the printer. Always check for the following information: • A description of a problem, see "Diagram of the printer. - Models E260d and E260dn... have an operator panel containing lights and buttons. 2. This is a precaution for personal safety and to prevent damage to repair a printer...
Service Manual
Page 30
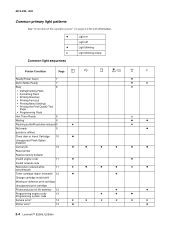
... 2-2 for icon information. 4513-220, -230 Common primary light patterns See "Overview of the operator panel" on Light off ✷ Light blinking x Light blinking slowly Common light sequences Printer Condition Page Ready/Power Saver 7 z Demo Mode Ready 7 z &#...canceling job Toner cartridge region mismatch 12 z z Change cartridge invalid refill Missing or defective print cartridge Unsupported print cartridge Photoconductor kit life warning¹ 12 Programming engine code/ 13 Programming system code ✷ z z z z Service error² 13 ✷ ✷ ...
... 2-2 for icon information. 4513-220, -230 Common primary light patterns See "Overview of the operator panel" on Light off ✷ Light blinking x Light blinking slowly Common light sequences Printer Condition Page Ready/Power Saver 7 z Demo Mode Ready 7 z &#...canceling job Toner cartridge region mismatch 12 z z Change cartridge invalid refill Missing or defective print cartridge Unsupported print cartridge Photoconductor kit life warning¹ 12 Programming engine code/ 13 Programming system code ✷ z z z z Service error² 13 ✷ ✷ ...
Service Manual
Page 38
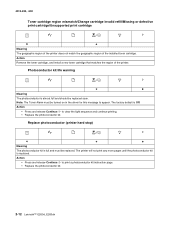
... the photoconductor kit. 2-12 Lexmark™ E260d, E260dn Replace photoconductor (printer hard stop) ✷ ✷ z Meaning The photoconductor kit is almost full and should be replaced soon. Action • Press and release Continue to clear the light sequence and continue printing. • Replace the photoconductor kit. Photoconductor kit life warning ✷ z Meaning The photoconductor...
... the photoconductor kit. 2-12 Lexmark™ E260d, E260dn Replace photoconductor (printer hard stop) ✷ ✷ z Meaning The photoconductor kit is almost full and should be replaced soon. Action • Press and release Continue to clear the light sequence and continue printing. • Replace the photoconductor kit. Photoconductor kit life warning ✷ z Meaning The photoconductor...

Service Manual
Page 72
...seconds. Controller board service check Controller board service check FRU Action Controller board assembly Warning: Do not replace the operator panel and controller board at the end of the... grounded. 7. Turn the printer off before plugging or unplugging any connectors. 2-46 Lexmark™ E260d, E260dn Disconnect the LVPS/HVPS cable from the LVPS/HVPS to the controller board. 6. ... Service checks which identifies the voltages and grounds for a good controller board. Power to display lights or activate the drive motor, fuser or fan, then check the following order: 1. POST ...
...seconds. Controller board service check Controller board service check FRU Action Controller board assembly Warning: Do not replace the operator panel and controller board at the end of the... grounded. 7. Turn the printer off before plugging or unplugging any connectors. 2-46 Lexmark™ E260d, E260dn Disconnect the LVPS/HVPS cable from the LVPS/HVPS to the controller board. 6. ... Service checks which identifies the voltages and grounds for a good controller board. Power to display lights or activate the drive motor, fuser or fan, then check the following order: 1. POST ...
Service Manual
Page 76
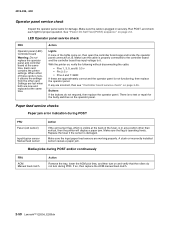
... operator panel. LED Operator panel service check FRU Operator panel (LED) Controller board Warning: Do not replace the operator panel and controller board at the same time. Make... the settings from the other than vertical, then the printer will display a paper jam. Run POST, and check each light for the faulty switches on , verify the following without disconnecting the cable: • Pins 1, 3, 5, and 6: ... at J5. If so, then replace the ACM manual feed clutch. 2-50 Lexmark™ E260d, E260dn 4513-220, -230 Operator panel service check Inspect the operator panel cable for ...
... operator panel. LED Operator panel service check FRU Operator panel (LED) Controller board Warning: Do not replace the operator panel and controller board at the same time. Make... the settings from the other than vertical, then the printer will display a paper jam. Run POST, and check each light for the faulty switches on , verify the following without disconnecting the cable: • Pins 1, 3, 5, and 6: ... at J5. If so, then replace the ACM manual feed clutch. 2-50 Lexmark™ E260d, E260dn 4513-220, -230 Operator panel service check Inspect the operator panel cable for ...


