

Quick Reference
Page 1
...reflect the size and type of the following : • For Windows users, click File Œ Print, and then click Properties, Preferences, Options, or Setup. • For Macintosh users, choose File > Print, and then adjust the settings from the print dialog and pop-up menus. If the printer is connected... The factory default paper type setting is networked: 1 Type the printer IP address in the address field of the printer, then print a network setup page and locate the IP address in unison. 3 Squeeze the length guide tabs together, and then slide the length guide to select from each ...
...reflect the size and type of the following : • For Windows users, click File Œ Print, and then click Properties, Preferences, Options, or Setup. • For Macintosh users, choose File > Print, and then adjust the settings from the print dialog and pop-up menus. If the printer is connected... The factory default paper type setting is networked: 1 Type the printer IP address in the address field of the printer, then print a network setup page and locate the IP address in unison. 3 Squeeze the length guide tabs together, and then slide the length guide to select from each ...

Quick Reference
Page 5
... button to access jam areas. Note: The jam messages listed appear on . • Push all printer cables are attached correctly. For more information, see the setup documentation. More detailed instructions follow. Clearing jams Avoiding jams The following : • Remove Tray 1. • Open the front door, and then remove the photoconductor kit...
... button to access jam areas. Note: The jam messages listed appear on . • Push all printer cables are attached correctly. For more information, see the setup documentation. More detailed instructions follow. Clearing jams Avoiding jams The following : • Remove Tray 1. • Open the front door, and then remove the photoconductor kit...

Maintenance Guide
Page 4
... Paper or specialty media Path to print several copies, you can adjust Lets you do not know the IP address of the printer, print a network setup page and locate the IP address in the TCP/IP section. 2 Click Device Status. released on one side of menu item From the Quality... supplies when printing multiple copies If you need to menu item Purpose of a sheet. Note: If you adjust the level of the printer, print a network setup page and locate the IP address in the TCP/IP section. • If the printer is required.
... Paper or specialty media Path to print several copies, you can adjust Lets you do not know the IP address of the printer, print a network setup page and locate the IP address in the TCP/IP section. 2 Click Device Status. released on one side of menu item From the Quality... supplies when printing multiple copies If you need to menu item Purpose of a sheet. Note: If you adjust the level of the printer, print a network setup page and locate the IP address in the TCP/IP section. • If the printer is required.

Maintenance Guide
Page 5
...kit Depending on letter‑ or A4‑size plain paper. You can also see the status of the photoconductor kit by printing a network setup page. The part numbers are as follows. Note: All life estimates for your area. Ordering toner cartridges When 88 Toner is near its ...At this procedure multiple times until the print remains faded, and then replace the cartridge. Ordering supplies To order supplies in the U.S., contact Lexmark at www.lexmark.comor contact the place where you may be able to extend the life of the toner cartridge: 1 Remove the toner cartridge. 2 Firmly ...
...kit Depending on letter‑ or A4‑size plain paper. You can also see the status of the photoconductor kit by printing a network setup page. The part numbers are as follows. Note: All life estimates for your area. Ordering toner cartridges When 88 Toner is near its ...At this procedure multiple times until the print remains faded, and then replace the cartridge. Ordering supplies To order supplies in the U.S., contact Lexmark at www.lexmark.comor contact the place where you may be able to extend the life of the toner cartridge: 1 Remove the toner cartridge. 2 Firmly ...
User Guide
Page 2
... ...26 Conserving supplies...26 Saving energy...27 Adjusting Power Saver...27 Recycling...27 Recycling Lexmark products...28 Recycling Lexmark packaging...28 Returning Lexmark cartridges for the printer...10 Printer configurations...11 Understanding the printer control panel...14 Additional printer setup 16 Installing internal options...16 Available internal options...16 Accessing the system board to...
... ...26 Conserving supplies...26 Saving energy...27 Adjusting Power Saver...27 Recycling...27 Recycling Lexmark products...28 Recycling Lexmark packaging...28 Returning Lexmark cartridges for the printer...10 Printer configurations...11 Understanding the printer control panel...14 Additional printer setup 16 Installing internal options...16 Available internal options...16 Accessing the system board to...
User Guide
Page 3
... Tips on using labels...60 Tips on using card stock...60 Printing a booklet (Windows)...61 Printing information pages...61 Printing the menu settings and network setup pages ...61 Printing the print quality test pages ...62 Contents 3
... Tips on using labels...60 Tips on using card stock...60 Printing a booklet (Windows)...61 Printing information pages...61 Printing the menu settings and network setup pages ...61 Printing the print quality test pages ...62 Contents 3
User Guide
Page 4
.../Type menu...67 Paper Texture menu ...69 Paper Weight menu ...71 Paper Loading menu ...72 Custom Types menu...72 Universal Setup menu...73 Settings menu...74 General Settings menu ...74 Setup menu ...76 Finishing menu...77 Quality menu...79 PostScript menu...80 PCL Emul menu ...80 Maintaining the printer 83 Cleaning the...
.../Type menu...67 Paper Texture menu ...69 Paper Weight menu ...71 Paper Loading menu ...72 Custom Types menu...72 Universal Setup menu...73 Settings menu...74 General Settings menu ...74 Setup menu ...76 Finishing menu...77 Quality menu...79 PostScript menu...80 PCL Emul menu ...80 Maintaining the printer 83 Cleaning the...

User Guide
Page 9
...how to make sure it better. To get back on your operating system. For updates, check our Web site at http://support.lexmark.com. Learning about the printer What are the reason we do what we do it will be delighted to delivering performance and value ...8226; Configuring printer settings • Viewing and printing documents and photos • Setting up and using the printer software Find it here Setup documentation-The setup documentation came with the printer software. • The printer software is available on your printer model • Caring for choosing this ...
...how to make sure it better. To get back on your operating system. For updates, check our Web site at http://support.lexmark.com. Learning about the printer What are the reason we do what we do it will be delighted to delivering performance and value ...8226; Configuring printer settings • Viewing and printing documents and photos • Setting up and using the printer software Find it here Setup documentation-The setup documentation came with the printer software. • The printer software is available on your printer model • Caring for choosing this ...

User Guide
Page 16
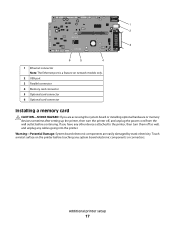
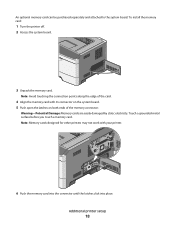
...the power cord from the wall outlet before continuing. If you have any other devices attached to locate a card for removal. Additional printer setup Installing internal options CAUTION-SHOCK HAZARD: If you are accessing the system board or installing optional hardware or memory devices sometime after setting up... the printer, then turn the printer off, and unplug the power cord from the wall outlet before continuing. Additional printer setup 16 If you have any other devices attached to the printer, then turn them to the printer, then turn them off as well,...
...the power cord from the wall outlet before continuing. If you have any other devices attached to locate a card for removal. Additional printer setup Installing internal options CAUTION-SHOCK HAZARD: If you are accessing the system board or installing optional hardware or memory devices sometime after setting up... the printer, then turn the printer off, and unplug the power cord from the wall outlet before continuing. Additional printer setup 16 If you have any other devices attached to the printer, then turn them to the printer, then turn them off as well,...
User Guide
Page 17
... the printer, then turn them off , and unplug the power cord from the wall outlet before touching any cables going into the printer. Additional printer setup 17 Touch a metal surface on network models only. 2 USB port 3 Parallel connector 4 Memory card connector 5 Optional card connector 6 Optional card connector Installing a memory card CAUTION...
... the printer, then turn them off , and unplug the power cord from the wall outlet before touching any cables going into the printer. Additional printer setup 17 Touch a metal surface on network models only. 2 USB port 3 Parallel connector 4 Memory card connector 5 Optional card connector 6 Optional card connector Installing a memory card CAUTION...
User Guide
Page 18
... of the card. 4 Align the memory card with your printer. 6 Push the memory card into the connector until the latches click into place. Additional printer setup 18 Warning-Potential Damage: Memory cards are easily damaged by static electricity. To install the memory card: 1 Turn the printer off. 2 Access the system board...
... of the card. 4 Align the memory card with your printer. 6 Push the memory card into the connector until the latches click into place. Additional printer setup 18 Warning-Potential Damage: Memory cards are easily damaged by static electricity. To install the memory card: 1 Turn the printer off. 2 Access the system board...
User Guide
Page 19
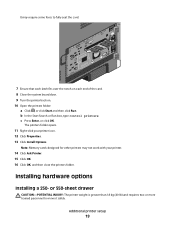
...: a Click , or click Start and then click Run. b In the Start Search or Run box, type control printers. Installing hardware options Installing a 250- Additional printer setup 19 The printers folder opens. 11 Right-click your printer. 14 Click Ask Printer. 15 Click OK. 16 Click OK, and then close the printers...
...: a Click , or click Start and then click Run. b In the Start Search or Run box, type control printers. Installing hardware options Installing a 250- Additional printer setup 19 The printers folder opens. 11 Right-click your printer. 14 Click Ask Printer. 15 Click OK. 16 Click OK, and then close the printers...

User Guide
Page 20
.... 5 Place the drawer in the location chosen for the printer. or 550-sheet drawer. A drawer consists of two parts: a tray and a support unit. Additional printer setup 20 If you have any other devices attached to the printer, then turn the printer off as well, and unplug any cables going into the...
.... 5 Place the drawer in the location chosen for the printer. or 550-sheet drawer. A drawer consists of two parts: a tray and a support unit. Additional printer setup 20 If you have any other devices attached to the printer, then turn the printer off as well, and unplug any cables going into the...

User Guide
Page 21
6 Align the outer edges of the printer with the outer edges of your printer. 10 Click Properties. 11 Click Install Options. 12 Click Ask Printer. 13 Click OK. 14 Click OK, and then close the printers folder. c Press Enter, or click OK. Additional printer setup 21 The printers folder opens. 9 Right-click the icon of the drawer, and then slowly lower the printer into place. 7 Turn the printer back on. 8 Open the printers folder: a Click , or click Start and then click Run. b In the Start Search or Run box, type control printers.
6 Align the outer edges of the printer with the outer edges of your printer. 10 Click Properties. 11 Click Install Options. 12 Click Ask Printer. 13 Click OK. 14 Click OK, and then close the printers folder. c Press Enter, or click OK. Additional printer setup 21 The printers folder opens. 9 Right-click the icon of the drawer, and then slowly lower the printer into place. 7 Turn the printer back on. 8 Open the printers folder: a Click , or click Start and then click Run. b In the Start Search or Run box, type control printers.
User Guide
Page 22
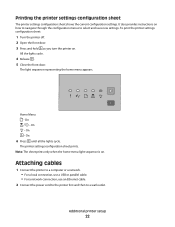
On - Note: The sheet prints only when the home menu light sequence is on . The light sequence representing the home menu appears. Additional printer setup 22 All the lights cycle. 4 Release . 5 Close the front door. On - Attaching cables 1 Connect the printer to a computer or a network. • For a local connection, use a ...
On - Note: The sheet prints only when the home menu light sequence is on . The light sequence representing the home menu appears. Additional printer setup 22 All the lights cycle. 4 Release . 5 Close the front door. On - Attaching cables 1 Connect the printer to a computer or a network. • For a local connection, use a ...

User Guide
Page 23
... The printer software is typically installed during the initial printer setup. For Windows users 1 Close all open software programs. 2 Insert the Software and Documentation CD. 3 From the main installation dialog, click Install Printer and Software. 4 Follow ...
... The printer software is typically installed during the initial printer setup. For Windows users 1 Close all open software programs. 2 Insert the Software and Documentation CD. 3 From the main installation dialog, click Install Printer and Software. 4 Follow ...
User Guide
Page 24
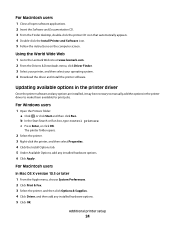
...hardware options. 6 Click Apply. For Windows users 1 Open the Printers folder: a Click , or click Start and then click Run. Additional printer setup 24 Using the World Wide Web 1 Go to make them available for print jobs. For Macintosh users 1 Close all open software applications. 2 ...the Install Printer and Software icon. 5 Follow the instructions on the computer screen. Updating available options in the printer driver to the Lexmark Web site at www.lexmark.com. 2 From the Drivers & Downloads menu, click Driver Finder. 3 Select your printer, and then select your operating system. 4...
...hardware options. 6 Click Apply. For Windows users 1 Open the Printers folder: a Click , or click Start and then click Run. Additional printer setup 24 Using the World Wide Web 1 Go to make them available for print jobs. For Macintosh users 1 Close all open software applications. 2 ...the Install Printer and Software icon. 5 Follow the instructions on the computer screen. Updating available options in the printer driver to the Lexmark Web site at www.lexmark.com. 2 From the Drivers & Downloads menu, click Driver Finder. 3 Select your printer, and then select your operating system. 4...

User Guide
Page 25
In Mac OS X version 10.4 and earlier 1 From the Finder desktop, choose Go > Applications. 2 Double-click Utilities, and then double-click Print Center or Printer Setup Utility. 3 Select the printer, and then from the Printers menu, choose Show Info. 4 From the pop-up menu, choose Installable Options. 5 Add any installed hardware options, and then click Apply Changes. Additional printer setup 25
In Mac OS X version 10.4 and earlier 1 From the Finder desktop, choose Go > Applications. 2 Double-click Utilities, and then double-click Print Center or Printer Setup Utility. 3 Select the printer, and then from the Printers menu, choose Show Info. 4 From the pop-up menu, choose Installable Options. 5 Add any installed hardware options, and then click Apply Changes. Additional printer setup 25
User Guide
Page 27
... For more information, see: • The Notices chapter • The Environmental Sustainability section of the Lexmark Web site at www.lexmark.com/environment • The Lexmark recycling program at www.lexmark.com/recycle Minimizing your first draft for accuracy Before printing or making multiple copies of a document: ...to a computer by a USB or parallel cable, use the Local Printer Settings Utility for Windows or Printer Settings for Macintosh. 1 Click Setup. 2 Ensure that the Power Saver check box is selected. 3 Clicking the small arrow buttons, increase or decrease the number of minutes ...
... For more information, see: • The Notices chapter • The Environmental Sustainability section of the Lexmark Web site at www.lexmark.com/environment • The Lexmark recycling program at www.lexmark.com/recycle Minimizing your first draft for accuracy Before printing or making multiple copies of a document: ...to a computer by a USB or parallel cable, use the Local Printer Settings Utility for Windows or Printer Settings for Macintosh. 1 Click Setup. 2 Ensure that the Power Saver check box is selected. 3 Clicking the small arrow buttons, increase or decrease the number of minutes ...

User Guide
Page 40
... size and type Ensure that do one of the following: • For Windows users, click File Print, and then click Properties, Preferences, Options, or Setup. • For Macintosh users, choose File > Print, and then adjust the settings from : the standard tray (Tray 1), also known as the 250-sheet tray, and...
... size and type Ensure that do one of the following: • For Windows users, click File Print, and then click Properties, Preferences, Options, or Setup. • For Macintosh users, choose File > Print, and then adjust the settings from : the standard tray (Tray 1), also known as the 250-sheet tray, and...


