

Quick Reference
Page 1
... computer, access the Paper menu through the Printer Settings. Loading paper and specialty media 1 Do not remove trays while a job prints or when the Busy light sequence appears on your printer is connected to a computer by a USB or parallel cable, use one of the following utilities to the correct position for...
... computer, access the Paper menu through the Printer Settings. Loading paper and specialty media 1 Do not remove trays while a job prints or when the Busy light sequence appears on your printer is connected to a computer by a USB or parallel cable, use one of the following utilities to the correct position for...

Quick Reference
Page 2
... paper and specialty media 2 the position for the length of the tray. Straighten the edges on the right guide, and slide the width guides to lightly touch the side of the tray to overload the tray. Note: The standard tray accommodates only 150 sheets of A6-size paper. 1 Maximum fill line...
... paper and specialty media 2 the position for the length of the tray. Straighten the edges on the right guide, and slide the width guides to lightly touch the side of the tray to overload the tray. Note: The standard tray accommodates only 150 sheets of A6-size paper. 1 Maximum fill line...
Quick Reference
Page 3
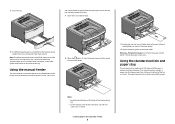
... feeder. Warning-Potential Damage: Do not force the paper into the manual feeder only to the point where its leading edge can use 2 When the light is that the standard tray accommodates up to the paper width. Forcing the paper causes jams. Using the standard exit bin and paper stop that...
... feeder. Warning-Potential Damage: Do not force the paper into the manual feeder only to the point where its leading edge can use 2 When the light is that the standard tray accommodates up to the paper width. Forcing the paper causes jams. Using the standard exit bin and paper stop that...

Quick Reference
Page 5
... Standard exit bin 3 Front door 4 Manual feeder door 5 Standard 250-sheet tray (Tray 1) 6 Optional tray (Tray 2) 7 Rear door Understanding jam lights and access locations The following illustration shows possible jam areas: 12 3 4 5 7 6 Access point Description 1 Push the button to access jam areas. Wait for... the light to access each jam. The light sequence for how to come on the virtual display of the following hints can help you avoid jams: • Use only ...
... Standard exit bin 3 Front door 4 Manual feeder door 5 Standard 250-sheet tray (Tray 1) 6 Optional tray (Tray 2) 7 Rear door Understanding jam lights and access locations The following illustration shows possible jam areas: 12 3 4 5 7 6 Access point Description 1 Push the button to access jam areas. Wait for... the light to access each jam. The light sequence for how to come on the virtual display of the following hints can help you avoid jams: • Use only ...

Maintenance Guide
Page 5
...kit is near its end of life. Note: All life estimates for printer supplies assume printing on your printer model, the printer issues a message or a light sequence to let you may be able to redistribute toner. 3 Reinsert the cartridge and continue printing. Note: Repeat this time, order a photoconductor kit. At... kit by printing a network setup page. The part numbers are as follows. Maintaining the printer 5 Ordering supplies To order supplies in the U.S., contact Lexmark at www.lexmark.comor contact the place where you purchased the printer. In other countries or regions, visit the...
...kit is near its end of life. Note: All life estimates for printer supplies assume printing on your printer model, the printer issues a message or a light sequence to let you may be able to redistribute toner. 3 Reinsert the cartridge and continue printing. Note: Repeat this time, order a photoconductor kit. At... kit by printing a network setup page. The part numbers are as follows. Maintaining the printer 5 Ordering supplies To order supplies in the U.S., contact Lexmark at www.lexmark.comor contact the place where you purchased the printer. In other countries or regions, visit the...

Maintenance Guide
Page 6
... reinsert it side‑to‑side and front‑to‑back several times to see approximately how much toner is low" light sequence appears, or when you experience faded print, remove the toner cartridge. When shaking the cartridge no longer improves the print quality,... replace the toner cartridge. Maintaining the printer 6 Firmly shake it and continue printing. Part name Photoconductor kit Replacing supplies Replacing the toner cartridge Light sequence Toner is low Part number E260X22G • ‑ On • ‑ On When the "Toner is left side of the ...
... reinsert it side‑to‑side and front‑to‑back several times to see approximately how much toner is low" light sequence appears, or when you experience faded print, remove the toner cartridge. When shaking the cartridge no longer improves the print quality,... replace the toner cartridge. Maintaining the printer 6 Firmly shake it and continue printing. Part name Photoconductor kit Replacing supplies Replacing the toner cartridge Light sequence Toner is low Part number E260X22G • ‑ On • ‑ On When the "Toner is left side of the ...
Maintenance Guide
Page 7
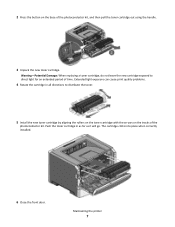
... the tracks of the photoconductor kit, and then pull the toner cartridge out using the handle. 3 Unpack the new toner cartridge. Extended light exposure can cause print quality problems. 4 Rotate the cartridge in as far as it will go. Push the toner cartridge in all directions to ...direct light for an extended period of time. The cartridge clicks into place when correctly installed. 6 Close the front door. Maintaining the printer 7 Warning-...
... the tracks of the photoconductor kit, and then pull the toner cartridge out using the handle. 3 Unpack the new toner cartridge. Extended light exposure can cause print quality problems. 4 Rotate the cartridge in as far as it will go. Push the toner cartridge in all directions to ...direct light for an extended period of time. The cartridge clicks into place when correctly installed. 6 Close the front door. Maintaining the printer 7 Warning-...

Maintenance Guide
Page 8
... significantly decreases. Note: The photoconductor kit is one item only. Maintaining the printer 8 The printer does this by displaying the "Photoconductor life warning" light sequence or the "Replace photoconductor" light sequence. Light sequences Photoconductor life warning ‑ Blinking ‑ On Replace photoconductor ‑ Blinking ‑ Blinking ‑ On When you first receive either...
... significantly decreases. Note: The photoconductor kit is one item only. Maintaining the printer 8 The printer does this by displaying the "Photoconductor life warning" light sequence or the "Replace photoconductor" light sequence. Light sequences Photoconductor life warning ‑ Blinking ‑ On Replace photoconductor ‑ Blinking ‑ Blinking ‑ On When you first receive either...
User Guide
Page 2
... location for reuse or recycling...28 Interpreting the printer control panel lights 29 Understanding the printer control panel light sequences 29 Understanding the primary light sequences...29 Understanding the secondary error light sequences...36 Contents 2 or 550-sheet drawer...19 Printing the...papers ...26 Conserving supplies...26 Saving energy...27 Adjusting Power Saver...27 Recycling...27 Recycling Lexmark products...28 Recycling Lexmark packaging...28 Returning Lexmark cartridges for the printer...10 Printer configurations...11 Understanding the printer control panel...14 Additional ...
... location for reuse or recycling...28 Interpreting the printer control panel lights 29 Understanding the printer control panel light sequences 29 Understanding the primary light sequences...29 Understanding the secondary error light sequences...36 Contents 2 or 550-sheet drawer...19 Printing the...papers ...26 Conserving supplies...26 Saving energy...27 Adjusting Power Saver...27 Recycling...27 Recycling Lexmark products...28 Recycling Lexmark packaging...28 Returning Lexmark cartridges for the printer...10 Printer configurations...11 Understanding the printer control panel...14 Additional ...
User Guide
Page 5
... Finding advanced networking and administrator information 92 Restoring the factory default settings...92 Clearing jams 93 Avoiding jams...93 Accessing jam areas...93 Understanding jam lights and access locations...94 Clearing jams behind the photoconductor kit and toner cartridge 98 Clearing jams from the standard exit bin...100 Clearing jams from...
... Finding advanced networking and administrator information 92 Restoring the factory default settings...92 Clearing jams 93 Avoiding jams...93 Accessing jam areas...93 Understanding jam lights and access locations...94 Clearing jams behind the photoconductor kit and toner cartridge 98 Clearing jams from the standard exit bin...100 Clearing jams from...
User Guide
Page 6
...correctly or quits after it is installed 112 Drawers...112 Memory card ...113 Solving paper feed problems...113 Paper frequently jams ...113 Paper jam lights remain on after jam is cleared ...113 Page that jammed does not reprint after the jam is cleared 114 Solving print quality problems...114 ...115 Clipped images...115 Gray background ...116 Ghost images...116 Incorrect margins...117 Paper curl...117 Print is too dark...117 Print is too light ...118 Skewed print...119 Toner fog or background shading appears on the page 119 Toner rubs off...119 Toner specks...120 Transparency print quality ...
...correctly or quits after it is installed 112 Drawers...112 Memory card ...113 Solving paper feed problems...113 Paper frequently jams ...113 Paper jam lights remain on after jam is cleared ...113 Page that jammed does not reprint after the jam is cleared 114 Solving print quality problems...114 ...115 Clipped images...115 Gray background ...116 Ghost images...116 Incorrect margins...117 Paper curl...117 Print is too dark...117 Print is too light ...118 Skewed print...119 Toner fog or background shading appears on the page 119 Toner rubs off...119 Toner specks...120 Transparency print quality ...

User Guide
Page 14
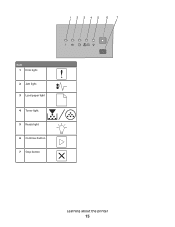
Learning about the printer 14 1 Front door release button 2 Paper stop 3 Standard exit bin 4 Printer control panel 5 System board door 6 Standard 250-sheet tray (Tray 1) 7 Optional 250- or 550-sheet drawer (Tray 2) 8 Manual feeder door 9 Front door Understanding the printer control panel The printer control panel features six lights and two buttons.
Learning about the printer 14 1 Front door release button 2 Paper stop 3 Standard exit bin 4 Printer control panel 5 System board door 6 Standard 250-sheet tray (Tray 1) 7 Optional 250- or 550-sheet drawer (Tray 2) 8 Manual feeder door 9 Front door Understanding the printer control panel The printer control panel features six lights and two buttons.
User Guide
Page 15
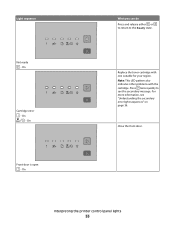
Item 1 Error light 2 Jam light 3 Load paper light 4 Toner light 5 Ready light 6 Continue button 7 Stop button Learning about the printer 15
Item 1 Error light 2 Jam light 3 Load paper light 4 Toner light 5 Ready light 6 Continue button 7 Stop button Learning about the printer 15
User Guide
Page 22
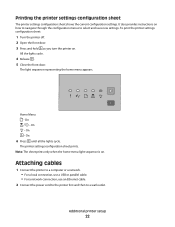
...connection, use an Ethernet cable. 2 Connect the power cord to the printer first and then to select and save new settings. The light sequence representing the home menu appears. On - Home Menu - On - The printer settings configuration sheet prints. On - On 6 Press until all the... lights cycle. Additional printer setup 22 Printing the printer settings configuration sheet The printer settings configuration sheet shows the current configuration settings. To print...
...connection, use an Ethernet cable. 2 Connect the power cord to the printer first and then to select and save new settings. The light sequence representing the home menu appears. On - Home Menu - On - The printer settings configuration sheet prints. On - On 6 Press until all the... lights cycle. Additional printer setup 22 Printing the printer settings configuration sheet The printer settings configuration sheet shows the current configuration settings. To print...
User Guide
Page 29
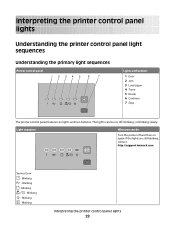
... the printer control panel lights 29 Interpreting the printer control panel lights Understanding the printer control panel light sequences Understanding the primary light sequences Printer control panel Lights and buttons 1 Error ...2 Jam 3 Load paper 4 Toner 5 Ready 6 Continue 7 Stop The printer control panel features six lights and two buttons. Light sequence What you can be on, off and then on again. Service Error - Blinking - Blinking - Blinking - If the lights are still blinking, contact http://support.lexmark...
... the printer control panel lights 29 Interpreting the printer control panel lights Understanding the printer control panel light sequences Understanding the primary light sequences Printer control panel Lights and buttons 1 Error ...2 Jam 3 Load paper 4 Toner 5 Ready 6 Continue 7 Stop The printer control panel features six lights and two buttons. Light sequence What you can be on, off and then on again. Service Error - Blinking - Blinking - Blinking - If the lights are still blinking, contact http://support.lexmark...

User Guide
Page 30
Replace PC Kit - Blinking - Ready - On Send a job to print. On (green) Send a job to print. Power Saver - On (yellow) Interpreting the printer control panel lights 30 Blinking - Light sequence What you can do Replace the photoconductor kit.
Replace PC Kit - Blinking - Ready - On Send a job to print. On (green) Send a job to print. Power Saver - On (yellow) Interpreting the printer control panel lights 30 Blinking - Light sequence What you can do Replace the photoconductor kit.

User Guide
Page 31
Blinking - Interpreting the printer control panel lights 31 Wait or press . Blinking What you can do Use Hex Trace to troubleshoot printing problems. Turn the printer off and then on again to return to the Ready state. Light sequence Hex Trace Ready - Blinking Flushing Buffer - Wait until the printer returns to the Ready state. Slowly Blinking Busy -
Blinking - Interpreting the printer control panel lights 31 Wait or press . Blinking What you can do Use Hex Trace to troubleshoot printing problems. Turn the printer off and then on again to return to the Ready state. Light sequence Hex Trace Ready - Blinking Flushing Buffer - Wait until the printer returns to the Ready state. Slowly Blinking Busy -

User Guide
Page 32
Waiting - On - On - Use valid code when programming the printer. Light sequence What you can do Wait for the light sequence to clear. On Press the twice to clear. On - Canceling job - On - On - On - On Interpreting the printer control panel lights 32 On Wait for the light sequence to get the secondary message. On - Invalid Engine Code or Invalid Network Code -
Waiting - On - On - Use valid code when programming the printer. Light sequence What you can do Wait for the light sequence to clear. On Press the twice to clear. On - Canceling job - On - On - On - On Interpreting the printer control panel lights 32 On Wait for the light sequence to get the secondary message. On - Invalid Engine Code or Invalid Network Code -
User Guide
Page 33
On What you can do Press and release either or to return to see "Understanding the secondary error light sequences" on page 36. Light sequence Not ready - Note: This LED pattern also indicates other problems with one suitable for your region. For more information, see the secondary message. On Front door is open - Replace the toner cartridge with the cartridge. Press twice quickly to the Ready state. Interpreting the printer control panel lights 33 On - On Cartridge error - Close the front door.
On What you can do Press and release either or to return to see "Understanding the secondary error light sequences" on page 36. Light sequence Not ready - Note: This LED pattern also indicates other problems with one suitable for your region. For more information, see the secondary message. On Front door is open - Replace the toner cartridge with the cartridge. Press twice quickly to the Ready state. Interpreting the printer control panel lights 33 On - On Cartridge error - Close the front door.

User Guide
Page 34
Light sequence No paper in Tray 1 or 2, and then press or . On - Blinking What you can do Load paper in Tray 1 or Tray 2 - Load paper in manual feeder - Interpreting the printer control panel lights 34 On Remove paper from the standard exit bin, and then press and release to clear the light sequence and continue printing. On No paper in the manual feeder. Remove printed pages from the standard exit bin -
Light sequence No paper in Tray 1 or 2, and then press or . On - Blinking What you can do Load paper in Tray 1 or Tray 2 - Load paper in manual feeder - Interpreting the printer control panel lights 34 On Remove paper from the standard exit bin, and then press and release to clear the light sequence and continue printing. On No paper in the manual feeder. Remove printed pages from the standard exit bin -


