
User Guide
Page 5
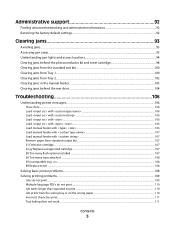
...and administrator information 92 Restoring the factory default settings...92 Clearing jams 93 Avoiding jams...93 Accessing jam areas...93 Understanding jam lights and access locations...94 Clearing jams behind the photoconductor kit and toner cartridge 98 Clearing jams from the standard exit bin...100... with ...107 Remove paper from standard output bin...107 31 Defective cartridge...107 32.yy Replace unsupported cartridge ...107 58 Too many flash options installed ...107 58 Too many trays attached ...108 59 Incompatible tray ...108 88 Replace toner ...108 Solving basic printer problems......
...and administrator information 92 Restoring the factory default settings...92 Clearing jams 93 Avoiding jams...93 Accessing jam areas...93 Understanding jam lights and access locations...94 Clearing jams behind the photoconductor kit and toner cartridge 98 Clearing jams from the standard exit bin...100... with ...107 Remove paper from standard output bin...107 31 Defective cartridge...107 32.yy Replace unsupported cartridge ...107 58 Too many flash options installed ...107 58 Too many trays attached ...108 59 Incompatible tray ...108 88 Replace toner ...108 Solving basic printer problems......

User Guide
Page 138
... feeder 103 2-sided printing 56 31 Defective cartridge 107 32.yy Replace unsupported cartridge 107 550-sheet drawer installing 19 58 Too many flash options installed 107 58 Too many trays attached 108 59 Incompatible tray 108 88 Replace toner 108 A attaching cables 22 B booklet printing... 106 collate setting Finishing menu 67 configurations printer 11 conserving supplies 26 contacting Customer Support 123 control panel, printer 29, 36 buttons 14 lights 14 Custom Types menu 72 D Default Source menu 67 documents, printing from Macintosh computer 55 from Windows 55 duplex printing 56 manual 56...
... feeder 103 2-sided printing 56 31 Defective cartridge 107 32.yy Replace unsupported cartridge 107 550-sheet drawer installing 19 58 Too many flash options installed 107 58 Too many trays attached 108 59 Incompatible tray 108 88 Replace toner 108 A attaching cables 22 B booklet printing... 106 collate setting Finishing menu 67 configurations printer 11 conserving supplies 26 contacting Customer Support 123 control panel, printer 29, 36 buttons 14 lights 14 Custom Types menu 72 D Default Source menu 67 documents, printing from Macintosh computer 55 from Windows 55 duplex printing 56 manual 56...
User Guide
Page 140
...moving 90 selecting a location 10 shipping 91 printer control panel 29, 36 buttons 14 lights 14 printer messages 31 Defective cartridge 107 32.yy Replace unsupported cartridge 107 58 Too many flash options installed 107 58 Too many trays attached 108 59 Incompatible tray 108 88 Replace ...of the paper 56 print quality test pages 62, 114 publications, finding 9 Q Quality menu 79 R recycled paper using 26 recycling Lexmark packaging 28 Lexmark products 28 toner cartridges 28 WEEE statement 126 Remove paper from standard output bin 107 replacing photoconductor kit 87 toner cartridge 85 reprint ...
...moving 90 selecting a location 10 shipping 91 printer control panel 29, 36 buttons 14 lights 14 printer messages 31 Defective cartridge 107 32.yy Replace unsupported cartridge 107 58 Too many flash options installed 107 58 Too many trays attached 108 59 Incompatible tray 108 88 Replace ...of the paper 56 print quality test pages 62, 114 publications, finding 9 Q Quality menu 79 R recycled paper using 26 recycling Lexmark packaging 28 Lexmark products 28 toner cartridges 28 WEEE statement 126 Remove paper from standard output bin 107 replacing photoconductor kit 87 toner cartridge 85 reprint ...
Service Manual
Page 28
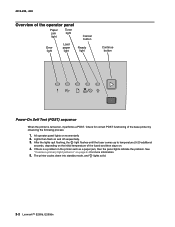
... lights quit flashing, the light flashes until the fuser comes up to temperature (5-20 additional seconds, depending on the initial temperature of the fuser) and then stays on , it performs a POST. The printer cycles down into standby mode, and lights solid. 2-2 Lexmark™ E260d, E260dn 4513-220, -230 Overview of the operator panel Paper jam light Toner light Error light...
... lights quit flashing, the light flashes until the fuser comes up to temperature (5-20 additional seconds, depending on the initial temperature of the fuser) and then stays on , it performs a POST. The printer cycles down into standby mode, and lights solid. 2-2 Lexmark™ E260d, E260dn 4513-220, -230 Overview of the operator panel Paper jam light Toner light Error light...

Service Manual
Page 29
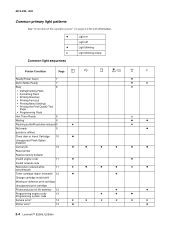
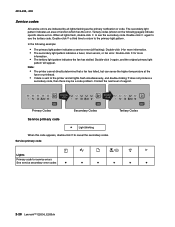
If is double-clicked on the panel, a second pattern may appear with more detailed information. Not all lights flashing as the primary notification or code. The secondary code indicates an area or function which case, when double-clicking, the pattern does not... codes used for service (see "Service tertiary error codes" on page 2-28. In which has the error. Diagnostics information 2-3 This may be all lights flash immediately, and double-clicking does not change . Note: If data is sent to the printer and all the information that is needed. Doubleclick Primary Codes...
If is double-clicked on the panel, a second pattern may appear with more detailed information. Not all lights flashing as the primary notification or code. The secondary code indicates an area or function which case, when double-clicking, the pattern does not... codes used for service (see "Service tertiary error codes" on page 2-28. In which has the error. Diagnostics information 2-3 This may be all lights flash immediately, and double-clicking does not change . Note: If data is sent to the printer and all the information that is needed. Doubleclick Primary Codes...
Service Manual
Page 30
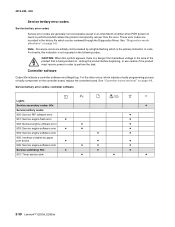
... 8 x Waiting 8 z z Flushing buffer/Resolution reduced 9 ✷ ✷ Not ready 9 z (printer is offline) Close door or Insert Cartridge 10 z Unsupported Flash Option Installed Cancel job 10 z z z z z z Reset printer Restore factory defaults Invalid engine code 11 z z Invalid network code Resolution reduced while 11 ✷ ...system code ✷ z z z z Service error² 13 ✷ ✷ ✷ ✷ ✷ ✷ Printer error³ 13 z z 2-4 Lexmark™ E260d, E260dn z Light on page 2-2 for icon information.
... 8 x Waiting 8 z z Flushing buffer/Resolution reduced 9 ✷ ✷ Not ready 9 z (printer is offline) Close door or Insert Cartridge 10 z Unsupported Flash Option Installed Cancel job 10 z z z z z z Reset printer Restore factory defaults Invalid engine code 11 z z Invalid network code Resolution reduced while 11 ✷ ...system code ✷ z z z z Service error² 13 ✷ ✷ ✷ ✷ ✷ ✷ Printer error³ 13 z z 2-4 Lexmark™ E260d, E260dn z Light on page 2-2 for icon information.

Service Manual
Page 31
... 2 14 z z Load Media in Multi-purpose 15 z Feeder or Manual Feeder Load Tray 1 for side 2 of manual 15 z ✷ duplex printing ¹ Toner low light will remain flashing with other primary light sequences. ² Secondary codes, and often a tertiary code, will follow this code. ³ Secondary codes will remain on with other primary...
... 2 14 z z Load Media in Multi-purpose 15 z Feeder or Manual Feeder Load Tray 1 for side 2 of manual 15 z ✷ duplex printing ¹ Toner low light will remain flashing with other primary light sequences. ² Secondary codes, and often a tertiary code, will follow this code. ³ Secondary codes will remain on with other primary...
Service Manual
Page 32
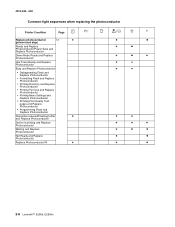
...light sequences when replacing the photoconductor Printer Condition Page Replace photoconductor 12 ✷ (printer hard stop) Ready and Replace Photoconductor/Power Save and Replace Photoconductor Demo Mode Ready and Replace Photoconductor Hex Trace Ready and Replace Photoconductor Busy and Replace Photoconductor • Defragmenting Flash... and Replace Photoconductor • Formatting Flash and Replace Photoconductor ...pages and Replace Photoconductor • Programming Flash and Replace Photoconductor Resolution reduced/Flushing buffer...
...light sequences when replacing the photoconductor Printer Condition Page Replace photoconductor 12 ✷ (printer hard stop) Ready and Replace Photoconductor/Power Save and Replace Photoconductor Demo Mode Ready and Replace Photoconductor Hex Trace Ready and Replace Photoconductor Busy and Replace Photoconductor • Defragmenting Flash... and Replace Photoconductor • Formatting Flash and Replace Photoconductor ...pages and Replace Photoconductor • Programming Flash and Replace Photoconductor Resolution reduced/Flushing buffer...
Service Manual
Page 34
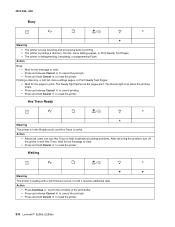
The Ready light is defragmenting, formatting, or programming Flash. Hex Trace Ready x Meaning The printer is in the Ready mode, and Hex Trace is waiting until a print timeout occurs, or until it receives additional ...; Wait for the message to clear. • Press and release Cancel to cancel the print job. • Press and hold Cancel to reset the printer. 2-8 Lexmark™ E260d, E260dn The Ready light flashes as the pages print.
The Ready light is defragmenting, formatting, or programming Flash. Hex Trace Ready x Meaning The printer is in the Ready mode, and Hex Trace is waiting until a print timeout occurs, or until it receives additional ...; Wait for the message to clear. • Press and release Cancel to cancel the print job. • Press and hold Cancel to reset the printer. 2-8 Lexmark™ E260d, E260dn The Ready light flashes as the pages print.
Service Manual
Page 43
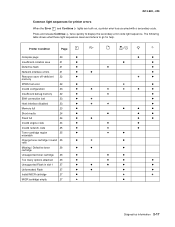
Press and release Continue twice quickly to go for printer errors When the Error and Continue lights are both on, a printer error has occurred with a secondary code. Printer Condition Page Complex page 20 z Insufficient collation area 21 z Defective flash 21 z Network interface errors 21 z z Resource save off-deficient 22 z memory PPDS font error...
Press and release Continue twice quickly to go for printer errors When the Error and Continue lights are both on, a printer error has occurred with a secondary code. Printer Condition Page Complex page 20 z Insufficient collation area 21 z Defective flash 21 z Network interface errors 21 z z Resource save off-deficient 22 z memory PPDS font error...
Service Manual
Page 52
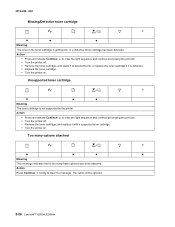
...The toner in the toner cartridge is not supported by the printer. Action Press Continue briefly to too many flash options have been attached. Action • Press and release Continue to clear the light sequence and continue processing the print job. • Turn the printer off . • Remove the toner... cartridge, and shake it to clear the light sequence and continue processing the print job. • Turn the printer off . • Remove the toner cartridge, and replace it is defective. &#...
...The toner in the toner cartridge is not supported by the printer. Action Press Continue briefly to too many flash options have been attached. Action • Press and release Continue to clear the light sequence and continue processing the print job. • Turn the printer off . • Remove the toner... cartridge, and shake it to clear the light sequence and continue processing the print job. • Turn the printer off . • Remove the toner cartridge, and replace it is defective. &#...
Service Manual
Page 54
... are indicated by all lights flash simultaneously, and double-clicking does not produce a secondary code, then there may be a code problem. Contact the next level of support. Double-click for service errors See service secondary error codes ✷ ✷ ✷ ✷ ✷ ✷ 2-28 Lexmark™ E260d, E260dn The secondary light pattern indicates an area...
... are indicated by all lights flash simultaneously, and double-clicking does not produce a secondary code, then there may be a code problem. Contact the next level of support. Double-click for service errors See service secondary error codes ✷ ✷ ✷ ✷ ✷ ✷ 2-28 Lexmark™ E260d, E260dn The secondary light pattern indicates an area...
Service Manual
Page 56
...software error ✷ ✷ ✷ 904: Service engine software error ✷ ✷ 905: Interface violation by all lights flashing which is performed which allows the printer to perform the task. See "Controller board removal" on page 3-8. Note: All service ... ✷ Service watchdog: 90x ✷ ✷ ✷ 901: Timer service slow ✷ ✷ ✷ 2-30 Lexmark™ E260d, E260dn Controller software Codes 90x indicate a controller software error/illegal trap. 4513-220, -230 Service tertiary error codes Service tertiary error codes Service...
...software error ✷ ✷ ✷ 904: Service engine software error ✷ ✷ 905: Interface violation by all lights flashing which is performed which allows the printer to perform the task. See "Controller board removal" on page 3-8. Note: All service ... ✷ Service watchdog: 90x ✷ ✷ ✷ 901: Timer service slow ✷ ✷ ✷ 2-30 Lexmark™ E260d, E260dn Controller software Codes 90x indicate a controller software error/illegal trap. 4513-220, -230 Service tertiary error codes Service tertiary error codes Service...
Service Manual
Page 60
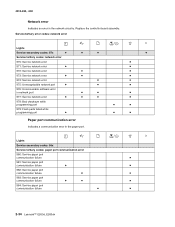
... failure ✷ ✷ ✷ 984: Service paper port communication failure ✷ ✷ 2-34 Lexmark™ E260d, E260dn Service tertiary error codes: network error Lights Service secondary codes: 97x ✷ ✷ ✷ ✷ Service tertiary codes: network error 970:... network error ✷ ✷ ✷ ✷ 978: Bad checksum while programming port ✷ ✷ 979: Flash parts failed while programming port ✷ ✷ ✷ Paper port communication error Indicates a communication error in the network circuitry. ...
... failure ✷ ✷ ✷ 984: Service paper port communication failure ✷ ✷ 2-34 Lexmark™ E260d, E260dn Service tertiary error codes: network error Lights Service secondary codes: 97x ✷ ✷ ✷ ✷ Service tertiary codes: network error 970:... network error ✷ ✷ ✷ ✷ 978: Bad checksum while programming port ✷ ✷ 979: Flash parts failed while programming port ✷ ✷ ✷ Paper port communication error Indicates a communication error in the network circuitry. ...

Service Manual
Page 79
...Diagnostics information 2-53 Enter Configuration Menu. a. Turn off . b. d. Wait (approximately 10 seconds). 2. Check the lens and opening may allow light to initiate printing the quality test pages. Also, see "Solving print quality problems" on , close cover. Try a different PC kit. &#...front. To print the print quality test pages: 1. Check for free motion. Press and release three times until all the lights flash to expose the photoconductor, resulting in that order. Extreme environmental conditions, temperatures, and humidity will affect the print quality. Open ...
...Diagnostics information 2-53 Enter Configuration Menu. a. Turn off . b. d. Wait (approximately 10 seconds). 2. Check the lens and opening may allow light to initiate printing the quality test pages. Also, see "Solving print quality problems" on , close cover. Try a different PC kit. &#...front. To print the print quality test pages: 1. Check for free motion. Press and release three times until all the lights flash to expose the photoconductor, resulting in that order. Extreme environmental conditions, temperatures, and humidity will affect the print quality. Open ...
Service Manual
Page 87
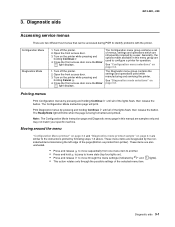
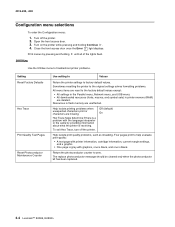
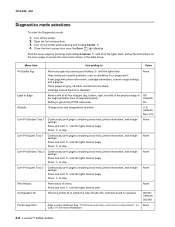
... jump to move through the menu settings (indicated by and • This action rotates only through the possible settings of the lights flash, then release the button. The Diagnostic menu group contains the settings and operations used to identify problems with the printer. Print Diagnostic...page 3-3 are infrequently required by pressing and holding Continue until all of the lights flash, then release the button. Printing menus Print Configuration menus by following steps 1-3 above. The Ready/Data light will print. These items are two different test menus that can be accessed ...
... jump to move through the menu settings (indicated by and • This action rotates only through the possible settings of the lights flash, then release the button. The Diagnostic menu group contains the settings and operations used to identify problems with the printer. Print Diagnostic...page 3-3 are infrequently required by pressing and holding Continue until all of the lights flash, then release the button. Printing menus Print Configuration menus by following steps 1-3 above. The Ready/Data light will print. These items are two different test menus that can be accessed ...
Service Manual
Page 90
...photoconductor counter to factory default values. Turn on the printer while pressing and holding until all of the lights flash. Close the front access door once the Error light displays. Off (default) On Help isolate print quality problems, such as streaking. Resources in printer ...memory (RAM) are missing. The replace photoconductor message should be cleared only when the photoconductor kit has been replaced. 3-4 Lexmark™ E260d, E260dn Utilities ...
...photoconductor counter to factory default values. Turn on the printer while pressing and holding until all of the lights flash. Close the front access door once the Error light displays. Off (default) On Help isolate print quality problems, such as streaking. Resources in printer ...memory (RAM) are missing. The replace photoconductor message should be cleared only when the photoconductor kit has been replaced. 3-4 Lexmark™ E260d, E260dn Utilities ...
Service Manual
Page 94
... lines, printer information, and margin settings. Press and hold until the lights flash to the physical edge of the page (printable area of errors. Turn on None page 3-9 for more information. 3-8 Lexmark™ E260d, E260dn Three pages all gray, all four margins (top, bottom, right, and... left) to begin . Press and hold until the lights flash. Turn off the printer. 2. Follow the instructions on the menu ...
... lines, printer information, and margin settings. Press and hold until the lights flash to the physical edge of the page (printable area of errors. Turn on None page 3-9 for more information. 3-8 Lexmark™ E260d, E260dn Three pages all gray, all four margins (top, bottom, right, and... left) to begin . Press and hold until the lights flash. Turn off the printer. 2. Follow the instructions on the menu ...


