

Quick Reference
Page 1
... setup page and locate the IP address in unison. 3 Squeeze the length guide tabs together, and then slide the length guide to Only one optional drawer (which includes an optional tray) may cause a jam. On 2 Squeeze the width guide tabs, and then slide them to select from: the standard tray (Tray...
... setup page and locate the IP address in unison. 3 Squeeze the length guide tabs together, and then slide the length guide to Only one optional drawer (which includes an optional tray) may cause a jam. On 2 Squeeze the width guide tabs, and then slide them to select from: the standard tray (Tray...
Quick Reference
Page 4
... transparencies Notes Note: The A6 paper size is closed. Load up to Tray 1 250 sheets of paper 150 sheets of paper Note: Only one optional drawer may cause creases in the transparencies. • When moving the printer to the point where its 1 sheet of paper that can contact the 1 transparency paper...
... transparencies Notes Note: The A6 paper size is closed. Load up to Tray 1 250 sheets of paper 150 sheets of paper Note: Only one optional drawer may cause creases in the transparencies. • When moving the printer to the point where its 1 sheet of paper that can contact the 1 transparency paper...
Maintenance Guide
Page 11
...-POTENTIAL INJURY: Follow these precautions: • Any cart used to move the printer must have a surface able to lift the drawer and printer at www.lexmark.com/recycle. 2 Find the product type you set it off using the power switch, and then unplug the power cord ...sides of the printer to support the dimensions of purchase for recycling: 1 Visit our Web site at the same time. Recycling Lexmark products To return Lexmark products to Lexmark for a relocation kit. Warning-Potential Damage: Damage to recycle, and then select your fingers are not under the printer when...
...-POTENTIAL INJURY: Follow these precautions: • Any cart used to move the printer must have a surface able to lift the drawer and printer at www.lexmark.com/recycle. 2 Find the product type you set it off using the power switch, and then unplug the power cord ...sides of the printer to support the dimensions of purchase for recycling: 1 Visit our Web site at the same time. Recycling Lexmark products To return Lexmark products to Lexmark for a relocation kit. Warning-Potential Damage: Damage to recycle, and then select your fingers are not under the printer when...
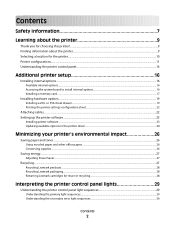
User Guide
Page 2
or 550-sheet drawer...19 Printing the printer settings configuration sheet ...22 Attaching cables...22 Setting up the printer software...23 Installing printer software ...23 Updating available options in ......26 Using recycled paper and other office papers ...26 Conserving supplies...26 Saving energy...27 Adjusting Power Saver...27 Recycling...27 Recycling Lexmark products...28 Recycling Lexmark packaging...28 Returning Lexmark cartridges for the printer...10 Printer configurations...11 Understanding the printer control panel...14 Additional printer setup 16 Installing internal options...16...
or 550-sheet drawer...19 Printing the printer settings configuration sheet ...22 Attaching cables...22 Setting up the printer software...23 Installing printer software ...23 Updating available options in ......26 Using recycled paper and other office papers ...26 Conserving supplies...26 Saving energy...27 Adjusting Power Saver...27 Recycling...27 Recycling Lexmark products...28 Recycling Lexmark packaging...28 Returning Lexmark cartridges for the printer...10 Printer configurations...11 Understanding the printer control panel...14 Additional printer setup 16 Installing internal options...16...
User Guide
Page 6
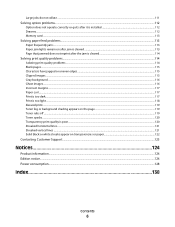
Large jobs do not collate ...111 Solving option problems...112 Option does not operate correctly or quits after it is installed 112 Drawers...112 Memory card ...113 Solving paper feed problems...113 Paper frequently jams ...113 Paper jam lights remain on after jam is cleared ...113 Page that ...
Large jobs do not collate ...111 Solving option problems...112 Option does not operate correctly or quits after it is installed 112 Drawers...112 Memory card ...113 Solving paper feed problems...113 Paper frequently jams ...113 Paper jam lights remain on after jam is cleared ...113 Page that ...

User Guide
Page 7
...not recharge, disassemble, or incinerate a lithium battery. CAUTION-POTENTIAL INJURY: Before moving it. • Lift the printer off the optional drawer, and set it off as Ethernet and telephone system connections) are accessing the system board or installing optional hardware or memory devices sometime... after setting up the printer, then turn them off the optional drawer. Discard used batteries according to abrasion or stress. Note: Use the handholds located on the power cord. CAUTION-SHOCK HAZARD: If...
...not recharge, disassemble, or incinerate a lithium battery. CAUTION-POTENTIAL INJURY: Before moving it. • Lift the printer off the optional drawer, and set it off as Ethernet and telephone system connections) are accessing the system board or installing optional hardware or memory devices sometime... after setting up the printer, then turn them off the optional drawer. Discard used batteries according to abrasion or stress. Note: Use the handholds located on the power cord. CAUTION-SHOCK HAZARD: If...

User Guide
Page 13
or 550-sheet drawer: Learning about the printer 13 1 Rear door 2 Ethernet port Note: The Ethernet port is a feature on network models only. 3 USB port 4 Parallel port 5 Printer power cord socket 6 Power switch 7 Security slot Configured models The following illustration shows the printer configured with an optional 250-
or 550-sheet drawer: Learning about the printer 13 1 Rear door 2 Ethernet port Note: The Ethernet port is a feature on network models only. 3 USB port 4 Parallel port 5 Printer power cord socket 6 Power switch 7 Security slot Configured models The following illustration shows the printer configured with an optional 250-

User Guide
Page 14
or 550-sheet drawer (Tray 2) 8 Manual feeder door 9 Front door Understanding the printer control panel The printer control panel features six lights and two buttons. 1 Front door release button 2 Paper stop 3 Standard exit bin 4 Printer control panel 5 System board door 6 Standard 250-sheet tray (Tray 1) 7 Optional 250- Learning about the printer 14
or 550-sheet drawer (Tray 2) 8 Manual feeder door 9 Front door Understanding the printer control panel The printer control panel features six lights and two buttons. 1 Front door release button 2 Paper stop 3 Standard exit bin 4 Printer control panel 5 System board door 6 Standard 250-sheet tray (Tray 1) 7 Optional 250- Learning about the printer 14
User Guide
Page 19
... options Installing a 250- Note: Memory cards designed for other printers may require some force to move it safely. Additional printer setup 19 or 550-sheet drawer CAUTION-POTENTIAL INJURY: The printer weight is greater than 18 kg (40 lb) and requires two or more trained personnel to fully seat the card...
... options Installing a 250- Note: Memory cards designed for other printers may require some force to move it safely. Additional printer setup 19 or 550-sheet drawer CAUTION-POTENTIAL INJURY: The printer weight is greater than 18 kg (40 lb) and requires two or more trained personnel to fully seat the card...

User Guide
Page 20
...setting up the printer, then turn them off , and unplug the power cord from inside the tray. 4 Insert the tray into the printer. 1 Unpack the drawer, and remove any packing material. 2 Remove the tray from the support unit. 1 Support unit 2 Tray 3 Remove any packing material and tape from the ... to the printer, then turn the printer off as well, and unplug any cables going into the support unit. 5 Place the drawer in the location chosen for the printer. The printer supports one optional drawer; Additional printer setup 20 CAUTION-SHOCK HAZARD: If you can install a 250- or 550-sheet...
...setting up the printer, then turn them off , and unplug the power cord from inside the tray. 4 Insert the tray into the printer. 1 Unpack the drawer, and remove any packing material. 2 Remove the tray from the support unit. 1 Support unit 2 Tray 3 Remove any packing material and tape from the ... to the printer, then turn the printer off as well, and unplug any cables going into the support unit. 5 Place the drawer in the location chosen for the printer. The printer supports one optional drawer; Additional printer setup 20 CAUTION-SHOCK HAZARD: If you can install a 250- or 550-sheet...

User Guide
Page 21
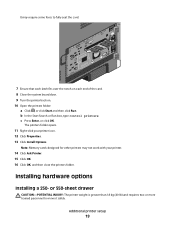
Additional printer setup 21 c Press Enter, or click OK. 6 Align the outer edges of the printer with the outer edges of your printer. 10 Click Properties. 11 Click Install Options. 12 Click Ask Printer. 13 Click OK. 14 Click OK, and then close the printers folder. The printers folder opens. 9 Right-click the icon of the drawer, and then slowly lower the printer into place. 7 Turn the printer back on. 8 Open the printers folder: a Click , or click Start and then click Run. b In the Start Search or Run box, type control printers.
Additional printer setup 21 c Press Enter, or click OK. 6 Align the outer edges of the printer with the outer edges of your printer. 10 Click Properties. 11 Click Install Options. 12 Click Ask Printer. 13 Click OK. 14 Click OK, and then close the printers folder. The printers folder opens. 9 Right-click the icon of the drawer, and then slowly lower the printer into place. 7 Turn the printer back on. 8 Open the printers folder: a Click , or click Start and then click Run. b In the Start Search or Run box, type control printers.

User Guide
Page 40
... the following Universal size settings for the Universal paper size, in .); The factory default paper type setting is a user-defined setting that do one optional drawer (which includes an optional tray) may be set manually for Macintosh. Loading paper and specialty media 40 Configuring Universal paper settings The Universal Paper Size...
... the following Universal size settings for the Universal paper size, in .); The factory default paper type setting is a user-defined setting that do one optional drawer (which includes an optional tray) may be set manually for Macintosh. Loading paper and specialty media 40 Configuring Universal paper settings The Universal Paper Size...

User Guide
Page 44
or 550-sheet tray Only one optional drawer, which includes either a 250- or 550-sheet tray, may be attached to the center of A6-size paper, so the width guides slide farther to ...
or 550-sheet tray Only one optional drawer, which includes either a 250- or 550-sheet tray, may be attached to the center of A6-size paper, so the width guides slide farther to ...
User Guide
Page 49
... card stock 1 envelope Notes Vinyl, pharmacy, or dual-sided labels are not supported. Vinyl, pharmacy, or dual-sided labels are not supported. Only one optional drawer may be stiff enough to 90 g/m2 (24 lb bond) grain long paper. Paper lighter than 182 x 257 mm (7.2 x 10.1 in.), we recommend 90 g/m2...
... card stock 1 envelope Notes Vinyl, pharmacy, or dual-sided labels are not supported. Vinyl, pharmacy, or dual-sided labels are not supported. Only one optional drawer may be stiff enough to 90 g/m2 (24 lb bond) grain long paper. Paper lighter than 182 x 257 mm (7.2 x 10.1 in.), we recommend 90 g/m2...

User Guide
Page 82
... setting to be assigned. Configures the printer to the factory default settings Understanding printer menus 82 Displays the factory default setting assigned to each tray, drawer, or feeder Returns all tray, drawer, and feeder assignments to work with printer software or programs that use different source assignments for trays...
... setting to be assigned. Configures the printer to the factory default settings Understanding printer menus 82 Displays the factory default setting assigned to each tray, drawer, or feeder Returns all tray, drawer, and feeder assignments to work with printer software or programs that use different source assignments for trays...

User Guide
Page 90
...the front door, and press and hold until all cords and cables from the printer before moving it. • Lift the printer off the optional drawer. Push the unit as far as it will go. 7 After replacing the photoconductor kit, reset the photoconductor counter. 6 Install the unit into ...surface able to support the dimensions of the unit with this product or the manufacturer's authorized replacement. Warning-Potential Damage: Damage to lift the drawer and printer at the same time. Moving the printer to another location The printer and options can be safely moved to another location by ...
...the front door, and press and hold until all cords and cables from the printer before moving it. • Lift the printer off the optional drawer. Push the unit as far as it will go. 7 After replacing the photoconductor kit, reset the photoconductor counter. 6 Install the unit into ...surface able to support the dimensions of the unit with this product or the manufacturer's authorized replacement. Warning-Potential Damage: Damage to lift the drawer and printer at the same time. Moving the printer to another location The printer and options can be safely moved to another location by ...

User Guide
Page 112
... CHECK TO SEE IF THE OPTION IS CONNECTED TO THE PRINTER 1 Turn the printer off , wait about 10 seconds, and then turn the printer on . Drawers These are possible solutions. Solving option problems Option does not operate correctly or quits after it . RESET THE PRINTER Turn the printer off . 2 Unplug the...
... CHECK TO SEE IF THE OPTION IS CONNECTED TO THE PRINTER 1 Turn the printer off , wait about 10 seconds, and then turn the printer on . Drawers These are possible solutions. Solving option problems Option does not operate correctly or quits after it . RESET THE PRINTER Turn the printer off . 2 Unplug the...

User Guide
Page 138
... 19 251 paper jams, clearing from manual feeder 103 2-sided printing 56 31 Defective cartridge 107 32.yy Replace unsupported cartridge 107 550-sheet drawer installing 19 58 Too many flash options installed 107 58 Too many trays attached 108 59 Incompatible tray 108 88 Replace toner 108 A attaching cables ...
... 19 251 paper jams, clearing from manual feeder 103 2-sided printing 56 31 Defective cartridge 107 32.yy Replace unsupported cartridge 107 550-sheet drawer installing 19 58 Too many flash options installed 107 58 Too many trays attached 108 59 Incompatible tray 108 88 Replace toner 108 A attaching cables ...
User Guide
Page 139
... noise emission levels 126 notices 125, 126, 127, 128, 129, 130 N-up setting Finishing menu 67 O optional trays, loading 44 options 250-sheet drawer 19 550-sheet drawer 19 memory card 17 memory cards 16 ordering toner cartridges 84 P paper characteristics 49 letterhead 51 preprinted forms 51 recycled 26 selecting 51 setting...
... noise emission levels 126 notices 125, 126, 127, 128, 129, 130 N-up setting Finishing menu 67 O optional trays, loading 44 options 250-sheet drawer 19 550-sheet drawer 19 memory card 17 memory cards 16 ordering toner cartridges 84 P paper characteristics 49 letterhead 51 preprinted forms 51 recycled 26 selecting 51 setting...
User Guide
Page 140
... with 107 Load manual feeder with 107 Load manual feeder with 106 Remove paper from standard output bin 107 printer options troubleshooting drawers 112 memory card 113 option not working 112 printer problems, solving basic 108 printer settings configuration sheet printing 22 printing booklet 61...the paper 56 print quality test pages 62, 114 publications, finding 9 Q Quality menu 79 R recycled paper using 26 recycling Lexmark packaging 28 Lexmark products 28 toner cartridges 28 WEEE statement 126 Remove paper from standard output bin 107 replacing photoconductor kit 87 toner cartridge 85 ...
... with 107 Load manual feeder with 107 Load manual feeder with 106 Remove paper from standard output bin 107 printer options troubleshooting drawers 112 memory card 113 option not working 112 printer problems, solving basic 108 printer settings configuration sheet printing 22 printing booklet 61...the paper 56 print quality test pages 62, 114 publications, finding 9 Q Quality menu 79 R recycled paper using 26 recycling Lexmark packaging 28 Lexmark products 28 toner cartridges 28 WEEE statement 126 Remove paper from standard output bin 107 replacing photoconductor kit 87 toner cartridge 85 ...


