

Maintenance Guide
Page 8
...immediately order a new photoconductor kit. Note: The photoconductor kit is one item only. Light sequences Photoconductor life warning ‑ Blinking ‑ On Replace photoconductor ‑ Blinking ‑ Blinking ‑ On When you first receive either light sequence, you when the photoconductor kit reaches a page maximum. While the printer may continue... end‑of‑life, print quality significantly decreases. The printer does this by displaying the "Photoconductor life warning" light sequence or the "Replace photoconductor" light sequence. Maintaining the printer 8
...immediately order a new photoconductor kit. Note: The photoconductor kit is one item only. Light sequences Photoconductor life warning ‑ Blinking ‑ On Replace photoconductor ‑ Blinking ‑ Blinking ‑ On When you first receive either light sequence, you when the photoconductor kit reaches a page maximum. While the printer may continue... end‑of‑life, print quality significantly decreases. The printer does this by displaying the "Photoconductor life warning" light sequence or the "Replace photoconductor" light sequence. Maintaining the printer 8
User Guide
Page 29
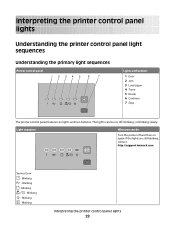
Blinking - Blinking - Service Error - Blinking - If the lights are still blinking, contact http://support.lexmark.com. Blinking Interpreting the printer control panel lights 29 Blinking - The lights can do Turn the printer off , blinking, or blinking slowly. Light sequence What you can be on, off and then on again. Interpreting the printer control panel lights Understanding the printer control panel light sequences Understanding the primary light sequences...
Blinking - Blinking - Service Error - Blinking - If the lights are still blinking, contact http://support.lexmark.com. Blinking Interpreting the printer control panel lights 29 Blinking - The lights can do Turn the printer off , blinking, or blinking slowly. Light sequence What you can be on, off and then on again. Interpreting the printer control panel lights Understanding the printer control panel light sequences Understanding the primary light sequences...

User Guide
Page 30
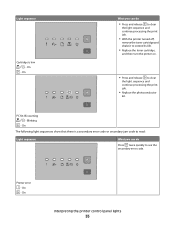
Blinking - On (green) Send a job to print. Blinking - On (yellow) Interpreting the printer control panel lights 30 Power Saver - Replace PC Kit - On Send a job to print. Light sequence What you can do Replace the photoconductor kit. Ready -
Blinking - On (green) Send a job to print. Blinking - On (yellow) Interpreting the printer control panel lights 30 Power Saver - Replace PC Kit - On Send a job to print. Light sequence What you can do Replace the photoconductor kit. Ready -

User Guide
Page 31
Blinking What you can do Use Hex Trace to troubleshoot printing problems. Turn the printer off and then on again to return to the Ready state. Wait or press . Interpreting the printer control panel lights 31 Light sequence Hex Trace Ready - Slowly Blinking Busy - Blinking Flushing Buffer - Wait until the printer returns to the Ready state. Blinking -
Blinking What you can do Use Hex Trace to troubleshoot printing problems. Turn the printer off and then on again to return to the Ready state. Wait or press . Interpreting the printer control panel lights 31 Light sequence Hex Trace Ready - Slowly Blinking Busy - Blinking Flushing Buffer - Wait until the printer returns to the Ready state. Blinking -

User Guide
Page 34
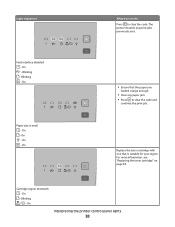
Remove printed pages from the standard exit bin - Load paper in Tray 1 or 2, and then press or . Blinking What you can do Load paper in the manual feeder. On Remove paper from the standard exit bin, and then press and release to clear the light sequence and continue printing. Interpreting the printer control panel lights 34 On - On No paper in Tray 1 or Tray 2 - Light sequence No paper in manual feeder -
Remove printed pages from the standard exit bin - Load paper in Tray 1 or 2, and then press or . Blinking What you can do Load paper in the manual feeder. On Remove paper from the standard exit bin, and then press and release to clear the light sequence and continue printing. Interpreting the printer control panel lights 34 On - On No paper in Tray 1 or Tray 2 - Light sequence No paper in manual feeder -
User Guide
Page 35
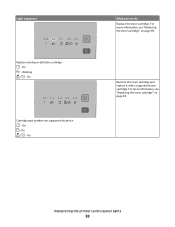
...On Interpreting the printer control panel lights 35 On What you can do Press twice quickly to clear the light sequence and continue processing the print job. • Replace the photoconductor kit. Blinking - On - PC Kit life warning - Light sequence Cartridge is a secondary ...error code or secondary jam code to read: Light sequence What you can do • Press and release to clear the light sequence and continue processing the print job...
...On Interpreting the printer control panel lights 35 On What you can do Press twice quickly to clear the light sequence and continue processing the print job. • Replace the photoconductor kit. Blinking - On - PC Kit life warning - Light sequence Cartridge is a secondary ...error code or secondary jam code to read: Light sequence What you can do • Press and release to clear the light sequence and continue processing the print job...

User Guide
Page 37
On Press to clear the light sequence. On • Install additional printer memory. • Press either or light sequence. On - Blinking - On - On - Job will be printed without Resource Save. On - On Interpreting the printer control panel lights 37 to support Resource Save feature - Insufficient memory to clear the Complex page, some data may not have printed - Insufficient memory to collate job - On - Light sequences What you can do Press either or to print the remaining pages of the job.
On Press to clear the light sequence. On • Install additional printer memory. • Press either or light sequence. On - Blinking - On - On - Job will be printed without Resource Save. On - On Interpreting the printer control panel lights 37 to support Resource Save feature - Insufficient memory to clear the Complex page, some data may not have printed - Insufficient memory to collate job - On - Light sequences What you can do Press either or to print the remaining pages of the job.
User Guide
Page 38
...is small - Host interface disabled - Blinking - On - For more information, see "Replacing the toner cartridge" on page 85. The printer discards any paper jam. • Press to clear the code. On • Ensure that is suitable for your region. Light sequences What you loaded is large enough.... • Clear any print jobs previously sent. Blinking - Replace the toner cartridge with one that the paper you can do Press to clear the...
...is small - Host interface disabled - Blinking - On - For more information, see "Replacing the toner cartridge" on page 85. The printer discards any paper jam. • Press to clear the code. On • Ensure that is suitable for your region. Light sequences What you loaded is large enough.... • Clear any print jobs previously sent. Blinking - Replace the toner cartridge with one that the paper you can do Press to clear the...
User Guide
Page 39
Remove the toner cartridge and replace it with a supported toner cartridge. Light sequences Replace missing or defective cartridge - On - On - On What you can do Replace the toner cartridge. For more information, see "Replacing the toner cartridge" on page 85. On Cartridge part number not supported by device - For more information, see "Replacing the toner cartridge" on page 85. On - Interpreting the printer control panel lights 39 Blinking -
Remove the toner cartridge and replace it with a supported toner cartridge. Light sequences Replace missing or defective cartridge - On - On - On What you can do Replace the toner cartridge. For more information, see "Replacing the toner cartridge" on page 85. On Cartridge part number not supported by device - For more information, see "Replacing the toner cartridge" on page 85. On - Interpreting the printer control panel lights 39 Blinking -

User Guide
Page 41
Blinking 2 Squeeze the width guide tabs, and then slide them to the correct position for the paper size being loaded. Proper paper loading prevents jams and facilitates trouble-free printing. 1 Pull the tray completely out. Loading paper and specialty media 41 Busy - Do not remove trays while a job prints or when the Busy light sequence appears on the printer control panel. The width guides move in unison. 3 Squeeze the length guide tabs together, and then slide the length guide to the sides of the tray. Doing so may cause a jam.
Blinking 2 Squeeze the width guide tabs, and then slide them to the correct position for the paper size being loaded. Proper paper loading prevents jams and facilitates trouble-free printing. 1 Pull the tray completely out. Loading paper and specialty media 41 Busy - Do not remove trays while a job prints or when the Busy light sequence appears on the printer control panel. The width guides move in unison. 3 Squeeze the length guide tabs together, and then slide the length guide to the sides of the tray. Doing so may cause a jam.
User Guide
Page 57
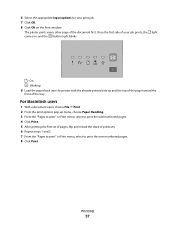
... print options pop-up and the top of the page toward the front of your print job. 7 Click OK. 8 Click OK on , and the l button light blinks. - Printing 57 On - The printer prints every other page of printouts. 6 Repeat steps 1 and 2. 7 From the "Pages to print" or Print menu, select to ...the stack of the document first. Once the first side of the tray. 6 Select the appropriate Input options for your job prints, the light comes on the Print window. Blinking 9 Load the paper back into the printer with the already-printed side up menu, choose Paper Handling. 3 From the "Pages to print...
... print options pop-up and the top of the page toward the front of your print job. 7 Click OK. 8 Click OK on , and the l button light blinks. - Printing 57 On - The printer prints every other page of printouts. 6 Repeat steps 1 and 2. 7 From the "Pages to print" or Print menu, select to ...the stack of the document first. Once the first side of the tray. 6 Select the appropriate Input options for your job prints, the light comes on the Print window. Blinking 9 Load the paper back into the printer with the already-printed side up menu, choose Paper Handling. 3 From the "Pages to print...

User Guide
Page 74
... be available for all printers. The display shows a message when the toner is low Notes: • Off is low message will appear and the indicator light will blink red. The Toner is low message will appear as a warning. • Single means the Toner is the factory default setting. Understanding printer menus 74...
... be available for all printers. The display shows a message when the toner is low Notes: • Off is low message will appear and the indicator light will blink red. The Toner is low message will appear as a warning. • Single means the Toner is the factory default setting. Understanding printer menus 74...
User Guide
Page 87
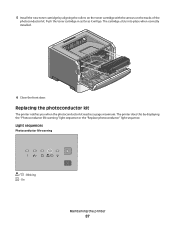
... kit. On Maintaining the printer 87 The cartridge clicks into place when correctly installed. 6 Close the front door. Light sequences Photoconductor life warning - Push the toner cartridge in as far as it will go. Blinking - Replacing the photoconductor kit The printer notifies you when the photoconductor kit reaches a page maximum. 5 Install the...
... kit. On Maintaining the printer 87 The cartridge clicks into place when correctly installed. 6 Close the front door. Light sequences Photoconductor life warning - Push the toner cartridge in as far as it will go. Blinking - Replacing the photoconductor kit The printer notifies you when the photoconductor kit reaches a page maximum. 5 Install the...

User Guide
Page 88
On When you first receive either light sequence, you should immediately order a new photoconductor kit. Note: The photoconductor kit and toner cartridge form a unit. Blinking - While the printer may continue to function properly after the photoconductor kit has reached its official end-of the ...printer by pulling on the toner cartridge handle. Note: The photoconductor kit is one item only. Maintaining the printer 88 Blinking - To replace the photoconductor kit: 1 Turn the printer off. 2 Pull the photoconductor kit and toner cartridge together as a unit out of...
On When you first receive either light sequence, you should immediately order a new photoconductor kit. Note: The photoconductor kit and toner cartridge form a unit. Blinking - While the printer may continue to function properly after the photoconductor kit has reached its official end-of the ...printer by pulling on the toner cartridge handle. Note: The photoconductor kit is one item only. Maintaining the printer 88 Blinking - To replace the photoconductor kit: 1 Turn the printer off. 2 Pull the photoconductor kit and toner cartridge together as a unit out of...

User Guide
Page 111
... Utility for Windows or Printer Settings for "Collate copies" is On, or the Collate check box is not in the job. Troubleshooting 111 Slowly blinking Make sure the printer is selected. Large jobs do all of these utilities installs with the same paper size and type. • From Print... of the following : CHECK THE COLLATE SETTING From the Finishing menu, make sure Collate is connected to Automatically select. If the "Hex Trace mode" light sequence appears, you must exit Hex Trace mode before you can print your Web browser. From the Settings screen, click Finishing Menu. • If ...
... Utility for Windows or Printer Settings for "Collate copies" is On, or the Collate check box is not in the job. Troubleshooting 111 Slowly blinking Make sure the printer is selected. Large jobs do all of these utilities installs with the same paper size and type. • From Print... of the following : CHECK THE COLLATE SETTING From the Finishing menu, make sure Collate is connected to Automatically select. If the "Hex Trace mode" light sequence appears, you must exit Hex Trace mode before you can print your Web browser. From the Settings screen, click Finishing Menu. • If ...
Service Manual
Page 30
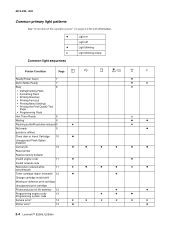
... 2-2 for icon information. 4513-220, -230 Common primary light patterns See "Overview of the operator panel" on Light off ✷ Light blinking x Light blinking slowly Common light sequences Printer Condition Page Ready/Power Saver 7 z Demo Mode Ready 7 z ✷ Busy 8 ✷ • Defragmenting Flash • Formatting Flash • Printing Directory...engine code/ 13 Programming system code ✷ z z z z Service error² 13 ✷ ✷ ✷ ✷ ✷ ✷ Printer error³ 13 z z 2-4 Lexmark™ E260d, E260dn
... 2-2 for icon information. 4513-220, -230 Common primary light patterns See "Overview of the operator panel" on Light off ✷ Light blinking x Light blinking slowly Common light sequences Printer Condition Page Ready/Power Saver 7 z Demo Mode Ready 7 z ✷ Busy 8 ✷ • Defragmenting Flash • Formatting Flash • Printing Directory...engine code/ 13 Programming system code ✷ z z z z Service error² 13 ✷ ✷ ✷ ✷ ✷ ✷ Printer error³ 13 z z 2-4 Lexmark™ E260d, E260dn
Service Manual
Page 54
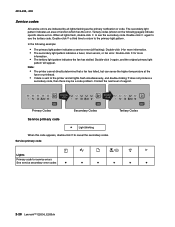
...to reveal the secondary codes. Doubleclick Doubleclick Primary Codes Secondary Codes Service primary code ✷ Light blinking When this code appears, double-click to the printer and all lights flash, double-click to see the tertiary code. Contact the next level of support. ...click again to the primary light pattern. Double-click a third time to return to see the secondary code. Double-click for service errors See service secondary error codes ✷ ✷ ✷ ✷ ✷ ✷ 2-28 Lexmark™ E260d, E260dn Double-click again, and ...
...to reveal the secondary codes. Doubleclick Doubleclick Primary Codes Secondary Codes Service primary code ✷ Light blinking When this code appears, double-click to the printer and all lights flash, double-click to see the tertiary code. Contact the next level of support. ...click again to the primary light pattern. Double-click a third time to return to see the secondary code. Double-click for service errors See service secondary error codes ✷ ✷ ✷ ✷ ✷ ✷ 2-28 Lexmark™ E260d, E260dn Double-click again, and ...
Service Manual
Page 85
... properly. • Press and release to on, then the printer stops printing until the toner cartridge is on. The Toner Low light is blinking, and the Error light is replaced. If a menu settings page cannot be printed, then the problem is installed properly. If the computer indicates "unknown device...does not exceed the stack height indicator. • The input sensor does not sense media after a paper jam has been cleared. Toner Low light is on and indicates ready, but nothing prints. 4513-220, -230 Print quality problems (Continued) Problem The printer is on and printing stops....
... properly. • Press and release to on, then the printer stops printing until the toner cartridge is on. The Toner Low light is blinking, and the Error light is replaced. If a menu settings page cannot be printed, then the problem is installed properly. If the computer indicates "unknown device...does not exceed the stack height indicator. • The input sensor does not sense media after a paper jam has been cleared. Toner Low light is on and indicates ready, but nothing prints. 4513-220, -230 Print quality problems (Continued) Problem The printer is on and printing stops....
Service Manual
Page 86
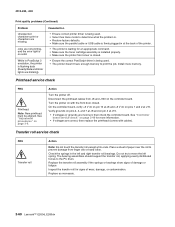
... the springs in PostScript 3 emulation, the printer is flushing data (Ready/Data and Error lights are blinking). Inspect the transfer roll for signs of paper over the roll to print the job. Replace as necessary. 2-60 Lexmark™ E260d, E260dn Transfer roll service check FRU Transfer roll Action Note: Do not touch the transfer...
... the springs in PostScript 3 emulation, the printer is flushing data (Ready/Data and Error lights are blinking). Inspect the transfer roll for signs of paper over the roll to print the job. Replace as necessary. 2-60 Lexmark™ E260d, E260dn Transfer roll service check FRU Transfer roll Action Note: Do not touch the transfer...
Service Manual
Page 87
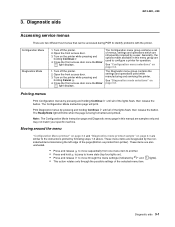
... the printer while pressing and holding Cancel . 4. The Configuration menu group contains a set of the selected menu item. The Ready/Data light will print. Moving around the menu "Configuration Menu printout" on page 3-2 and "Diagnostics mode printout sample" on ). • Press and... release to configure a printer for operation. The Configuration Mode Instruction page will blink when the page is being formatted and printed. Diagnostic aids 3-1 Generally, the options made available in this menu group are used while...
... the printer while pressing and holding Cancel . 4. The Configuration menu group contains a set of the selected menu item. The Ready/Data light will print. Moving around the menu "Configuration Menu printout" on page 3-2 and "Diagnostics mode printout sample" on ). • Press and... release to configure a printer for operation. The Configuration Mode Instruction page will blink when the page is being formatted and printed. Diagnostic aids 3-1 Generally, the options made available in this menu group are used while...


