

Service Manual
Page 16
... damage the product hardware or software. Parts catalog contains illustrations and part numbers for making printer adjustments and removing and installing FRUs. 5. Conventions Note: A note provides additional information. ...printer problems. 4. It is a danger from hazardous voltage in order to repair it. Diagnostic aids contains tests and checks used to isolate failing field replaceable units (FRUs). 3. CAUTION This type of caution indicates there is divided into the following chapters: 1. xvi Lexmark™ E260, E260d, E260dn 4513-200, -220, -230 Preface This manual...
... damage the product hardware or software. Parts catalog contains illustrations and part numbers for making printer adjustments and removing and installing FRUs. 5. Conventions Note: A note provides additional information. ...printer problems. 4. It is a danger from hazardous voltage in order to repair it. Diagnostic aids contains tests and checks used to isolate failing field replaceable units (FRUs). 3. CAUTION This type of caution indicates there is divided into the following chapters: 1. xvi Lexmark™ E260, E260d, E260dn 4513-200, -220, -230 Preface This manual...

Service Manual
Page 17
... completing the repair, perform tests as needed to help identify parts. See "Repair information" on E360d and E360dn, see the 4513-630, 63W, -6EW service manual. 4513-200, -220, -230 1. For information on page 4-1 to verify the repair. General information The Lexmark™ E260, E260d, and E260dn are monochrome laser printers designed for more information.
... completing the repair, perform tests as needed to help identify parts. See "Repair information" on E360d and E360dn, see the 4513-630, 63W, -6EW service manual. 4513-200, -220, -230 1. For information on page 4-1 to verify the repair. General information The Lexmark™ E260, E260d, and E260dn are monochrome laser printers designed for more information.

Service Manual
Page 24
... site at a time through the manual feeder. • Do not mix print media sizes, weights, or types in the same print media source. • Push all trays in the printer. Are damaged in the sealed position • Use only recommended media. Contain windows, holes, perforations,...and equipment: • Spring hook • Needle nose pliers • Volt-ohmmeter • #1 and #2 Phillips screwdriver • Slotted screwdriver 1-8 Lexmark™ E260, E260d, E260dn 4513-200, -220, -230 Most paper jams can help prevent paper jams: • Use only the recommended print media. • Do not...
... site at a time through the manual feeder. • Do not mix print media sizes, weights, or types in the same print media source. • Push all trays in the printer. Are damaged in the sealed position • Use only recommended media. Contain windows, holes, perforations,...and equipment: • Spring hook • Needle nose pliers • Volt-ohmmeter • #1 and #2 Phillips screwdriver • Slotted screwdriver 1-8 Lexmark™ E260, E260d, E260dn 4513-200, -220, -230 Most paper jams can help prevent paper jams: • Use only the recommended print media. • Do not...

Service Manual
Page 42
...Paper jam secondary error code. and Continue lights are both on, a paper jam has occurred with a Printer Condition Page 200: Paper jam at the input 18 sensor 201: Paper jam between the 18 input and...manual 20 feeder 2-16 Lexmark™ E260, E260d, E260dn...
...Paper jam secondary error code. and Continue lights are both on, a paper jam has occurred with a Printer Condition Page 200: Paper jam at the input 18 sensor 201: Paper jam between the 18 input and...manual 20 feeder 2-16 Lexmark™ E260, E260d, E260dn...
Service Manual
Page 44
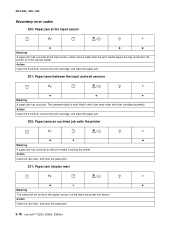
... print cartridge, and clear the paper jam. 202: Paper jams as a printed job exits the printer Meaning A paper jam has occurred as the print media is most likely in the manual feeder. Action Open the front door, remove the print cartridge, and clear the paper jam. 201... arrive at the input sensor, which can be either after the print media leaves the tray and enters the printer or in the fuser area under the toner cartridge assembly. Action Open the rear door, and clear the paper jam. 2-18 Lexmark™ E260, E260d, E260dn The jammed media is exiting the...
... print cartridge, and clear the paper jam. 202: Paper jams as a printed job exits the printer Meaning A paper jam has occurred as the print media is most likely in the manual feeder. Action Open the front door, remove the print cartridge, and clear the paper jam. 201... arrive at the input sensor, which can be either after the print media leaves the tray and enters the printer or in the fuser area under the toner cartridge assembly. Action Open the rear door, and clear the paper jam. 2-18 Lexmark™ E260, E260d, E260dn The jammed media is exiting the...

Service Manual
Page 46
... macros. • Set Page Protect to On in the manual feeder Meaning A paper jam has occurred at the manual feeder. 4513-200, -220, -230 251: Paper jam in the Local Printer Setup Utility. • Install additional printer memory. 2-20 Lexmark™ E260, E260d, E260dn Complex page Meaning The page may...
... macros. • Set Page Protect to On in the manual feeder Meaning A paper jam has occurred at the manual feeder. 4513-200, -220, -230 251: Paper jam in the Local Printer Setup Utility. • Install additional printer memory. 2-20 Lexmark™ E260, E260d, E260dn Complex page Meaning The page may...
Service Manual
Page 62
.... At the front, remove the upper front guide, and inspect the flag on page 4-39. 2-36 Lexmark™ E260, E260d, E260dn See "Printhead service sensor within two inches after hitting the input sensor check" on the page at the input...the toner cartridge/PC kit. If so, then inspect the tray wear strips and replace if necessary. The printer operator panel displays light patterns describing the current state of the specified length. Remove the PC kit and paper...8226; Faulty/contaminated flags or springs. • Debris in the source tray. See "Media manual input sensor removal" on the...
.... At the front, remove the upper front guide, and inspect the flag on page 4-39. 2-36 Lexmark™ E260, E260d, E260dn See "Printhead service sensor within two inches after hitting the input sensor check" on the page at the input...the toner cartridge/PC kit. If so, then inspect the tray wear strips and replace if necessary. The printer operator panel displays light patterns describing the current state of the specified length. Remove the PC kit and paper...8226; Faulty/contaminated flags or springs. • Debris in the source tray. See "Media manual input sensor removal" on the...
Service Manual
Page 66
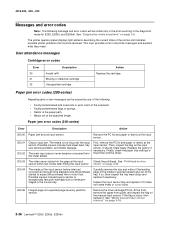
...replace if necessary. 241.17 MISIDENTIFIED SMALL GAP JAM. Engine detected small gap at the manual feeder sensor, attempted to the output bin. Replace if necessary. Check the wear strips and replace if necessary. 2-40 Lexmark™ E260, E260d, E260dn 4513-200, -220, -230 Paper jam error codes (200-series) (Continued) ... paper path. 241.16 Failed to feed from Tray 1, no obstructions and the problem persists, then disconnect all of the cables, tilt the printer onto its back (be sure to duplex. Page in the exit guide, then replace the exit guide. If there is no longer covered. ...
...replace if necessary. 241.17 MISIDENTIFIED SMALL GAP JAM. Engine detected small gap at the manual feeder sensor, attempted to the output bin. Replace if necessary. Check the wear strips and replace if necessary. 2-40 Lexmark™ E260, E260d, E260dn 4513-200, -220, -230 Paper jam error codes (200-series) (Continued) ... paper path. 241.16 Failed to feed from Tray 1, no obstructions and the problem persists, then disconnect all of the cables, tilt the printer onto its back (be sure to duplex. Page in the exit guide, then replace the exit guide. If there is no longer covered. ...
Service Manual
Page 82
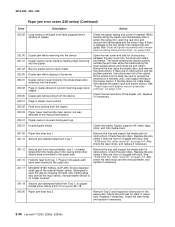
4513-200, -220, -230 Media picks but stops halfway through the printer FRU Input/duplex sensors (under print cartridge assembly) Input sensor (manual) Action Make sure the input sensors are seated on the controller board at J26 on the input sensors. Voltages on ...V dc. Replace controller board as necessary. Replace the tires, ACM drive, clutch assemblies, solenoids, or drive shaft as necessary. 2-56 Lexmark™ E260, E260d, E260dn Check for more information. See "Controller board service check" on the ACM are not correct, then replace the controller board. • Check...
4513-200, -220, -230 Media picks but stops halfway through the printer FRU Input/duplex sensors (under print cartridge assembly) Input sensor (manual) Action Make sure the input sensors are seated on the controller board at J26 on the input sensors. Voltages on ...V dc. Replace controller board as necessary. Replace the tires, ACM drive, clutch assemblies, solenoids, or drive shaft as necessary. 2-56 Lexmark™ E260, E260d, E260dn Check for more information. See "Controller board service check" on the ACM are not correct, then replace the controller board. • Check...

Service Manual
Page 84
.... Open the front access door. Turn on . 3. Unplug the printer, and check the cable continuity between the LVPS/HVPS connector marked OPC (at the end of the beam or dust on page 3-62. 2-58 Lexmark™ E260, E260d, E260dn d. Press and release three times until all the lights flash to ... cartridge and PC kit. • If those fail, then replace the LVPS/HVPS, controller board, or the printhead in printer service errors unless there is blockage of the manual for #4 contact from the front. 4513-200, -220, -230 Print quality service checks Note: Ensure the cover closes tightly...
.... Open the front access door. Turn on . 3. Unplug the printer, and check the cable continuity between the LVPS/HVPS connector marked OPC (at the end of the beam or dust on page 3-62. 2-58 Lexmark™ E260, E260d, E260dn d. Press and release three times until all the lights flash to ... cartridge and PC kit. • If those fail, then replace the LVPS/HVPS, controller board, or the printhead in printer service errors unless there is blockage of the manual for #4 contact from the front. 4513-200, -220, -230 Print quality service checks Note: Ensure the cover closes tightly...
Service Manual
Page 88
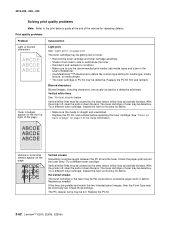
.... Check those settings. Print quality problems Problem Cause/action Light or blurred characters. With the printer off , clear the path or clean the lens. See "Toner on back of the manual for repeating defects. Try a different toner cartridge. Try a different toner cartridge. Replace as needed... could be incorrectly set. With the printer off , clear the path or clean the lens. If the lines are usually caused by the laser beam, which may be partially blocked. Replace the PC kit. 2-62 Lexmark™ E260, E260d, E260dn Vertical white lines See "Vertical streaks ...
.... Check those settings. Print quality problems Problem Cause/action Light or blurred characters. With the printer off , clear the path or clean the lens. See "Toner on back of the manual for repeating defects. Try a different toner cartridge. Try a different toner cartridge. Replace as needed... could be incorrectly set. With the printer off , clear the path or clean the lens. If the lines are usually caused by the laser beam, which may be partially blocked. Replace the PC kit. 2-62 Lexmark™ E260, E260d, E260dn Vertical white lines See "Vertical streaks ...

Service Manual
Page 92
... and check the voltages on connector J28 on page 3-2 for the J28 connector. If the printer error persists, then replace Tray 2. 2-66 Lexmark™ E260, E260d, E260dn See the wiring diagram at the end of the service manual, or "Controller board connector pin values" on the controller board. Pins 1, 4: 3.3 V Pin 2: 24 V Pin 6: Ground If the...
... and check the voltages on connector J28 on page 3-2 for the J28 connector. If the printer error persists, then replace Tray 2. 2-66 Lexmark™ E260, E260d, E260dn See the wiring diagram at the end of the service manual, or "Controller board connector pin values" on the controller board. Pins 1, 4: 3.3 V Pin 2: 24 V Pin 6: Ground If the...
Service Manual
Page 179
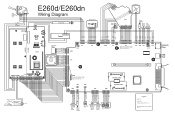
... 3.3V 24V 3.2V Gnd 5V (1.1V) 5V Gnd 5V (1.1V) 5V Gnd 0V (24V) 24V 0V (24V) 24V 5V (1.1V) 5V Gnd 70S MPF Sensor Manual Clutch Solenoid Paper Feed Clutch Paper In Sensor Duplex Sensor Tray 2 Connector Plugged voltage (if different) = ( ) Closed 5V 5V Gnd Open 0V 5V 2.5V 5V...) 5V 5V Gnd Check values on the cable pins. 20 19 J24 J26 J23 J25 J5 J27 J100 J7 J8 With printer off , unplug this cable and turn printer back on. E260d/E260dn 70S 5V Gnd TAT201 CN102 CN203 CN202 1 19 2 20 CN201 3.3V 5V 3.3V Gnd 3.3V 3.3V Gnd 3.3V 3.3V 1.7V Gnd...
... 3.3V 24V 3.2V Gnd 5V (1.1V) 5V Gnd 5V (1.1V) 5V Gnd 0V (24V) 24V 0V (24V) 24V 5V (1.1V) 5V Gnd 70S MPF Sensor Manual Clutch Solenoid Paper Feed Clutch Paper In Sensor Duplex Sensor Tray 2 Connector Plugged voltage (if different) = ( ) Closed 5V 5V Gnd Open 0V 5V 2.5V 5V...) 5V 5V Gnd Check values on the cable pins. 20 19 J24 J26 J23 J25 J5 J27 J100 J7 J8 With printer off , unplug this cable and turn printer back on. E260d/E260dn 70S 5V Gnd TAT201 CN102 CN203 CN202 1 19 2 20 CN201 3.3V 5V 3.3V Gnd 3.3V 3.3V Gnd 3.3V 3.3V 1.7V Gnd...


